Event Cylinder DMX - Elation Professional
Event Cylinder DMX - Elation Professional
Event Cylinder DMX - Elation Professional

You also want an ePaper? Increase the reach of your titles
YUMPU automatically turns print PDFs into web optimized ePapers that Google loves.
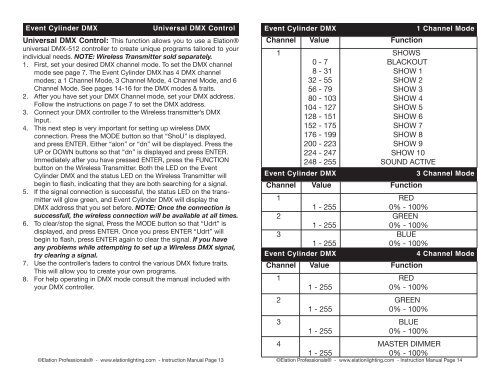
<strong>Event</strong> <strong>Cylinder</strong> <strong>DMX</strong> Universal <strong>DMX</strong> Control <strong>Event</strong> <strong>Cylinder</strong> <strong>DMX</strong> 1 Channel ModeUniversal <strong>DMX</strong> Control: This function allows you to use a <strong>Elation</strong>®universal <strong>DMX</strong>-512 controller to create unique programs tailored to yourindividual needs. NOTE: Wireless Transmitter sold separately.1. First, set your desired <strong>DMX</strong> channel mode. To set the <strong>DMX</strong> channelmode see page 7. The <strong>Event</strong> <strong>Cylinder</strong> <strong>DMX</strong> has 4 <strong>DMX</strong> channelmodes; a 1 Channel Mode, 3 Channel Mode, 4 Channel Mode, and 6Channel Mode. See pages 14-16 for the <strong>DMX</strong> modes & traits.2. After you have set your <strong>DMX</strong> Channel mode, set your <strong>DMX</strong> address.Follow the instructions on page 7 to set the <strong>DMX</strong> address.3. Connect your <strong>DMX</strong> controller to the Wireless transmitter’s <strong>DMX</strong>Input.4. This next step is very important for setting up wireless <strong>DMX</strong>connection. Press the MODE button so that “ShoU” is displayed,and press ENTER. Either “alon” or “dn” will be displayed. Press theUP or DOWN buttons so that “dn” is displayed and press ENTER.Immediately after you have pressed ENTER, press the FUNCTIONbutton on the Wireless Transmitter. Both the LED on the <strong>Event</strong><strong>Cylinder</strong> <strong>DMX</strong> and the status LED on the Wireless Transmitter willbegin to flash, indicating that they are both searching for a signal.5. If the signal connection is successful, the status LED on the trans -mitter will glow green, and <strong>Event</strong> <strong>Cylinder</strong> <strong>DMX</strong> will display the<strong>DMX</strong> address that you set before. NOTE: Once the connection issuccessfull, the wireless connection will be available at all times.6. To clear/stop the signal, Press the MODE button so that “Udrt” isdisplayed, and press ENTER. Once you press ENTER “Udrt” willbegin to flash, press ENTER again to clear the signal. If you haveany problems while attempting to set up a Wireless <strong>DMX</strong> signal,try clearing a signal.7. Use the controller’s faders to control the various <strong>DMX</strong> fixture traits.This will allow you to create your own programs.8. For help operating in <strong>DMX</strong> mode consult the manual included withyour <strong>DMX</strong> controller.Channel Value Function1 SHOWS0 - 7 BLACKOUT8 - 31 SHOW 132 - 55 SHOW 256 - 79 SHOW 380 - 103 SHOW 4104 - 127 SHOW 5128 - 151 SHOW 6152 - 175 SHOW 7176 - 199 SHOW 8200 - 223 SHOW 9224 - 247 SHOW 10248 - 255 SOUND ACTIVE<strong>Event</strong> <strong>Cylinder</strong> <strong>DMX</strong>Channel Value Function3 Channel Mode1 RED1 - 255 0% - 100%2 GREEN1 - 255 0% - 100%3 BLUE1 - 255 0% - 100%<strong>Event</strong> <strong>Cylinder</strong> <strong>DMX</strong>4 Channel ModeChannel Value Function1 RED1 - 255 0% - 100%2 GREEN1 - 255 0% - 100%3 BLUE1 - 255 0% - 100%4 MASTER DIMMER1 - 255 0% - 100%©<strong>Elation</strong> <strong>Professional</strong>s® - www.elationlighting.com - Instruction Manual Page 13 ©<strong>Elation</strong> <strong>Professional</strong>s® - www.elationlighting.com - Instruction Manual Page 14