
Create successful ePaper yourself
Turn your PDF publications into a flip-book with our unique Google optimized e-Paper software.
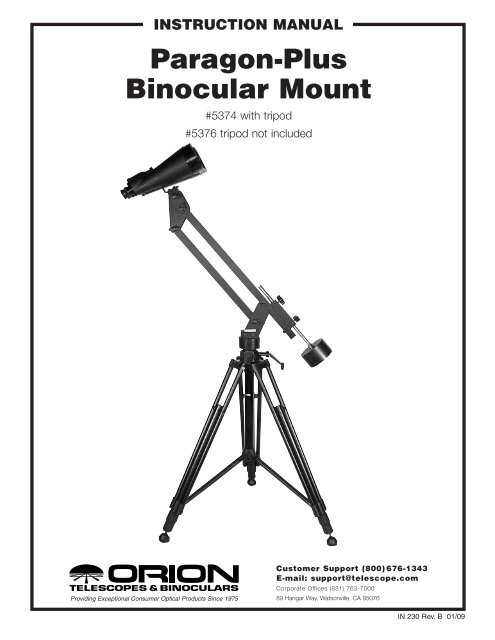
instruction Manual<strong>Paragon</strong>-<strong>Plus</strong><strong>Binocular</strong> <strong>Mount</strong>#5374 with tripod#5376 tripod not includedProviding Exceptional Consumer Optical Products Since 1975Customer Support (800) 676-1343E-mail: support@telescope.comCorporate Offices (831) 763-700089 Hangar Way, Watsonville, CA 95076IN 230 Rev. B 01/09
<strong>Binocular</strong> (optional)Altitude knobTension knobs<strong>Binocular</strong> mountingknob (not shown)ParallelogramCounterweight shaft lock knobsCounterweight shaftPivot diskCounterweightElevator shaft lock leverElevator shaft crankTripod legBrace lock knobCenter braceHelical lock ringsDual rubber/spike footFigure 1. The <strong>Paragon</strong>-<strong>Plus</strong> binocular mount2
Congratulations on your purchase of the Orion <strong>Paragon</strong>-<strong>Plus</strong><strong>Binocular</strong> <strong>Mount</strong>. This sturdy support apparatus is designed toallow comfortable use of binoculars up to 80mm in aperture forastronomical or terrestrial viewing. The mount greatly reducesarm strain and positions the binocular away from the tripod,allowing the viewer to stand or sit comfortably under the binocularwhile aiming it overhead — even to the zenith. The mount alsoenables the binocular to be raised and lowered while still stayingright on a given target, a wonderful feature when two or morepeople of different heights are observing together.These instructions cover assembly and use of both the <strong>Paragon</strong>-<strong>Plus</strong> <strong>Binocular</strong> <strong>Mount</strong> only (#5376, without tripod) and the<strong>Paragon</strong>-<strong>Plus</strong> <strong>Binocular</strong> <strong>Mount</strong> & Tripod (#5374). Please readthem thoroughly.Attaching the <strong>Paragon</strong>-<strong>Plus</strong><strong>Binocular</strong> <strong>Mount</strong> to a TripodThe attachment instructions cover the attachment to either the<strong>Paragon</strong>-<strong>Plus</strong> tripod (included with #5374), or any sturdy tripodyou might already have. You will need a flat-head screwdriverand a 2mm hex wrench to attach the binocular mount to a tripod.Refer to Figure 1 during assembly.1) Remove the pan head of the tripod you plan to use. If youpurchased the <strong>Paragon</strong>-<strong>Plus</strong> binocular mount and tripod, youwill not need to do this as the tripod does not come with a panhead. Note the size of the screw the tripod uses to attach thepan head.2) Turn the binocular mount upside down. On the bottom of thepivot disk (Figure 1) there is a 3/8" threaded hole containinga brass 1/4"-20 threaded insert. This may need to beremoved, depending on the tripod you are using. Comparethe size of the threaded post on the tripod with the size ofthe brass insert. If the brass insert is too small, then it willneed to be removed. It should be removed to use it with the<strong>Paragon</strong>-<strong>Plus</strong> tripod in the #5374 package. Use the flat-headscrewdriver to do this.3) Spread the legs of the tripod as far as they will go and lockthem in place with the brace lock knob (Figure 1). Keep thelegs at their shortest height, for now. The <strong>Paragon</strong>-<strong>Plus</strong> tripodhas a very wide stance for enhanced stability. The wideststance is achieved when the tri-brace is as far down as it willgo on the elevator shaft housing. The brace lock knob shouldbe tightened to secure the stance. When using the binocularmount, the tripod legs should always be fully extended, otherwisethe weight of the binocular mount could cause the tripodto tip over.4) For the <strong>Paragon</strong>-<strong>Plus</strong> tripod, attach the parallelogram mountto the platform on top of the elevator shaft (Figure 2). Forother tripods, thread the mount onto the shaft where the panhead normally goes. Do this by placing the hole on the bottomof the mount onto the shaft while holding the mount with onehand. With your other hand, turn the pivot disk until it is tight.5) If you are using the <strong>Paragon</strong> tripod, you secure the pivot diskto the platform on top of the elevator shaft with the setscrewslocated underneath the platform. With the 2mm hex wrench,thread the setscrews until they are secure. The mount shouldnow be able to pivot without unthreading from the tripod.Your <strong>Paragon</strong>-<strong>Plus</strong> binocular mount is now assembled andshould resemble Figure 1.Attaching the <strong>Binocular</strong> to the <strong>Binocular</strong> <strong>Mount</strong>The <strong>Paragon</strong>-<strong>Plus</strong> binocular mount is capable of holding binocularsof up to 80mm aperture. The binocular must have a threadedsocket for mounting. Adjust the tripod height to the level you willbe viewing from before mounting the binoculars. See below forinstructions on how to raise the <strong>Paragon</strong>-<strong>Plus</strong> tripod.Remove the cover cap from the threaded tripod adapter on yourbinocular. Then thread the binocular mounting knob into the tripodadapter on the binocular until it is secure (Figure 3). Pleasenote that if you are using a large binocular that employs a centralsupport shaft (such as the Orion MegaView), then you will needan optional mounting plate (#7589).<strong>Binocular</strong>mounting knobL-bracketFigure 2. Line up the threadedpan head attachment shaftof the tripod with the threadedhole on the bottom of the pivotdisk. Then hold the binocularmount still while turning thepivot disk to thread it onto theshaft.Threadedtripod adapterFigure 3. Attaching thebinocular to the binocularmountBalancing the <strong>Paragon</strong>-<strong>Plus</strong> <strong>Binocular</strong> <strong>Mount</strong>To assure smooth movement of the binocular mount, the binocularshould be properly balanced on the mount by adjusting thecounterweight shaft. Note that a perfect balance is not necessary,as the balance can be compensated by using the tension knobs.However, try to achieve as precise a balance as possible.1) Loosen all four tension knobs and carefully bring the mountto a horizontal position.2) Loosen the counterweight shaft knobs and slide the counterweightshaft out from the mount until it balances the binocularon the other end. Note that a perfect balance may not beachievable with a very light or very heavy binocular.If the mount will not balance (very likely with a small binocular),you can make adjustments to the tension knobs until the mountremains in place when you stop moving it. If it does not, increasethe tension with the tension knobs.3
tilt angleFigure 6. The binocular mountcan be used to view objects at ornear the zenith. Adjust the tripodso that you can stand under thebinocular to view objects locatedhigh in the sky.Altitude knobFigure 4. The “tilt angle” of the binocularsa. b.Figure 5. The binocular will remain on target as you adjust theheight using the parallelogram. The standing person in (a) is lookingat the same thing while seated in (b). Note that only the parallelogramhas moved; the tilt angle of the binocular has not. The pivot disk andbinocular altitude should not be adjusted for this feature to work.Adjusting the “Tilt Angle” of the <strong>Binocular</strong>The binocular “tilt angle” is controlled with the altitude knob(Figure 4). You should set the knob tension such that the binocularwill move when pushed, but will not move on its own. Keep inmind that as the angle of the binocular approaches the zenith,the knob tension will need to be increased so that the binoculardoes not flop over. Increase the knob tension when bringing thebinocular 40˚ or more from horizontal.Adjusting AzimuthMoving the binocular in azimuth (left/right) is a simple matter ofturning the mount on its pivot disk. There is no azimuth lock feature.Adjusting the Height of the <strong>Binocular</strong>A nice feature of the <strong>Paragon</strong>-<strong>Plus</strong> binocular mount is that whenthe binocular is pointed at an object, the height can be adjustedfor different viewers without moving the binocular off its target. Todo this, simply move the binocular so that only the parallelogrampart of the mount is moving. Do not adjust the tilt angle of thebinocular or move the mount on its pivot disk. Figure 5 shows thisfeature in action. Using this feature, people of varying heights willbe able to enjoy binocular views without any crouching over orstraining to reach the binocular.Adjusting the <strong>Paragon</strong>-<strong>Plus</strong> Tripod Height(#5374)You may find that the binocular position is too low when the tripodlegs are fully retracted. To raise the height you should extend thelegs of the tripod. You should remove the binocular mount beforeextending the tripod legs to prevent the mount and tripod fromfalling over.Each leg of the tripod has two telescoping sections. To extenda leg, loosen the ridged helical lock ring by turning it counterclockwise,then extend the leg. When it has been extended to thedesired length, turn the lock ring clockwise until tight.Although the <strong>Paragon</strong>-<strong>Plus</strong> tripod also has an elevator shaft, thisshould be used with the binocular mount only after raising thetripod by use of the legs. Extending the elevator shaft reducesthe stability of the binocular mount. To operate the elevator shaft,loosen the elevator lock knob and turn the elevator hand crank toadjust to the desired height. Then tighten the elevator lock knob.Dual Rubber/Spike Feet (#5374)The tripod is equipped with dual-purpose feet that consist of aretractable rubber foot and a metal spike. The rubber feet areintended for use of the tripod indoors or on a smooth, pavedsurface. The metal spikes are desirable for achieving a firm gripon soft surfaces. To use the rubber feet, thread the foot counterclockwiseuntil it stops. In this position, the metal spike will be wellrecessed within the rubber. Be sure all three rubber feet are flaton the floor, not tipped sideways.To expose the spike feet, thread the rubber foot clockwise untilthe spike protrudes from the rubber. In some instances you maywish to remove the rubber feet altogether so more of the metalspike is exposed. This can be done by pulling the rubber feet offtheir anchors. They can be pressed on again at any time.Parallelogram Safety StopThe parallelogram has a safety stop to prevent the aluminumbars from completely collapsing. This ensures that no fingerswill be caught and crushed by an accidental fast closing of theparallelogram. This feature will also prevent the counterweightfrom hitting the tripod.4
Astronomical UseThe <strong>Paragon</strong>-<strong>Plus</strong> binocular mount allows viewing of subjectsfrom the horizon all the way up to the zenith. To view objects atthe zenith, adjust the binocular mount and tripod so that they willbe tall enough for you to stand underneath the binocular. Thenadjust the tilt angle of the binocular to point it at the zenith. Standunderneath the binocular and look up into them. When doneproperly, this should resemble Figure 6.TransportingWhen moving the binocular mount any significant distance, youshould remove the binocular to prevent them from being damaged.To make moving easier, you may want to separate themount from the tripod. An optional carrying case (#15161) is alsoavailable from Orion to make transportation easier.Specifications:Maximum binocular weight: 5.5 lbs.Counterweight: 8 lbs.<strong>Binocular</strong> mounting knob: Accommodates <strong>Binocular</strong> with 1/4"-20tripod adapterMinimum binocular height (with <strong>Paragon</strong>-<strong>Plus</strong> tripod): 31"Maximum binocular height (with <strong>Paragon</strong>-<strong>Plus</strong> tripod): 91"Weight (without <strong>Paragon</strong>-<strong>Plus</strong> tripod): 12 lbs. 9 oz.Weight (With <strong>Paragon</strong>-<strong>Plus</strong> tripod): 19 lbs. 10 oz.Carry case: OptionalCare and MaintenanceWhen using the mount in direct sunlight, be aware that its blacksurface can become hot. If the mount is used in wet conditions,dry it completely with a soft cloth after use. Clean the tripod andmount with a mild detergent and a soft cloth.One-Year Limited WarrantyThis Orion <strong>Paragon</strong> <strong>Binocular</strong> <strong>Mount</strong> is warranted against defects in materials or workmanship for a period of one year from the date ofpurchase. This warranty is for the benefit of the original retail purchaser only. During this warranty period Orion Telescopes & <strong>Binocular</strong>swill repair or replace, at Orion’s option, any warranted instrument that proves to be defective, provided it is returned postage paid to:Orion Warranty Repair, 89 Hangar Way, Watsonville, CA 95076. If the product is not registered, proof of purchase (such as a copy ofthe original invoice) is required.This warranty does not apply if, in Orion’s judgment, the instrument has been abused, mishandled, or modified, nor does it apply tonormal wear and tear. This warranty gives you specific legal rights, and you may also have other rights, which vary from state to state.For further warranty service information, contact: Customer Service Department, Orion Telescopes & <strong>Binocular</strong>s, 89 Hangar Way,Watsonville, CA 95076; (800) 676-1343.Orion Telescopes & <strong>Binocular</strong>s89 Hangar Way, Watsonville, CA 95076Customer Support Help Line (800) 676-1343 • Day or Eveningwww.telescope.com5