Avaya 9608 IP Phone â Quick Reference User Guide
Avaya 9608 IP Phone â Quick Reference User Guide
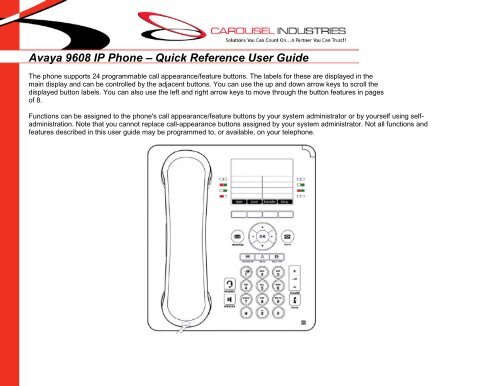
Avaya 9608 IP Phone â Quick Reference User Guide
- No tags were found...

Create successful ePaper yourself
Turn your PDF publications into a flip-book with our unique Google optimized e-Paper software.
Personal Contacts/DirectoryThe following covers use of theCONTACTS menu of your phone. Allfunctions are preceded by pressing thisbutton.Adding Entries1. Access your personal directory contacts:a. Press the CONTACTS key. Thedirectory menu is displayed.b. Use the left and right arrow keys toselect your Personal directory.2. Press the New soft key. The menu nowallows editing of the name and number.• Use the up and down arrow keys toswitch between number and name entry.• When the name and number have beenentered as required, press the Save softkey.• To exit without making any changes,press the Cancel soft key.You can add up to 100 personal directoryentries.Editing Entries1. Use the left and right arrow keys toselect your Personal directory and locatethe desired entry. Press the Details softkey.2. Press the More soft key and then theEdit soft key.• Use the up and down arrow keys toswitch between number and name entry.• When the name and number havebeen entered as required, press the Savesoft key.• To exit without making any changes,press the Cancel soft key.Deleting Entries1. Locate the entry in your Personaldirectory.2. Press the More soft key and then theDelete soft keyCalling a Person from the ContactsList1. Use the left and right arrow keys toselect which type of directory entriesyou want displayed.AllAll directory entries.ExternalDirectory entries stored by thetelephone system for all users to use.GroupsThe names and numbers ofDepartments/Groups on the systemnetwork.<strong>User</strong>sThe names and numbers of otherusers on the system network.PersonalYour own personal directory entries.2. Either press the List soft key todisplay all the directory entries, orstart spelling out the name using thedialpad to display only matchingentries.3. Use the up and down arrow keys toscroll through the matching entries.To return to the start to match adifferent directory selection, press theClear soft key.When the required entry is displayed,press Call soft key.Page 5 of 6
Self Administration:External Speed Dial ButtonsThe following instructions are forprogramming speed dial buttons to outsideparties, however they can also be appliedto assign other features to emptybuttons on the 2 nd , 3 rd and 4th pages onyour phone. Refer to the full <strong>Avaya</strong> 9600<strong>User</strong> <strong>Guide</strong> for explanation of availablebutton features.All administration is done by followingalong on the display screen.1. Press the Features soft key, ifshown on your display screen. To do this· The button will be given a default label.To change the label, press More and thenselect Label. Use the“keyboard” to enter the text you want todisplay for the button label. Note that thelabel is only shown whileediting the label, and after you exit theadministration menu.6. When completed press Back.*To learn more about features you mayprogram to your phone, refer to Chapter16 (page 89) in the <strong>Avaya</strong> 9600 <strong>User</strong>Manual.during a call, press the PHONE keyand then press the Features soft key.2. Use the up and down arrow keys tohighlight <strong>Phone</strong> <strong>User</strong>. Press Select.3. Use the up and down keys to highlightSelf-Administer. Press Select.4. Enter your security PIN (default is yourextension number) and press Done.5. Use the up and down keys to scrollthrough the list of current functionsassigned to each button.· To remove the existing function froma button (except call appearance), pressErase. You can also press More and usethe Copy and Paste options to copy thesettings of an existing button ontoanother.· To assign a function to the highlightedbutton press Replace.· Select the required function from thelist (“Abbreviated Dial”), and pressSelect.· Enter the full outside number, includingthe outside access code (9).Page 6 of 6