Prostaglandin E2 Metabolite ELISA - IBL International
Prostaglandin E2 Metabolite ELISA - IBL International
Prostaglandin E2 Metabolite ELISA - IBL International

Create successful ePaper yourself
Turn your PDF publications into a flip-book with our unique Google optimized e-Paper software.
PGEM EIA Antiserum<br />
Reconstitute the PGEM Antiserum as follows:<br />
100 dtn PGEM Antiserum (96-well kit; Catalog No. 414532): Reconstitute with<br />
6 ml EIA Buffer.<br />
OR<br />
500 dtn PGEM Antiserum (480-well kit; Catalog No. 414532): Reconstitute with<br />
30 ml EIA Buffer.<br />
Store the reconstituted PGEM Antiserum at 4°C. It will be stable for at least four weeks. A<br />
20% surplus of PGEM Antiserum has been included to account for any incidental losses.<br />
Antiserum Dye Instructions (optional)<br />
This dye may be added to the antiserum, if desired, to aid in visualization of<br />
antiserum-containing wells. Add the dye to the reconstituted antiserum at a final<br />
dilution of 1:100 (add 60 µl of dye to 6 ml antiserum or add 300 µl of dye to<br />
30 ml of antiserum).<br />
Plate Set Up<br />
The 96-well plate(s) included with this kit is supplied ready to use. It is not necessary to<br />
rinse the plate(s) prior to adding the reagents. NOTE: If you do not need to use all the strips<br />
at once, place the unused strips back in the plate packet and store at 2-4°C. Be sure the packet is<br />
sealed with the desiccant inside.<br />
Each plate or set of strips must contain a minimum of two blanks (Blk), two non-specific<br />
binding wells (NSB), two maximum binding wells (B 0 ), and an eight point standard curve<br />
run in duplicate. NOTE: Each assay must contain this minimum configuration in order to<br />
ensure accurate and reproducible results. Each sample should be assayed at two dilutions<br />
and each dilution should be assayed in duplicate. For statistical purposes, we recommend<br />
assaying samples in triplicate.<br />
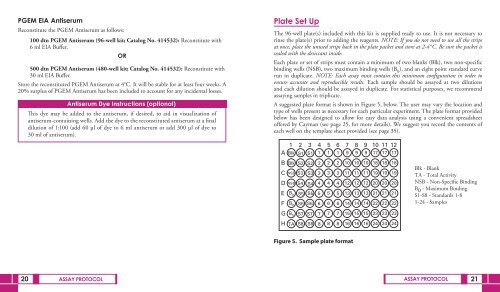
A suggested plate format is shown in Figure 5, below. The user may vary the location and<br />
type of wells present as necessary for each particular experiment. The plate format provided<br />
below has been designed to allow for easy data analysis using a convenient spreadsheet<br />
offered by Cayman (see page 25, for more details). We suggest you record the contents of<br />
each well on the template sheet provided (see page 35).<br />
1 2 3 4 5 6 7 8 9 10 1112<br />
A Blk S1 S1 1 1 1 9 9 9 17 17 17<br />
B Blk S2 S2 2 2 2 10 10 10 18 18 18<br />
C NSB S3 S3 3 3 3 11 11 11 19 19 19<br />
D NSB S4 S4 4 4 4 12 12 12 20 20 20<br />
E B0 S5 S5 5 5 5 13 13 13 21 21 21<br />
F B0 S6 S6 6 6 6 14 14 14 22 22 22<br />
G B0 S7 S7 7 7 7 15 15 15 23 23 23<br />
H TA S8 S8 8 8 8 16 16 16 24 24 24<br />
Figure 5. Sample plate format<br />
Blk - Blank<br />
TA - Total Activity<br />
NSB - Non-Specific Binding<br />
B 0 - Maximum Binding<br />
S1-S8 - Standards 1-8<br />
1-24 - Samples<br />
20 ASSAY PROTOCOL ASSAY PROTOCOL 21