fuel cell car science kit assembly guide - Arcola Energy - Home
fuel cell car science kit assembly guide - Arcola Energy - Home
fuel cell car science kit assembly guide - Arcola Energy - Home
Create successful ePaper yourself
Turn your PDF publications into a flip-book with our unique Google optimized e-Paper software.
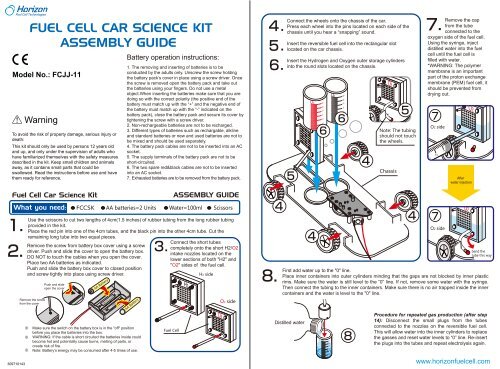
FUEL CELL CAR SCIENCE KITASSEMBLY GUIDEModel No.: FCJJ-11WarningTo avoid the risk of property damage, serious injury ordeath:This <strong>kit</strong> should only be used by persons 12 years oldand up, and only under the supervision of adults whohave familiarized themselves with the safety measuresdescribed in the <strong>kit</strong>. Keep small children and animalsaway, as it contains small parts that could beswallowed. Read the instructions before use and havethem ready for reference.Fuel Cell Car Science KitWhat you need:Battery operation instructions:1. The removing and inserting of batteries is to beconducted by the adults only. Unscrew the screw holdingthe battery pack’s cover in place using a screw driver. Oncethe screw is removed open the battery pack and take outthe batteries using your fingers. Do not use a metalobject.When inserting the batteries make sure that you aredoing so with the correct polarity (the positive end of thebattery must match up with the “+” and the negative end ofthe battery must match up with the “-” indicated on thebattery pack), close the battery pack and secure its cover bytightening the screw with a screw driver.2. Non-rechargeable batteries are not to be recharged.3. Different types of batteries such as rechargable, alklineand standard batteries or new and used batteries are not tobe mixed and should be used separately.4. The battery pack cables are not to be inserted into an ACsocket.5. The supply terminals of the battery pack are not to beshort-circuited.6. The two spare red&black cables are not to be insertedinto an AC socket.7. Exhausted batteries are to be removed from the battery pack.ASSEMBLY GUIDEFCCSK AA batteries=2 Units Water=100ml ScissorsConnect the wheels onto the chassis of the <strong>car</strong>.Press each wheel into the pins located on each side of thechassis until you hear a “snapping” sound.Insert the reversible <strong>fuel</strong> <strong>cell</strong> into the rectangular slotlocated on the <strong>car</strong> chassis.Insert the Hydrogen and Oxygen outer storage cylindersinto the round slots located on the chassis.Note: The tubingshould not touchthe wheels.ChassisRemove the capfrom the tubeconnected to theoxygen side of the <strong>fuel</strong> <strong>cell</strong>.Using the syringe, injectdistilled water into the <strong>fuel</strong><strong>cell</strong> until the <strong>fuel</strong> <strong>cell</strong> isfilled with water.*WARNING: The polymermembrane is an importantpart of the proton exchangemembrane (PEM) <strong>fuel</strong> <strong>cell</strong>, itshould be prevented fromdrying out.O2 sideAfterwater injection309710143Use the scissors to cut two lengths of 4cm(1.5 inches) of rubber tubing from the long rubber tubingprovided in the <strong>kit</strong>.Place the red pin into one of the 4cm tubes, and the black pin into the other 4cm tube. Cut theremaining long tube into two equal pieces.Remove the screw from battery box cover using a screwdriver. Push and slide the cover to open the battery box.DO NOT to touch the cables when you open the cover.Place two AA batteries as indicated.Push and slide the battery box cover to closed positionand screw tightly into place using screw driver.Remove the screwfrom the coverPush and slideopen the coverAA BatteryAA BatteryMake sure the switch on the battery box is in the "off" positionbefore you place the batteries into the box.WARNING: If the cable is short circuited the batteries inside couldbecome hot and potentially cause burns, melting of parts, orcreate risk of fire.Note: Battery’s energy may be consumed after 4-5 times of use.Connect the short tubescompletely onto the short H2/O2intake nozzles located on thelower sections of both "H2" and"O2" sides of the <strong>fuel</strong> <strong>cell</strong>.Fuel CellH2 sideO2 sideO2 sidebend thetube this wayFirst add water up to the "0" line.Place inner containers into outer cylinders minding that the gaps are not blocked by inner plasticrims. Make sure the water is still level to the “0” line. If not, remove some water with the syringe.Then connect the tubing to the inner containers. Make sure there is no air trapped inside the innercontainers and the water is level to the "0" line.Distilled waterProcedure for repeated gas production (after step14): Disconnect the small plugs from the tubesconnected to the nozzles on the reversible <strong>fuel</strong> <strong>cell</strong>.This will allow water into the inner cylinders to replacethe gasses and reset water levels to “0” line. Re-insertthe plugs into the tubes and repeat electrolysis again.www.horizon<strong>fuel</strong><strong>cell</strong>.com
Connect the tubes opposite end to theupper nozzles located on the upperpositions of both "H2" and "O2" sides of<strong>fuel</strong> <strong>cell</strong> shown here. Make sure thetubes are connected correctly to thecorresponding sides of the <strong>fuel</strong> <strong>cell</strong>.Disconnect the solar panel from the <strong>fuel</strong><strong>cell</strong> or turn the switch on the battery boxto “off” and remove the cablesconnected to the <strong>fuel</strong> <strong>cell</strong>. Keep thebattery box switched to the "off "position except during the time you areperforming electrolysis.Connect the red and black cablesto the solar panel, and connect theother ends to the red and blacksockets on the <strong>fuel</strong> <strong>cell</strong>.BatteryPackALTERNATE OPTION:Connect the red cable from thebattery pack to the red socket onthe <strong>fuel</strong> <strong>cell</strong> and connect the blackcable to black socket.Switch the battery pack to the "on"position.Electrolysis of water should begin withoxygen and hydrogen being producedand stored in each storage tank.Wait until the bubbles in the hydrogentank start to escape from the innerstorage cylinder located in the H2cylinder.(Be patient, process can take 15–20min)Remove the red and black cablesconnected to the <strong>fuel</strong> <strong>cell</strong> in "step10".Insert the banana plug cables from the <strong>car</strong>’smotor into the red and black plugs on the <strong>fuel</strong><strong>cell</strong>.Make sure the colors of the plugs and cablesare inserted into plug socket of the same coloras in "step 10".The motor should begin to power the <strong>car</strong>. Theestimated driving time on one charge is about3 to 5 minutes.FUEL CELL CAR SCIENCE KITTECHNICAL SUPPORT1.The water levels do not drop when the gas outlet tubes on both sides of the <strong>fuel</strong><strong>cell</strong> are unplugged.Solution:Check whether the spaces on the wall of the inner cylinder are blocked. If so, turnthe inner cylinder until water enters the spaces and fills up the inner cylinder.2.The reversible <strong>fuel</strong> <strong>cell</strong> does not produce hydrogen and/or oxygen.Solution:a. Check whether the wires are appropriately connected, and whether there areany loose connections. The <strong>fuel</strong> <strong>cell</strong> could be completely destroyed if the red wireof the battery pack is connected to the black jack of the <strong>fuel</strong> <strong>cell</strong>.b. Check whether the switch of the battery pack is in the “on” position.3.The water electrolysis process slows down.Solution:a. Add water to the oxygen side of the <strong>fuel</strong> <strong>cell</strong> and wait for about 5 minutes.b. Replace old AA batteries with new AA batteries inside the battery pack.4.The <strong>car</strong> stops moving while there is still hydrogen left inside the tanks.Solution:a. Purge the gases and perform water electrolysis for 4-5 minutes. Unplug thehydrogen gas outlet tube and oxygen gas tubes to purge the gases. Performwater electrolysis again until the hydrogen tank is filled, and connect the motor tothe <strong>fuel</strong> <strong>cell</strong>. If the problem persists, go to the next step.b. Let the water electrolysis process last about 10 minutes to consume theresidual water. To push water out of the <strong>fuel</strong> <strong>cell</strong>, purge the gases. Perform waterelectrolysis once more until the hydrogen tank is filled, then connect the motor tothe <strong>fuel</strong> <strong>cell</strong>.Note: Hydrogen <strong>fuel</strong> <strong>cell</strong>s are consumables and have a life time of up to 2 years and we givewarranty for 1 year. You can buy replacement <strong>fuel</strong> <strong>cell</strong>s from Horizon by placing online ordersat http://www.horizon<strong>fuel</strong><strong>cell</strong>.com/store.htmFCJJ-11_FCCSK_AG_V1.2_ENwww.horizon<strong>fuel</strong><strong>cell</strong>.com


