AXES and SAWS Axes and Saws - Brooklyn Scouts, Wellington
AXES and SAWS Axes and Saws - Brooklyn Scouts, Wellington
AXES and SAWS Axes and Saws - Brooklyn Scouts, Wellington

Create successful ePaper yourself
Turn your PDF publications into a flip-book with our unique Google optimized e-Paper software.
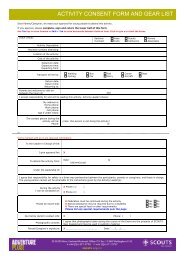
PRACTICAL BLOCK – <strong>AXES</strong> <strong>and</strong> <strong>SAWS</strong><strong>Axes</strong> <strong>and</strong> <strong>Saws</strong>Introduction<strong>Scouts</strong> <strong>and</strong> Venturers use axes, saws <strong>and</strong> knives at camp <strong>and</strong> onactivities, to chop firewood, build gadgets such as gateways,tables <strong>and</strong> st<strong>and</strong>s <strong>and</strong> of course to prepare food.The emphasis of the training is on the following:1. Sharpening <strong>and</strong> maintaining the tools.2. Using them effectively so as to be able to survive in anemergency situation.3. Using the tools wisely <strong>and</strong> safely.You could also view h<strong>and</strong>ling <strong>and</strong> using knives safely as a type ofh<strong>and</strong>craft activity.Protecting theenvironmentSCOUTS do not encourage chopping up trees, either dead or alive. However, using axes<strong>and</strong> knives is a necessary part of teaching our youth members how to look after themselves<strong>and</strong> their families in the outdoors in an emergency or survival situation.To ignore these tools on environmental grounds would be to place our members at risk ifthey found themselves in a survival situation. That’s not the time to start learning to usethese tools safely.So in certain circumstances <strong>and</strong> with the permission of the l<strong>and</strong> owners, we do train <strong>Scouts</strong><strong>and</strong> Venturers how to use axes, saws <strong>and</strong> knives <strong>and</strong> how to build <strong>and</strong> light open fires.Folding sawhintDid you know that you can use a folding saw to split logs of up to100mm in diameter into kindling <strong>and</strong> firewood? Here is a link to awebsite that has a video presentation on how to do this. You maylike to reconsider the necessity of using axes after trying this.http://www.5min.com/Video/How-to-Use-a-Folding-Saw-151462951In reality, there is almost no reason when in camp to need to cut any timber greater than100mm in diameter. Folding saws seldom need sharpening <strong>and</strong> can be folded up everytime they are put down. They are a particularly safe <strong>and</strong> economical cutting tool to take tocamp.Sharp toolsare safestContrary to what many people think, really sharp tools are the safest to use. The mainreason is that the teeth or cutting edge slices into the timber, gets a grip on it <strong>and</strong> tendsnot to slip.Blunt tools, bounce or glance off the timber <strong>and</strong> when this happens the tool is difficult tocontrol, especially for the young users. This is when the user or someone nearby tends toget hurt.Checking <strong>and</strong>storing yourtoolsAlways <strong>and</strong> without fail, personally check any axe, saw or knife beingtaken to camp <strong>and</strong> ensure it is sharp or sharpened before packing it in thetrailer. Keep a spray can of oil or WDF40 silicone spray in the Group storeroom <strong>and</strong> spray the tools before storing them.Continued on next pagePage 1 of 7
PRACTICAL BLOCK – <strong>AXES</strong> <strong>and</strong> <strong>SAWS</strong><strong>Axes</strong> <strong>and</strong> <strong>Saws</strong>, ContinuedProtectingbladesIn an ideal world, each axe you have in the Group store will have a leather pouch availableto put over the head of the axe when it is not being used.In reality, if it ever had one, it has long been left in a fieldor in the bush.Axe head coverHere is a simple method of making a cover for your axe. Ifit gets lost or wet at camp, you simple make a new one outof a piece of cardboard from a carton in the food tent <strong>and</strong> abit of light cord or rope.• Cut a piece of cardboard <strong>and</strong> fold it around the axehead as shown in the illustration.• Cut a nick in the cardboard close to the axe h<strong>and</strong>le<strong>and</strong> tie the cord around it to stop the cardboardfrom slipping off the head.• Lightly spraying the inside of the cardboard cover with oil would be beneficial aswell.Saw blade cover<strong>Saws</strong> are also dangerous when not in use. If placed in a toolbox or a trailer without a guardover the blade, you run the risk of people injuring themselves when sorting through thegear looking for something. Here is a easy way to make a guard:• Cut a piece of garden hose to the same length as the saw blade.• Use a sharp knife or blade <strong>and</strong> slit the hose from one end to the other.• Prise the cut in the hose apart <strong>and</strong> slide it over the blade.• If you have some wire twists h<strong>and</strong>y, tie the hose to the saw blade so it doesn’t dropoff.Parts of an axeIt’s a good idea to learn the parts of an axe as it assists when instructing others. You cantalk about the bit instead of the sharp side of the blade etc.Continued on next pagePage 2 of 7
PRACTICAL BLOCK – <strong>AXES</strong> <strong>and</strong> <strong>SAWS</strong><strong>Axes</strong> <strong>and</strong> <strong>Saws</strong>, ContinuedCarrying anaxeAn unshielded axe can be a very dangerous tool to carryaround. If the user trips, stumbles or falls when carrying anunshielded axe the chances of injury are quite high. Injuriesmight be:• The user may cut an arm or leg by falling on theaxe.• A person walking beside the user of the axe could behit <strong>and</strong> injured• A user holding an axe by the h<strong>and</strong>le could be hit bythe axe swinging against their leg.The illustration shows how to carry an unshielded axe. Remember that if you are walkingwith others, you always walk on the outside of the group with the axe on the opposite sideof you from others. Note that the axe head is tilted away from theperson’s body.Passing an axe to another person is done by passing th axe headfirst. If you pass it h<strong>and</strong>le first, <strong>and</strong> let go of the head, the weightcan cause the axe to fall <strong>and</strong> hit the other person’s leg.Sharpening anaxeWhen you buy an axe, the head is already correctly shaped<strong>and</strong> all you need to do is to rub it with a sharpening stoneafter every use to re-sharpen the blade.However, over time the blade becomes worn <strong>and</strong> too thick tohold an edge <strong>and</strong> this is when they become dangerously blunt.Re-shaping the blade is really a job for the professionals. Theyuse a large grindstone that turns quite slowly <strong>and</strong> grinds theaxe back in to shape without overheating it <strong>and</strong> damaging the steel.This illustration shows the desired shape of a correctly sharpened axe head. Once upon atime every butcher’s shop had such a grindstone, but today you may have to hunt aroundto find someone in an independent butchery with the skills to reshape the axe head for you.Continued on next pagePage 3 of 7
PRACTICAL BLOCK – <strong>AXES</strong> <strong>and</strong> <strong>SAWS</strong><strong>Axes</strong> <strong>and</strong> <strong>Saws</strong>, ContinuedSharpening anaxe, continuedIf the axe is not too thick, you can use a file to reshape it.• Always file from the bit (thesharp end of the blade)towards the back of thehead of the axe.• Always use gloves to avoidinjury• Always have someone holdthe axe h<strong>and</strong>le firmly so itdoesn’t move <strong>and</strong> cause thefile to slip.The blade can be a given final sharpen using a carborundumstone purchased from any hardware store.Use the stone as shown in the illustration, making sure theangle between the blade <strong>and</strong> the stone is about 20 degrees.You can use oil or water to assist the grinding process. Inthe illustration oil has been used <strong>and</strong> clearly shows thecircular motion used to grind the blade.Most stones have a coarse side <strong>and</strong> a fine side. Start withthe coarse side <strong>and</strong> then finish with 5 or 6 strokes using thefine side to put a very sharp edge on the bit.Splittingfirewood withan axeAlways have an area of ground put aside for cutting <strong>and</strong> splittingfirewood <strong>and</strong> make sure only one person is inside that area whenusing an axe.Roping off the area is a sensible thing to do <strong>and</strong> will remove apotential hazard.When using a h<strong>and</strong> axe to split small logs for kindling, always:• Use a log or tree stump as a chopping block <strong>and</strong> place thewood as shown.• Hold the wood in one h<strong>and</strong> <strong>and</strong> use the other to hold the axe.When using a larger axe for splitting short lengths of a log,always:• Place the wood against a larger piece of timber as shown inthe illustration.• Use both h<strong>and</strong>s on the axe.Continued on next pagePage 4 of 7
PRACTICAL BLOCK – <strong>AXES</strong> <strong>and</strong> <strong>SAWS</strong><strong>Axes</strong> <strong>and</strong> <strong>Saws</strong>, ContinuedFelling a treeAs mentioned previously SCOUTS try not to fell either alive or dead trees. However,assuming you have the l<strong>and</strong>owner’s permission to do so, the following is how you fell <strong>and</strong>trim a tree.If you need to fell a tree in aparticular direction, use thetechnique shown in thisillustration.Warning:When the tree finally starts to fall,the trunk will nearly always kickback about 2 metres towards theperson wielding the axe.Serious injury is the least you canexpect if you don’t move smartlyback from the tree once theobserver warns you the tree isstarting to fall.Start by cutting a‘scarf’ on the side ofthe tree that will fallonto the ground.If the trunk is asubstantial size youmay need to start two‘scarfs’ <strong>and</strong> join themtogether as shown inthe left illustration.Once you are just over half way through the trunk, move to the other side of the tree <strong>and</strong>start cutting another scarf about 100mm higher than the scarf on the other side of the tree.Make sure you have an observer st<strong>and</strong>ing clear of the tree <strong>and</strong> who can warn you as soonas the tree starts to fall. When it does fall it will happen quickly <strong>and</strong> you may need theextra warning time given by the observer so you can move away from the trunk.Note: You can fell a tree with a coarse cross cut saw using the same method. You will haveto cut several scarfs though to avoid the saw jambing if the tree starts to lean <strong>and</strong> closesthe sawcut.CuttingangleContinued on next pagePage 5 of 7
PRACTICAL BLOCK – <strong>AXES</strong> <strong>and</strong> <strong>SAWS</strong><strong>Axes</strong> <strong>and</strong> <strong>Saws</strong>, ContinuedCutting logsThis illustration shows the cutting pattern needed to cut a log in two.A 100mm diameter log will probablyneed 2 cuts either side.Bigger logs will need at least 3 cutseach side of the ‘scarf’.If possible turn the log over when halfway through <strong>and</strong> start again on theother side until the two cuts join up.TrimmingbranchesTrimming branches is relatively easy ifthe axe is sharp <strong>and</strong> you st<strong>and</strong> correctly<strong>and</strong> safely.Always st<strong>and</strong> on the opposite side of thetrunk <strong>and</strong> cut through the branch fromwhat was the underside of the branchwhere it joins the trunk.As you cut each branch try <strong>and</strong> drag itclear before cutting the next branch. Bydoing this you are removing potentialhazards from your work area.Types of sawsSCOUTS tend to use one of threetypes of saws when in camp.The Cross Cut Bushman SawNot many Groups have the saws.They have been replaced bychainsaws <strong>and</strong> any remainingh<strong>and</strong>saws are generally used forforestry workers competitions <strong>and</strong>for training.The saw illustrated is a single usersaw, adapted by adding twoupright h<strong>and</strong>les on either end tomake it a two h<strong>and</strong>ed saw that both users pull alternately.The main point to remember is that the users pull the saw towards themselves. The sawwill not work if either user attempts to push it.Continued on next pagePage 6 of 7
PRACTICAL BLOCK – <strong>AXES</strong> <strong>and</strong> <strong>SAWS</strong><strong>Axes</strong> <strong>and</strong> <strong>Saws</strong>, ContinuedTypes of saws,continuedThis is a modern bow saw.It folds up <strong>and</strong> will easily fit in a pack or aPatrol box.The blade is about 300mm long <strong>and</strong> willeasily cope with timber up to 150mm longif needed.It’s easy to use, very robust <strong>and</strong>economical to buy.Stocked by most outdoor retail shops, <strong>and</strong>also readily available on the internet.The saw shown opposite is a folding saw.• It is easy to use.• Easily folds up when not in use• Readily available from hardware stores orinternet outdoor equipment sites.Using the sawsThe main thing to remember is to hold the timber still while cutting it. You may needsomeone to hold it, or you drive pegs into the ground on either side of the log <strong>and</strong> hold itstill with one h<strong>and</strong>Sharpening the sawsThe two h<strong>and</strong>ed Cross Cut saw needs professional sharpening unless you happen to know aformer bushman who has the skill.The Bow Saw <strong>and</strong> Folding Saw need replacements blades which you buy from the supplier.They can be sharpened by a person trained to sharpen saw blades if needed, but it’scheaper to buy a new blade if you have to pay someone to sharpen the old blade.Chain <strong>Saws</strong><strong>Scouts</strong> must not use electric or petrol powered chain saws.axes_<strong>and</strong>_saws 1_3.doc 30/06/2011Page 7 of 7