8-Series Instruction Booklet
8-Series Instruction Booklet
8-Series Instruction Booklet

You also want an ePaper? Increase the reach of your titles
YUMPU automatically turns print PDFs into web optimized ePapers that Google loves.
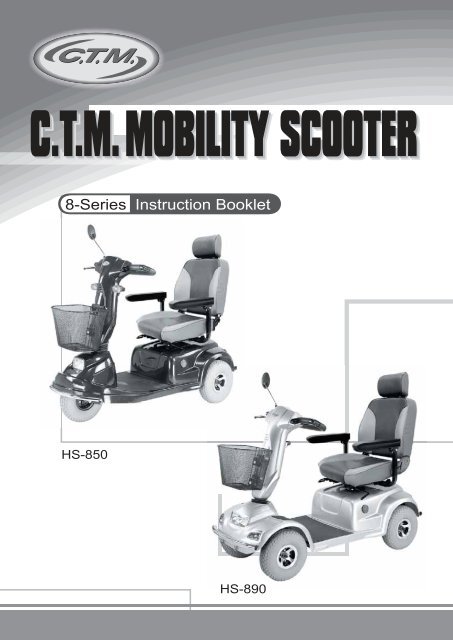
8-<strong>Series</strong><strong>Instruction</strong> <strong>Booklet</strong>INTRODUCTIONThank you and congratulation on purchasing your new C.T.M. Mobility Scooter.It is designed to provide you with transportation ability indoors and outdoors.We pride ourselves on providing safe and comfortable products. Our goal is to ensure yourcomplete satisfaction. We sincerely hope you enjoy your C.T.M. Mobility Scooter.Please read and observe all warning and instruction provided in owner's manual before youoperate with various convenient function of this scooter. Also, please retain this booklet forfuture reference.If you have any question, you can contact :C.T.M.HOMECARE PRODUCT, INC.6191 Schaefer Ave Suite B Chino CA 91710Tel : +909-590-1388 Fax : +909-590-3365E-Mail : ctm@ctmhomecare.com http : //www.ctmhomecare.comor your local dealer:1
8-<strong>Series</strong><strong>Instruction</strong> <strong>Booklet</strong>FUNCTION OF PARTSTOP CONTROL PANELSpeed Dial KnobThe Rabbit means fast and Turtle is slow. By turning this you control total speedtransferred to thumb controls.Battery GaugeThere is a meter shows batteries capacity status.ADJACENT TO TOP CONTROL PANELThumb LeverPushing right thumb lever moves scooter forward. Pushing left thumb lever moves thescooter backward. (This can be reversed if required by local dealer.) Releasing both,engages automatic brake. These are also your accelerator. The further you depressthem, the faster you go. (Subject to the position of the Rabbit/Turtle control).AT BASE OF STEERING TILLERTiller Angle AdjustmentPull downward the tiller adjustment to adjust tiller angle and release to lock atcomfortable position.BELOW SEATSeat Height AdjusterThere are three holes on seat tube to adjust seat height. Be sure the detent pin is fullyinserted at its new height before sitting.Armrest width Adjustment ThumbscrewsLoosen the two thumbscrews to adjust arm width; tighten again to lock in at desiredposition.Legroom AdjusterThere are few holes on front and rear frame tube for adjusting legroom. Pull the togglelatch to loosen and insert the detent pin to locate the position. Push the toggle latchagain to lock.REAR BODYRear Compartment CoverOpen the compartment Cover to access on board charger.Anti-tip wheelsHelps keep scooter from tipping over.Free-Wheeling LeverWhen lever is in N (Neutral) position, scooter can be moved without power.When lever is in D (Drive) position, scooter can be driven. Normal position is D.6
8-<strong>Series</strong><strong>Instruction</strong> <strong>Booklet</strong>OPERATING YOUR SCOOTERYou could make the following adjustments to increase your comfort when driving.adjust seat height and locationadjust armrest width to comfortable position.adjust legroom.1.Before operating your scooter, check the following:free-wheeling lever in Dspeed dial knob is at turtle picture.2.Sit on scooter and turn on key, Battery Gauge meter should be indicate at F.The Self-Diagnostic Warning Light should not be blinking.3.When your hands rest comfortably on handlebars, the thumb levers should be within easyreach. The right lever moves scooter forward, the left one moves it backward. When yourelease both levers, scooter will stop.This scooter has automatic braking system. Release the thumb leverand brake will stop scooter.4.Steer scooter by turning tiller toward the way you want to go.5.Practice driving where there are is No obstacle. Start at the slowest speed and driveforward and backward; make some turns. As you get more comfortable, you can increasespeed by turning speed dial toward picture of rabbit.6.If Battery Gauge indicates E, you should plan to recharge batteries very soon.7.If scooter stops, locate the circuit breaker on top of battery pack. Push it and trydriving again.8.When you are finished riding, turn off the key before getting off.9.If you are finished riding for the day, immediately recharge batteries.See CHARGING THE BATTERIES, page 12.7
8-<strong>Series</strong><strong>Instruction</strong> <strong>Booklet</strong>Keep in mind these rulesRelease thumb levers and allow scooter to stop completely before changing fromforward to reverse, or reverse to forward.When turning to corner, swing front wheels widely, so back wheels will turn more tightly.Use scooter only where it is safe for walting.Drive in low speeds when reversing, riding dowhill, over rainp or curb, or on unevensukpace, downhills, ramps, curbs, or uneven surfaces.Other Operating InformationHill climbing: You may need to use a higher speed. Turn to lower speed before goingdownhill.Down slopes: proceed with downward slopes slowly, and set speed control in proximityof turtle. The closer speed control is set toward turtle, the slower scootertravels. However, this scooter will not self accelerate down hills due to theautomatic braking, taking effect should you attempt to drive too fast.Kerb climbing: Approach slowly from right angles to curb. A slight angle is permissiblewith a 4-wheel scooter, but a direct approach is needed on a 3-wheelscooter. Do not attempt greater than a 3" curb.If Self-Diagnostic Warning Light starts to blink, identify problem fromchart on page 14 and take action.If the scooter breaks down and must be moved, get off scooter, engageFree-Wheeling Lever to N, push scooter slowly to a safe location, andpush lever back to D.In unlikely event of a panel display error, you need to re-set the displaysystem by cycling the on/off main switch. The display circuitry is independentof the motor control system. A display console error does not affect scooterspeed control.8
8-<strong>Series</strong><strong>Instruction</strong> <strong>Booklet</strong>DISASSEMBLING YOUR SCOOTERThe HS-890's compact design and light weight style make it fit easily into trunk or backseat of most vehicle. No tools are necessary to disassemble scooter.Remove seat by releasing Seat Rotation Lever (A) and then lift seat off. (See Fig. 4)Remove rear shroud (B) off scooter. (See Fig. 5)(B)(A)Figure 4 Figure 5Unscrew two wire connectors (C) between front and rear units. (See Fig. 6)Remove battery fixing Velcro (D). (See Fig. 7)(D)(C)Figure 6 Figure 7Detach battery power plugs (E). (See Fig. 8)Remove batteries (F). (See Fig. 9)(F)(E)Figure 8Figure 99
8-<strong>Series</strong><strong>Instruction</strong> <strong>Booklet</strong>Remove front basket (G) and lower tiller by pulling tiller adjustment (H) and push tillerdoun. (See Fig. 10)When fintsh instruction from figure (4) to figure (10) , there are 5 main parts. (See Fig. 11)(H)(G)Figure 10 Figure 1110
8-<strong>Series</strong><strong>Instruction</strong> <strong>Booklet</strong>ASSEMBLING YOUR SCOOTERTo assemble scooter, you can repeat disassembly directions in reverse. Abbreviateddirections are given below. Refer to Figures on pages 9 - 11 to locate parts.1.Use the tiller adjustment to move tiller up and out of the way.2.Place front basket.3.Place battery pack in battery compartment.4.Place seat on seat post and tighten seat locker knob.11
8-<strong>Series</strong><strong>Instruction</strong> <strong>Booklet</strong>CHARGING THE BATTERIESBatteries must be charged before using the scooter for the first time and should berecharged after each day use. You will need the scooter and the battery charger.Each country may supply differentcharger. The charging proceduremay be different from below.If you require more details, pleasecontact your authorized dealer.Be sure the scooter key is in theOFF positionFigure 121.Insert battery charger cord into the charger connector on the charger output. Refer toabove figure for correct position2.Plug the other end of the battery charger cable into a standard electrical outlet.3.Turn the power on. Normally, The LED (Power) Light will turn on when electric currentpasses.4.Charging starts. During charging, LED (Charge) will indicate orange light, when it turnsto green light, that means well-charged.5.LED indicationLED(POWER) - GREEN LIGHT ON : Power On.LED(CHARGE) - ORANGE LIGHT ON : Charging / GREEN LIGHT ON : Fully Charged6.Charger Trouble Shooting(A)If LED (POWER) light is offCheck the input voltage (115V/230V) is the same as you adjust.If light is still off, please check and repair the battery charger.(B)If LED (CHARGE) light is offCheck to see clips connection is correct.If the battery is fully charged, the LED (CHARGE) light will be off.If light is still off, the battery may be defective.(C)If ORANGE light can turn to GREENThe battery can not be charged. Please check and recover it.(D)If ORANGE light turns to GREEN immediatelyCheck to see the battery is fully charged, if not, The battery may be defectiveCheck and recover it.The time needed to recharge will vary depending on the depletion of thebatteries. Charging for longer than necessary will not harm the batteries.They can not be overcharged.Keep in mind these rulesFully charge batteries at least once a month, or more if you use scooter regularly.Charge after each trip exceeding 3 kilometers.If storing your scooter for some time (1 month or more), make sure that batteries arefully charged, and on returning, charge them again before using scooter.Batteries will only give maximum performance after scooter has been used, and batterieshave been recharged up to 10 times. A bit like breaking in a new car.12
8-<strong>Series</strong><strong>Instruction</strong> <strong>Booklet</strong>CARE AND MAINTENANCECleaning Your ScooterIf your scooter is dirty, use a damp or lightly soapy cloth to wipe it down. Do not use runningwater to wash or rinse scooter in order to protect electrical parts. Polish with an automotiveliquid polish.Maintaining Your ScooterAll maintenance and repair of scooter should be done by an authorized dealer.The following areas required periodic inspection:Tire pressure between 30-50 lbsAll electrical connections are firmly attachedStoring Your ScooterBetween uses, your scooter is best stored in a dry location.13
8-<strong>Series</strong><strong>Instruction</strong> <strong>Booklet</strong>TROUBLESHOOTINGHere are some suggestions about solving problems you may have with your scooter. Thereis a Self-Diagnostic Warning Light on the Control Panel. To check the Self-DiagnosticWarning Light, turn on the key and count the number of blinks on the Warning Light.Number ofFlashes123456789ProblemBattery needsrechargingBattery voltage too lowto operate scooterBattery voltage too highShort in motorBrake malfunctionThumb lever not inneutralThumb lever malfunctionMotor problemsOther internal errorsSolutionRecharge the batteries soon.Must recharge before using. Checkbattery condition and connections.Check battery condition and connections.Contact your authorized dealer to checkyour battery charger.Contact your authorized dealer.Contact your authorized dealer.Contact your authorized dealer.Contact your authorized dealer.Contact your authorized dealer.Contact your authorized dealer.Other ProblemsLow tire pressure: pump up tires to 30-50 lbs.During charging, light on charger does not change to green: Contact your authorized dealer.Scooter will not move when key is turned on:1.Check Power Reserve Indicator on control panel, it should be lighting in green, yellow, andred zones.2.Check Self-Diagnostic Warning Light, it should be steady. If it is flashing, see chart abovefor problem identification.3.Check all electrical connections to be sure they are tight.4.If none of above correct problem, contact your authorized dealer.14
8-<strong>Series</strong><strong>Instruction</strong> <strong>Booklet</strong>TECHNICAL SPECIFICATIONSSPECIFICATIONS HS-850 HS-890Overall LengthOverall WidthOverall HeightWheels: FrontWheels: RearWeight w/ BatteriesMax. SpeedWeight CapacityGround ClearanceGrade ClimbableCurb ClimbingTurning RadiusSuspensionBrake57.1"27"42.9"13"13"214 lbs9.3 mph450 lbs3.3"12 degree2.4"68.1"Front & RearElectro-Mechanical60.2"27"42.1"13"13"251 lbs8 mph500 lbs3.3"10 degree2.8"68.1"Front & RearElectro-MechanicalSeat TypeSliding and Swivel RecliningCaptain W/HeadrestSeat WidthMotor SizeBattery SizeBattery WeightTravel RangeBattery Charger19"700W 5400r.p.m(2) 12V . 50Ah69 lbs23.4 Miles5A Off Board22"700W 5400r.p.m(2) 12V . 50Ah69 lbs23.4 Miles5A Off BoardElectronicsOn/Off Key Switch, Battery Level Indicator,Speed Control Knob*Subject to change without notice.15