IGS6-10 GSM Interface Unit Siemens Add-on Modem for Sintony 60 ...
IGS6-10 GSM Interface Unit Siemens Add-on Modem for Sintony 60 ...
IGS6-10 GSM Interface Unit Siemens Add-on Modem for Sintony 60 ...
- No tags were found...

Create successful ePaper yourself
Turn your PDF publications into a flip-book with our unique Google optimized e-Paper software.
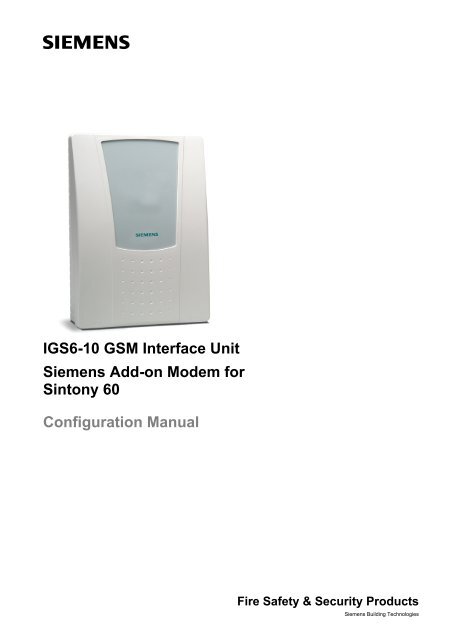
<str<strong>on</strong>g>IGS6</str<strong>on</strong>g>-<str<strong>on</strong>g>10</str<strong>on</strong>g> <str<strong>on</strong>g>GSM</str<strong>on</strong>g> <str<strong>on</strong>g>Interface</str<strong>on</strong>g> <str<strong>on</strong>g>Unit</str<strong>on</strong>g><str<strong>on</strong>g>Siemens</str<strong>on</strong>g> <str<strong>on</strong>g>Add</str<strong>on</strong>g>-<strong>on</strong> <strong>Modem</strong> <strong>for</strong>Sint<strong>on</strong>y <strong>60</strong>C<strong>on</strong>figurati<strong>on</strong> ManualFire Safety & Security Products<str<strong>on</strong>g>Siemens</str<strong>on</strong>g> Building Technologies
Liefermöglichkeiten und technische Änderungen vorbehalten.Data and design subject to change without notice. / Supply subject to availability.© 2007 Copyright by<str<strong>on</strong>g>Siemens</str<strong>on</strong>g> Building TechnologiesWir behalten uns alle Rechte an diesem Dokument und an dem in ihm dargestellten Gegenstand vor. Der Empfänger erkennt diese Rechtean und wird dieses Dokument nicht ohne unsere vorgängige schriftliche Ermächtigung ganz oder teilweise Dritten zugänglich machen oderaußerhalb des Zweckes verwenden, zu dem es ihm übergeben worden ist.We reserve all rights in this document and in the subject thereof. By acceptance of the document the recipient acknowledges these rightsand undertakes not to publish the document nor the subject thereof in full or in part, nor to make them available to any third party without ourprior express written authorizati<strong>on</strong>, nor to use it <strong>for</strong> any purpose other than <strong>for</strong> which it was delivered to him.
4<str<strong>on</strong>g>Siemens</str<strong>on</strong>g> Building TechnologiesFire Safety & Security Products 12.2007
Product descripti<strong>on</strong>1 Product descripti<strong>on</strong>The <str<strong>on</strong>g>IGS6</str<strong>on</strong>g>-<str<strong>on</strong>g>10</str<strong>on</strong>g> is a <str<strong>on</strong>g>GSM</str<strong>on</strong>g> add-<strong>on</strong> modem. It c<strong>on</strong>nects to the Sint<strong>on</strong>y bus and canfuncti<strong>on</strong> as a sec<strong>on</strong>d dialer or backup dialer to the <strong>on</strong>e in the c<strong>on</strong>trol panel.When an event or alarm takes place the unit can either report to a central stati<strong>on</strong> orsend an SMS message to a cellular ph<strong>on</strong>e.The following reporting media can be used simultaneously:Reporting media Reporting <strong>for</strong>matTCP/IPCIDGPRSCID<str<strong>on</strong>g>GSM</str<strong>on</strong>g>SMSFeatures• Full report <strong>for</strong> all the events of the IC<strong>60</strong>.• Reporting <strong>for</strong>mats in CID and SMS.• Reporting up to 4 subscriber ph<strong>on</strong>es in each <strong>for</strong>mat.• Communicati<strong>on</strong> via <str<strong>on</strong>g>GSM</str<strong>on</strong>g> Quad Band 900 / 1800 MHz or 850 / 1900 MHz based<strong>on</strong> <str<strong>on</strong>g>Siemens</str<strong>on</strong>g> TC63 engine.• Rechargeable lead acid 12 V/1.3 Ah backup battery.• Tamper alarm is triggered if cover is opened or the unit is torn from the wall.• Programming the unit by a PC via USB Port and via GPRS.• Two operati<strong>on</strong> modes: 1. Backup <strong>for</strong> the c<strong>on</strong>trol panel dialer.2. Parallel reporting channel.<str<strong>on</strong>g>Siemens</str<strong>on</strong>g> Building TechnologiesFire Safety & Security Products 12.20075
Technical data2 Technical dataRadio frequencyOperating frequency850 MHz, 900 MHz, 1800 MHz, 1900 MHzOutput powerClass 4 E<str<strong>on</strong>g>GSM</str<strong>on</strong>g>850: 2 WClass 4 E<str<strong>on</strong>g>GSM</str<strong>on</strong>g>900: 2 WClass 1 E<str<strong>on</strong>g>GSM</str<strong>on</strong>g>1800: 1 WClass 1 E<str<strong>on</strong>g>GSM</str<strong>on</strong>g>1900: 1 WGPRS multi-slot class 12<strong>Modem</strong> Type<str<strong>on</strong>g>GSM</str<strong>on</strong>g> Quad-BandInternal AntennaTri-BandCommunicati<strong>on</strong> servicesTCP/IPStack access via AT commandsInternet servicesTCP, UDP, HTTP, FTP, SMTP, POP3<str<strong>on</strong>g>GSM</str<strong>on</strong>g> Report ModesTCP/IP over CIDGPRS over CID<str<strong>on</strong>g>GSM</str<strong>on</strong>g> over SMS<str<strong>on</strong>g>Interface</str<strong>on</strong>g>sAntenna c<strong>on</strong>nectorU.FL-R-SMTSIM card3 V, 1.8 VBusIC<strong>60</strong>Power c<strong>on</strong>sumpti<strong>on</strong>Power supply<str<strong>on</strong>g>10</str<strong>on</strong>g>.5 - 14.5 V DCBattery12 V 1.3 Ah Lead AcidCurrent c<strong>on</strong>sumpti<strong>on</strong> Standby: <str<strong>on</strong>g>10</str<strong>on</strong>g>0 mA Max. 200 mABattery charging c<strong>on</strong>trolCurrent limited 2<strong>60</strong> mA, 1.6 A fuse protectedInputs 1& 2Reprogrammed SMSOutput 1Active "Low" while there is a network error (<str<strong>on</strong>g>GSM</str<strong>on</strong>g>fail, low RSSI)Envir<strong>on</strong>mental c<strong>on</strong>diti<strong>on</strong>s:Operati<strong>on</strong> temperature -<str<strong>on</strong>g>10</str<strong>on</strong>g> to +50 °CStorage temperature -20 to +<strong>60</strong> °CHumidity (EN<strong>60</strong>721)< 85 % r.h., n<strong>on</strong> c<strong>on</strong>densingApprovalsR&TTE, FCC, UL, IC, GCF, PTCRB, CE, Localapprovals and network operator certificati<strong>on</strong>s6<str<strong>on</strong>g>Siemens</str<strong>on</strong>g> Building TechnologiesFire Safety & Security Products 12.2007
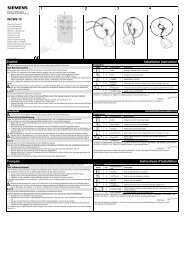
C<strong>on</strong>necti<strong>on</strong>s3 C<strong>on</strong>necti<strong>on</strong>s1NET: turns green when there is communicati<strong>on</strong> with TCP/IP server.Status LEDsBUS: blinks yellow <strong>on</strong> BUS communicati<strong>on</strong> with c<strong>on</strong>trol panel.FAIL: Blinks or stable in red <strong>on</strong> network error (problem with SIM card,<str<strong>on</strong>g>GSM</str<strong>on</strong>g> network…).2 SIM card holder SIM card used <strong>for</strong> the <str<strong>on</strong>g>GSM</str<strong>on</strong>g> modem.3 Antenna Cellular ph<strong>on</strong>e antenna c<strong>on</strong>nector.4 Tamper Switch Activates alarm if cover is removed.5 Program C<strong>on</strong>nector C<strong>on</strong>nector <strong>for</strong> c<strong>on</strong>necting the inputs and outputs.6 CONFIG PORT 1 Serial port and c<strong>on</strong>nects to a PC or laptop.7 Battery C<strong>on</strong>nector Backup rechargeable battery 12 V/1.3 Ah lead acid.8 Bus C<strong>on</strong>nector For communicati<strong>on</strong> with the c<strong>on</strong>trol panel.9 Power LED Red when power ok.<str<strong>on</strong>g>10</str<strong>on</strong>g> <str<strong>on</strong>g>GSM</str<strong>on</strong>g> modem <str<strong>on</strong>g>Siemens</str<strong>on</strong>g> TC63 <str<strong>on</strong>g>GSM</str<strong>on</strong>g> modem11 <str<strong>on</strong>g>GSM</str<strong>on</strong>g> Service LED Blinks yellow when <str<strong>on</strong>g>GSM</str<strong>on</strong>g> service c<strong>on</strong>nected.12 Output 1&213 Terminal block Gnd14Input 1&2<str<strong>on</strong>g>Siemens</str<strong>on</strong>g> Building TechnologiesFire Safety & Security Products 12.20077
Pre-installati<strong>on</strong> requirements4 Pre-installati<strong>on</strong> requirements4.1 Cellular accountYou need to open a cellular account with your cellular service provider to enablethe cellular gateway module <strong>on</strong> your unit.On opening the account you receive the following:– A cell-ph<strong>on</strong>e number– <str<strong>on</strong>g>GSM</str<strong>on</strong>g>/GPRS SIM card4.2 SIM cardWhen ordering the <str<strong>on</strong>g>GSM</str<strong>on</strong>g>/GPRS SIM card, be sure to specify to the cellular serviceprovider that the SIM card needs to be activated <strong>for</strong> GPRS data services (unlocked).In some locati<strong>on</strong>s you might receive a password <strong>for</strong> this, and maybe even adifferent number.4.3 TCP / IPThe IP functi<strong>on</strong>ality is designed <strong>for</strong> use with a CMS and requires support from CSC.For TCP/IP c<strong>on</strong>necti<strong>on</strong> you need:– APN (Access Point Name)APN is the name of an access point <strong>for</strong> GPRS. It identifies an external networkthat is accessible from a terminal. An APN has several attributes associated withit that define how you can access the external network at that point.Speak to your local service provider to get the ATN of your network.– IP of target receiver.4.4 Hardware– PC or laptop with a USB port4.5 Software– Windows XP or VISTA8<str<strong>on</strong>g>Siemens</str<strong>on</strong>g> Building TechnologiesFire Safety & Security Products 12.2007
Installati<strong>on</strong>5 Installati<strong>on</strong>5.1 C<strong>on</strong>figurati<strong>on</strong> software1. Double Click the installati<strong>on</strong> file. The InstallShield Wizard opens.2. Choose the destinati<strong>on</strong> locati<strong>on</strong>.3. Click Next. The installati<strong>on</strong> starts.4. After the installati<strong>on</strong> click Finish. The c<strong>on</strong>figurati<strong>on</strong> software <str<strong>on</strong>g>IGS6</str<strong>on</strong>g>-<str<strong>on</strong>g>10</str<strong>on</strong>g> is installed.<str<strong>on</strong>g>Siemens</str<strong>on</strong>g> Building TechnologiesFire Safety & Security Products 12.20079
Installati<strong>on</strong>5.2 <str<strong>on</strong>g>Unit</str<strong>on</strong>g>• Be<strong>for</strong>e installing the hardware we str<strong>on</strong>gly recommend that you pre-program the unit. This is d<strong>on</strong>eusing a PC or a laptop running the c<strong>on</strong>figurati<strong>on</strong> program and using the USB cable supplied.• If the <str<strong>on</strong>g>GSM</str<strong>on</strong>g> unit is installed as a backup module, it should be installed at another locati<strong>on</strong> than thepanel.Disc<strong>on</strong>nect the mains and the backup battery.1. Choose a suitable locati<strong>on</strong> <strong>for</strong> the unit within 1 to 20 meters from the IC<strong>60</strong>.Thelocati<strong>on</strong> must be within the secured area.2. Using the paper template drill 4 holes in the wall to mount the unit.3. Using four screws, fix the unit to the wall.4. C<strong>on</strong>nect the unit to the Sint<strong>on</strong>y bus: POS, NEG, CLK, DATA(see secti<strong>on</strong> 3: C<strong>on</strong>necti<strong>on</strong>s).• If external power supply is used to power the <str<strong>on</strong>g>IGS6</str<strong>on</strong>g>-<str<strong>on</strong>g>10</str<strong>on</strong>g>, the GND of the bus (from c<strong>on</strong>trol panel)must be c<strong>on</strong>nected with the GND of the external power supply.• The 2 wires are c<strong>on</strong>nected <strong>on</strong> the same terminal (NEG).5. Insert the SIM card into the SIM card housing.6. Verify that the antenna is c<strong>on</strong>nected.7. Power <strong>on</strong> the IC<strong>60</strong>.8. C<strong>on</strong>nect the backup battery.<str<strong>on</strong>g>10</str<strong>on</strong>g><str<strong>on</strong>g>Siemens</str<strong>on</strong>g> Building TechnologiesFire Safety & Security Products 12.2007
C<strong>on</strong>figure the unit6.3 C<strong>on</strong>figurati<strong>on</strong> methodsThere are 2 ways to c<strong>on</strong>figure the modem:– Local c<strong>on</strong>trol via COM: <strong>for</strong> c<strong>on</strong>figurati<strong>on</strong> via local PC (USB).– C<strong>on</strong>trol modem via Data Link: <strong>for</strong> remote c<strong>on</strong>figurati<strong>on</strong> via <str<strong>on</strong>g>GSM</str<strong>on</strong>g> data call12Fig. 1C<strong>on</strong>figurati<strong>on</strong> method6.3.1 Local c<strong>on</strong>trol via COMFig. 2C<strong>on</strong>figurati<strong>on</strong> method: Local c<strong>on</strong>trol via COM PortPrerequisites:• The USB cable is c<strong>on</strong>nected.1. Start the program.2. Press the butt<strong>on</strong> Local c<strong>on</strong>trol via COM (see Fig. 1).3. Press Next.12<str<strong>on</strong>g>Siemens</str<strong>on</strong>g> Building TechnologiesFire Safety & Security Products 12.2007
C<strong>on</strong>figure the unit6.3.2 Remote mode c<strong>on</strong>figurati<strong>on</strong>Disc<strong>on</strong>nect the master unit (the modem you are dialing from) from the keypad bus of the IC<strong>60</strong>.Fig. 3C<strong>on</strong>figurati<strong>on</strong> method: Remote mode c<strong>on</strong>figurati<strong>on</strong>Prerequisites:• The SIM card has been inserted in both modems.• A network c<strong>on</strong>necti<strong>on</strong> is established.• The access code is available.Be<strong>for</strong>e making a remote c<strong>on</strong>figurati<strong>on</strong>, a local c<strong>on</strong>figurati<strong>on</strong> has to be made using the USB cable (seechapter 6.4.1: Local c<strong>on</strong>trol via COM).1. Start the program.2. Press the butt<strong>on</strong> C<strong>on</strong>trol modem via Data Link (see Fig. 1, page 12).3. Enter the ph<strong>on</strong>e number of the "far end" unit (the <strong>on</strong>e that will be c<strong>on</strong>figuredremotely),4. Enter the password.5. Press Next. The modem is dialing (see also Fig. 3):<str<strong>on</strong>g>Siemens</str<strong>on</strong>g> Building TechnologiesFire Safety & Security Products 12.200713
C<strong>on</strong>figure the unit6.4 ProtocolsThe following protocols can be used simultaneously:Reporting Reporting <strong>for</strong>mat Reporting priority Symbol Secti<strong>on</strong>mediaTCP/IP CID 1 6.4.1GPRS CID 2 6.4.2<str<strong>on</strong>g>GSM</str<strong>on</strong>g> SMS 3 6.4.3If both <str<strong>on</strong>g>GSM</str<strong>on</strong>g> and TCP/IP protocols are selected, the data will be sent <strong>on</strong>ly via TCP/IP. If TCP/IP fails,the data will be sent via <str<strong>on</strong>g>GSM</str<strong>on</strong>g>.1. Select the required protocols from the Available protocols.2. Move it to the Selected protocols by pressing . The required protocols re listed in the field Selected protocols.The order of c<strong>on</strong>figurati<strong>on</strong> windows depends <strong>on</strong> the order of the protocols in the selected protocols list.I.e. if the order of the protocols is TCP/IP, SMS, and CID so the first c<strong>on</strong>figurati<strong>on</strong> window will beInternet c<strong>on</strong>figurati<strong>on</strong>, the sec<strong>on</strong>d will be SMS c<strong>on</strong>figurati<strong>on</strong>, etc…3. Click the butt<strong>on</strong>. The modem status is displayed (in the following Fig. the firmware versi<strong>on</strong> ofthe <str<strong>on</strong>g>IGS6</str<strong>on</strong>g>-<str<strong>on</strong>g>10</str<strong>on</strong>g>, the operator and the RSSI level):14<str<strong>on</strong>g>Siemens</str<strong>on</strong>g> Building TechnologiesFire Safety & Security Products 12.2007
C<strong>on</strong>figure the unitIf there is a network error (see secti<strong>on</strong> 3: C<strong>on</strong>necti<strong>on</strong>s), this window pops up automatically.4. Click OK. The window will be closed<str<strong>on</strong>g>Siemens</str<strong>on</strong>g> Building TechnologiesFire Safety & Security Products 12.200715
C<strong>on</strong>figure the unit6.4.1 TCP/IPPrerequisites:• APN (see secti<strong>on</strong> 4.3: TCP / IP) of your service provider.• Domain name or an IP address.1. Click the butt<strong>on</strong>. The window Internet c<strong>on</strong>figurati<strong>on</strong> will open:Fig. 4Internet C<strong>on</strong>figurati<strong>on</strong>Butt<strong>on</strong> or FieldAccess point nameEvent’s table<str<strong>on</strong>g>Add</str<strong>on</strong>g>RemovePropertiesUpDownDescripti<strong>on</strong>Displays the internet service provider (APN address)Displays the available events to trigger the <str<strong>on</strong>g>IGS6</str<strong>on</strong>g>-<str<strong>on</strong>g>10</str<strong>on</strong>g> modem.<str<strong>on</strong>g>Add</str<strong>on</strong>g> a new entry to the list.Removes an unwanted number.Edit the existing account and IP <str<strong>on</strong>g>Add</str<strong>on</strong>g>ress (or ph<strong>on</strong>e number)The top number is dialed first and if unavailable c<strong>on</strong>tinues to the next insequence. Use these butt<strong>on</strong>s to move the numbers up and down the listso that you can place them in the required sequence.There are 2 ways to operate the <str<strong>on</strong>g>IGS6</str<strong>on</strong>g>-<str<strong>on</strong>g>10</str<strong>on</strong>g> modem:– As backup– IndependentlyBackupThe backup will operate at the following cases:• Physical loss of ph<strong>on</strong>e line.• Dialer: Unanswered.• Dialer: No Kiss-off.If you want the <str<strong>on</strong>g>IGS6</str<strong>on</strong>g>-<str<strong>on</strong>g>10</str<strong>on</strong>g> modem to operate <strong>on</strong>ly as backup to PSTN and the integrateddialer of the IC<strong>60</strong>:2. Disable the setting “Enable Dialer: P175E 1E in the IC<strong>60</strong>.3. Select the checkbox Only while PSTN Fail/Dialer Failure! (this opti<strong>on</strong> can bechecked separately <strong>for</strong> every protocol).16<str<strong>on</strong>g>Siemens</str<strong>on</strong>g> Building TechnologiesFire Safety & Security Products 12.2007
IndependentlyC<strong>on</strong>figure the unitIf you want the <str<strong>on</strong>g>IGS6</str<strong>on</strong>g>-<str<strong>on</strong>g>10</str<strong>on</strong>g> modem unit to operate independently of the PSTN of thec<strong>on</strong>trol panel:4. Uncheck the checkbox Only while PSTN Fail/Dialer Failure! The <str<strong>on</strong>g>IGS6</str<strong>on</strong>g>-<str<strong>on</strong>g>10</str<strong>on</strong>g> unit will transmit the events together with the teleph<strong>on</strong>e line ofthe c<strong>on</strong>trol panel.5. To add new IP addresses click the butt<strong>on</strong> .6. Enter a 4 digit ID number <strong>for</strong> the <str<strong>on</strong>g>IGS6</str<strong>on</strong>g>-<str<strong>on</strong>g>10</str<strong>on</strong>g> modem in the account field.7. In the next field enter a domain name or an IP address.8. Click the butt<strong>on</strong> . The new IP address has been added to the list.9. Enter the Access point name (APN) of your service provider.<str<strong>on</strong>g>10</str<strong>on</strong>g>. To add events to trigger a transmissi<strong>on</strong> click the butt<strong>on</strong> . The window Event ListView opens:<str<strong>on</strong>g>Siemens</str<strong>on</strong>g> Building TechnologiesFire Safety & Security Products 12.200717
C<strong>on</strong>figure the unitFig. 5Events in simple modeThere are two modes:• Simple mode: The available events list has <strong>on</strong>ly comm<strong>on</strong> events (see Fig. 5).• Advanced mode: The available events list has all events (Fig. 6).Fig. 6Events in advanced mode18<str<strong>on</strong>g>Siemens</str<strong>on</strong>g> Building TechnologiesFire Safety & Security Products 12.2007
C<strong>on</strong>figure the unit11. Choose a mode.12. Double-click an event from the Available events list-OR-Select <strong>on</strong>e and then click the butt<strong>on</strong> . Multiple events are now shown in the field Events to send. Any <strong>on</strong>e of theseevents causes the <str<strong>on</strong>g>IGS6</str<strong>on</strong>g>-<str<strong>on</strong>g>10</str<strong>on</strong>g> modem (if enabled) to transmit the event in<strong>for</strong>mati<strong>on</strong>.13. To load a c<strong>on</strong>figurati<strong>on</strong>: click the butt<strong>on</strong> .14. To save the current c<strong>on</strong>figurati<strong>on</strong> <strong>on</strong> your PC: click the butt<strong>on</strong> .You can make multiple c<strong>on</strong>figurati<strong>on</strong>s and save them <strong>on</strong> your PC. Speak with your service providerwhich typical data should be saved.15. Click the butt<strong>on</strong> . The Internet c<strong>on</strong>figurati<strong>on</strong> is complete.6.4.2 C<strong>on</strong>tact ID c<strong>on</strong>figurati<strong>on</strong>1. Click the butt<strong>on</strong> . The window C<strong>on</strong>tact ID c<strong>on</strong>figurati<strong>on</strong> opens.Fig. 7C<strong>on</strong>tact ID c<strong>on</strong>figurati<strong>on</strong>2. C<strong>on</strong>figure the window C<strong>on</strong>tact ID c<strong>on</strong>figurati<strong>on</strong> as described in secti<strong>on</strong>6.4.1. Excepti<strong>on</strong>: Entry of APN not required.<str<strong>on</strong>g>Siemens</str<strong>on</strong>g> Building TechnologiesFire Safety & Security Products 12.200719
C<strong>on</strong>figure the unit6.4.3 SMS c<strong>on</strong>figurati<strong>on</strong>1. Click the butt<strong>on</strong> . The window SMS c<strong>on</strong>figurati<strong>on</strong> opens:Fig. 8SMS c<strong>on</strong>figurati<strong>on</strong>2. C<strong>on</strong>figure the window SMS c<strong>on</strong>figurati<strong>on</strong> as described in secti<strong>on</strong> 6.4.1.Excepti<strong>on</strong>:– Entry of APN not required.– Instead of a domain name or IP address you have to enter a teleph<strong>on</strong>enumber.The SMS texts are in standard text and in English <strong>on</strong>ly.20<str<strong>on</strong>g>Siemens</str<strong>on</strong>g> Building TechnologiesFire Safety & Security Products 12.2007
C<strong>on</strong>figure the unit6.5 Remote access c<strong>on</strong>figurati<strong>on</strong>In this window you can setup the remote c<strong>on</strong>figurati<strong>on</strong>.There are 2 security levels:• Only password• Password and teleph<strong>on</strong>e number. The teleph<strong>on</strong>e number will be used to getc<strong>on</strong>necti<strong>on</strong> from the local unit to this unit, in order to figure this unit remotely.Make sure that your teleph<strong>on</strong>e can display the incoming ph<strong>on</strong>e number.1. Click the butt<strong>on</strong> . The window Remote access c<strong>on</strong>figurati<strong>on</strong> opens:2. If remote access is not to be allowed, press the butt<strong>on</strong> Remote access disable.3. If the authenticati<strong>on</strong> requires a password, press the butt<strong>on</strong> Check password. The window Enter password opens:If previously no password was used, the field old password will not appear.<str<strong>on</strong>g>Siemens</str<strong>on</strong>g> Building TechnologiesFire Safety & Security Products 12.200721
C<strong>on</strong>figure the unit4. Enter the desired password (max. 14 characters).5. If the authenticati<strong>on</strong> requires a password and a ph<strong>on</strong>e number, press the butt<strong>on</strong>Check password and ph<strong>on</strong>e number. The window <str<strong>on</strong>g>Add</str<strong>on</strong>g> ph<strong>on</strong>e number opens:6. Enter the desired password (max. 9 characters).7. Enter the ph<strong>on</strong>e number.8. To erase the password at this entry remove the ph<strong>on</strong>e number from the list.9. Click the butt<strong>on</strong> . You will get back to the c<strong>on</strong>figurati<strong>on</strong> window.22<str<strong>on</strong>g>Siemens</str<strong>on</strong>g> Building TechnologiesFire Safety & Security Products 12.2007
C<strong>on</strong>figure the unit6.6 Fast SMS c<strong>on</strong>figurati<strong>on</strong>This is the window to customize the SMS that will be triggered at Input 1.When Input 1 is shorted to ground (pulse), the custom SMS will be sent to theph<strong>on</strong>e number entered in the SMS c<strong>on</strong>figurati<strong>on</strong> window. If the SMS protocol is notselected in the field Selected protocols, then no SMS will be sent.As an additi<strong>on</strong>al feature, when this input is shorted to ground, an event "GeneralAlarm" will be sent in CID (number 140), beside the custom SMS.For the CID event to be sent, select the CID protocol in the field Selectedprotocols. This event will be sent to the ph<strong>on</strong>e numbers entered in the c<strong>on</strong>tact IDc<strong>on</strong>figurati<strong>on</strong> window. If there was a kiss-off of this event, the reporting will stop. Ifthere wasn't a kiss-off of this event, the event will be reported to the next ph<strong>on</strong>enumber (if there is any). If you leave these fields blank, then no SMS and no CIDwill be sent.1. Click the butt<strong>on</strong> . The window Fast SMS opens.2. Make you c<strong>on</strong>figurati<strong>on</strong>.3. Click the butt<strong>on</strong> . The c<strong>on</strong>figurati<strong>on</strong> is finished.<str<strong>on</strong>g>Siemens</str<strong>on</strong>g> Building TechnologiesFire Safety & Security Products 12.200723
Issued by<str<strong>on</strong>g>Siemens</str<strong>on</strong>g> Building TechnologiesFire & Security Products GmbH & Co. oHGD-76181 Karlsruhewww.siemens.com/homesecurity© 2007 Copyright by<str<strong>on</strong>g>Siemens</str<strong>on</strong>g> Building TechnologiesData and design subject to change without notice.Supply subject to availability.Document no. A6V<str<strong>on</strong>g>10</str<strong>on</strong>g>075156Editi<strong>on</strong> 12.2007