gcf drive assembly gcf41-61 - Gearmore, Inc.
gcf drive assembly gcf41-61 - Gearmore, Inc.
gcf drive assembly gcf41-61 - Gearmore, Inc.
- No tags were found...

Create successful ePaper yourself
Turn your PDF publications into a flip-book with our unique Google optimized e-Paper software.
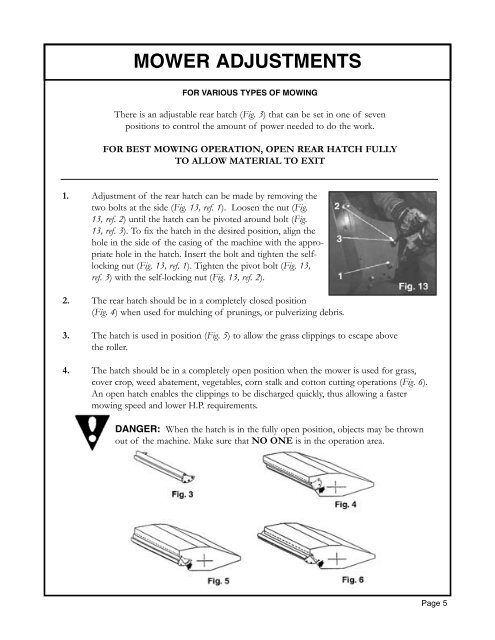
MOWER ADJUSTMENTSFOR VARIOUS TYPES OF MOWINGThere is an adjustable rear hatch (Fig. 3) that can be set in one of sevenpositions to control the amount of power needed to do the work.FOR BEST MOWING OPERATION, OPEN REAR HATCH FULLYTO ALLOW MATERIAL TO EXIT1. Adjustment of the rear hatch can be made by removing thetwo bolts at the side (Fig. 13, ref. 1). Loosen the nut (Fig.13, ref. 2) until the hatch can be pivoted around bolt (Fig.13, ref. 3). To fix the hatch in the desired position, align thehole in the side of the casing of the machine with the appropriatehole in the hatch. Insert the bolt and tighten the selflockingnut (Fig. 13, ref. 1). Tighten the pivot bolt (Fig. 13,ref. 3) with the self-locking nut (Fig. 13, ref. 2).2. The rear hatch should be in a completely closed position(Fig. 4) when used for mulching of prunings, or pulverizing debris.3. The hatch is used in position (Fig. 5) to allow the grass clippings to escape abovethe roller.4. The hatch should be in a completely open position when the mower is used for grass,cover crop, weed abatement, vegetables, corn stalk and cotton cutting operations (Fig. 6).An open hatch enables the clippings to be discharged quickly, thus allowing a fastermowing speed and lower H.P. requirements.DANGER: When the hatch is in the fully open position, objects may be thrownout of the machine. Make sure that NO ONE is in the operation area.Page 5