How to Big Wall Climb
How to Big Wall Climb
How to Big Wall Climb
- No tags were found...

Create successful ePaper yourself
Turn your PDF publications into a flip-book with our unique Google optimized e-Paper software.
Chapter TitleAmmon McNeely makesthe first move on one of thecleanest corners on El Capitan:Pitch 13 of Horse ChutePho<strong>to</strong>: Chris McNamara2FOR CURRENT GEAR INFORMATION, VISIT WWW.SUPERTOPO.COM
<strong>How</strong> <strong>to</strong><strong>Big</strong> <strong>Wall</strong> <strong>Climb</strong>by Chris McNamara
Warning<strong>Climb</strong>ing is an inherently dangerous sport in which severe injuries or deathmay occur. Relying on the information in this book may increase the danger.When climbing you can only rely on your skill, training, experience, and conditioning. If youhave any doubts as <strong>to</strong> your ability <strong>to</strong> safely use any information in this book, do not try it.This book is neither a professional climbing instruc<strong>to</strong>r nor a substitute for one. It containsinformation that is nothing more than a compilation of opinions about climbing. Theseopinions are neither facts nor promises. Treat the information as opinions and nothing more.Do not substitute these opinions for your own common sense and experience.Assumption of RiskThere may be errors in this book resulting from the mistakes of the author and/or the peoplewith whom he consulted. The information was gathered from a variety of sources, which maynot have been independently verified. Those who provided the information may have mademistakes in their descriptions. The author may have made mistakes in their conveyance of theinformation in this book. The author cannot, therefore, guarantee the correctness of any of theinformation contained in this book. The suggestions about equipment, technique, and othermatters may be incorrect or misleading. You must keep in mind that the information in thisbook may be erroneous, so use your own judgement when using information described in thisbook.DO NOT USE THIS BOOK UNLESS YOU [AND YOUR ESTATE] PROMISE NEVER TOTRY TO SUE US IF YOU GET HURT OR KILLED.Disclaimer of WarrantiesTHE AUTHOR AND PUBLISHER WARN THAT THIS BOOK CONTAINS ONLY THEAUTHOR’S OPINIONS ON THE SUBJECTS DISCUSSED. THEY MAKE NO OTHERWARRANTIES, EXPRESSED OR IMPLIED, OF MERCHANTABILITY, FITNESS FORPURPOSE, OR OTHERWISE, AND IN ANY EVENT, THEIR LIABILITY FOR BREACHOF ANY WARRANTY OR CONTRACT WITH RESPECT TO THE CONTENT OF THISBOOK IS LIMITED TO THE PURCHASE PRICE OF THE BOOK. THEY FURTHER LIMITTO SUCH PURCHASE PRICE THEIR LIABILITY ON ACCOUNT OF ANY KIND OFNEGLIGENT BEHAVIOR WHATSOEVER ON THEIR PART WITH RESPECT TO THECONTENTS OF THIS BOOK.4FOR CURRENT GEAR INFORMATION, VISIT WWW.SUPERTOPO.COM
Mark Melvin on the RubberBand Man Pendulum, SouthSeas, during the first GirdleTraverse of El Capitan.Pho<strong>to</strong>: Chris McNamaraFOR CURRENT GEAR INFORMATION, VISIT WWW.SUPERTOPO.COM5
Published bySuperTopo2 Bradford WayMill Valley, CA 94941www.super<strong>to</strong>po.comCopyright 2012 by SuperTopoAll rights reserved.No part of this book may be reproduced in any form, or by any electronic mechanical or othermeans, without permission in writing from the publisher.Design and Layout by David Safanda Design Solutions, Inc.Editing by Steve McNamaraAdvice by: Steve McNamara, Tim Parr, and Randy SpurrierCover Pho<strong>to</strong>graphyChris McNamara on a 10:58 ascent of The Shield, El Capitan.Pho<strong>to</strong> by Corey RichCover Designby David SafandaSequence pho<strong>to</strong>s by Jerry Dodrill - www.jerrydodrill.comAll uncredited pho<strong>to</strong>s by Chris McNamara.McNamara, Chris<strong>How</strong> To <strong>Big</strong> <strong>Wall</strong> <strong>Climb</strong>: SuperTopoISBN- 978-0-9833225-1-1Printed in China6FOR CURRENT GEAR INFORMATION, VISIT WWW.SUPERTOPO.COM
Table of contentsIntroduction 9My personal road <strong>to</strong> big wall climbing 19Master checklist 27Essential aid gear 35Basic leading technique 47Following – low angle 55Leading steep terrain 61Following steep terrain 67Clean aid protection 71Leading – placing protection 75Following – cleaning gear 81Building anchors 87Leading traversing terrain 91Following traversing terrain 95Hauling and the belay 103Bivy gear 115Rappelling with the bag, surviving s<strong>to</strong>rms, and retreat 119<strong>Wall</strong> Strategy: Crowds, passing, and teams of three and more 125Ratings 131Free climbing on big walls 132Speed <strong>Climb</strong>ing 134<strong>Big</strong> wall gear checklist 13911 Clean Aid Tricks 140FOR CURRENT GEAR INFORMATION, VISIT WWW.SUPERTOPO.COM7
AcknowledgementsSteve McNamara, my dad gets the most kudos for this book. He kept pushing me <strong>to</strong> finish i<strong>to</strong>ver the last decade and helped get it done by editing all the chapters. Mark Melvin got me in<strong>to</strong>wall climbing, let me borrow all his gear for my first year, and was my partner for many of mysignificant ascents. Many thanks also <strong>to</strong> Randy Spurrier, David Safanda, Tim Parr, AmmonMcNeely, and Erik Sloan as well as well as…Dick DuaneJason “Singer” SmithMatt GerdesGraeme KnightJerry DodrillDavid DouganKay McNamaraMorgan McNamaraJoe PuryearEric CotteLita CollinsAll my big wall partners and all my friendsTom EvansHans FlorineBrian PoulsenCorey RichTodd OffenbacherWayne WilloughbySuperTopo Forum Members for all the helpful comments8FOR CURRENT GEAR INFORMATION, VISIT WWW.SUPERTOPO.COM
Introduction
IntroductionIwrote this book because big wallclimbing has been the most rewardingsport in my life and I want <strong>to</strong> see morepeople succeed at it. The first time youclimb El Cap can be the hardest and scariestevent in your life. It can also be the mostadventurous, exciting, and memorable.Eighteen years later, I still clearly remembermy first trip up The Captain. And it’s stillthe single most memorable day of my life. Iwould give anything <strong>to</strong> relive that experienceagain with the same level of heightenedanticipation and adventure. But you onlyget one “first time.” So the next best thingfor me is <strong>to</strong> help other people succeed and<strong>to</strong> hear their s<strong>to</strong>ries. I love meeting peoplewho dream of climbing El Cap and whoexude that energy of half fear and half eageranticipation. You hear it in their voices. Theyknow big wall climbing will step up theirmental and physical climbing game – andthey are clearly excited about it. I hope thisbook becomes a starting point for yourown incredible adventure. And don’t forget<strong>to</strong> email me your s<strong>to</strong>ries or post them onsuper<strong>to</strong>po.com so we can all live throughthem with you.What is a big wall?A big wall is a steep multi-pitch climb thattakes most people more than a day <strong>to</strong> climb.<strong>Big</strong> walls are all about vertical exposure;climbing and sleeping with thousands of fee<strong>to</strong>f air below you and thousands of feet ofrock above you. There is nothing else like it.<strong>Big</strong> wall climbing is not about summit gloryor pulling a single hard move or savoringthe rush of adrenaline, although all three ofthose things will happen. The experience ismuch more complex and rich. You don’t flirtbriefly with gravity as you might while BASEjumping or doing a hard single pitch climb.You live with the pull of gravity and dauntingexposure 24 hours a day.Plus there are side benefits, plenty of them.All big wall climbs are in stunning mountainsettings. Usually you share the experiencewith a good friend. There is lots of timeMark Melvin on Pitch 3 of the Zodiac onthe first El Cap Girdle Traverse.10FOR CURRENT GEAR INFORMATION, VISIT WWW.SUPERTOPO.COM
Introduction<strong>to</strong> contemplate, even read, and generallyexperience the slow life.On a more philosophical level, a wall like ElCapitan is just so much bigger than we are.It’s mysterious, massive, and unforgiving.While nothing is truly static, the surface ofEl Cap is about as unmoving as anythingcan be. Because the rock changes so littleit becomes a mirror. Every fear, doubt, andjoy comes right back at you. <strong>Climb</strong>ing bigwalls is very hard, and that is exactly whatengages the people who climb them. A bigwall makes you dig deep, both physically andmentally.But isn’t aid climbing not muchfun?I have always loved the process of aidclimbing. But I am a little weird. Amongmost of the climbers who have neverclimbed a big wall, aid climbing seems likecheating, or simply not fun. I’ve heard, “Aidclimbing is like hitting your head with ahammer; it only feels good when you s<strong>to</strong>p.”Unlike my case, for most people aid climbingis a means <strong>to</strong> an end. Few of them aid climbbecause they love the process. And even Iconcede that nobody goes “aid cragging” or“aid bouldering” like they would free climba crag or a boulder. Nearly everybody aidclimbs for one basic reason: <strong>to</strong> get up bigwalls. Aid climbing is the <strong>to</strong>ol for ascendingthe most wild, massive, and inspiring facesin the world. And once you are up there, aidclimbing through the wildly overhanging lastpitch of The Nose, you won’t judge yourselfon whether it is stylish <strong>to</strong> aid climb. Youwill be <strong>to</strong>o busy relishing one of the coolestlocations and experiences of your life.Sixty percent of Nose climbersbailFrom El Cap Meadow, pho<strong>to</strong>grapher Tom“Ansel” Evans of elcapreport.com hasprobably watched more El Capitan ascentsand failures than anyone. He estimates thatabout 60 percent of the climbers who startup The Nose bail. Why? “Most climbersthink The Nose is Washing<strong>to</strong>n Column butbigger. It’s not. El Capitan is way biggerthan most people think,” says Evans. “Theyjump on The Nose without practice, sowhen the first glitch arises – and one doeson every wall – they just bail.” On a onepitchclimb or even on a 10-pitch climb likeWashing<strong>to</strong>n Column, you can make basicmistakes and still get your way up the wall.When you jump on a 30-pitch route, thoselittle mistakes and inefficiencies compoundand you have <strong>to</strong> bail. Anyone can climbThe Nose, but they need <strong>to</strong> master the aidclimbing basics and train hard.Two key pointsLike anything worthwhile, big wall climbingrequires hard work. <strong>How</strong>ever, unlikeclimbing 5.13 or bouldering V8, big wallclimbing doesn’t take heroic strength. It justrequires solid 5.9-5.10 multi-pitch skills andmaking thousands of easy moves efficiently.That is where this book comes in. It’s the first<strong>How</strong> To <strong>Big</strong> <strong>Wall</strong> book specifically organizedand clearly designed <strong>to</strong> address the processof building big wall skills, step by step.I’ve climbed more than 100 big walls andhave spent more than 400 days on ElCapitan. During my time I’ve seen lots ofpeople bail, myself included. In nearly allcases they missed the two main principles ofthis book:• Keep it simple.• Master the aid climbing basics.FOR CURRENT GEAR INFORMATION, VISIT WWW.SUPERTOPO.COM11
1 212FOR CURRENT GEAR INFORMATION, VISIT WWW.SUPERTOPO.COM
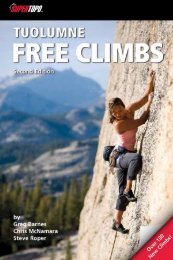
3 41 Leader leaves the belay. 2 Leadernears the <strong>to</strong>p of the pitch. 3 Leadersets up the belay and hauls the bagwhile follower prepared <strong>to</strong> cleanthe pitch. 4. Bags are hauled, pitchcleaned, and leader starts out on thenext pitch. Dawn <strong>Wall</strong>, El Capitan.Pho<strong>to</strong>s: Tom Evanswww.elcap-pics.comFOR CURRENT GEAR INFORMATION, VISIT WWW.SUPERTOPO.COM13
IntroductionI believe in reducing everything <strong>to</strong> theessentials, so that’s all I include here. I offerthe techniques that I have found helpful andomit the rest. Here’s a taste of the sort ofclimbing myths I want you <strong>to</strong> deal with:• Don’t duct tape water bottles.• Don’t use four aiders (two work best).• Don’t use oval carabiners.• Don’t bother with 3-<strong>to</strong>-1 hauling systems.My technique for hauling up huge loads ofgear is this: don’t bring huge loads. Instead,climb light and efficiently so you don’thave <strong>to</strong> bring big loads. I keep the verticalbaggage handling <strong>to</strong> a minimum. I spendtime climbing lightly and quickly over therock and spend minimum time movingluggage. If every moment an aspiring wallclimber spent figuring how <strong>to</strong> set up a 3-<strong>to</strong>-1system was instead spent mastering movingin aiders efficiently and learning <strong>to</strong> set up asimple belay, they would not need a 3-<strong>to</strong>-1 inthe first place. And a lot more people wouldsummit El Cap and enjoy the experience ofgetting there.<strong>Wall</strong> climbing is easy…sortaTechnically speaking, big wall climbingis easy. Walking up a pair of aiders is notphysically or technically demanding.Jumaring is pretty straightforward onceyou get the hang of it. Hauling is not thatcomplex. Each component of big wallclimbing is surprisingly easy. The challengecomes in two parts:1. <strong>Big</strong> walls require putting <strong>to</strong>gether a lot ofunfamiliar skills and logistics.2. These skills must be put <strong>to</strong>getherextremely efficiently and everything muststay organized.These two challenges can be overcome byone simple principle: master the aid climbingbasics. That is what this book is all about, astep-by-step guide <strong>to</strong> mastering the basics. Ifyou do that, all the little aid climbing trickswill fall effortlessly in<strong>to</strong> place.Don’t be a vertical baggagehandlerPersonally, I don’t just want <strong>to</strong> get <strong>to</strong> the <strong>to</strong>pof El Cap. I want <strong>to</strong> enjoy the climb and wallexperience, spending as little time as possibledealing with haul bags and gear clusters.Maybe one day there will be a portable hotair balloon for wall climbers. All the gear,water, beer, and fish tacos you need will floatjust a few feet away from you and effortlesslyfollow you up the wall. But until that dayarrives we must deal with a brutal fact: weneed a lot of water <strong>to</strong> stay alive and water isheavy. Conservatively, we need a gallon perperson, per day when wall climbing and agallon of water weighs eight pounds. So on afive-day climb of El Cap:8 lbs. x 2 people x 5 days = 80 lbs.Add another two pounds per person perday for food, 20 pounds in bivy supplies andyour haul bag might tip 120 pounds at lif<strong>to</strong>ff.Can you say Sufferfest?Beyond sufferingEven beyond the suffering issue of movingbags up a wall, there are other reasons <strong>to</strong>climb efficiently• <strong>Climb</strong>ing efficiently keeps you safe frombad weather. You will be better able <strong>to</strong>“turn on the gas” and summit before anoncoming s<strong>to</strong>rm, or at least make it <strong>to</strong> amore sheltered bivy spot. Most climberswho die on El Cap do so because theyget caught in s<strong>to</strong>rms, often just a fewpitches from the <strong>to</strong>p. Weather forecastswon’t protect you because most weatherforecasts in mountain areas are only goodfor a few days. Read John Dill’s “StayingAlive” at http://www.super<strong>to</strong>po.com/<strong>to</strong>pos/yosemite/stayalive.pdf14FOR CURRENT GEAR INFORMATION, VISIT WWW.SUPERTOPO.COM
Introduction• <strong>Climb</strong>ing efficiently is more fun. You get<strong>to</strong> sleep on the ledge you want <strong>to</strong>, not theone forced on you by circumstance andvanishing sunlight. Or, worse, having <strong>to</strong>spend the night standing in aiders.• <strong>Climb</strong>ing efficiently is taking the rightamount of water and food – not way <strong>to</strong>omuch or way <strong>to</strong>o little.Sneak Peak: Examples ofefficient climbing covered in thebook• Use two aiders instead of four.• Aid like you free climb.• Spend your time at belays keeping thingsorganized and visualizing what <strong>to</strong> do oncethe leader is ready <strong>to</strong> haul.• When leading, always move <strong>to</strong> the <strong>to</strong>p stepor second step.• Clean with two slings that can be handed<strong>to</strong> the leader, instead of handing over eachpiece one by one.Efficient climbing, not speedclimbing<strong>Climb</strong>ing The Nose in two bivies insteadof four does not mean becoming a franticspeed climber. You don’t have <strong>to</strong> rush everymove, frantically scream at your partner <strong>to</strong>jumar faster, and take more chances whenyou’re leading. You just need <strong>to</strong> streamlineyour systems and have the aid basics dialed.If you read and practice the techniques inthis book, you will cut out the hours lost <strong>to</strong>inefficiency that the typical big wall teamendures and instead wonder why you everclimbed walls any other way.TWO CLIMBING SCENARIOS:Just <strong>to</strong> drive home this critical point, let’slook at climbing The Nose route on El Capunder two different scenarios.First the Sufferfest Way, thesurprisingly common way thatit’s donePrep Day – <strong>Climb</strong> slowly <strong>to</strong> The Sickle witha few parties nipping on your heels, trying<strong>to</strong> pass you. Spend all afternoon and in<strong>to</strong> thenight bringing up heavy haul bags.Day 1 – Get bogged down in the S<strong>to</strong>velegsdue <strong>to</strong> heavy loads. You’re so tired from thehauling that you have <strong>to</strong> aid climb cracksthat you had planned <strong>to</strong> free climb. Bummer.Make it <strong>to</strong> Dolt Tower after dark with littletime <strong>to</strong> dial in a nice bivy, let alone kickback and appreciate the amazing ledge andlocation.Day 2 – Wake up exhausted with workedhands from all the hauling. So far the climbhasn’t been much fun. You and your partnereach hope the other comes up with a goodexcuse <strong>to</strong> bail, as 60 percent of climbersusually have done by now. <strong>Climb</strong> all day andbarely make it <strong>to</strong> Camp 4 by nightfall – anuncomfortable bivy site.Day 3 – The Great Roof takes forever andantsy parties stack up behind you. Youwanted <strong>to</strong> free the Pancake Flake (awesome5.10a) but when you made a hand jam yourarm cramped up, so you had <strong>to</strong> aid it. Nowyou have <strong>to</strong> let the party behind you passand you deal with some gnarly belay clustersin the process. The passing team offers <strong>to</strong> fixa rope and you accept. You had wanted <strong>to</strong>climb every pitch but you are moving slowlyand don’t want <strong>to</strong> climb in<strong>to</strong> the night again.You make it <strong>to</strong> a crowded Camp 5 and have<strong>to</strong> take the lame bivy sites and hope the teamabove doesn’t pee on you.Day 4 – At this point the haul bag is gettinglighter but all the heavy hauling downlow has wrecked your hands and drainedyour strength. You have <strong>to</strong> aid everything,even the easy free climbing, which makesyou move even slower. The turd bucket isdangerously close <strong>to</strong> overflowing. You haveFOR CURRENT GEAR INFORMATION, VISIT WWW.SUPERTOPO.COM15
Introduction<strong>to</strong> bivy on Camp 6 and another party catchesup <strong>to</strong> you, creating another cluster.Day 5 – You have <strong>to</strong> ration your food andwater, which just adds <strong>to</strong> your malaise. Youfinally <strong>to</strong>p out. You are relieved and feelproud <strong>to</strong> have summited. <strong>How</strong>ever – becauseof the hauling, bad bivies, and belay clusters– your climb of what is probably the bestroute in the world was not much fun.Now, the Efficient (non-Sufferfest) way <strong>to</strong> climb El CapPrep DayStart early and zip up the first four pitchesin a half day. Return <strong>to</strong> the ground and haveplenty of time <strong>to</strong> haul <strong>to</strong> Sickle or just do“the El Cap Lieback” in El Cap Meadow.Day 1Blast off and pass a party in the S<strong>to</strong>velegsby climbing variations around them. Witha light haul bag holding only three days offood and water, the hauling is easy and youhave plenty of strength <strong>to</strong> free climb theseclassic pitches. Get <strong>to</strong> El Cap Tower withplenty of time <strong>to</strong> kick back and enjoy theview.Day 2Cruise through the King Swing and theGreat Roof. With a light bag, easy haulingmeans you still have enough strength <strong>to</strong> freeclimb Pancake Flake: Oh it’s soo good! Andexposed! You have enough time <strong>to</strong> chooseCamp 5 or Camp 6 (whichever has fewerpeople). At this point the bag weighs almostnothing.Day 3Pass that suffering party I described above.You give them a little water because eventhough they started with 80 pounds ofwater, they are almost out. Three pitchesfrom the <strong>to</strong>p you feel a potential afternoonthunders<strong>to</strong>rm developing. You step on thegas and blast through the final pitches,<strong>to</strong>ping out before the rain starts. There isplenty of time <strong>to</strong> pack up, walk down, andstill buy a six-pack before the s<strong>to</strong>re closes.Three PathsSo there you have it, there are essentiallythree paths:• Get frustrated and bail low before DoltTower.• Barely eke out an ascent and not enjoy theprocess as much as you could.• Master the aid basics and climb The Noseconfidently and have fun.The basic equation of efficientclimbingA little time saved on an action, whenmultiplied by thousands of actions on a wall= giant time savings.For example, on The Nose:Lead a pitch ten minutes faster multiplied by31 pitches = 5+ hours.Save five minutes on a belay changeovermultiplied by 31 pitches = 2.5+ hours.Save three minutes when you lower out thebag and leave the belay multiplied by 31pitches = 1.5 hours.You haven’t done any fancy “speed climbing”and you have already shaved a day off theclimb.Now, imagine, after dialing the skills in thisbook you shave 20 minutes off leading eachpitch and belay changeovers that used <strong>to</strong> take12 minutes instead take two.There are other things that can’t bequantified in time: hauling with less effort,over 31 pitches = more energy for freeclimbing the classic pitches and more fun.16FOR CURRENT GEAR INFORMATION, VISIT WWW.SUPERTOPO.COM
Introduction<strong>How</strong> <strong>to</strong> use this book – TheMaster ChecklistThis book is intended <strong>to</strong> be “active reading.”Print or pho<strong>to</strong>copy the Master Checklist inChapter 3 and take it with you on all yourtraining. Every time you get <strong>to</strong> a major stage,celebrate!Open up the first chapter on Aid Basics andgo out and practice, practice, practice. Makesure you check off everything on the MasterChecklist. Then you’ll move on<strong>to</strong> Chapter2 and get that dialed and so on. If you havenever aid climbed, you are lucky. You don’thave bad habits yet. If you don’t skip ahead,and instead master each section, one chapterat a time, you are on the path <strong>to</strong> cruising upEl Cap.OK, maybe skim through the entire bookonce. That’s allowed. But I encourage you <strong>to</strong>read this book slowly, dialing in each sectionbefore skipping ahead. Don’t skip around <strong>to</strong>pick things here and there.Some folks out there may say, “But I alreadyknow the basics, I want <strong>to</strong> know how <strong>to</strong> stackpi<strong>to</strong>ns or set up a complex hauling system.”While I can’t call BS without actually seeingyou aid climb, the vast majority of aidclimbers I see on El Cap could still use a lo<strong>to</strong>f help with the aid basics. So even if youare moderately experienced at aid climbing,please don’t skip ahead.Videos explain technical parts ofthe textI have free instructional videos available athttp://www.super<strong>to</strong>po.com/gear/how-<strong>to</strong>-bigwallThere you will see chapter titles thatmatch the chapter numbers in this book.Chances are, if there is a confusing techniquementioned in the text, I put a free videoonline <strong>to</strong> explain it. If there is not a video,email me and I may be able <strong>to</strong> go shoot andupload it for you and everyone else.About the gear in this bookThis book has many gear pho<strong>to</strong>s. I am notsponsored. At the time of publication, thegear shown is the gear I like <strong>to</strong> use. But whileI like the products you see in the book, othergear might work better for you. The onlyway <strong>to</strong> know is <strong>to</strong> experiment for yourself.On this page http://www.super<strong>to</strong>po.com/climbingareas/bigwalls.html is the gear Icurrently use. In addition, we have writtena number of reviews on popular aid gear athttp://www.outdoorgearlab.com/big-wall.There you can also see what other climbersfind works best for them.Before you start - get psyched!<strong>Big</strong> walls are a big undertaking. If you arenot genuinely psyched <strong>to</strong> wall climb, thenyou will suffer. If you just want <strong>to</strong> say youhave climbed El Capitan but are not thrilledabout the idea of being on the wall fordays on a time, don’t bother. <strong>Wall</strong> climbinginvolves a <strong>to</strong>n of work. If you are just halfheartedabout the endeavor, then all thatwork feels like suffering. If you are trulypsyched, then all the work just feels like par<strong>to</strong>f the adventure.In addition, if you are not amped <strong>to</strong> be onthe wall, you will get scared. Probably reallyscared. You’re more likely <strong>to</strong> bail when thefirst challenge arises. On my first El Capascent I was scared. But I was so pumped onthe adventure that the fear just added a littlespice <strong>to</strong> the experience. Compare that <strong>to</strong> anascent seven years later when my heart wasnot in<strong>to</strong> climbing El Cap at that moment.Despite having done 60+ El Cap ascents, Iwas actually more scared than my first timeon the wall because I didn’t REALLY want<strong>to</strong> be up there. A year later, I had my psycheback and suddenly El Cap was a quarter asscary and four times as much fun. It’s all inthe head.So before you get <strong>to</strong>o much in<strong>to</strong> this bookFOR CURRENT GEAR INFORMATION, VISIT WWW.SUPERTOPO.COM17
Introductionor spend <strong>to</strong>o much money on wall climbinggear, go <strong>to</strong> Yosemite or Zion or your closestbig wall area. Spend a day walking theentire base of El Cap or your local big wall.Bring a book or watch a movie from thelist at SuperTopo. Go <strong>to</strong> the back of El CapMeadow with a pair of binocs and watchclimbers up on the wall. If you can’t get <strong>to</strong>a big wall area, read even more from myreading list.If you are genuinely psyched, keep chargingon this path of learning <strong>to</strong> climb a big wall. Ifyou are not yet truly psyched, move forward,but maybe put off the purchase of thatportaledge.Winding upBy the way, this is the only section of thebook where I am quite so long winded. Afterthis rant, where I try and convince you <strong>to</strong> dothings as simply as possible, I’ll heed my ownadvice and write as simply as possible. I’mworking at it – the first draft of this book wasthree times as long. Then I pared it down <strong>to</strong>just the essentials.PS: I want <strong>to</strong> hear success s<strong>to</strong>ries! If thisbook helped you get <strong>to</strong> the summit of ELCap, please email me: chris@super<strong>to</strong>po.com.I would love <strong>to</strong> hear about it.Ammon McNeely below theStreaked <strong>Wall</strong>, Zion.Pho<strong>to</strong>: Chris McNamara18FOR CURRENT GEAR INFORMATION, VISIT WWW.SUPERTOPO.COM
My road <strong>to</strong> big wall climbingChris McNamara, age 16, reaches theGlowering Spot on a one-day ascent of TheNose.Pho<strong>to</strong>: Mark Melvin
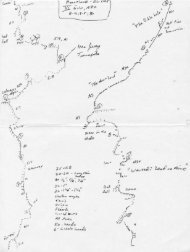
My Personal Road <strong>to</strong> <strong>Big</strong> <strong>Wall</strong> <strong>Climb</strong>ingWhen tackling a new challengethere are two main ways <strong>to</strong>go about it. One is <strong>to</strong> find amen<strong>to</strong>r and follow in his or herfootsteps. The other approach is <strong>to</strong> wing it,finding your way all by yourself or with apartner who also learning. I prefer the firstway – finding a men<strong>to</strong>r. That’s how I learned<strong>to</strong> climb El Cap, although in the process Ialso tried winging it… with not-so-goodresults. Here’s how it went for me:I was dragged up my first few ascents of ElCap, thought I saw how everything worked,went back and trained hard, and eventuallystarted leading my share of the pitches.If they take the other path, climbers willconnect with a partner of equal or less ability,creating much more uncertainty plus betters<strong>to</strong>ries about how unprepared they werebut pulled it off anyway. Their path will takelonger and involve more self-sufficiency butin the end it will take them <strong>to</strong> the same spot:the summit of El Capitan.I started climbing in seventh grade at afriend’s birthday party at a local climbinggym. My parents later said that five kids wentin<strong>to</strong> the gym, four came out normal and Icame out as a climbing addict. That’s aboutright. I started doing as many pull-ups as Icould manage and worked on the hardestgym routes I could handle. I could barelywait <strong>to</strong> climb outdoors. That was a challenge;my mom had <strong>to</strong> take me because I was <strong>to</strong>oyoung <strong>to</strong> drive.The first climbing magazine I rememberseeing had the s<strong>to</strong>ry of Lynn Hill freeclimbing The Nose, the first person <strong>to</strong> doit. Such a big deal was made that I figuredthis was where the action was. So that yearon a family trip <strong>to</strong> Tuolumne Meadows Iasked mom <strong>to</strong> take a de<strong>to</strong>ur <strong>to</strong> see YosemiteValley and El Capitan. I jumped out of thecar and ran <strong>to</strong> the base with climbing shoesand a chalk bag. I climbed up about ten fee<strong>to</strong>f what I thought was the start of The Nose(it wasn’t). I wanted <strong>to</strong> be able <strong>to</strong> say I hadclimbed on El Cap, never mind how far up.Standing at the base, the granite wall in fron<strong>to</strong>f me overwhelmed my field of vision. I feltsmall. Only the Pacific Ocean rivaled El Capin scale. I had no thoughts of ever climbing <strong>to</strong>the <strong>to</strong>p of this wall. I knew people climbed it,but I didn’t see how it was possible, especiallyfor me. It was just <strong>to</strong>o big!That was my start. Here’s my diary of how itwent from there, the point being <strong>to</strong> suggesthow my experiences can offer lessons for you.Pho<strong>to</strong>: Justin Colsky.Age 14 – First big adventureclimb: Golden Gate BridgeA friend and I convinced our parents thatwe were camping in the Marin Headlandsabove the Golden Gate Bridge. That nightwe hiked down a hill, got on the bridge cableand walked/climbed <strong>to</strong> the summit. NOTE:This was pre-9/11. Try <strong>to</strong> climb the GoldenGate Bridge <strong>to</strong>day and you will get a $10,000fine if you are lucky and if you are unluckymaybe get shot.20FOR CURRENT GEAR INFORMATION, VISIT WWW.SUPERTOPO.COM
My Personal Road <strong>to</strong> <strong>Big</strong> <strong>Wall</strong> <strong>Climb</strong>ingSuperTopo of our climbing adventure on the Golden Gate Bridge.Lesson:For me, climbing is about the adventurefirst. Doing a hard boulder problem or freepitch is fine. But for me, climbing techniqueand strength is for getting <strong>to</strong> the truly bigadventures in wild places.Age 14 – First aid climbThirty-foot sport climb at Mickey’s Beachnear San Francisco. On <strong>to</strong>prope I tie slings<strong>to</strong>gether <strong>to</strong> make aiders and place theoccasional nut <strong>to</strong> get between bolts. I aminstantly hooked on aid climbing. Notbecause I love it, but because this obscure arthas now been demystified and I feel I am onthe path <strong>to</strong> climbing El Cap.Lesson:Improvise! Eventually you will want the rightgear for the job. But at first make do withwhat you have. A few slings can be your firstpair of aiders. Don’t wait for the “perfectmoment.” Just go out and do it.Age 14 – Tree climbing daysI set up an aid practice course on mybackyard tree. Make two aid moves up, a freemove, then five aid moves horizontally out abranch. I time myself <strong>to</strong> see how long it takes<strong>to</strong> lead, set an anchor, and follow.Lesson:Practice the essentials over and over. Idon’t live near any good cliffs on which <strong>to</strong>practice aid climbing so with just a tree all Ican do is practice the basics over and over.This is a blessing in disguise. Most people’sproblems with big walls come from the factthat they never master the basics of movingefficiently in aiders, setting up an anchor,and jumaring. That is ALL I could do afterschool, so I quickly was able <strong>to</strong> walk upladders faster than I could free climb.FOR CURRENT GEAR INFORMATION, VISIT WWW.SUPERTOPO.COM21
My Personal Road <strong>to</strong> <strong>Big</strong> <strong>Wall</strong> <strong>Climb</strong>ingAge 15 – First outdoor aid leadWinter rains<strong>to</strong>rm in Yosemite Valley. Head<strong>to</strong> the first pitch of Zodiac and find I amdry while rain falls just a few feet away. I’munder-equipped. I lead up, and after 30 feettake a whipper when a rolling nut (an extinctpiece of gear, like a sliding nut but lesseffective) pulls on me. Ten feet higher I takeanother fall. I have my friend Nick tie me off<strong>to</strong> a boulder, go in<strong>to</strong> the trees, find a stickand I make myself a cheat stick so that I amable <strong>to</strong> finish the pitch.Lesson:Start the “real aid leads” with a better rack.With a poor rack I <strong>to</strong>ok whippers. But it wasgood <strong>to</strong> get on the rock and push myself.Also, if I hadn’t improvised a cheat stick andinstead had used a bunch of pins, I wouldhave unnecessarily nailed. If you are missingthe right clean gear from your rack, use acheat stick instead of nailing.Starting up Pitch 1 of Zodiac in a rains<strong>to</strong>rm(sheltered by the roof above). Pho<strong>to</strong> by NickTelischak.Age 15 – West Face, El Capitan.First big wallAt a high school Outdoor Ed Club meeting,a teacher who knows of my climbingaddiction gives me a business plan for aproposed climbing gym: Mission Cliffs. Idon’t care about the investment merits atthe time; I just want a lifetime membership.So after meeting Mark Melvin, the climberbehind the project, and seeing the space hehas in mind, I immediately hand over mylife savings earned from years of working asa Little League umpire, grounds keeper, andsnack shack opera<strong>to</strong>r.Perhaps as thanks for investing in his gym,Mark invites me up the West Face of ElCapitan. I imagine that the preparation forthe climb will be a serious undertaking. We’llspread out all our gear and go through adetailed check, right down <strong>to</strong> rationing thenumber of M&Ms <strong>to</strong> take with us. Right?I am so wrong. After parking the car Markjust heaps a bunch of biners, ropes and otherclimbing gear in<strong>to</strong> a backpack and we headoff for the West Face. I think this casualapproach is fun until we arrive at the base ofthe route and discover a big problem. Oneof us has forgotten his climbing shoes. Ona one-day ascent you try <strong>to</strong> slim down yourgear <strong>to</strong> move as fast as possible but you neverforget the climbing shoes! The only thingmore crucial is the rope.My first reaction: “This is great news.” I thinkthis way because when we get <strong>to</strong> the base ofthe cliff I’m terrified by this 2000-foot walland am hoping that something will go wrongso we won’t actually have <strong>to</strong> climb it. It lookslike my prayers have been answered. ButMark doesn’t see it that way. He just looksup at the wall and says, “Guess I’ll tie theshoes <strong>to</strong> the rope and zip them back <strong>to</strong> youevery 100 feet and then lead some of the 5.7pitches barefoot.”22FOR CURRENT GEAR INFORMATION, VISIT WWW.SUPERTOPO.COM
My Personal Road <strong>to</strong> <strong>Big</strong> <strong>Wall</strong> <strong>Climb</strong>ingAmazingly, this actually works. The first1500 feet go smoothly. <strong>How</strong>ever, with 500feet <strong>to</strong> go we run in<strong>to</strong> another problem. Wehave brought only about two liters of water,not nearly enough. We run dry right whenthe sun hit us and the wall begins <strong>to</strong> bake. Ifeel sick but Mark just keeps on leading. Afew hundred feet from the <strong>to</strong>p we find somewater that has been left on a ledge. It’s hotfrom lying in the sun and has insects floatingon the <strong>to</strong>p. We pitch the bugs and gladlydrink it. Then, after eight hours and 2000feet of climbing, we make it <strong>to</strong> the <strong>to</strong>p.It can’t overstate how much this climbchanged me. It’s the most intense, raw, andterrifying experience I have ever had. Thewall was vertical so there was often nothingbut a thousand feet of air between my feetand the ground. From that high in the air the200-foot trees at the base looked like littleclumps of broccoli. And because we wereclimbing so hard with little water or food Iwas having minor hallucinations. It was themost difficult and draining thing I had everdone in my life.All I could think about was doing more of it.Lesson:Get a men<strong>to</strong>r. Mark Melvin accelerated mybig wall career by years by showing me theropes and letting me borrow a lot of his aidgear for my first summer in Yosemite. Whilethere is a certain pride is doing everythingyourself and/or doing a wall with a climbingequal, you learn much faster and more safelyif you start with a good climber.Pulling up <strong>to</strong> the Glowering Spot on my firsttime climbing The Nose. Pho<strong>to</strong> by MarkMelvin.Age 16 – First one-day ascen<strong>to</strong>f El Cap via The NoseMark and I agree <strong>to</strong> trade pitches. Markleads the first four pitches. I lead the nexttwo and realize that I am in way over myhead. I hand the lead over <strong>to</strong> Mark and hetakes us <strong>to</strong> the <strong>to</strong>p. While this is technicallythe first time I climb The Nose, I only lead afew hundred feet and jug the rest. I know Ineed <strong>to</strong> get better, return, and properly climbit.Lesson:Routes like The Nose are long anddemanding. At this point I was ready <strong>to</strong> takeon a short aid route, but not the 31 pitches ofThe Nose.FOR CURRENT GEAR INFORMATION, VISIT WWW.SUPERTOPO.COM23
My Personal Road <strong>to</strong> <strong>Big</strong> <strong>Wall</strong> <strong>Climb</strong>ingAge 16 – Prow bailI ditch the last day of sophomore year ofhigh school and head <strong>to</strong> Yosemite for thesummer. I have little gear but Mark loansme his haul bag, Gramicci portaledge and abunch of other stuff. I don’t have a partner soI decide <strong>to</strong> solo The Prow. After two pitches Iget scared. The climbing is not the problem.It’s my head that is the problem. While I hadclimbed the South Face with a partner, theProw’s steep walls feel ominous and makeme wonder if I am really ready <strong>to</strong> be up therealone.Lesson:Take it one step at a time. While soloing awall early in your career is proud, it is notthe best way <strong>to</strong> go. I set myself up for failureby taking such a giant mental leap <strong>to</strong> soloing.Age 16 – First multi-day <strong>Big</strong><strong>Wall</strong>, Zenyatta MondattaMy dreams of big wall glory are crushedwhen I bail on The Prow. I make up a varietyof excuses, both <strong>to</strong> myself and <strong>to</strong> others: myportaledge wasn’t working and I didn’t bringenough water and it was <strong>to</strong>o hot and… Intruth, I was plain terrified by that massiveexpanse of granite. Who was I kidding? Onmy first couple of walls I had been draggedup. I wasn’t a wall climber.My dreams having evaporated, I spend thenext day walking the base of El Cap <strong>to</strong> lookfor fallen gear and ogle routes that I wouldcertainly never climb. At the base of thesoutheast face I plant myself on a boulder,arch my head back and take in the infinitegranite ocean above me. I don’t have <strong>to</strong> climbEl Cap <strong>to</strong> feel its power.Moving my attention <strong>to</strong> the west I spot asoloist on Zenyatta Mondatta. At the timeit is rated A5. Fucking A5! That means thatwhoever is up there is either suicidal, an aidclimbing god or has just broken up with hisgirlfriend. Maybe all three. Then a strangething happens. For reason still not clear I yellup <strong>to</strong> the solist, “Need a partner?”Looking down at me from his height I’mjust a spec in the talus. He can’t tell thatI’m sophomore in high school or thatThe Prow has just humiliated me or that Ihave never climbed a true big wall. But asit happens this soloist is probably in the“zone of doubt,” that mental space whereone is equally <strong>to</strong>rn between the painful andchallenging prospect of El Cap solo glory orthe readily available dip in the Merced Riverand pints of Ben and Jerry’s. After a momen<strong>to</strong>f hesitation the soloist calls down, “Sure Icould use a partner. Go get your stuff andwe’ll start up the day after <strong>to</strong>morrow.”Ecstatic but terrified, I feel like a T-ballplayer just drafted <strong>to</strong> the major leagues.Later, as I gather my stuff and walk <strong>to</strong> thebase, the gravity of the situation descendsupon me. What the hell was I thinking!?Blast off day. A fixed line leads <strong>to</strong> mypartner’s highpoint on the second belay.Staring up at the fixed line two words come<strong>to</strong> mind: dental floss. The rope runs upwards,gradually getting smaller and smaller<strong>to</strong> where it seems so small it could slidebetween my teeth.For the next 30 minutes I delicately slide upthe rope, taking great care <strong>to</strong> bounce as littleas possible. Reaching the belay I prepare <strong>to</strong>haul my bag. You would think I was handlingplu<strong>to</strong>nium the way my hands tremble as Igrab a carabiner, open the pulley and placethe rope inside. One 60-meter rope stretchesfrom me <strong>to</strong> the ground but the exposure is sogreat that it feels like I am at least a thousandfeet off the ground. I tremble <strong>to</strong> think whatexposure is actually like an actual thousandfeet off the ground.24FOR CURRENT GEAR INFORMATION, VISIT WWW.SUPERTOPO.COM
My Personal Road <strong>to</strong> <strong>Big</strong> <strong>Wall</strong> <strong>Climb</strong>ingJugging up the STEEP first two pitches ofZodiac. The rope felt the diameter of <strong>to</strong>othfloss.My partner leads the next pitch and then Iface my first lead of the climb: Pitch 4, A3.Looking upwards, a few shallow cracks runupwards for 15 feet, then 15 feet of blankness<strong>to</strong> the first good feature.I put in a nut for the first piece. Then I have<strong>to</strong> place a pin. Ugh. I have never beforeplaced a pi<strong>to</strong>n on a real climb. My ineptitudeshines through as I give tiny little babytaps <strong>to</strong> the pin, like I don’t want <strong>to</strong> hurt itsfeelings. I do the same with the next pi<strong>to</strong>nplacement and give it a few pseudo bouncetests where I don’t actually put any weigh<strong>to</strong>n the piece. I stand up on it…for a second.Then: PING! The distinct sound of janglingpi<strong>to</strong>ns and carabiners is followed by a jol<strong>to</strong>n my harness. I look up and see that I’vefallen <strong>to</strong> ten feet below my belayer. My firstten minutes as a hard climber have seen meprogress negative ten feet.In a way I’m relieved. I have an excuse <strong>to</strong>bail on leading the pitch. After all, if I keepleading I’m bound <strong>to</strong> kill myself.Strangely, my partner sees it differently: “Yougot it, Chris. It’s no big deal, but next timetry bounce testing those pieces!”I regain my highpoint, placing the samepi<strong>to</strong>ns and this time wielding the hammerwith a heft that would make Thor proud.The pi<strong>to</strong>ns hold! Above, I move on<strong>to</strong> a seriesof hooks and feel my confidence grow.Suddenly I’m having fun as I gain morecontrol over the placements. After 130 feetI pull myself on<strong>to</strong> a ledge and triumphantlyscream, “Off belay!” Right then I just aboutlose it, jumping up and down like a fiveyear-oldon Christmas morning. My bodyfeels light and tingly and I wear a grin thatstretches from El Cap Tower <strong>to</strong> HorsetailFalls. I’m hooked for life.Lesson:Hang in there through the <strong>to</strong>ugh sections.Don’t get discouraged. It’s great <strong>to</strong> have apartner who knows what they are doing andwho can encourage you on.Age 16 – First El Cap routewithout a men<strong>to</strong>r, Zodiac, ElCapitanI convince my 13-year-old brother Morganthat I am qualified <strong>to</strong> take him up El Cap.This despite the fact that I have not evenswapped leads on an El Cap route. I teachhim <strong>to</strong> jumar in the same backyard tree Istarted on. We show up at the base of Zodiacand meet two Swedish guys. After dreamingof the proudness of El Cap, they are bummed<strong>to</strong> be behind a couple of teenagers. We laterbecome friends and they tell us their firstthought was, “Oh, no! The kindergartnershave beaten us!”FOR CURRENT GEAR INFORMATION, VISIT WWW.SUPERTOPO.COM25
My Personal Road <strong>to</strong> <strong>Big</strong> <strong>Wall</strong> <strong>Climb</strong>ingOn the second pitch of the route, I don’tleave Morgan enough rope <strong>to</strong> lower out.I tell him <strong>to</strong> just cut loose and he takes aviolent swing. Somehow I end up moreshaken than he is. The rest of the climb goessmoothly until my brother is following andthe rope starts grating over an edge… I amterrified and so is he. But the rope does notget damaged despite some horrible noises.We <strong>to</strong>p out after one night on the wall andeverything goes fine.Lessons:Protect your follower because he is often atthe mercy of how you run the rope. Havetape ready for sharp edges and be mindful ofthe rope on traverses. For me, it was best thatmy first big wall where I led my share of thepitches was like the Zodiac: shorter and withno time pressure <strong>to</strong> make it <strong>to</strong> a certain ledgeat a certain time. Even though we did it inone bivy, we had enough food and water foranother night, which lowered the stress level.Age 17 – First true Nose ascentThe next year I return <strong>to</strong> The Nose with mybrother. This time on The Nose I am leadingevery pitch so I need <strong>to</strong> have my skills dialed.No hiding behind a partner. After one day offixing, and a morning rains<strong>to</strong>rm, we cruiseup <strong>to</strong> Camp 4 for an uncomfortable bivy. Thenext day we <strong>to</strong>p out, right as it gets dark.Lessons:All my aid practice in my tree had made mea solid enough climber <strong>to</strong> do the Zodiac anda few other walls. But it <strong>to</strong>ok two years untilI got the speed and free climbing ability <strong>to</strong>do The Nose. By traveling light the haulingis easy but the tradeoff is that we don’t sleepwell. A worthwhile tradeoff.Final Lesson:By committing months <strong>to</strong> wall climbing, andintensively focusing on it, I learned a lot fast.If you can move <strong>to</strong> Yosemite for a summer…do it! <strong>How</strong>ever, most people can’t committhat kind of time. So it’s possible <strong>to</strong> make dowhere you are. Just about anything can beaid climbed, even a tree in your backyard.My brother Morgan (age 13) jugging downlow on Zodiac. He’s using Jumars!26FOR CURRENT GEAR INFORMATION, VISIT WWW.SUPERTOPO.COM
Master checklist
Master ChecklistQuestion: “<strong>How</strong> do I know when Iam ready <strong>to</strong> climb The Nose?”Answer: Complete this 30-sessioncourse over 4-6 months. That’senough time <strong>to</strong> have rests between practicedays but not <strong>to</strong>o much time so that youloose momentum. It is important <strong>to</strong> not skipsteps. If you skip the low-angle environmentand go straight <strong>to</strong> vertical or overhangingterrain, you will get frustrated and developbad habits.<strong>How</strong> many times should youpractice each routine?When do you know if you areclimbing efficiently?Practice each skill until you have it so dialedyou don’t see any more improvement. Everytime you do your first lap, time yourself<strong>to</strong> establish your baseline time. At regularintervals after that, time yourself andcompare yourself <strong>to</strong> earlier times. At firstyou will see big improvements. Over timethe increments will get smaller and smaller.If you can’t get any faster, you are probablygoing as fast as you can.You don’t have <strong>to</strong> do each activity the listednumber of times. <strong>How</strong>ever, make sure youerr on the side of over-practicing eachtechnique. Too many people get bored witha technique when the only have it 70 percentdialed. It can help <strong>to</strong> practice next <strong>to</strong> a friendand have friendly speed competitions. Orhave speed competitions with yourself. Thatusually takes out the boredom.Each session takes about 2-3 hours.1. Get Psychedo Get psyched. Read a bunch of booksfrom the recommended reading list inthe Appendix. Check out some inspiringmovies like “El Capitan” or “VerticalFrontier.” If you are not REALLYmotivated <strong>to</strong> climb El Cap, it’s hard <strong>to</strong>get through the inevitable challengingmoments on the wall.2. Acquire Basic Aid <strong>Climb</strong>ing Gearo Use what you have, borrow, or if youare going <strong>to</strong> buy, check out http://www.super<strong>to</strong>po.com/gear/htbw-list3. Leading 1: Low-Angle TerrainSessions 1 and 2Set up a practice bolt ladder on a low anglewall.o Aid it once, timing yourself <strong>to</strong> get abenchmark.o Now aid it five times. Focus on smoothbut consistent movement.o Time yourself on the fifth time. Aim <strong>to</strong> be50-75 percent faster by the fifth time thanon the first.o Now aid five times where you focuscompletely on smooth movement. Try <strong>to</strong>never s<strong>to</strong>p moving up the aiders from onepiece <strong>to</strong> the next. Remember, “Slow issmooth. Smooth is fast.”o Now go another five times, focusing onboth smoothness and speed. Try <strong>to</strong> get 20percent faster than your last timed lap.o Overall, aim <strong>to</strong> do at least 25 laps over thecourse of two days.4. Following 1: Low-Angle TerrainSessions 3-4Set up a rope on a less than vertical 30-50foot cliff.o Jug once, timing yourself <strong>to</strong> get abenchmark time.o Jug five times. Focus on smooth butconsistent movement.o On the fifth time, time yourself and try <strong>to</strong>get 50-75 percent faster than on your firstbenchmark time.28FOR CURRENT GEAR INFORMATION, VISIT WWW.SUPERTOPO.COM
Master checklis<strong>to</strong> Now adjust the length of the daisy chainand go five times. Time the fifth one andcompare it <strong>to</strong> the time before. Go with thedaisy length that is most comfortable andgives the best time.o Now adjust the height of your feet in theaiders and go five times. Time the fifthlap and compare it <strong>to</strong> the time before.Go with the aider height that is mostcomfortable and gives the best time.o Once you figure out the best place foryour feet, do another five laps. Timeyourself on the last lap and try <strong>to</strong> get 25percent faster than your tenth time.o Overall, aim <strong>to</strong> do at least 25 laps over thecourse of two days.5. Leading 2: Vertical andOverhanging TerrainSessions 5 and 6o Find a 30-50 foot vertical cliff. Slightlyoverhanging is okay. A gym with a boltladder is ideal.o Aid once, timing yourself <strong>to</strong> get abenchmark time.o Aid like you free climb: Aid three times,trying <strong>to</strong> use as many face holds aspossible (and grabbing the aider as little aspossible).o Introduce the fifi hook. Do three laps withthe fifi at different lengths <strong>to</strong> figure out theright length.o Introduce the daisy chains. Do three laps.o Top stepping – do three laps where you<strong>to</strong>p step every piece using holds or featureson the wall for balance (when possible).o Top stepping – do three laps where you<strong>to</strong>p step every piece without using anyholds or features on the wall for balance.6. Following 2: Vertical andOverhanging TerrainSession 7Where: Set up a free hanging rope at a cliff,climbing gym or tree.o Jug once, timing yourself <strong>to</strong> get abenchmark time.o Jug five times. Focus on smooth butconsistent movement.o On the fifth time, time yourself and tryget 50-75 percent faster than your firstbenchmark time.o Now adjust the length of daisy chainand go five times. Time the fifth one andcompare it <strong>to</strong> the time before. Go with thedaisy length that is most comfortable andgives the best time.o Now adjust the height of your feet in theaiders and go five times. Time the fifthlap and compare it <strong>to</strong> the time before.Go with the aider height that is mostcomfortable and gives the best time.o Once you figure out the best place foryour feet, do another five laps. Timeyourself on the last lap and try <strong>to</strong> get 25percent faster than your tenth time.o Get a good arm pump.o Recover for two days.o Anchor a free-hanging rope 20-30 feet upwith rope length that is at least 200 feet.Build your jugging muscles so they won’tlock up with cramps on Day 3 of a big wall.7. Acquire Clean Aid Protectiono Borrow, buy or improvise whatever gear<strong>to</strong> enhance your free climbing s<strong>to</strong>ck.If you are going <strong>to</strong> buy gear, check outreviews at http://www.outdoorgearlab.com/big-wall-gearFOR CURRENT GEAR INFORMATION, VISIT WWW.SUPERTOPO.COM29
Master Checklist8. Leading 3: Placing GearSessions 8 and 9Where: A 30-50-foot-tall C1 and slightly lowangle cliff.o Aid once, timing yourself <strong>to</strong> get abenchmark.o Now aid five times. Focus on smooth butconsistent movement.o Time yourself on the tenth time. You want<strong>to</strong> be 50-75 percent faster than the firsttime.o Now try five times where you a littleslower but focus on fluidity. Try <strong>to</strong> nevers<strong>to</strong>p moving up the aiders from one piece<strong>to</strong> the next.o Time yourself again, focusing on speed.Try <strong>to</strong> get 20 percent faster than your lasttime.o Overall, aim <strong>to</strong> do at least 25 laps over thecourse of two sessions.9. Following 3: Cleaning GearSessions 10 and 11Where: A 30-50-foot-tall, slightly low angleC1 cliff.o Clean once, timing yourself <strong>to</strong> get abenchmark.o Now clean five times. Focus on smoothbut consistent movement.o Time yourself on the tenth time. You want<strong>to</strong> be 50-75 percent faster than the firsttime.o Now try five times where you are a littleslower but focus on fluidity. Try <strong>to</strong> nevers<strong>to</strong>p moving up the aiders from onepiece <strong>to</strong> the next.o Time yourself again, focusing on speed.Try <strong>to</strong> get 20 percent faster than your lasttime.o Overall, aim <strong>to</strong> do at least 25 laps over thecourse of two sessions.10. Building Anchors and Basic AidCourseSession 12Where: Any place where you can stand onthe ground and have 3-5 pieces at aboutchest level.o Build an anchor of 3-5 pieces of gear usinga cordelette. Break down the anchor andrebuild it a couple more times.o Now use different pieces and build andbreak down a few more anchors.o Build one more anchor with pieces thatare spread out (use shoulder-length slingswith the cordelette).Sessions 13 and 14 – Basic Aid CourseWhere: Ideally, you will have an 80-degreeroute that is 30-80 feet. I started in a tree.Not ideal. But work with what you got. Theimportant thing is <strong>to</strong> get out there as muchas possible.With the skills dialed, it is time <strong>to</strong> learn <strong>to</strong>transition between them efficiently. Thebest way <strong>to</strong> do that is <strong>to</strong> build a course andtime yourself. The course has five parts:lead, build an anchor, clean, break down theanchor, repeat.o Do the aid course once and time yourself<strong>to</strong> get a benchmark.o Do the course five times or until you can’tdo it any faster.11. Leading 4: Traversing TerrainSession 15Where: Find a traversing lower angle cliff30-50 feet tall.NOTE: For this session, you need a belayer.o Lead up at least 20 feet, then build alower out point (1-2 bomber pieces), thenhave the belayer lower you 10 feet andpendulum over <strong>to</strong> a crack or face hold.Continue up <strong>to</strong> the <strong>to</strong>p of the pitch or re-30FOR CURRENT GEAR INFORMATION, VISIT WWW.SUPERTOPO.COM
Master checklistpractice the pendulum.o Repeat, the above but this time wearfree climbing shoes and practicetension traverses. Especially work oncommunication with the belayer.12. Following 4: Traversing TerrainSessions 16 and 17Where: Find a traversing lower angle cliff30-50 feet tall.o Before you get <strong>to</strong> the a cliff, slingingsomething at eye level and passing the leadrope through a carabiner connected <strong>to</strong> it.Practice lowering out five timeso Once you have the lower out dialed onthe ground, set up a traversing rope.Anchor a rope <strong>to</strong> the <strong>to</strong>p of a cliff, clipit through a piece at least ten feet <strong>to</strong> theside of the anchor point, and at least tenfeet off the ground. Practice lowering outfive times.o Set up a traversing rope. Anchor a rope<strong>to</strong> the <strong>to</strong>p of a cliff, clip it through atleast five pieces that run diagonal up,hopefully at a 30-45 degree angle. Clean itfive times. Remember <strong>to</strong> tie backup knots.o Try <strong>to</strong> find a traversing crack that takes3-5 pieces in. Jug up <strong>to</strong> the first piece, thenswitch <strong>to</strong> re-aiding mode. Practice reaidingfive times.Congratulations, you are now an aid climber!You are about half way through the processof climbing El Capitan. And you are 95percent closer <strong>to</strong> achieving that goal thatmost climbers. If you have done all the itemson this checklist, you are proficient on thebasic techniques of aid climbing. Even someclimbers who have crawled and scratchedtheir way <strong>to</strong> a big wall summit can’t say that.FOR CURRENT GEAR INFORMATION, VISIT WWW.SUPERTOPO.COM31
Master Checklist13. Acquire More Gear: Haul bagsand Hauling Gearo Borrow what you can or, if you are going<strong>to</strong> buy gear, check out reviews at http://www.outdoorgearlab.com/big-wall-gear14. Hauling and Belay ManagementPlus Advanced Aid CourseSession 18Where: Ideally do this on your small practicecliff after first setting up the systems on flatground.o Set up a hauling anchor at least fivedifferent times (incorporate both the leadand haul rope in<strong>to</strong> the anchor).o Space haul 15 times.o If you think you can do it safely, body haul15 times.Session 19 and 20 – Advanced AidCourseDo the Basic Aid Course on a longer, moresustained pitch (hopefully at least 100 feetlong). Each time try <strong>to</strong> set up the anchora little differently and alternate haulingtechniques.It is important <strong>to</strong> find a long and sustainedpitch so that you learn <strong>to</strong> deal with these bigwall issues:o <strong>How</strong> <strong>to</strong> maintain speed and fluidity over alonger pitch.o <strong>How</strong> <strong>to</strong> conserve gear by mixing upwhat size piece you leave so you have afull selection at the end of the pitch andextra for anchor.o Time yourself the first time <strong>to</strong> get abenchmark.32FOR CURRENT GEAR INFORMATION, VISIT WWW.SUPERTOPO.COM
Master Checklis<strong>to</strong> Every ten times you do a lap on thecourse, time yourself and try <strong>to</strong> improveyour time 10-20 percent every ten times.o After the first ten laps, introduce haulingfor another ten laps. For the first fivetimes, use the body hauling technique.Once you can body haul safely, try outthe space haul first on the ground andlater on the wall. DANGER: Rememberbody hauling only works if your haulbag weighs close <strong>to</strong> your own weight.Otherwise: Danger!).o Do 20-30 laps <strong>to</strong>tal over two sessions.Congratulations, you are now a proficient aidclimber. If you <strong>to</strong>ok the time <strong>to</strong> master all thelessons, then you have the basics dialed. Nowtake your solid set of skills <strong>to</strong> the multi-pitchenvironment. When the exposure kicks in onDay 2 and your partner wants <strong>to</strong> bail because“it doesn’t feel right,” you can confidentlydraw from your mastered skill set and pushon through!15. The BivySession 21o On the ground, put the portaledge<strong>to</strong>gether five times.o Hang from a wall and put the ledge<strong>to</strong>gether five times.o Put the ledge <strong>to</strong>gether twice while using aheadlamp.o Try camping on the side of a cliff for anight (optional).o Set up the rainfly and turn the hose on fullblast. Spray it up from below the ledge. Seehow dry you stay.FOR CURRENT GEAR INFORMATION, VISIT WWW.SUPERTOPO.COM33
Master Checklist16. Rescue and retreatSession 22o Practice rappelling with a haul bag.o Learn the basics of self rescue; how <strong>to</strong>escape the belay, etc. (material not coveredin this book).BONUS: The Road <strong>to</strong> the Nose– Free <strong>Climb</strong>ing Skills1. Training at the CragSessions 23 and 24Where: After becoming a solid 5.10b tradclimber, go a crag with 100+ foot tall pitches.The El Capitan base is perfect but mostpeople only have their local crag.Congratulations, you are ready for your firstwall! If you have not skipped any sections, ifyou have checked every box, and graduated<strong>to</strong> each level honestly, you know where yourweaknesses still lie…or you are ready <strong>to</strong>charge.3. <strong>Climb</strong> 3 Grade V <strong>Wall</strong>sSession 29-30Where: Yosemite, Zion, Black Canyon or anyother big wall area.o <strong>Climb</strong> two or more grade V walls.4. <strong>Climb</strong> An El Cap Grade VI!o <strong>Climb</strong> five 5.9 trad pitches carrying a Noserack [see page http://www.super<strong>to</strong>po.com/rock-climbing/route_gear.php?r=ybelnose].o <strong>Climb</strong> five 5.10 pitches carrying a Noserack.o Now add in a haul line and hang someascenders and a wall hauler off yourharness. If you still climb 5.10b, you arein good shape. Try <strong>to</strong> climb pitches longerthan 100 feet.o Practice moving from aid <strong>to</strong> free five timesclimbing out of your aider, and five timesclimbing out of a shoulder length sling.2. Training on the <strong>Big</strong> <strong>Climb</strong>sSessions 25-28Where: Any place with long multi-pitchclimbs.o <strong>Climb</strong> five or more multi-pitch free routes.Key skills <strong>to</strong> pay attention <strong>to</strong>:o Fast belay changeover (2-5 minutes).o Rope and belay management (practiceseeing rope snags before they happen).34FOR CURRENT GEAR INFORMATION, VISIT WWW.SUPERTOPO.COM
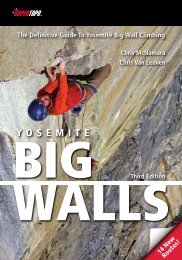
Essential aid gearBasic aid gear: two ladder aiders, twoascenders (with a light locking carabiner),fifi hook, two daisy chains.
Essential AiD GearBasic Aid GearTwo basic principles of good aidgear:• Use the best gear you can get. The right gearis essential. But buying brand new all at oncewould cost $5,000. Don’t be discouraged.Borrow gear and improvise where possibleuntil you fill out your rack with the best gearyou can get. I was lucky that my aid men<strong>to</strong>r,Mark Melvin, basically let me borrow hishaul bag, portaledge, and rack for my firstseason in Yosemite. See Dirtbag Options atthe end of the chapter for ways <strong>to</strong> improviseand the Do-It-Yourself <strong>Big</strong> <strong>Wall</strong> Thread.• Use the lightest and simplest gear. I usethe lightest gear possible as long as it doesnot compromise safety or functionality.Aid racks are heavy. If you compare thedifference between a standard rack and arack that uses lightweight biners and slings,the difference can be more than five pounds.Psychologically, I feel much better standingon marginal aid placements with a lighterrack. And when it comes time <strong>to</strong> free climbthe S<strong>to</strong>velegs and Pancake Flake on The Nose,5.9 can feel like 5.11 if you have a really heavyrack.My exceptions <strong>to</strong> using the lightest gearpossible: ropes, cams, aiders, and harness. Iwill describe why later.WARNING: While I encourage usingwhatever you can latch on<strong>to</strong> at first, neveruse worn out gear, especially such criticalequipment as a harness, daisy chain orrope. Todd Skinner’s death on the LeaningTower when his worn belay loop brokereminded us all of how important it is <strong>to</strong>check your harness carefully and retire it ifthere is any question about its safety.AidersThere is no one-size-fits-all aider. What youbuy will depend on the type of wall you aredoing.Length and Number of StepsIf you are doing a wall with lots of freeclimbing, you want a shorter aider thatwill be less bulky when clipped <strong>to</strong> the sideof your harness. If you are doing an aidintensiveroute, you want a longer aider thatwill give you more bounce-testing options.More at OutdoorGearLab.comThis chapter features excerpts from ourBuying Advice articles at OutdoorGearLab.com. There is more detail, pho<strong>to</strong>s, andgeneral sweetness over at OutdoorGearLab.And while some of this info is timeless,some of it will be much more current atOutdoorGearLab when you read this.36FOR CURRENT GEAR INFORMATION, VISIT WWW.SUPERTOPO.COM
Essential AiD GearWhen considering length, it is much moreimportant <strong>to</strong> look at the overall length thanthe number of steps. All manufacturerscount steps differently. For example, the Petzl<strong>Wall</strong>Step 7 Step Etrier is the same length asthe Me<strong>to</strong>lius 5 Step Aider because Me<strong>to</strong>liushas sub steps that are not counted. Moreimportant than the number of steps is wherethey are located. If possible, you want <strong>to</strong> trywalking up a pair of aiders with you harnessand fifi so you can see if the aider steps arewhere you want them when resting on apiece.This shows how the upper steps on theMe<strong>to</strong>lius 8 Step Ladder (left) get squished<strong>to</strong>gether when weighted while the Yates AidLadder stays open. This makes it easier <strong>to</strong> getyour feet in the upper steps of the aid ladder.Hopefully one day manufacturers will nametheir aiders by length rather than by stepnumbers. That will make it much easier forclimbers <strong>to</strong> compare and contrast them.Types of AidersThese aiders are all about the same lengtheven though their names imply otherwise.From left <strong>to</strong> right: 7 Step Petzl <strong>Wall</strong>step Etrier,Me<strong>to</strong>lius 8 Step Ladder, Me<strong>to</strong>lius 5 Step Aider.There are three common types of aiders <strong>to</strong>consider:Aid LadderAnd aid ladder has two vertical piecesof webbing down the sides connected byhorizontal pieces in the middle (so it lookslike a ladder). This is my favorite type ofaider for more aid-intensive walls such asZodiac, The Prow, or The Shield for threereasons:1) It is much less prone <strong>to</strong> twists and “goinginside out” than standard aiders.2) You don’t have <strong>to</strong> orient the aider step <strong>to</strong>the correct side when you are steppingin<strong>to</strong> it. This is especially helpful forFOR CURRENT GEAR INFORMATION, VISIT WWW.SUPERTOPO.COM37
Essential AiD Gearbeginners, which makes this style aiderthe best for climbers learning <strong>to</strong> aidclimb.3) Because the steps are closer <strong>to</strong>gether atthe <strong>to</strong>p, you can often rest two feet in theaider at the same time.The downside for aid ladders is that theyare a little heavier than standard aiders andgenerally have more material, which meansthey are more likely <strong>to</strong> get stuck in the crack– which really sucks when moving from aid<strong>to</strong> free.When buying a ladder-style aider, try <strong>to</strong> ge<strong>to</strong>ne with a beefy plastic spreader bar at the<strong>to</strong>p. Without a spreader bar the aider willbe difficult <strong>to</strong> walk up once you weight thebot<strong>to</strong>m step. As you can see in the pho<strong>to</strong> onPage 37, the upper step on the aider withoutthe spreader bar (left) gets compressed.Standard Aiders AKA EtriersThis is the most common type of aider. Iprefer it on walls with lots of free climbing(The Nose, South Face of Washing<strong>to</strong>nColumn, Touchs<strong>to</strong>ne <strong>Wall</strong>) over aid laddersbecause it is lighter weight and less bulkywhen you clip it <strong>to</strong> the side of your harnessand free climb. The downside is that it getstwisted, the steps get turned inside out, andyou always have <strong>to</strong> orient them properly(left foot in<strong>to</strong> a step oriented left of center).That means more dealing and declusteringtime, which adds up over the course of awall and disrupts the “aid climbing flow.”Make sure there is a grab loop at the <strong>to</strong>p. Iprefer models where the <strong>to</strong>p and second stephave sub steps. The webbing should be atleast one inch wide and have some type ofreinforcement on the bot<strong>to</strong>m of each step.Lightweight Aiders AKA Alpine AidersThis is best for mostly-free routes where youoccasionally need <strong>to</strong> use aiders. Very lightweight but uncomfortable if you are standingfor more than a few minutes. If I am doingThe Nose in a day, I will usually bring one ofthese and one mid-weight aider such as thePetzl <strong>Wall</strong>Step. <strong>How</strong>ever, this is a bad choicefor learning <strong>to</strong> aid climb.Showing aider step width. From <strong>to</strong>p <strong>to</strong>bot<strong>to</strong>m: Yates Aid Ladder, Me<strong>to</strong>lius Aider,Petzl <strong>Wall</strong>Step, Petzl GradiStep.ComfortThe most comfortable aider is going <strong>to</strong> bethe one with the widest webbing in stepswith the most reinforcement that does notcrush your feet from the side. I find aiderswith urethane-like coating on the steps areusually the most comfortable because theextra structure digs in<strong>to</strong> the bot<strong>to</strong>m andsides of your foot less.Ease of use free climbingEverything that makes an aider comfortableand easy <strong>to</strong> walk up tends also <strong>to</strong> make itcumbersome with which <strong>to</strong> free climb. Thisis because the features that make an aidercomfortable also make it bulky and likely <strong>to</strong>get stuck in cracks. When doing a lot of freeclimbing, you want an aider that bunches upsmall on the sides of your harness.38FOR CURRENT GEAR INFORMATION, VISIT WWW.SUPERTOPO.COM
Essential AiD GearIt is NOT necessary <strong>to</strong> have extra elastic <strong>to</strong>keep your feet in the aiders when cleaning.Yes, at first when cleaning your feet willcome out more than you like. But over timeyou will learn <strong>to</strong> keep your feet in. Using theelastic takes extra time and makes it harderget your feet out when you want <strong>to</strong>.Daisy ChainsShowing a daisy chain with reinforced endShowing the bulk of aiders when bunch up(for clipping <strong>to</strong> the side of the harness forfree climbing). From <strong>to</strong>p <strong>to</strong> bot<strong>to</strong>m: PetzlGradistep, Petzl <strong>Wall</strong>Step, Yates Aid Ladder,Me<strong>to</strong>lius Aider.Features that are Important and NotImportantImportantIt is important in a ladder-style aider <strong>to</strong> havea spreader bar.It is important <strong>to</strong> have a grab loop up <strong>to</strong>p(pretty much every aider has one).Not ImportantIt is NOT important for there <strong>to</strong> be a loop atthe bot<strong>to</strong>m of the aider for clipping a weight.Many manufacturers design this for highwind situations. I have climbed in a lot ofhigh winds and never felt the urge <strong>to</strong> use thisfeature. And even if I did feel the need, it’salmost as easy <strong>to</strong> clip a weight <strong>to</strong> the bot<strong>to</strong>mof the aider itself.What is The Right Length?All daisy chains I have seen work, so themost important thing is <strong>to</strong> get the lengthright. You don’t want the daisy chain <strong>to</strong> cometight before you get <strong>to</strong> your maximum reach.When shopping in the s<strong>to</strong>re, put one endat belt level and hold the other end as highas you can above your head with fingersoutstretched. There should be <strong>to</strong> four <strong>to</strong>eight inches of extra daisy beyond yourfingers. If between sizes, err on the size ofbeing <strong>to</strong>o long. If shopping online, raise yourhand, measure from your waist <strong>to</strong> the tip ofyour fingers, and add a few inches. For mostpeople, 55 inches is the right length.DurabilityDurability comes down <strong>to</strong> how you use yourdaisy chain. If you are just free climbing,it will last for five-plus years. If you are aidclimbing and bounce testing a lot, it willwear out much faster. Unless you are unluckyand blow a bar tack, the point on the daisychain that wears out first is the point thatyou clip <strong>to</strong> the biner that you then clip <strong>to</strong> theaider and piece you are standing on. If youFOR CURRENT GEAR INFORMATION, VISIT WWW.SUPERTOPO.COM39
Essential AiD Gearaid climb a lot, get a daisy chain that has thiscritical point reinforced like the Me<strong>to</strong>liusMonster Daisy Chain. If you don’t aid climba lot this does not matter as much.There is some debate about how long thebar tacks last on nylon vs. Dyneema. Thethought is Dyneema bar tacks rip out faster. Ihave not been able <strong>to</strong> test this but if you haveexperience, send an email.Dyneema or Nylon?I usually recommend Dyneema orDyneema/nylon mix because they are lighterthan regular nylon daisy chains. <strong>How</strong>ever,the nylon stretches more than Dyneemaand therefor will absorb more force duringa short daisy fall. <strong>How</strong> much does thismatter? It is very debatable. It is important <strong>to</strong>remember that a real world climber fallingcreates force equations much more complexthan simply dropping a weight in a lab test.I personally have only taken a handful ofdaisy falls in 100-plus big wall ascents andwhether it was nylon or Dyneema I wasconnected <strong>to</strong> my last piece with, it usuallyheld and I could never tell much difference.I am not sure how much difference there isbetween nylon and Dyneema in a real worldenvironment where your harness, your body,friction against the rock, “penduluming” andother fac<strong>to</strong>rs add in fall absorption (read our<strong>Climb</strong>ing Sling and Runner Buying Advicearticle <strong>to</strong> learn more). If I was on a scaryhard aid route, I would go with nylon just forthe psychological value of thinking it wouldabsorb more force. But for most walls I do,lightness and ease of use are much moreimportant <strong>to</strong> me and I go with Dyneema or aDyneema/nylon mix.review. What I do find is that most of theadjustable daisy chains do not have verysmooth one-handed extension. The one thatdoes extend nicely is the Me<strong>to</strong>lius AdjustableDaisy Chain. <strong>How</strong>ever, these are for bodyweight use only and I hear that they havebroken during small falls. Even if Me<strong>to</strong>liusfixed that issue I still find that regulardaisy chains are faster and require lessmanagement. With adjustable daisy chainsyou have <strong>to</strong> keep them untwisted or theydon’t slide as well.AscendersAscenders are often called Jumars or justjugs. Jumars were the first popular ascenderin Yosemite. Almost nobody uses the Jumarbrand anymore but people still use the term“jumaring“ or “jugging“ <strong>to</strong> describe movingup the rope with ascenders because the term“ascending“ is just <strong>to</strong>o generic and “ascendinga rope using ascenders“ is a mouthful.Unlike a harness, where you can get a senseof how well it will work based on hangingaround in it, there is no easy way <strong>to</strong> testascenders in a s<strong>to</strong>re. The reason is thatascenders are not intuitive <strong>to</strong> use at first.They take practice <strong>to</strong> move efficiently andget on and off the rope. So more importantthan holding these in the s<strong>to</strong>re is asking theopinions of experienced big wall climbers.Left and Right AscendersAscenders are sold individually, not in pairs.So make sure you are buying one rightascender and one left ascender.Adjustable or Regular Daisy Chains?There are two types of daisy chains:adjustable and regular. I have always usedregular daisy chains and most aid climbersprefer them. I have only used adjustabledaisy chains a little so I can’t give a detailed40FOR CURRENT GEAR INFORMATION, VISIT WWW.SUPERTOPO.COM
Essential AiD GearWeightWeight is not a big deal when you are usingascenders. But you will notice the differencein weight when they are clipped <strong>to</strong> the sideof your harness. Since big wall racks alreadyweigh so much, it is nice <strong>to</strong> have a lightascender on your harness when leading.Also, if you are alpine climbing, the lighterthe ascender the better.Belay DeviceBlack Diamond nForce ascenders on <strong>Wall</strong> ofEarly Light, El Capitan.Ease of sliding up the ropeOf all the features <strong>to</strong> look for an ascender,this is the most important: It is how easilythe ascender slides up the rope that willdetermine how tired your arms get overtime. If the device slides up effortlessly, yourarms will thank you.Ease of taking on and off the ropeThis is the second most important featurein an ascender. Remember that no ascenderis perfectly intuitive <strong>to</strong> use at first; it takespractice <strong>to</strong> be able <strong>to</strong> quickly get themon and off the rope. So if you are testingascenders head-<strong>to</strong>-head in a s<strong>to</strong>re, make sureyou use them a LOT. For example, at firstI could not get the nForce ascender off therope quickly and my friend Tim could notget the Petzl off the rope quickly. Then weboth practiced a lot. In the end, after lots ofpractice, we found them both about the same<strong>to</strong> get off the rope.An au<strong>to</strong>-assist belay device like the PetzlGriGri 2 or Trango Cinch is manda<strong>to</strong>ry on awall. There are times when you need <strong>to</strong> takeyour brake hand off the device <strong>to</strong> clear a ropesnag or dig in<strong>to</strong> the haul bag. Also, it is oftenhard <strong>to</strong> stay perfectly alert during a multihourbelay. I have used the GriGri a lot andlove it, especially because it is also a greatbelay device at the crags as well. <strong>How</strong>ever, Iprefer the Cinch on big walls for one reason:it au<strong>to</strong>matically slides up the rope when youare jugging up whereas the GriGri does notunless there is a <strong>to</strong>n of weight on the ropeand everything is aligned just right. Thismeans that between backup knots, you havea nice extra backup with the Cinch.CarabinersI only climb with lightweight wire gate biners.With a big rack and hundreds of biners, usinglightweight biners saves pounds of weight.My current favorite is the CAMP Nano 23because it is the lightest carabiner out there.<strong>How</strong>ever, many wall climbers want somethinga little bigger and easier <strong>to</strong> handle, in whichcase I would recommend the Black DiamondOz, CAMP Pho<strong>to</strong>n or Wild Country Astro.By the time you read this, there may be bettercarabiner options so be sure <strong>to</strong> check out myreview at http://www.outdoorgearlab.com/Carabiner-ReviewsFOR CURRENT GEAR INFORMATION, VISIT WWW.SUPERTOPO.COM41
Essential AiD GearNote: S<strong>to</strong>p Buying OvalsOval carabiners like the Black Diamond Ovalwere the old aid climbing standby. They arewhat everyone used on walls in the 60-70’s(there were not many alternatives) and theydon’t make the scary “biner shift” noise. Bu<strong>to</strong>val biners are heavy and have some of thelowest strength ratings of any biners outthere. I don’t use them. FYI: the “biner shift”noise occurs when three biners are clipped<strong>to</strong> each other and the load changes betweenbiners. A biner can then shift position andmake a noise eerily similar <strong>to</strong> a piece pullingout. If you are using the simple systems inthis book, biner shift won’t happen muchand is not a big deal when it does. If you aregoing <strong>to</strong> use an oval biner, I would go withsomething lighter than the standard oval,like the Black Diamond Oval Wire or OmegaPacific Doval.Locking CarabinersI like <strong>to</strong> have four <strong>to</strong> eight locking carabiners.Again, light ones are best such as the PetzlAttache 3D. I also bring a few larger lockingcarabiners for attaching the haul bag <strong>to</strong> thehaul line and for using as the master point atthe belay. A good big locking carabiner likethe Black Diamond Rocklock is also good<strong>to</strong> have. Again, my recommendations mayhave changed by the time you read this sogo <strong>to</strong> www.outdoorgeralab.com for the latestrecommendations.QuickdrawsI prefer six-inch or 10-inch Dyneema drawswith any of the lightweight carabinersmentioned above.<strong>Climb</strong>ing Slingsand RunnersJust like carabiners, it is hard <strong>to</strong> bring <strong>to</strong>omany slings. I bring 15 lightweight shoulderlengthslings on a wall. The Dyneema onesare the best because they are so light, like theMammut Contact Dyneema. <strong>How</strong>ever, I alsobring 2-5 non-sewn nylon slings so that I canleave one behind at a pendulum point or justhave something more versatile.HelmetsIt is especially important <strong>to</strong> wear a helme<strong>to</strong>n a wall for two reasons: 1) If you get a badhead injury on a wall, rescue will be manyhours away. 2) When bounce testing, pieceswill pull and hit you squarely in the head.Most helmets made by major manufacturerswork. I use the lightest I can find with therequirement it must allow me <strong>to</strong> attach aheadlamp for night climbing. Two helmetsI have used and like are the Petzl Elios andPetzl Meteor III. (I take the Meteor on onedayascents and the Elios on ascents thattake more than a day. But there are a lot ofgreat helmets available. Read our completeBest <strong>Climb</strong>ing Helmet Review <strong>to</strong> see howthe <strong>to</strong>p helmets compare. http://www.outdoorgearlab.com/<strong>Climb</strong>ing-Helmet-ReviewsTip: To avoid bad farmer’s tan and skincancer, wear a bandana under the helmetso it covers your neck and ears. Or, formaximum ventilation, duct tape thebandana <strong>to</strong> the back of your helmet.42FOR CURRENT GEAR INFORMATION, VISIT WWW.SUPERTOPO.COM
Essential AiD GearAmmon McNeely on the firstmove and anchor (!) of RodeoQueen, Zion.Pho<strong>to</strong>: Chris McNamaraFOR CURRENT GEAR INFORMATION, VISIT WWW.SUPERTOPO.COM43
Essential AiD GearFifi HookThere are a few different manufacturers of fifihooks. The important thing is the length ofthe half-inch webbing that connects the fifihook <strong>to</strong> your harness. The length is usuallyshorter that you think—usually about sixinches or just long enough <strong>to</strong> be able <strong>to</strong> girthhitch <strong>to</strong> your harness. If the fifi hook comeswith pre-sewn webbing like Black DiamondFifi Hook, you may need <strong>to</strong> cut off thewebbing and tie on your own in order <strong>to</strong> getthe right length.<strong>Big</strong> <strong>Wall</strong> HarnessGet a harness with decent padding thatis well padded at the waist and leg loops.Because I don’t like heavy gear, I don’t wearthe super-beefy wall harnesses like the YatesShield Harness but a lot of people love ‘em.Make sure there are two beefy gear loopson each side. Before you commit <strong>to</strong> a beefyharness for a mostly-free route like TheNose, make sure you are willing <strong>to</strong> sacrificethe extra weight for comfort.If I am going <strong>to</strong> spend multiple days ona wall, I will wear a “medium beefy” bigharness like the Me<strong>to</strong>lius Safe Tech Waldo.Most of the time, especially on a one-dayascent, I just wear a trad climbing harnessbecause they are light. My three favoritesright now are Arc’teryx R320, the BlackDiamond Momentum Harness, and the PetzlSama Harness.We have a complete big wall harness reviewand an article <strong>How</strong> To Choose A <strong>Big</strong> <strong>Wall</strong>Harness at OutdoorGearLab.com.GlovesI used <strong>to</strong> only use sturdy leather gloves likethe Me<strong>to</strong>lius <strong>Climb</strong>ing Glove. They are beefyand probably the best option for seriousnailing routes. <strong>How</strong>ever, they really onlyprotect your palms. After days on a wall yourfingers will be sore and black from handlingbiners and the rope. Then when you eatfinger foods with those black fingers… Youget the idea. I’m now a fan of bringing twopairs of gloves. I bring the Black DiamondS<strong>to</strong>ve Glove for leading aid pitches. I bringa full-finger Mountain Bike Glove forcleaning. The Mountain Bike Gloves protectyour entire hand, have great dexterity, andyou can do easy free moves with them on.The downside is they are a little expensiveconsidering they won’t last for a lot of walls.If I am going <strong>to</strong> do a wall with lots of burlyhauling, instead of the Mountain Bike GloveI bring Wells Lamont Leather Work Glovesor a pair of construction gloves if there aresome lying around.<strong>Wall</strong> ShoesWalking up and down in aiders maybe thesingle most destructive activity <strong>to</strong> a pairof shoes. “What shoes <strong>to</strong> bring on a wall?”is still a question I grapple with on everyclimb. I have listed all the different types offootwear with their pros and cons on thenext page. I usually use climbing approachshoes, but at the peak of my wall climbingactivity I would buy a cheap pair of hikingboots and cover the seams in Shoe Gooor Seam Grip. Even if you buy a pair ofclimbing-specific approach shoes, it maystill make sense <strong>to</strong> cover them in Seam Grip.Some climbers go as far as putting two tubeson each shoe! This will likely result in thefabric blowing out long before the stitchingdoes... which is what you want <strong>to</strong> happen.44FOR CURRENT GEAR INFORMATION, VISIT WWW.SUPERTOPO.COM
Essential AiD GearAs for shoe fit, I err on the side of wearingmy wall shoes a little tight. That way theyperform better when doing free moves. Butbear in mind that tight shoes will hurt a littlemore on the descent.Approach shoes likeLa Sportiva GandaRegular hiking shoeslike Merrell MoabHiking boots likeSalomon QuestPros:Great for moving fromaid <strong>to</strong> free climbing.Generally low profile,so they move in andout of aiders efficiently.What I usually use onThe Nose.Pros:Reasonable supportand durability.Can be pretty cheapPros:Most durable option.Comfortable for longA3-A5 leads.Good for edging if fittightly.Cons:Expensive.Will only last for ahandful of wall climbsbefore blowing out—sometimes only for onewall.Painful for long A3-A5leads.Cons:Not as precise for doingthe occasional freemove.Cheap versions canblow apart fast.Cons:Generally prettyexpensive.Can be clunky whenyou move around inaiders.Bad for smearing.Tip: If you really want your boots <strong>to</strong> lastas long as possible and don’t care ifthey’re ugly, liberally apply Shoe Goo oran equivalent product <strong>to</strong> the seams mostlikely <strong>to</strong> blow out (mainly the area aroundthe <strong>to</strong>e).<strong>Big</strong> <strong>Wall</strong> Free <strong>Climb</strong>ing ShoesFor free climbing on a big wall, I bringshoes that are one size <strong>to</strong>o big. <strong>Big</strong> shoesreduce performance a little but make theshoes way more comfortable—a worthytradeoff. Wearing thin socks makes themmore comfortable, especially when you have<strong>to</strong> haul. When climbing The Nose in a dayI wear a comfy pair of free shoes all daylong. If climbing The Nose over multipledays, I wear free shoes on all of my leads butswitch in<strong>to</strong> approach shoes when cleaning.I prefer Velcro shoes so that I can take themoff at the belays. That said, lately I havebeen using the La Sportiva TC Pro becausethey are comfortable and edge very well.FOR CURRENT GEAR INFORMATION, VISIT WWW.SUPERTOPO.COM45
Essential AiD GearUnfortunately, they cost $170. If you are ona budget, just about any free shoe will work.But in general, go with a stiff sole.Lead RopeYou want a 10.2 <strong>to</strong> 10.5mm rope with aperfectly intact sheath. Anything withsmaller diameter will wear through <strong>to</strong>oquickly and be scary <strong>to</strong> jumar on. The 11mmropes add an extra feeling of security but arereally heavy. I like a 60m rope. A 50m rope is<strong>to</strong>o short these days and won’t allow you <strong>to</strong>link pitches as easily. In general, a 70m ropeis overkill and means you will have 30 extrafeet of rope <strong>to</strong> manage at the belay on everypitch—which can lead <strong>to</strong> more rope clusters.Right now the Maxim Glider is our <strong>to</strong>precommended big wall rope and the MaximEquinox is our Best Buy recommendation.Check out the how <strong>to</strong> buy a climbing rope atOutdoorGearLab.com.Tip: Always carry climbing tape on a wall.There is nothing worse than being halfwayup an aid route and noticing a tiny bit ofwhite core poking through the sheath ofyour rope. It’s a personal call as <strong>to</strong> whena rope is so damaged that you should notlead on it and need <strong>to</strong> bail. In most cases,if the core is not damaged, I will wrap thedamaged spot in athletic tape and mainlyuse the “better half of the rope” the rest ofthe climb (this means switching ends of therope every time you switch leaders).Fifi hook: Biner or quickdraw (or nothing).Harness: Regular free climbing harness.Shoes: Old pair of running shoes or hikingboots.Haul Bag: check out this Do-It-Yourself<strong>Big</strong> <strong>Wall</strong> Thread for more inspirationhttp://www.super<strong>to</strong>po.com/climbersforum/1340828/<strong>Big</strong>-<strong>Wall</strong>-DIY-ThreadIf you get serious about aid climbing, youwill want <strong>to</strong> buy the more specific aidclimbing gear mentioned above.PantsThe ideal pants are synthetic, have reinforcedknees and are loose enough that you canroll them up <strong>to</strong> the below the knee if you get<strong>to</strong>o hot. I never wear shorts on a wall. Myfavorite is the Patagonia Simple Guide Pant- Men’s.Knee PadsI don’t use them because they get in the wayand make you sweat behind the knees. Buta lot of aid climbers, especially beginners,seem <strong>to</strong> like ‘em. On The Nose or any freeclimbing wall they really get in the way whenfree climbing. If you are going <strong>to</strong> use them Iwould use the lightest and most low profileones you can find. One problem with morebeefy knee pads is that they can get snaggedin the aiders.DIRTBAG OPTIONSWhen you start aid climbing you canimprovise just about everything you need offa regular free climbing rack.Aiders: Intertwine two shoulder-lengthslings or buy some one-inch webbing andimprovise an aider like they used <strong>to</strong> do in theolden days46FOR CURRENT GEAR INFORMATION, VISIT WWW.SUPERTOPO.COM
Leading traversing terrainMark Melvin winds up for The King Swing,The Nose, El CapitanPho<strong>to</strong>: Chris McNamara
Leading Traversing TerrainLeading traversing terrain is the mostexciting and tricky part of wallclimbing. There is nothing as coolas making a giant pendulum likeThe King Swing on The Nose and nothingas scary and traversing horizontally under aroof like The Great Roof. Traverses are headsup for three reasons:• If you fall on traversing terrain, you swingsideways which is the most dangerousway <strong>to</strong> fall. On a vertical fall you almostalways take the impact with your legs. Ona sideways fall you usually take it <strong>to</strong> theabdomen or hip after you first impact withyour hands. You are also more likely <strong>to</strong> hityour head on a sideways fall.• It’s harder <strong>to</strong> bounce test on traversingterrain.• You need <strong>to</strong> always be thinking about yourfollower and leave gear and lower-outslings in convenient places for him or her.Skills <strong>to</strong> learn:• Pendulums• Tension traverses• Placing and testing gear <strong>to</strong> the side• Projecting your followerGear you need:o Daisy chainso Aiderso Helme<strong>to</strong> Gloves (optional)o Locking biners (lightweight if possible)o Two shoulder length slingso Lead ropeo Fifi hook.Where <strong>to</strong> practiceIdeally, you will have an 80-degree wall thatis 30-80 feet tall and has one horizontal crackor bolt ladder and one diagonal crack or boltladder. I started in a tree that had a sturdy20-foot-long horizontal branch. Anothergood option is a rafter that you can sling.Work with what you have. The importantthing is <strong>to</strong> practice as much as possible.PendulumsPendulums are my favorite part of wallclimbing. Nothing compares <strong>to</strong> running backand forth on El Cap with thousands of fee<strong>to</strong>f air under you. Pendulums are also prettysimple: just lower, swing, and latch on<strong>to</strong> thenext crack. What is tricky about them is what<strong>to</strong> do after the pendulum swing. It helps alot <strong>to</strong> have sticky rubber approach shoes orfree climbing shoes for pendulums. Not onlydoes it make the pendulum easier, it makesthe critical climbing after the pendulum feelmore secure and be potentially safer.Step-by-step guide<strong>to</strong> pendulums:1.Make sure your pendulum point isbomber. If it blows on you, you fall <strong>to</strong>your last piece. If it blows on the follower, thefollower will take a dangerous swinging fall,probably on<strong>to</strong> their ascenders, which can cutthe rope. Back up the point with gear if youare unsure of how bomber it is. The followercan then decide for himself if he wants <strong>to</strong>leave gear or not.2.Make sure there is a convenient way forthe follower <strong>to</strong> lower off the pendulumpoint. If there is a sketchy lower-out sling,replace it with a good one. It is much easierfor the leader <strong>to</strong> clean up the pendulum pointthan it is for the follower. When the follower92FOR CURRENT GEAR INFORMATION, VISIT WWW.SUPERTOPO.COM
Leading Traversing Terraingets up there the pendulum point will beweighted and harder <strong>to</strong> manage.3.Have the belayer lower you downuntil you think you are in position <strong>to</strong>make the swing. Work out in advance whatcommands you will use. Usually the leader willsay, “Take. Lower... lower... lower... s<strong>to</strong>p!” Itis VERY important that you can communicatewith your belayer for a pendulum. Keep thisin mind if you are linking pitches and willpotentially be far away from your belayer.4.Swing over <strong>to</strong> the crack or face holdyou are going for. Usually on the first goyou are <strong>to</strong>o high so you have <strong>to</strong> lower down alittle. Its better <strong>to</strong> start <strong>to</strong>o high than <strong>to</strong>o low. Ifyou are <strong>to</strong>o low then you have <strong>to</strong> find away <strong>to</strong>climb back up or, if the wall is blank, you have<strong>to</strong> jumar back up <strong>to</strong> the anchor point and star<strong>to</strong>ver.5.If you are making a pendulum <strong>to</strong>free climbing, you can usually justswing, sink your hands in<strong>to</strong> the crack, andstart going. If you are penduluming <strong>to</strong> an aidplacement, you should guess which piece ofgear you will need and put that on the end ofyour aider. Once you reach the crack, you canthen sink in the piece of gear and stand on it.6.Once you are done with the pendulum,you either tell the belayer <strong>to</strong> give lotsof slack in the rope by yelling “slack” or giveslack slowly <strong>to</strong> ease the transition <strong>to</strong> the nextmove by yelling “lower slow.” Often if you arependuluming <strong>to</strong> a free move, you will want<strong>to</strong> have some tension for the first few freemoves, so careful communicating exactlyhow much slack or tension you want with thebelayer is essential.7.Now the crux of pendulums: where <strong>to</strong>place your first piece of gear. The longeryour wait <strong>to</strong> place gear, the less rope drag andthe more exposed you are <strong>to</strong> a bad fall (andhaving <strong>to</strong> redo the pendulum). The absolutesafest and slowest way is <strong>to</strong> immediately startplacing gear after the pendulum. If the ropedrag becomes <strong>to</strong>o bad later, you can alwayslower down and clean.Tension traversesUnlike a pendulum, a tension traverses doesnot involve swinging side-<strong>to</strong>-side. Instead,you typically have your belayer take, thenslowly lower you as you gingerly use frictionand face holds <strong>to</strong> traverse <strong>to</strong> the side andusually a little down. Communication iskey. Too much slack from the belayer andyou lose tension in the rope and usually loseyour balance and footing. In many cases, apendulum leads <strong>to</strong> a tension traverse. Forexample, with The King Swing on The Nose,a popular route has you swinging side-<strong>to</strong>sideuntil you can gingerly face climb withtension from the rope over <strong>to</strong> Eagle Ledge.All tension traverses are made easier byclimbing shoes or sticky rubber approachshoes.Ammon McNeely tension traverses low onHorse Chute, El Capitan.FOR CURRENT GEAR INFORMATION, VISIT WWW.SUPERTOPO.COM93
Leading Traversing TerrainPlacing and testing gear <strong>to</strong>the sideThe hardest part of leading traversing terrainis placing gear way <strong>to</strong> the side and knowingif it is bomber. It is very hard <strong>to</strong> test geareffectively <strong>to</strong> your side because <strong>to</strong> fullycommit <strong>to</strong> a piece <strong>to</strong> your side means thatif that piece pops during testing, you fallback and put a lot of swinging force on theprevious piece. There is no easy way <strong>to</strong> testgear <strong>to</strong> the side, but here are a few tips:• A little tension from the belayer will helpyou keep your balance if the piece you aretesting pops.• Use your foot like a lever (this tip wasmentioned earlier). With you foot in theaider of the piece you are testing, pointyour <strong>to</strong>e down a little and then try and useit as a lever.• Use cams instead of s<strong>to</strong>ppers. I alwaystry <strong>to</strong> use cams instead of s<strong>to</strong>ppers, butespecially on traversing terrain. It’s hard<strong>to</strong> tell if a s<strong>to</strong>pper way <strong>to</strong> your side is anygood. And a s<strong>to</strong>pper might be good whenyou are testing it, but then when yourweight shifts <strong>to</strong> the side, it might becomecrappy.• Use cam hooks. Cam hooks are greatunder some traversing roofs like the NipplePitch on Zodiac. You can generally tell howbomber they are by how deep they sink ina roof crack. The downside <strong>to</strong> cam hooksis it might then be harder for your follower<strong>to</strong> clean the pitch. This issue is solved bygiving your follower cam hooks or justmaking sure there is not <strong>to</strong>o much distancebetween horizontal pieces.wrong spot, your follower may have no way<strong>to</strong> clean a piece other than leaving it. It isimportant <strong>to</strong> think things through. Anytimeyou backclean a piece, ask, “Will the followernow be able <strong>to</strong> get the piece before it?” Inaddition, you need <strong>to</strong> make sure the followercan safely lower out from pendulum ortension traverse points. Is the lower outpoint solid? Is the webbing that will be lef<strong>to</strong>n the lower out point solid? Remember, youare not just protecting the followers safety,you are also making sure you don’t put thefollower in a position where they will have <strong>to</strong>leave behind a lot of gear.Protecting your followerWhen leading straight up and downpitches, you don’t need <strong>to</strong> worry about gearplacements for you follower (except forprotecting the rope from sharp edges). Whenyou are leading traversing terrain, thingsare different. If you backclean gear at the94FOR CURRENT GEAR INFORMATION, VISIT WWW.SUPERTOPO.COM
<strong>Big</strong> wall gear checklistBelow is a general list. Go <strong>to</strong> the link below<strong>to</strong> see the latest specific gear I recommend.http://www.super<strong>to</strong>po.com/gear/htbw-rackClean Aid Racko Nutso Offset Nutso Camso Offset Camso Cam Hookso Lead Ropeo Haul Ropeo Lower Out Line (optional)o Quickdrawso Carabinerso Locking Carabinerso Slingso Cordeletteso Hooks (optional)o Peckers/Tomahawks (optional)o Wire Rivet Hangerso Keyhole Rivet Hangers (optional)Personal Gearo Harnesso Belay Deviceo <strong>Climb</strong>ing Shoeso Helme<strong>to</strong> Gear Slingo Chalk bago Fifi hooko Nut Toolo Ascenderso Aiderso Daisy Chainso Approach Shoeso GlovesHauling Gearo Knot Protec<strong>to</strong>ro Haul Bago Hauling DeviceBivy Gearo Bivy Sacko Synthetic Sleeping Bago Sleeping Pado S<strong>to</strong>ve (optional)o Headlamp with space batterieso Poop Tubeo Portaledge and seam-sealed Rain Flyo Stuff Sacks with clip-in loopso Portable Solar Panel and Cell Phoneo Duct Tapeo <strong>Climb</strong>ing Tapeo Water Bottles with clip in tie-offsClotheso Synthetic Pantso Synthetic Underwearo Synthetic Belay Jacke<strong>to</strong> Rain Jacke<strong>to</strong> Rain Pantso Balaclavao Beanieo Synthetic Layerso Bandanao Wool or Synthetic SocksFOR CURRENT GEAR INFORMATION, VISIT WWW.SUPERTOPO.COM139
Clean Aid and Hammerless <strong>Climb</strong>ing -Top 11 TricksA big goal of SuperTopo is <strong>to</strong> inspire more clean ascents. Here are 11 tricks that I have found <strong>to</strong>do that. Please add in your own clean aid tips below the article.Carry lots of small camsIt’s impossible <strong>to</strong> carry <strong>to</strong>o many smallcams (sizes .33-1”) – just try. They weighnothing and are the most-used pieces on anyaid climb. If you have <strong>to</strong>o few, you have <strong>to</strong>backclean, which means you are more likely<strong>to</strong> get scared and reach for the hammer.Offset camsIn an earlier book, offset cams were“recommended” in the racks. Now we listmost racks as requiring 1-2 sets. Yes, youcan get up most walls without them; bu<strong>to</strong>ffset cams are usually the most bomberclean placement in a pin scar. The differencebetween a tipped out regular cam or abomber offset cam is often the differencebetween C1 and C2 or C3.From <strong>to</strong>p <strong>to</strong> bot<strong>to</strong>m, Black Diamond CamalotC3, Me<strong>to</strong>lius Master Cam, Wild CountryZero, CCH Alien.Me<strong>to</strong>lius Offset Master Cam in a Yosemite pinscar.Offset micro nutsThese little guys get in pin scars where nothing else can. Nonoffsetmicro nuts often won’t stick at all or are more likely <strong>to</strong>getfixed.A set of DMM Brass offset nuts.140FOR CURRENT GEAR INFORMATION, VISIT WWW.SUPERTOPO.COM
Cam hooksCam hooks not only save time, they are oftenthe only clean placement that works in a thincrack. They are scary at first, but if you “aidboulder practice” enough with them, youwill cruise C2 as fast as you free climb.Intertwine s<strong>to</strong>ppersYou can make a two-foot mini cheat stick byintertwining three s<strong>to</strong>ppers <strong>to</strong> snag distantrivets.Hooks and beak hookingOften you can hook a crack or fixed headeither with a regular hook or with a beak.Medium and large sized Black DiamondPeckers work especially well. A BAT hookcan also sometimes get in the eye of a RURPwith a broken cable. If you are going <strong>to</strong> nail,it is much better <strong>to</strong> use a beak, Pecker orTomahawk as they are much less destructivethan Lost Arrows, knifeblades and angles.Moses Cam HooksTop stepIncreasing your reach is usually the best way<strong>to</strong> find an elusive clean placement. Gettingin<strong>to</strong> that <strong>to</strong>p step gives you another foot ormore. There are <strong>to</strong>p-stepping tips and othertips at the online “<strong>How</strong> To <strong>Big</strong> <strong>Wall</strong>” pagehere:http://www.super<strong>to</strong>po.com/gear/tableofcontentsFree climbMany low-angle A2 sections can be easilyfree climbed. Sometimes a move or two of5.8 or 5.9 saves ten minutes of trying <strong>to</strong> geta shallow pin scar placement <strong>to</strong> hold. Evenpasting one foot on an edge and one foot inyour <strong>to</strong>p step can help you reach a bomberclean placement. Wearing comfortable freeshoes on a low-angle aid pitch is a good idea.Leave the hammer in the bagOn a route that you might be able <strong>to</strong> doclean, leave the hammer in the haul bag. Justby having <strong>to</strong> tag it up, you are more likely <strong>to</strong>push your clean climbing as far as possible.The Tomahawk works as a regular hook insome applications thanks <strong>to</strong> the curved shaftthat wraps around edges for stability.Hand place pi<strong>to</strong>nsMany pin scars take a hand-placed pi<strong>to</strong>n.For extra security, give it a few pounds withyour palm (leather gloves recommended).Sawed-off pi<strong>to</strong>ns often work the best if ahand-placed beak or Pecker won’t work.Cheat sticksI don’t use em. But if it keeps you fromreaching for the hammer, go for it.FOR CURRENT GEAR INFORMATION, VISIT WWW.SUPERTOPO.COM141
More from SuperTopoDESERT ADVENTURE CLASSICSRED ROCKS CLIMBINGList Price: $24.95 Available at www.super<strong>to</strong>po.comOur Red Rocks <strong>Climb</strong>ing guidebook provides SuperTopos for thebest Red Rocks climbs—most in the 5.4 <strong>to</strong> 5.11 range. While theguidebook focuses on the most classic multi-pitch routes suchas Crimson Chrysalis and Epinephrine, cragging routes are alsoincluded. Most of the climbs are on the highest quality sands<strong>to</strong>neRed Rocks has <strong>to</strong> offer and are well-protected with bolts or naturalgear. This guide is perfect for climbers making their first trip <strong>to</strong> RedRocks or returning climbers who want <strong>to</strong> tick off all the classics.THE MOST CLASSY WALLS IN THE WORLDYOSEMITE BIG WALLS: 3RD EDITIONList Price: $29.95 Available at www.super<strong>to</strong>po.comYosemite <strong>Big</strong> <strong>Wall</strong>s: 3rd Edition is the most current, detailed,and accurate guide <strong>to</strong> Yosemite’s most classic walls such as ElCap and Half Dome. This 208-page full-color printed guidebookincludes unprecedented route detail such as climbing strategy,retreat information, descent <strong>to</strong>pos, pitch lengths, and gearrecommendations for each pitch.THE BEST TOPOS FOR YOSEMITE’S BEST CLIMBSYOSEMITE VALLEY FREE CLIMBSList Price: $29.95 Available at www.super<strong>to</strong>po.comThis guidebook includes over 230 of the best routes in YosemiteValley, from 16-pitch trad climbs <strong>to</strong> one-pitch sport routes. Whilemany hard Yosemite testpieces are included, this book focuses on<strong>to</strong>propes, crags, and multi-pitch climbs in the 5.4-5.9 range. Wealso include formerly obscure climbs <strong>to</strong> provide more options foravoiding crowds. As in all SuperTopo books, the authors personallyclimbed and documented each route with meticulous care <strong>to</strong> createthe most detailed and accurate <strong>to</strong>pos ever published.142FOR CURRENT GEAR INFORMATION, VISIT WWW.SUPERTOPO.COM
ALPINE ROCK CLIMBING PARADISEHIGH SIERRA CLIMBINGList Price: $24.95 Available at www.super<strong>to</strong>po.comThis guidebook includes 26 of the best High Sierra alpine climbs,ranging in difficulty from 3rd class <strong>to</strong> 5.11c. Most of these climbsare well-protected, 10-15 pitches long, and ascend some of thebest alpine granite anywhere. Whether you plan <strong>to</strong> scramble upthe 3rd class East Ridge of Mt. Russell, climb the 5.7 East Face ofMt. Whitney, or ascend the epic 18-pitch Sun Ribbon Arête, ourguidebook will ensure you spend minimum time off-route andmaximum time enjoying the climb.OUTSTANDING PEAKS AND DOMES IN THE HIGH SIERRATUOLUMNE FREE CLIMBS: 2ND EDITIONList Price: $24.95 Available at www.super<strong>to</strong>po.comTuolumne Free <strong>Climb</strong>s includes over 110 of the best routes inTuolumne Meadows from 14-pitch trad climbs <strong>to</strong> one-pitch sportroutes. This book focuses on <strong>to</strong>propes, crags, and multi-pitchclimbs in the 5.4-5.9 range. Includes formerly obscure climbs <strong>to</strong>provide more options for avoiding crowds. As in all SuperTopobooks, the authors personally climbed and documented each climbwith meticulous care <strong>to</strong> create the most detailed and accurate <strong>to</strong>posever published.DESERT BIG WALL MECCAZION CLIMBING: FREE AND CLEANList Price: $29.95 Available at www.super<strong>to</strong>po.comZion <strong>Climb</strong>ing Free and Clean is the most comprehensive climber’sguide <strong>to</strong> Zion National Park, arguably one of the most beautifulnational parks in the United States. Inside you will find up-<strong>to</strong>-dateinformation on more than 250 free climbs and 25 of Zion’s bestclean aid climbs, plus pictures and directions <strong>to</strong> the park’s mostpopular bouldering areas.FOR CURRENT GEAR INFORMATION, VISIT WWW.SUPERTOPO.COM143
About the Author<strong>Climb</strong>ing Magazineonce computed thatthree percent of ChrisMcNamara’s life onearth had been spen<strong>to</strong>n the face of ElCapitan – anaccomplishment thatleft friends and familypondering Chris’ssanity. He has climbedEl Capitan more than70 times and holdsnine big wall speed climbing records. In1998 Chris did the first Girdle Traverse of ElCapitan, an epic 75-pitch route that asks thequestion, “Why?”Outside Magazine has called Chris oneof “the world’s finest aid climbers.” He isthe winner of the 1999 Bates Award fromthe American Alpine Club and founder ofthe American Safe <strong>Climb</strong>ing Association(ASCA), a nonprofit group that has replacedmore than 11,000 dangerous anchor bolts.He is a graduate of UC Berkeley and serveson the board of the ASCA and the RowellLegacy Committee. As a BASE jumperhe claimed a slice of the Golden Age ofWingsuit BASE first descents by findingand jumping 10-plus significant new exitsin the United States and Baffin Island. InSwitzerland he hiked and jumped TheEiger three times in one day. Chris is thefounder of SuperTopo and is its CEO. Healso founded OutdoorGearLab and servesas its Edi<strong>to</strong>r-in-Chief. And he also runsthe Lake Tahoe vacation rental businessRentSouthLake.com.What do you think about this book? Pleaseemail your reactions and suggestions <strong>to</strong>chris@super<strong>to</strong>po.com. The second edition isin the works and needs feedback.Author Chris McNamara.Pho<strong>to</strong> Mark Melvin.144FOR CURRENT GEAR INFORMATION, VISIT WWW.SUPERTOPO.COM