E2000 Catalogue 2008.indd - Schneider Electric
E2000 Catalogue 2008.indd - Schneider Electric
E2000 Catalogue 2008.indd - Schneider Electric

You also want an ePaper? Increase the reach of your titles
YUMPU automatically turns print PDFs into web optimized ePapers that Google loves.
���<br />
���<br />
���<br />
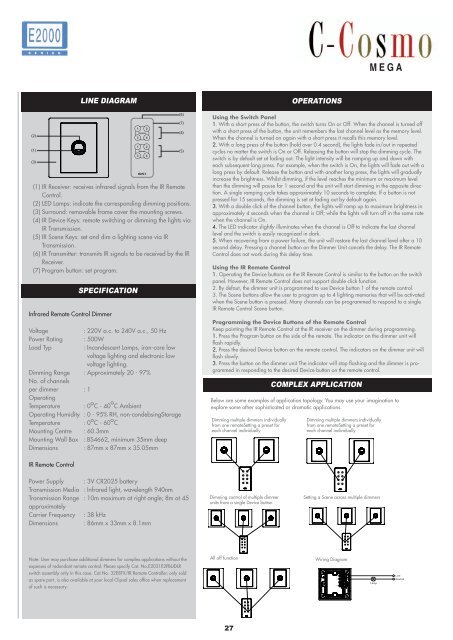
LINE DIAGRAM<br />
(1) IR Receiver: receives infrared signals from the IR Remote<br />
Control.<br />
(2) LED Lamps: indicate the corresponding dimming positions.<br />
(3) Surround: removable frame cover the mounting screws.<br />
(4) IR Device Keys: remote switching or dimming the lights via<br />
IR Transmission.<br />
(5) IR Scene Keys: set and dim a lighting scene via IR<br />
Transmission.<br />
(6) IR Transmitter: transmits IR signals to be received by the IR<br />
Receiver.<br />
(7) Program button: set program.<br />
SPECIFICATION<br />
Infrared Remote Control Dimmer<br />
Voltage : 220V a.c. to 240V a.c., 50 Hz<br />
Power Rating : 500W<br />
Load Typ : Incandescent Lamps, iron-core low<br />
voltage lighting and electronic low<br />
voltage lighting.<br />
Dimming Range : Approximately 20 - 97%<br />
No. of channels<br />
per dimmer : 1<br />
Operating<br />
Temperature : 0 o C - 40 o C Ambient<br />
Operating Humidity : 0 - 95% RH, non-condebsingStorage<br />
Temperature : 0 o C - 60 o C<br />
Mounting Centre : 60.3mm<br />
Mounting Wall Box : BS4662, minimum 35mm deep<br />
Dimensions : 87mm x 87mm x 35.05mm<br />
IR Remote Control<br />
Power Supply : 3V CR2025 battery<br />
Transmission Media : Infrared light, wavelength 940nm<br />
Transmission Range : 10m maximum at right angle; 8m at 45<br />
approximately<br />
Carrier Frequency : 38 kHz<br />
Dimensions : 86mm x 33mm x 8.1mm<br />
Note: User may purchase additional dimmers for complex applications without the<br />
expenses of redundant remote control. Please specify Cat. No.E2031E2PBUDLR<br />
switch assembly only in this case. Cat.No. 32E8TX/IR Remote Controller, only sold<br />
as spare part, is also available at your local Clipsal sales office when replacement<br />
of such is necessary.<br />
���<br />
���<br />
���<br />
���<br />
27<br />
OPERATIONS<br />
M E G A<br />
Using the Switch Panel<br />
1. With a short press of the button, the switch turns On or Off. When the channel is turned off<br />
with a short press of the button, the unit remembers the last channel level as the memory level.<br />
When the channel is turned on again with a short press it recalls this memory level.<br />
2. With a long press of the button (hold over 0.4 second), the lights fade in/out in repeated<br />
cycles no matter the switch is On or Off. Releasing the button will stop the dimming cycle. The<br />
switch is by default set at fading out. The light intensity will be ramping up and down with<br />
each subsequent long press. For example, when the switch is On, the lights will fade out with a<br />
long press by default. Release the button and with another long press, the lights will gradually<br />
increase the brightness. Whilst dimming, if the level reaches the minimum or maximum level<br />
then the dimming will pause for 1 second and the unit will start dimming in the opposite direction.<br />
A single ramping cycle takes approximately 10 seconds to complete. If a button is not<br />
pressed for 15 seconds, the dimming is set at fading out by default again.<br />
3. With a double click of the channel button, the lights will ramp up to maximum brightness in<br />
approximately 4 seconds when the channel is Off; while the lights will turn off in the same rate<br />
when the channel is On.<br />
4. The LED indicator slightly illuminates when the channel is Off to indicate the last channel<br />
level and the switch is easily recognized in dark.<br />
5. When recovering from a power failure, the unit will restore the last channel level after a 10<br />
second delay. Pressing a channel button on the Dimmer Unit cancels the delay. The IR Remote<br />
Control does not work during this delay time.<br />
Using the IR Remote Control<br />
1. Operating the Device buttons on the IR Remote Control is similar to the button on the switch<br />
panel. However, IR Remote Control does not support double click function.<br />
2. By defaut, the dimmer unit is programmed to use Device button 1 of the remote control.<br />
3. The Scene buttons allow the user to program up to 4 lighting memories that will be activated<br />
when the Scene button is pressed. Many channels can be programmed to respond to a single<br />
IR Remote Control Scene button.<br />
Programming the Device Buttons of the Remote Control<br />
Keep pointing the IR Remote Control at the IR receiver on the dimmer during programming.<br />
1. Press the Program button on the side of the remote. The indicator on the dimmer unit will<br />
flash rapidly.<br />
2. Press the desired Device button on the remote control. The indicators on the dimmer unit will<br />
flash slowly.<br />
3. Press the button on the dimmer unit The indicator will stop flashing and the dimmer is programmed<br />
in responding to the desired Device button on the remote control.<br />
Below are some examples of application topology. You may use your imagination to<br />
explore some other sophisticated or dramatic applications.<br />
Dimming multiple dimmers individually<br />
from one remoteSetting a preset for<br />
each channel individually<br />
Dimming control of multiple dimmer<br />
units from a single Device button<br />
�������<br />
������<br />
�������<br />
������<br />
�������<br />
������<br />
COMPLEX APPLICATION<br />
Dimming multiple dimmers individually<br />
from one remoteSetting a preset for<br />
each channel individually<br />
�������<br />
������<br />
Setting a Scene across multiple dimmers<br />
All off function Wiring Diagram<br />
����<br />
����<br />
����<br />
�������<br />
������<br />
����<br />
����<br />
�������