12â30W Fuel Cell Inventor Kit User Guide - Arcola Energy
12â30W Fuel Cell Inventor Kit User Guide - Arcola Energy
12â30W Fuel Cell Inventor Kit User Guide - Arcola Energy

You also want an ePaper? Increase the reach of your titles
YUMPU automatically turns print PDFs into web optimized ePapers that Google loves.
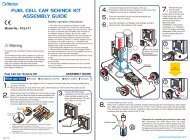
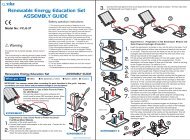
Setup InstructionsConnect H2 Regulator And Purge ValveImportantIf you plan to use more than 20W with the H‐30, you mayneed to connect 2 HydroSTIKs with a tee splitter to the H‐30 to increase the flow of hydrogen.1. Cut a short length of silicone tube (approx 3cm)2. Push one end of the short length onto the whitenozzle of the purge valve3. Push the other end of this tube onto the outletnozzle of the fuel cell stack4. Cut a longer piece of silicone (about 8cm)5. Thread the longer length of silicone through theplastic tube clip. This clip will be used later toopen or close the flow of hydrogen whilst theregulator and HydroSTIK are connected6. Unscrew the nut from the regulator and threadone end of the tube through the nut beforepushing the tube onto the regulator andtightening the nut over the tube (there is no needto use a spanner ‐ finger‐tight is sufficient)7. Connect the other end to the fuel cell stack inletby pushing the tube over the inlet nozzleFigure 5. Hydrogen PlumbingElectrical Connections To Arduino ShieldTake the black wire from the fuel cell stack and connectto the terminal on the Arduino shield labeled GNDTake the red wire from the fuel cell stack and connect tothe terminal on the Arduino shield labeled FC INConnect one wire (doesn't matter which of the two)from the purge valve to the terminal on the Arduinoshield labeled PURGEConnect the other wire from the purge valve to theterminal on the Arduino shield labeled PURGEFigure 6. Electrical connections4