SensarPro Manual - Winegard
SensarPro Manual - Winegard
SensarPro Manual - Winegard
- No tags were found...

You also want an ePaper? Increase the reach of your titles
YUMPU automatically turns print PDFs into web optimized ePapers that Google loves.
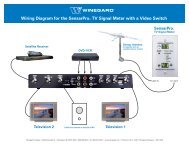
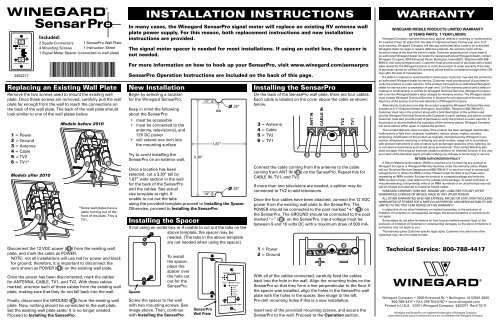
CABLE IN2452217Replacing an Existing Wall PlateRemove the two screws used to mount the existing wallplate. Once these screws are removed, carefully pull the wallplate far enough from the wall to reach the connections onthe back of the wall plate. The back of the wall plate shouldlook similar to one of the wall plates below.1 = Power2 = Ground3 = Antenna4 = Cable5 = TV26 = TV1*Models after 2010Included:2 Spade Connectors 1 <strong>SensarPro</strong> Wall Plate4 Mounting Screws 1 Instruction Sheet1 Signal Meter Spacer (connected to wall plate)31245Models before 2010*Some wall plates have acable coming out of thefront of the plate. This isTV1.Disconnect the 12 VDC power ( 1 ) from the existing wallplate, and mark the cable as POWER.NOTE: not all installations will use red for power and blackfor ground; therefore, it is important to disconnect thewire shown as POWER ( 1 ) on the existing wall plate.Once the power has been disconnected, mark the cablesfor ANTENNA, CABLE, TV1, and TV2. With these cablesmarked, unscrew each of these cables from the existing wallplate, making sure that they do not fall back into the wall.Finally, disconnect the GROUND ( 2 ) from the existing wallplate. Now, nothing should be connected to the wall plate.Set the existing wall plate aside; it is no longer needed.Proceed to Installing the <strong>SensarPro</strong>.3Installation InstructionsIn many cases, the <strong>Winegard</strong> <strong>SensarPro</strong> signal meter will replace an existing RV antenna wallplate power supply. For this reason, both replacement instructions and new installationinstructions are provided.The signal meter spacer is needed for most installations. If using an outlet box, the spacer isnot needed.For more information on how to hook up your <strong>SensarPro</strong>, visit www.winegard.com/sensarpro<strong>SensarPro</strong> Operation Instructions are included on the back of this page.New InstallationBegin by selecting a locationfor the <strong>Winegard</strong> <strong>SensarPro</strong>.Keep in mind the followingabout the <strong>SensarPro</strong>:• must be accessible• must be connected to theantenna, television(s), and12V DC power• will extend one inch intothe mounting surface1.87”Try to avoid installing the3.30”<strong>SensarPro</strong> on an exterior wall.54Once a location has beenselected, cut a 3.30” tall by1 2 1.87” wide section in the wallfor the back of the <strong>SensarPro</strong>and the cables. See actualsize template at right. If.14”unable to cut out the tabsusing the provided template,proceed to Installing the Spacer.Otherwise, proceed to Installing the <strong>SensarPro</strong>.Installing the SpacerIf not using an outlet box or if unable to cut out the tabs on theabove template, the spacer may beneeded. (The tabs in the above templateare not needed when using the spacer.)SpacerTo installthe spacer,place thespacer overthe hole cutout for the<strong>SensarPro</strong>.Screw the spacer to the wallwith two mounting screws. Seeimage above. Then, continuewith Installing the <strong>SensarPro</strong>..12”<strong>SensarPro</strong>Wall Platetab.25”.25”Installing the <strong>SensarPro</strong>On the back of the <strong>SensarPro</strong> wall plate, there are four cables.Each cable is labeled on the cover above the cable as shownbelow.3 = Antenna4 = Cable5 = TV26 = TV1Connect the cable coming from the antenna to the cablecoming from ANT IN ( 3 ) on the <strong>SensarPro</strong>. Repeat this forCABLE IN, TV1, and TV2.If more than two televisions are needed, a splitter may beconnected to TV2 to add televisions.Once the four cables have been attached, connect the 12 VDCpower from the existing wall plate to the <strong>SensarPro</strong>. ThePOWER should be connected to the post marked “+” ( 1 ) onthe <strong>SensarPro</strong>. The GROUND should be connected to the postmarked “−” ( 2 ) on the <strong>SensarPro</strong>. Input voltage must bebetween 9 and 16 volts DC with a maximum draw of 500 mA.1 = Power2 = GroundANT INWith all of the cables connected, carefully feed the cablesback into the hole in the wall. Align the mounting holes on the<strong>SensarPro</strong> so that they form a line perpendicular to the floor. Ifthe spacer was installed, align the holes in the <strong>SensarPro</strong> wallplate with the holes in the spacer. See image to the left.Pre-drill mounting holes if this is a new installation.Insert two of the provided mounting screws, and secure the<strong>SensarPro</strong> to the wall. Proceed to the Operation section.TV21 2TV13 4 5 6WarrantyWINEGARD MOBILE PRODUCTS LIMITED WARRANTY(2 YEARS PARTS; 1 YEAR LABOR)<strong>Winegard</strong> Company warrants this product against defects in materials or workmanshipfor a period of two (2) years from the date of original purchase. During year one (1) ofsuch warranty, <strong>Winegard</strong> Company will also pay authorized labor costs to an authorized<strong>Winegard</strong> dealer to repair or replace defective products. No warranty claim will behonored unless at the time the claim is made, Customer presents proof of purchase toan authorized <strong>Winegard</strong> dealer (to locate the nearest authorized <strong>Winegard</strong> dealer, contact<strong>Winegard</strong> Company, 3000 Kirkwood Street, Burlington, Iowa 52601, Telephone 800-288-8094 or visit www.winegard.com). Customer must provide proof of purchase with a datedsales receipt for the <strong>Winegard</strong> product to verify the product is under warranty. If the dateof purchase cannot be verified, the warranty period shall be considered to begin thirty (30)days after the date of manufacture.If a defect in material or workmanship is discovered, Customer may take the product toan authorized <strong>Winegard</strong> dealer for service. Customer must provide proof of purchase toverify the product is under warranty. If the product is brought to an authorized <strong>Winegard</strong>dealer for service prior to expiration of year one (1) of the warranty period and a defect inmaterial or workmanship is verified by <strong>Winegard</strong> Technical Services, <strong>Winegard</strong> Companywill cover the <strong>Winegard</strong> dealer’s labor charges for warranty service. The <strong>Winegard</strong> dealermust contact <strong>Winegard</strong> Technical Services in advance for pre-approval of the service.Approval of the service is at the sole discretion of <strong>Winegard</strong> Company.Alternatively, Customer may ship the product prepaid to <strong>Winegard</strong> Technical Services(located at 3111 Kirkwood Street, Burlington, Iowa 52601, Telephone 800-788-4417).Customer must return the product along with a brief description of the problem andprovide <strong>Winegard</strong> Technical Services with Customer’s name, address, and phone number.Customer must also provide proof of purchase to verify the product is under warranty. Ifthe product is returned before the expiration of the warranty period, <strong>Winegard</strong> Companywill (at its option) either repair or replace the product.This Limited Warranty does not apply if the product has been damaged, deteriorates,malfunctions or fails from: improper installation, misuse, abuse, neglect, accident,tampering, modification of the product as originally manufactured by <strong>Winegard</strong> in anymanner whatsoever, removing or defacing any serial number, usage not in accordancewith product instructions or acts of nature such as damage caused by wind, lightning, iceor corrosive environments such as salt spray and acid rain. This Limited Warranty alsodoes not apply if the product becomes unable to perform its’ intended function in any wayas a result of the television signal provider making any changes in technology or service.RETURN AUTHORIZATION POLICYA Return Material Authorization (RMA) is required prior to returning any product to<strong>Winegard</strong> Company or <strong>Winegard</strong> Warranty Services under this warranty policy. Pleasecall our Technical Services Department at 800-788-4417 or send an e-mail to warranty@winegard.com to obtain the RMA number. Please furnish the date of purchase whenrequesting an RMA number. Enclose the product in a prepaid package and write theRMA number in large, clear letters on the outside of the package. To avoid confusion ormisunderstanding, a shipment(s) without an RMA number(s) or an unauthorized return(s)will be refused and returned to Customer freight collect.WINEGARD COMPANY DOES NOT ASSUME ANY LIABILITIES FOR ANY OTHERWARRANTIES, EXPRESS OR IMPLIED, MADE BY ANY OTHER PERSON.ALL OTHER WARRANTIES WHETHER EXPRESS, IMPLIED OR STATUTORY INCLUDINGWARRANTIES OF FITNESS FOR A PARTICULAR PURPOSE AND MERCHANTABILITY ARELIMITED TO THE TWO YEAR PERIOD OF THIS WARRANTY.In states that do not allow limitations on implied warranties, or the exclusion oflimitation of incidental or consequential damages, the above limitations or exclusions donot apply.Some states do not allow limitations on how long an implied warranty lasts, or theexclusion of limitation of incidental or consequential damages, so the above limitations orexclusions may not apply to you.This warranty gives Customer specific legal rights. Customer may also have otherrights that may vary from state to state.Technical Service: 800-788-4417<strong>Winegard</strong> Company • 3000 Kirkwood St. • Burlington, IA 52601-2000800/788-4417 • FAX 319/754-0787 • www.winegard.comPrinted in U.S.A. ©2011 <strong>Winegard</strong> Company 2452217 Rev2 10/11<strong>Winegard</strong> and <strong>SensarPro</strong> are registered trademarks of <strong>Winegard</strong> Company.www.antennaweb.org and www.tvfool.com are not affiliated with <strong>Winegard</strong> Company.
OPERAtion InstructionsHow the Signal Meter WorksThe digital transition changed television in many ways. Manybroadcasters were forced to move from the frequency theyhad been using for years. When this happened, broadcastersfought to continue to call themselves by their old channel,even if they were using a different one to send theirprogramming.This means that many stations will broadcast on one channelbut say they are another. For example, KWQC in Davenport,IA, calls itself channel 6 and appears as channel 6 on thetelevision. However, when the digital transition took place,KWQC moved its broadcast frequency to channel 36. Thecomputer in the television translates the information thatKWQC sends to identify itself as channel 6.This translation slows down the tuner in the television,making real time signal strength impossible to measure. Forthis reason, the <strong>SensarPro</strong> displays only the broadcast orRF channel number. Therefore, when looking for KWQC inDavenport, IA, set the <strong>SensarPro</strong> to channel 36 instead of 6.In addition, not all channels are broadcasting in digital. Inmany markets, some smaller broadcasters are still using theold analog technology.Due to this, it will often be useful to visit the following sites:www.antennaweb.org or www.tvfool.com.Before traveling, enter the zip code of the location where the<strong>SensarPro</strong> will be used into one of the websites above. Thiswill help point the antenna and determine which channels areavailable in the area.Basic OperationOnce the vehicle is set up and ready to watch television,begin by raising the antenna. Turn on the <strong>SensarPro</strong> bypressing the SELECT button ( 3 ) until the lights besideANTENNA-SCAN are lit.With the unit in SCAN mode, the <strong>SensarPro</strong> will shortlydisplay both a signal strength and an RF channel number.The displayed channel will not change until a button ispressed. The signal strength will continue to adjust as theantenna moves and environmental conditions change slightly.Slowly rotate the antenna handle clockwise. If the signalstrength increases, continue to rotate the antenna clockwiseuntil the signal begins to slowly drop. Then, carefully movethe antenna back to the strongest signal possible. If the signalgets weaker when moving the antenna clockwise, rotate theantenna counter-clockwise to find the best signal.Once the signal does not get any stronger, press SELECTto move the <strong>SensarPro</strong> to ANTENNA-SEEK mode. In SEEKmode, it is possible to see how many channels are availableby pressing the UP button and making a note of the channelsfound. Channels with a signal strength below 40 may notappear or may not be watchable on the television. Theantenna may need to be fine-tuned when these channelsare desired. Pressing the UP or DOWN button returns the<strong>SensarPro</strong> to the channel found during the SEEK mode.Rotate the antenna 90°, and repeat these steps until theantenna returns to the direction of the first scan. The reasonfor this is that most areas will have channels in multipledirections. Running multiple scans in different directions isthe best way to pick up all available stations.Move the antenna to the area that had the most watchablechannels in SEEK mode. Turn the television on, and run achannel scan on the television. Consult the television manualfor these instructions.Running the channel scan on the television will input thechannels into the television and allow it to display theavailable programming. The channel numbers on thetelevision scan may not match the channel numbers foundon the signal meter.tipShould the <strong>SensarPro</strong> not function as this guide indicates,press and hold both the UP and DOWN buttons at thesame time for 3 seconds. This will reset the <strong>SensarPro</strong>.ModesThe SELECT button on the front of the <strong>SensarPro</strong> cyclesthrough all six modes (PARK CABLE, ANTENNA-SCAN,ANTENNA-SEEK, ANTENNA-CHANNEL, ANTENNA-GAIN, andANTENNA-VOLUME) on the <strong>SensarPro</strong>.The <strong>Winegard</strong> <strong>SensarPro</strong> has two main modes:PARK CABLE (OFF)ANTENNA (ON).13 451 = Speaker2 = Signal Strength Display3 = Select Button264 = Available Modes5 = Up/Down Buttons6 = Mode DisplayPark CableWhen the <strong>SensarPro</strong> is set for PARK CABLE, it is, in essence,off. The park cable system connection will press through thewall plate without interference from the <strong>SensarPro</strong> amplifier.AntennaANTENNA mode is broken into five modes: Scan, Seek,Channel, Gain, and Volume. Each mode is designedto improve the process of finding and tuning in to qualitybroadcast television signals. Anytime the <strong>SensarPro</strong> is in oneof these modes, both the antenna and the mode light will belit. Use the SELECT button ( 3 ) to cycle through the modes.• ScanIn SCAN mode, the <strong>SensarPro</strong> will check each RF televisionchannel between 2 and 51 and will take a reading of thesignal strength for each channel. The <strong>SensarPro</strong> will displaythe signal strength in the SIGNAL STRENGTH DISPLAY ( 2 )and the channel in the MODE DISPLAY ( 6 ) for thestrongest signal found during the scan. The <strong>SensarPro</strong> willremain on that channel until either the UP or DOWN buttons( 5 ) are pressed. Then, it will start a new scan and willdisplay the strongest channel the antenna is currentlyreceiving. It is possible that the same channel could notbe displayed. If nothing (-) is showing in both the SIGNALSTRENGTH DISPLAY and MODE DISPLAY, then no channelsare available, and the gain should be checked.• SeekIn SEEK mode, the <strong>SensarPro</strong> works much like a car radio.Cycling through each RF channel, the <strong>SensarPro</strong> willdisplay only viable channels. Once it finds a channel, itwill display a live signal reading in the SIGNAL STRENGTHDISPLAY and the RF channel in the MODE DISPLAY. The<strong>SensarPro</strong> will remain on this channel until either of theUP or DOWN buttons are pressed. While this channel isdisplayed, it is possible to peak the channel for maximumsignal strength by slowly rotating the antenna and watchingthe signal strength display. The signal strength displays upto 99, but not every channel can be peaked to this point.Generally, a channel can be watched at a signal strength of40. Any signal above this level is less likely to have minorinterruptions due to environmental factors. To send the<strong>SensarPro</strong> back into SEEK mode, press either the UP orDOWN button. The <strong>SensarPro</strong> will start searching for thenext channel (either UP when the UP button is pressed orDOWN when the DOWN button is pressed), stopping onthe next channel it finds in that direction. SEEK mode isnot intended for use while making large corrections withthe antenna. Moving the antenna while the <strong>SensarPro</strong> isin SEEK mode can cause channels to be missed.• ChannelIn CHANNEL mode, the <strong>SensarPro</strong> will continuouslyscan for the RF channel shown in the MODE DISPLAY.To select a different RF channel, use the UP or DOWNbutton. This mode is used to find low strength signals. Byfocusing on a single RF channel, the signal meter allowsthe antenna to be aimed at a weak or distant RF channel.• GainThe <strong>SensarPro</strong> contains an amplifier to adjust GAIN.While in Gain Mode, increase the gain on the <strong>SensarPro</strong>by pressing the Up Arrow, which can help improve aweak channel that is not quite watchable. Decrease thegain by pressing the Down arrow, which can help preventa strong signal from overloading the television tuner. Ifthe signal is too strong, you will see a high number onthe signal strength display but no picture. Turning downthe gain will stop this overloading, and a picture shouldappear. If there is no signal, check that the gain is not setto 0 or 1. In most situations, optimal gain will be 10, thefactory preset. Gain should not need to be changed inmost cases. Note that the tone is muted in GAIN mode.• VolumeThe <strong>SensarPro</strong> has an audio tone ( 1 ) that can help topeak a signal when the meter is not easily seen fromwhere the antenna is mounted. If the signal remainssteady and no buttons are pressed, the tone will last forten seconds before muting so that it does not disturbprogramming once the channel has been located. To usethe tone to peak a channel with the <strong>SensarPro</strong>, press theMODE SELECT button until the VOLUME light is on. Pressthe UP button until the tone can be clearly heard.Note: in VOLUME mode, the <strong>SensarPro</strong> will return toSCAN mode if no button is pushed for 3 seconds.Sleep ModeIf no button is pressed for three minutes, the <strong>SensarPro</strong> willenter SLEEP mode, turning off all of its displays and thebuzzer. In SLEEP mode, the <strong>SensarPro</strong> will provide signal butwill remain unlit until a button is pressed.