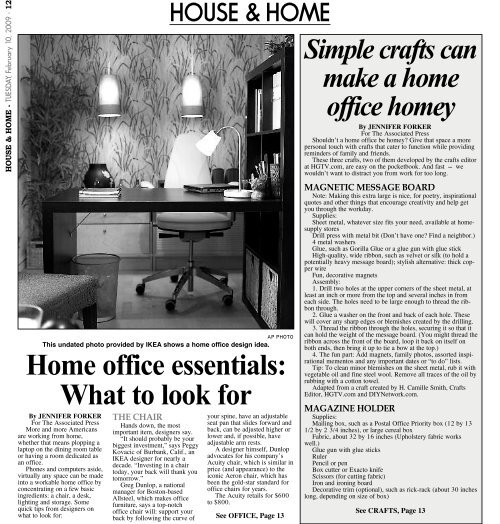
HOUSE & HOME - TUESDAY, February 10, 2009 - 12By JENNIFER FORKERFor The Associated PressMore and more Americansare working from home,whether that means plopping alaptop on the dining room tableor having a room dedicated asan office.Phones and computers aside,virtually any space can be madeinto a workable home office byconcentrating on a few basicingredients: a chair, a desk,lighting and storage. Somequick tips from designers onwhat to look for:THE CHAIRHands down, the mostimportant item, designers say.“It should probably be yourbiggest investment,” says PeggyKovacic of Burbank, Calif., anIKEA designer for nearly adecade. “Investing in a chairtoday, your back will thank youtomorrow.”Greg Dunlop, a nationalmanager for Boston-basedAllsteel, which makes officefurniture, says a top-notchoffice chair will: support yourback by following the curve ofHOUSE & HOMEAP PHOTOThis undated photo provided by IKEA shows a home office design idea.Home office essentials:What to look foryour spine, have an adjustableseat pan that slides forward andback, can be adjusted higher orlower and, if possible, haveadjustable arm rests.A designer himself, Dunlopadvocates for his company’sAcuity chair, which is similar inprice (and appearance) to theiconic Aeron chair, which hasbeen the gold-star standard foroffice chairs for years.The Acuity retails for $600to $800.See OFFICE, Page 13Simple crafts canmake a homeoffice homeyBy JENNIFER FORKERFor The Associated PressShouldn’t a home office be homey? Give that space a morepersonal touch with crafts that cater to function while providingreminders of family and friends.These three crafts, two of them developed by the crafts editorat HGTV.com, are easy on the pocketbook. And fast — wewouldn’t want to distract you from work for too long.MAGNETIC MESSAGE BOARDNote: Making <strong>this</strong> extra large is nice, for poetry, inspirationalquotes and other things that encourage creativity and help getyou through the workday.Supplies:Sheet metal, whatever size fits your need, available at homesupplystoresDrill press with metal bit (Don’t have one? Find a neighbor.)4 metal washersGlue, such as Gorilla Glue or a glue gun with glue stickHigh-quality, wide ribbon, such as velvet or silk (to hold apotentially heavy message board); stylish alternative: thick copperwireFun, decorative magnetsAssembly:1. Drill two holes at the upper corners of the sheet metal, atleast an inch or more from the top and several inches in fromeach side. The holes need to be large enough to thread the ribbonthrough.2. Glue a washer on the front and back of each hole. Thesewill cover any sharp edges or blemishes created by the drilling.3. Thread the ribbon through the holes, securing it so that itcan hold the weight of the message board. (You might thread theribbon across the front of the board, loop it back on itself onboth ends, then bring it up to tie a bow at the top.)4. The fun part: Add magnets, family photos, assorted inspirationalmementos and any important dates or “to do” lists.Tip: To clean minor blemishes on the sheet metal, rub it withvegetable oil and fine steel wool. Remove all traces of the oil byrubbing with a cotton towel.Adapted from a craft created by H. Camille Smith, CraftsEditor, HGTV.com and DIYNetwork.com.MAGAZINE HOLDERSupplies:Mailing box, such as a Postal Office Priority box (12 by 131/2 by 2 3/4 inches), or large cereal boxFabric, about 32 by 16 inches (Upholstery fabric workswell.)Glue gun with glue sticksRulerPencil or penBox cutter or Exacto knifeScissors (for cutting fabric)Iron and ironing boardDecorative trim (optional), such as rick-rack (about 30 incheslong, depending on size of box)See CRAFTS, Page 13
Home officeessentials: Whatto look forContinued from Page 12Dunlop warns against office chairs that place a bar at the lowerback to lend support.“That’s not what you want,” he says. “That’s another pressurepoint.”Monica Pedersen, an HGTV designer, likes IKEA and Crate &Barrel’s office chairs. In particular, she recommends Crate &Barrel’s Icon Executive office chair ($599) and IKEA’s Nominellswivel chair (starting at $139) for bringing style into the homeoffice. IKEA’s Kovacic warns against buying a chair online.“You want to sit in it and make sure your body feels good in it,”she says.THE DESKDunlop cautions that while most office desks are 30 to 32 inchestall, if you buy one that’s taller, make sure your chair willadjust. If it doesn’t, you may be able to resolve the difference byattaching a keyboard tray to the underside of the desk.The key is to avoid having your shoulders raised while typing atthe computer, says Dunlop. If the desk and chair don’t align properly,your elbows won’t make that ergonomically correct 90-degreeangle that helps prevent back pain.As for desk style, Pedersen often uses Ballard Design’s modularoffice furniture in her design projects because they’re attractive and“you can create it any way you want.”LIGHTINGPedersen recommends a swing-arm lamp on the wall above thedesk for task lighting, and either a larger lamp or good ceilinglighting for more diffused light.Kovacic advocates a swing arm with a halogen bulb, and tryingto position the desk near natural light.“You’re sitting inside all day, so natural light makes it so muchnicer,” she says.STORAGEKovacic recommends something with doors that close to minimizeclutter, especially if the work area is in a prominent part ofthe house, such as a family room. Homeowners can tuck away notjust files and accessories, but computers and printers behind cabinetdoors, too.“It makes it look more serene and clean,” says Kovacic.OTHER NEEDSPedersen considers an area rug an essential. She recommendsa 41/2-by-61/2-inch, low-pile rug, such as a sisal. Use rug tapeinstead of a carpet pad, so chair legs or wheels don’t get stuck.Hide electrical cords, which are unsightly, says Pedersen, whofavors the Master Products Cord Away clips ($3.29) she picks upat Staples.— — —On the Web:http://www.allsteeloffice.comhttp://www.ballarddesigns.comhttp://www.crateandbarrel.comhttp://www.hgtv.comhttp://www.ikea.comhttp://www.staples.comHOUSE & HOMESimple crafts can make ahome office homeyAP PHOTOShouldn't a home office be homey? Give that space amore personal touch with crafts that cater to functionwhile providing reminders of family and friends.Continued from Page 12Assembly:1. With the box on its side,measure 6 inches from onebottom corner lengthwise upthe box and mark that spot.On the opposite corner,measure 12 inches lengthwiseup the box and mark it.2. Line the ruler up, fromone mark to the other, anddraw a straight line. Carry thatline around the entire box.3. With a sharp knife orscissors, cut along the line.This gives you the shape ofyour magazine holder.4. Decide which end of thebox you want facing out inyour office: The shorter end,with magazine titles showing,or the taller end, in which themagazines will be hidden.Wrap the box in fabric,starting at whichever end youdetermine will be the backside,and overlap the fabric in backwith the top layer of fabricfolded over 1/4 inch andpressed (for a cleaner line).5. Do not wrap the fabric onthe under side of the magazineholder.Instead, fold the fabric over1/4 inch and press, then line up<strong>this</strong> pressed edge along the bottomedge of the magazineholder.6. Once you figure out howbest to wrap the fabric, line itup and glue it in place, leavingthe edges at the top of the magazineholder open.After the rest of the fabric(sides and bottom) is glued inplace, fold the top layer intothe box.Cut away the fabric so onlya few inches are left inside thebox. Glue <strong>this</strong> fabric to the box(you will have to cut towardthe four inside corners so thefabric lies flat (don’t cut toofar).7. If using decorative trim,glue it along the bottom edgeof the magazine holder.Tip: Try using wrapping orscrapbook paper, or wallpaperremnants, rather than fabric.Adapted from instructionsfor “recycled magazine holder”at pinkandpolkadot.blogspot.com.Otherinstructions available atwww.allfreecrafts.com.MEMORYCOASTERSHave family photos, afavorite vacation memory or afunny moment close at hand,right under your drinking glass.Supplies:2 pieces of Plexiglas (about41/2 by 41/2 inches square).Check with your local homeimprovementstore, which mayhave scraps and will cut themto size.Colored electrical tape (red,blue and black work best)1 or 2 photosGlue gun with glue stickPaint pen (optional)1. Take the protective filmcover off the Plexiglas. Cut thephoto(s) to fit, and sandwichthe photo(s) between the twopieces of Plexiglas. (If youwant a photo on each side, usetwo.Or use one photo and writethe date it was taken on itsbackside.)2. Wrap the Plexiglasensemble with electrical tape,wrapping each corner like apackage and gluing it in place.Use one piece of tape to covereach side.3. Decorate the taped edgeswith the paint pen, using simpledesigns.Adapted from a craft by H.Camille Smith, Crafts Editor,HGTV.com andDIYNetwork.com.13 - HOUSE & HOME - TUESDAY, February 10, 2009