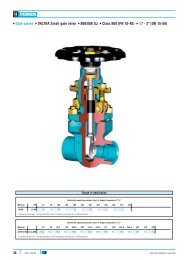
Masoneilan® Reciprocating Globe and Angle Valves ... - Fagerberg
Masoneilan® Reciprocating Globe and Angle Valves ... - Fagerberg
Masoneilan® Reciprocating Globe and Angle Valves ... - Fagerberg
- No tags were found...

Create successful ePaper yourself
Turn your PDF publications into a flip-book with our unique Google optimized e-Paper software.
Maintenance (Figures 3 <strong>and</strong> 4)Packing BoxTight sealing within the packing box is obtained by compressionof the packing (12). Compression must be achieved by evenlytightening the packing flange nuts (17) on the packing flange(15). Periodic re-tightening of the packing flange nuts is requiredto maintain proper sealing.Be careful not to over tighten the packing as this couldprevent proper operation of the valve. If leakage persists aftermaximum packing compression, then the packing needs tobe changed.Valve with PTFE PackingKevlar/PTFE, carbon/PTFE <strong>and</strong> pure PTFE packing rings arecut in such a way that they can be replaced without having toseparate the valve plug stem from the actuator stem.Valve with Grafoil PackingTo replace Grafoil packing, it is necessary to separate thevalve plug stem from the actuator stem.1. Remove the packing flange nuts (17) from the packingstuds (16).2. Lift the packing flange (15) <strong>and</strong> packing follower (14) upalong the valve stem (11).3. By means of a puller, remove the packing (12) being carefulnot to damage the sealing surface of the packing boxor the valve plug stem.4. Replace the packing rings, placing the cut in each ringabout 120° apart from the adjacent ring for PTFE packing.Press rings in one at a time.5. Reassemble the packing follower (14) <strong>and</strong> the packingflange (15).6. Tighten the packing flange nuts (17) without over compressingthe packing rings.7. Put the valve back into service <strong>and</strong> check for leakage.Tighten packing flange nuts (17) as required.Repair of PartsPrior to reassemble, examine parts carefully for any scratches,unusual wear, or other damage.Guiding SurfacesGuiding surfaces of the V-LOG restrictor (4), valve plug stemassembly (11), guide bushing (13) <strong>and</strong> cage retainer (18)when applicable must be checked. If there is only slight wearindications, then use a light abrasive to smooth out guidingsurfaces. Otherwise the factory should be consulted <strong>and</strong> thepart must be replaced.Seating SurfacesThe lapping procedure should only be conducted by experiencedvalve technicians. Lapping may cause greater damageto the seating surface when improperly done. When indoubt, contact the local Masoneilan factory for assistance.The seat ring seating surface (2) <strong>and</strong> valve plug seating surface(11) must be completely free of dents, wear, or scratches. Anyseating surface showing signs of slight deterioration should beconsulted with the factory before attempting to touch up. If aslight defect exists on either the seat ring seating surface (2)<strong>and</strong> valve plug seating surface (11), lapping can be applied perthe following instructions.1. Place seat ring (2) in the body, noting the seating angleis up.2. Assemble the V-LOG restrictor (4) onto the seat ring.3. Spread a fine layer of high quality lapping compound onthe seating surface.4. Assemble the valve plug assembly (11).5. Assemble the bonnet (6) <strong>and</strong> the guide bushing (13).6. Place an appropriate tool on the valve stem (11) threadto allow for manual rotation.7.Lapping can be repeated, but should be limitedas much as possible so that the seat remainssufficiently narrow to guarantee tightness.8. After lapping, disassemble the parts to clean them <strong>and</strong>then reassemble, making sure the seating angles arewithin tolerance.Gasket Seating SurfacesGasket seating surfaces must be free of dents, scratches,<strong>and</strong> corrosion.Seal Rings <strong>and</strong> GasketsSpiral-wound gaskets (3) must always be replaced after disassembly.Seal rings (5) can be reused if they are free ofscratches, erosion, corrosion, or other damage.Valve PlugIf the valve plug needs to be replaced see instructions forValve Reassemble.Valve Body - Bridgeman Sealing SurfaceDuring maintenance of the valve, always inspect the body boresurface adjacent to where the Bridgeman Seal (7) is seated. Ifthis surface has been deformed or if there is a groove where theseal seats, the surface should be cleaned <strong>and</strong> honed prior toreassembling the valve.If the refinishing procedure is unsuccessful, the factory shouldbe consulted for further instructions.Instructions ET00001 - 2/05<strong>Reciprocating</strong> <strong>Globe</strong> <strong>and</strong> <strong>Angle</strong> <strong>Valves</strong> with V-LOG Trim 4