
You also want an ePaper? Increase the reach of your titles
YUMPU automatically turns print PDFs into web optimized ePapers that Google loves.
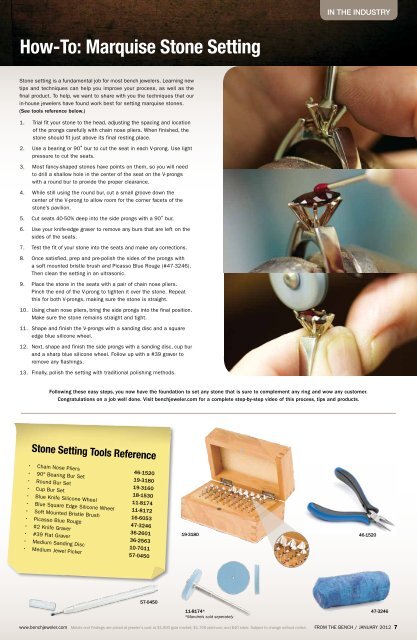
IN THE INDUSTRYHow-To: Marquise Stone SettingStone setting is a fundamental job for most bench jewelers. Learning newtips and techniques can help you improve your process, as well as thefinal product. To help, we want to share with you the techniques that ourin-house jewelers have found work best for setting marquise stones.(See tools reference below.)1. Trial fit your stone to the head, adjusting the spacing and locationof the prongs carefully with chain nose pliers. When finished, thestone should fit just above its final resting place.2. Use a bearing or 90˚ bur to cut the seat in each V-prong. Use lightpressure to cut the seats.3. Most fancy-shaped stones have points on them, so you will needto drill a shallow hole in the center of the seat on the V-prongswith a round bur to provide the proper clearance.4. While still using the round bur, cut a small groove down thecenter of the V-prong to allow room for the corner facets of thestone’s pavilion.5. Cut seats 40-50% deep into the side prongs with a 90˚ bur.6. Use your knife-edge graver to remove any burs that are left on thesides of the seats.7. Test the fit of your stone into the seats and make any corrections.8. Once satisfied, prep and pre-polish the sides of the prongs witha soft mounted bristle brush and Picasso Blue Rouge (#47-3246).Then clean the setting in an ultrasonic.9. Place the stone in the seats with a pair of chain nose pliers.Pinch the end of the V-prong to tighten it over the stone. Repeatthis for both V-prongs, making sure the stone is straight.10. Using chain nose pliers, bring the side prongs into the final position.Make sure the stone remains straight and tight.11. Shape and finish the V-prongs with a sanding disc and a squareedge blue silicone wheel.12. Next, shape and finish the side prongs with a sanding disc, cup burand a sharp blue silicone wheel. Follow up with a #39 graver toremove any flashings.13. Finally, polish the setting with traditional polishing methods.Following these easy steps, you now have the foundation to set any stone that is sure to complement any ring and wow any customer.Congratulations on a job well done. Visit benchjeweler.com for a complete step-by-step video of this process, tips and products.Stone Setting Tools Reference• Chain Nose Pliers 46-1520• 90° Bearing Bur Set 19-3180• Round Bur Set 19-3160• Cup Bur Set 18-1530• Blue Knife Silicone Wheel 11-8174• Blue Square Edge Silicone Wheel 11-8172• Soft Mounted Bristle Brush 16-6053• Picasso Blue Rouge 47-3246• #2 Knife Graver 36-2601• #39 Flat Graver 36-2563• Medium Sanding Disc 10-7011• Medium Jewel Picker 57-045019-3180 46-152057-045011-8174* 47-3246*Mandrels sold seperatelywww.benchjeweler.com Metals and Findings are priced at jeweler's cost at $1,900 gold market; $1,700 platinum; and $40 silver. Subject to change without notice. FROM THE BENCH / JANUARY 2012 7