PrintSmith Session Handouts Offset and Copier Pricing - EFI
PrintSmith Session Handouts Offset and Copier Pricing - EFI
PrintSmith Session Handouts Offset and Copier Pricing - EFI
Create successful ePaper yourself
Turn your PDF publications into a flip-book with our unique Google optimized e-Paper software.
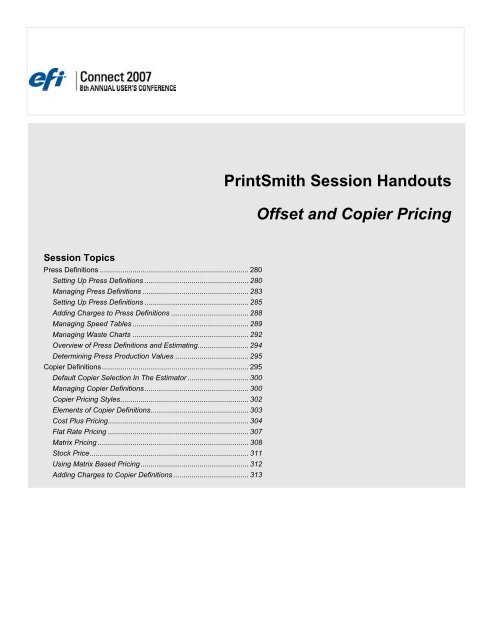
<strong>PrintSmith</strong> <strong>Session</strong> <strong>H<strong>and</strong>outs</strong><strong>Offset</strong> <strong>and</strong> <strong>Copier</strong> <strong>Pricing</strong><strong>Session</strong> TopicsPress Definitions ......................................................................... 280Setting Up Press Definitions ................................................... 280Managing Press Definitions .................................................... 283Setting Up Press Definitions ................................................... 285Adding Charges to Press Definitions ...................................... 288Managing Speed Tables ......................................................... 289Managing Waste Charts ......................................................... 292Overview of Press Definitions <strong>and</strong> Estimating......................... 294Determining Press Production Values .................................... 295<strong>Copier</strong> Definitions........................................................................ 295Default <strong>Copier</strong> Selection In The Estimator .............................. 300Managing <strong>Copier</strong> Definitions ................................................... 300<strong>Copier</strong> <strong>Pricing</strong> Styles............................................................... 302Elements of <strong>Copier</strong> Definitions................................................ 303Cost Plus <strong>Pricing</strong>..................................................................... 304Flat Rate <strong>Pricing</strong> ..................................................................... 307Matrix <strong>Pricing</strong> .......................................................................... 308Stock Price.............................................................................. 311Using Matrix Based <strong>Pricing</strong> ..................................................... 312Adding Charges to <strong>Copier</strong> Definitions ..................................... 313
<strong>PrintSmith</strong> <strong>Session</strong> <strong>H<strong>and</strong>outs</strong>Press DefinitionsPress definitions are a key component of <strong>PrintSmith</strong>’s powerful estimating engine. In pressdefinitions, you define key variables of your company’s pricing practices that influence profitability.Setting Up Press DefinitionsThe Press Definition window is where you enter the types of presses you have <strong>and</strong> define theirrunning characteristics. While you may only have a few presses in your shop you can defineseveral presses to accommodate differing pricing characteristics of a given job. For example, tightregistration, coated stock, carbonless forms, etc. can all run on the same press but one may runslower, or take longer to set up, or require more waste. You can define up to 100 press definitions.Select Press Definitions from the <strong>Pricing</strong> menu.The Press Definition window is displayed.<strong>Offset</strong> And <strong>Copier</strong> <strong>Pricing</strong> 280
To print a report of all press definitions, select the Print comm<strong>and</strong> from the File menu.<strong>PrintSmith</strong> <strong>Session</strong> <strong>H<strong>and</strong>outs</strong>The report lists each press definition, its labor rate, labor markup, set up times, speed table, wastechart, wash up charges, <strong>and</strong> attached charges.Review the press definitions in <strong>PrintSmith</strong>. The Machine ID field in <strong>PrintSmith</strong> allows you to grouppress definitions for reporting work in progress. For example, you may define four different pressdefinitions for your Heidelberg Quick-Master but only have one actual press. Enter the sameMachine ID in those four definitions <strong>and</strong> you will be able to view work in progress for all fourpresses even though there is one piece of equipment.The name of the press helps the user underst<strong>and</strong> the specifics <strong>and</strong> assists them in selecting thecorrect press for the job. Name your presses to reflect the situations in which you will use them.Define the maximum paper size that can be run on this press. <strong>PrintSmith</strong> will warn you if the paperselected for a job exceeds the maximum paper size.For each press, you can define average impressions per hour or attach a variable speed table. Thespeed table lets you adjust the speed of the press based upon quantity produced. You can alsoattach a waste chart to each press definition. If no waste chart is attached, the press definition usesthe default waste chart.Notes: It is recommended that you title Speed tables <strong>and</strong> Waste charts with a name that matchestheir characteristics (i.e. High Waste, Slow Speed, A.B Dick 9870, etc.).<strong>Offset</strong> And <strong>Copier</strong> <strong>Pricing</strong> 281
<strong>PrintSmith</strong> <strong>Session</strong> <strong>H<strong>and</strong>outs</strong><strong>PrintSmith</strong> allows you to attach up to 10 charges on each press. Whenever the press is selected, itwill add those charges. For example, you could add Metal Plates, Ink, <strong>and</strong> Cutting to each press<strong>and</strong> they would be automatically included on all jobs estimated with that press definition.<strong>PrintSmith</strong> gives you the ability to track sales generated from each press into a specific salescategory.Example: The following window shows the assumptions for a press named Komori 4 Tower.In this example,the Komori 4Tower press hascustomizedSpeed <strong>and</strong> Wastetables attached.Thisinformationwill be used asthe basis forcostingprinting jobs.There are twochargesVerify the speed <strong>and</strong> waste tables by clicking on their respective buttons. Change the rates to meetyour requirements.Click the Charges button to see which charges are attached. Add more, remove, or accept thoseassumptions. You can attach 10 charges to any one press.Developing Press Definitions should be a quick process. If you define the presses before you enteryour stocks, you will be able to assign a press definition to the paper definition in the set up.<strong>PrintSmith</strong> uses press definitions to determine production costs for jobs using the Printing pricingmethod. Press Definitions are also used with List pricing to estimate the run time of a job for theWork in Progress report.You can define up to 100 different press definitions. A press definition defines how the job is run,the labor rate, press speed, waste, markups, <strong>and</strong> preset charges. A press definition is notnecessarily related to a single machine. You might have a special press definition for carbonlessforms, envelopes, business cards, coated stock <strong>and</strong> so on.The buttons at the bottom of the window are used in conjunction with the selected press definition:<strong>Offset</strong> And <strong>Copier</strong> <strong>Pricing</strong> 282
Add/ChangeThis button is used to save the current contents of the window. If you are creating a new pressdefinition, it will add it, if you are working with an existing definition, it will change it.Stock Price ListThe Stock Price List button allows you to generate a price list for any press definition. Before theprice list is generated, you select the stock to be used with the press definition. It is particularlyuseful to tune your press definition for a particular stock without continually going back <strong>and</strong> forthbetween stock <strong>and</strong> press definitions.Press Price List<strong>PrintSmith</strong> <strong>Session</strong> <strong>H<strong>and</strong>outs</strong>The Press Price List button allows you to generate a price list for any press definition. This price listis exactly the same, as the one generated from Stock Definitions except it does not include a stockprice. Use this to generate production price lists. These price lists can be useful for manuallycalculating an approximate price for a special order paper.DeleteDeletes the selected press definition.Clear/CloseIf you have selected a definition, the Clear button erases the information leaving you with a blankwindow so you can create a new definition. The Close button closes the Press Definition window.Default Press Selection in the EstimatorThe first entry in the list is the default press. This default is the press that <strong>PrintSmith</strong> uses when thestock definition does not have a preset press.You can change the default press at any time by moving a different press definition up to thebeginning of the list. Refer to the Organizing Press Definitions section.Managing Press DefinitionsWhen the window first opens, you are ready to create a new press definition. To create a definition,fill in the data <strong>and</strong> click the Add button. After saving the press definition, the window clears so youcan add another definition. The new press definition resides at the bottom of the list.Selecting An Existing Press DefinitionThe top part of the window contains a list of the existing press definitions. Clicking once on anyitem in the list displays the definition. The Add button now reads Change because an existing pressdefinition is selected. To update the definition, click the Change button.When a press definition is displayed, there is a Clear button, selecting it clears the definition fromthe window <strong>and</strong> presents a blank record so you can add another press. The button label thenchanges to read Close. Selecting it closes the press definition window.Creating A New Press DefinitionWhen the Press Definitions comm<strong>and</strong> is first selected, the window opens with an empty pressdefinition. You add a press definition by filling out the text boxes <strong>and</strong> clicking the Add button. If thebutton in the lower left h<strong>and</strong> corner is the Change button you must first click the Clear button to geta blank definition. You can also use the New comm<strong>and</strong> in the File menu.<strong>Offset</strong> And <strong>Copier</strong> <strong>Pricing</strong> 283
Changing An Existing Press Definition<strong>PrintSmith</strong> <strong>Session</strong> <strong>H<strong>and</strong>outs</strong>To change a press definition, first locate the press in the list of presses at the top of the window.When you find the press you wish to change, click on the name <strong>and</strong> <strong>PrintSmith</strong> will display thedefinition. After you have made your changes, click the Change button to save them.Copying An Existing Press DefinitionThe easiest way to duplicate a press definition is to select it, hold down the key onMacintosh or the key on Windows, <strong>and</strong> drag the press you want to copy to a new location inthe list. When you release the mouse, the press is copied. Enter a new name <strong>and</strong> save thechanges.Existing Press Definitions can also be copied by selecting a press definition <strong>and</strong> clicking the Clearbutton or select the New comm<strong>and</strong> in the File menu. This action sets up a new untitled definitionusing exactly the same parameters as the definition you want to copy. Type in a new name <strong>and</strong>click the Add button.You can also use Edit menu comm<strong>and</strong>s to copy <strong>and</strong> paste definitions. To do this, click on thedefinition to be copied, select Cut or Copy from the Edit menu. Click the Clear button, <strong>and</strong> thenselect the Paste comm<strong>and</strong> from the Edit menu.New Definitions are added to the end of the list. You can move a new definition to a differentposition in the list by dragging. Refer to the Organizing Press Definitions section for moreinformation.Deleting Press DefinitionsFind the press definition in the list <strong>and</strong> select it. When the definition is displayed, click the Deletebutton.When first setting up your pricing system you can safely delete any press definition. After you areup <strong>and</strong> running, we recommend more caution when deleting definitions. You can still delete anypress definition. But you may want to keep definitions that have been used as a preset press in astock definition or by the estimator in a job.If you would like to retain a definition but no longer use it, we recommend moving it to the end ofthe list. When you create a press job, a press definition is selected. When the job is saved, the factthat this particular press was used is part of the job. When the job is copied to a new invoice orchanged in any way, <strong>PrintSmith</strong> selects the press definition from the pricing system <strong>and</strong> uses it toadjust the price. <strong>PrintSmith</strong> can find the definition even if you have changed the name or location inthe press list, but not if it was deleted. When this occurs, <strong>PrintSmith</strong> warns you that the definition ismissing <strong>and</strong> that press needs to be selected.If you preset a press selection in a Stock Definition <strong>and</strong> then delete that press definition, <strong>PrintSmith</strong>automatically selects the default press (the press at the top of the list). The user may not recognizethis <strong>and</strong> an incorrect price could be given to the customer.On the other h<strong>and</strong>, if you make major changes to the pricing system, you may want to call attentionto the fact that deleting some press definitions changed pricing. When you use an old job that waspriced with the “old” pricing system, the Estimator will warn you <strong>and</strong> recommend changingdefinitions. At this point, the user can select the proper press from a list.Organizing Press DefinitionsThe order in which press definitions are displayed is important because the first definition in the listis the default press for Print <strong>and</strong> List job pricing methods.<strong>Offset</strong> And <strong>Copier</strong> <strong>Pricing</strong> 284
<strong>PrintSmith</strong> <strong>Session</strong> <strong>H<strong>and</strong>outs</strong>To change the position of a press definition in a list, click (<strong>and</strong> hold) on the press name <strong>and</strong> dragthe entry to the desired position in the list.Repeat this operation as often as you like until all of the presses are in the order you want.Remember the first press in the list is the default press definition <strong>PrintSmith</strong> selects when youcreate new Printing or List jobs <strong>and</strong> there is no pre-selected press.Setting Up Press DefinitionsThe press data entered is used by <strong>PrintSmith</strong> to estimate the amount of time needed for the job<strong>and</strong> the labor rate to apply. It determines the amount of setup time, the speed of the press <strong>and</strong> soforth.Machine ID.The Machine ID is a number from 1 to 255, identifying the machine. If you use more than one pressdefinition for each real machine, you can identify the machine with a number.The Machine ID is used by Work In Progress to sort jobs by the machine the order will be run on,rather than the press definition used to price the job.NameThe Name field can hold up to 50 characters, identifying the press.Machine NameA Machine Name is the actual hardware name for the Press. Used by the Tracker module.Costing PressWhen a Machine Name is entered, the Costing Press option becomes available. The costing pressdefinition is intended to be used somewhat generically <strong>and</strong> can apply to several similar presses thatmay or may not be available for a job.For example, a single, physical press can have several press definitions depending on the differentways you want to run jobs on it. In the course of running a job, a physical press often becomesunavailable <strong>and</strong> the job must be run on another press. The press operator should use the numbersfor job costing as the press on which the job was run. The operator can pick this generically definedCosting Press which will be used to calculate costs on the final invoice.Output DescriptionDefault value is “printed.”Production LocationA Production Location is the name of a process set to indicate what stage a job is at in the overallproduction process. Production Locations are defined in the Production Locations table <strong>and</strong>support the Tracker module.OEM Device IDRequired for Fiery integration.Integrated DeviceTurn on for Fiery integration.Paper Style: Sheet-Fed versus Roll-FedIf you are upgrading from a version of <strong>PrintSmith</strong> earlier than 8.0, by default all of your pressdefinitions will use Sheet-Fed as the paper style. You must go through your list of presses <strong>and</strong>select Roll-Fed if you want to take advantage of the features available for that style.<strong>Offset</strong> And <strong>Copier</strong> <strong>Pricing</strong> 285
Note: You should also select a default sheet-fed <strong>and</strong> roll-fed press definition; otherwise,<strong>PrintSmith</strong> uses the first press definition of each listed type as the defaultMax Paper Size / Min Paper Size<strong>PrintSmith</strong> <strong>Session</strong> <strong>H<strong>and</strong>outs</strong>These fields indicate the largest <strong>and</strong> smallest size paper that can be run on the press. TheEstimator uses this to check for an improper press specification. You can leave it blank if this is notimportant to you. The Estimator will still allow you to specify a press with a smaller run size but willremind you that the run size is larger than that allowed by the press.Avg. ImpressionsThe Average Impressions field defines the speed at which the press usually runs. The Estimatoruses this value to determine how long it will take to run a job. You can override this value for aparticular job in the job’s Production Data window. If you define a speed table for the press, theamount entered here is ignored, replaced with the word variable <strong>and</strong> the speed is taken from thetable.Labor RateThe Labor Rate is the cost per hour to run the press. This value is used as the cost basis in thecosting system.Labor MarkupThe Labor Markup field is the mark up on the labor rate when generating the production componentof a print job price. The markup is multiplied by the labor rate to determine the charge for labor.This value is used as profit in the costing system.Minimum LaborThe Minimum Labor field indicates the minimum number of labor minutes assigned to a job. Usethis field when you want to charge a penalty for short runs on a particular press or establish aminimum price for using this press.Fixed WasteFixed Waste is the number of sheets of spoilage to add to all jobs that use this press. This value isin addition to waste calculated as a percentage of the run, which is determined by a waste chart.SetupSetup is the number of minutes usually required to prepare the press for the first run of a job.# HeadsThe Number of Heads field is the number of print heads (impression cylinders) on the press. Thisfield determines the number of passes needed to print a number of colors specified in the job.Setup Add’l HeadThe Setup Additional Head field records the additional time needed to prepare each additional printhead on multi-color runs. (<strong>PrintSmith</strong> ignores unneeded heads.)Setup Add’l RunThe Setup Additional Run field records the additional time needed to prepare for an additional run.This value should include the time for a plate change <strong>and</strong> run up. The Estimator uses this value forall passes after the first one.Work & Turn 2 nd side setupThis field supports the redesigned work <strong>and</strong> turn functionality.<strong>Offset</strong> And <strong>Copier</strong> <strong>Pricing</strong> 286
Washup FeeWashup Fee records the dollar amount charged for each washup. You specify the number ofwashups for each job.Washup Minutes<strong>PrintSmith</strong> <strong>Session</strong> <strong>H<strong>and</strong>outs</strong>Washup Minutes is the time it takes to do the washup of the press.Note: Do not use Washup Fee <strong>and</strong> Washup Minutes in the same Press Definition, as it will addboth prices together in a job.If you enter a value for Washup Minutes only, the washup charge is:Washup Minutes x WashesWashup time per fountainWashup time per fountain is the time it takes, in minutes, to do the washup of each ink fountain. Ifyou enter a value for Washup Minutes <strong>and</strong> Washup time per fountain, the washup charge is:(Washup Minutes x Passes) + (Washes x Washup time per fountain)Washes <strong>and</strong> Passes are specified in job specification.Speed TableGenerally, the longer the press run, the closer a machine gets to its rated speed. Because thepress speed increases on long runs, it is more efficient <strong>and</strong> cheaper to produce each piece. Youcan use the speed table button to create a speed curve that adjusts the press speed for the lengthof the run. Refer to the Managing Speed Tables section for additional information.Waste ChartIn addition to the system default waste chart, <strong>PrintSmith</strong> lets you define waste charts for eachpress. Refer to the Managing Waste Charts section for additional information.Add ChargesEach press definition can have up to 10 preset charges. The Add Charges button allows you to editthe preset charge list. If charges are already assigned to the press definition, the number ofcharges displays on the button as “(1) Charges…”. Refer to the Adding Charges to PressDefinitions section for additional information.Sales CatYou can assign each press definition to a different sales category. This assignment is useful if youwant to separate certain types of jobs in your sales summary based on the press definition used forthe job. Use the Sales Cat pop up menu to select a sales category.PerfectorChecking the Perfector option changes the method <strong>PrintSmith</strong> uses to calculate the number ofpasses in a job. On a normal press, an additional pass is needed for each side. On a perfector, youcan print on both sides of the stock in a single pass. If this button is enabled, <strong>PrintSmith</strong> calculatesadditional passes only when the total number of passes exceeds the number of heads available. Inthis context, 1/1 (one color front <strong>and</strong> back) is the same as 2/0 (2 colors front, none on the back).Likewise, on a 4 head press, 4/0, 3/1 <strong>and</strong> 2/2 all price the same wayTarget <strong>Pricing</strong>Each press definition has its own Target <strong>Pricing</strong> table. Target <strong>Pricing</strong> is a method of adjusting costbased pricing for market conditions at any quantity or job type. You can be as specific in adjusting aprice for 1/1 pricing, a quantity of 1000, to exactly $15.15 while leaving all other prices unchanged.<strong>Offset</strong> And <strong>Copier</strong> <strong>Pricing</strong> 287
<strong>PrintSmith</strong> <strong>Session</strong> <strong>H<strong>and</strong>outs</strong>Then, when your costs change, the price is automatically adjusted while maintaining the samemargins <strong>and</strong> market position. Refer to the Target <strong>Pricing</strong> section for additional information.Adding Charges to Press DefinitionsCharge definitions add a tremendous amount of flexibility to the <strong>PrintSmith</strong> Estimator. The sixcharge definition comm<strong>and</strong>s (Pre Press, Bindery, Production, Merch<strong>and</strong>ise, Mailing Services, <strong>and</strong>Miscellaneous) can hold up to 60,000 different charge definitions. You can select any 10 of thosecharges <strong>and</strong> attach them to a press definition. When you select a press, the preset charges areautomatically loaded. If you change to a different press, the charges that are attached to the oldpress are discarded <strong>and</strong> the new set of charges attached to the new press is loaded.To add charges to the preset charge list, click the Add Charges button. The Charge Selectorwindow is displayed.The window is divided into two sections, the top section is used for making new selections, <strong>and</strong> thebottom section displays the current selections <strong>and</strong> is used to remove preset charges from the list.The top part of the window presents a hierarchy. At the top level are the charge comm<strong>and</strong>s. Beloweach charge comm<strong>and</strong> is a list of the categories defined in the comm<strong>and</strong> window. Below eachcategory are the charge definitions themselves.Double-clicking on one of the charge definitions adds it to the bottom of the list. You can preset upto 10 charges, which will display in the bottom of the window. You can remove a preset charge byselecting it <strong>and</strong> clicking the Remove button. When a charge is attached to a press, the charge itselfis not copied. The press definition remembers where to find the charge. If you change a chargedefinition, <strong>PrintSmith</strong> uses the latest definition when the charge is added to a job.Click the Close button when you have finished attaching selections.Strategies For Using Preset ChargesThe biggest advantage to using preset charges is that it gives you the ability to quickly generatecomplex quotes in a consistent manner. Often, this means that complex quotes can be delegatedto less knowledgeable employees with a much greater degree of confidence. It also can serve as atickler – preset all the most common charges to each press <strong>and</strong> when entering a job, the user c<strong>and</strong>elete any that do not apply to a particular job. It is often easier to recognize elements in a job thatshould not be there, than it is to see what you have forgotten to add.For example, if you are producing many direct mail jobs, you could add a metering charge to apress definition set up for envelopes. This may even prompt the user to go back to the customer<strong>and</strong> ask if they want the envelopes metered which may increase the value of the order. There aremany different strategies for defining press definitions <strong>and</strong> deciding what, if any, charges should bepreset in the press.<strong>Offset</strong> And <strong>Copier</strong> <strong>Pricing</strong> 288
<strong>PrintSmith</strong> <strong>Session</strong> <strong>H<strong>and</strong>outs</strong>One of the most common uses for preset charges is to add plates. When a press definition isselected you already know what kind of plate the job requires. If you use both metal <strong>and</strong> paperplates on the same press, it is a simple matter of setting up press definitions to match your decisionprocess. A press definition such as “AB Dick - Metal” or “AB Dick – Tight Registration” <strong>and</strong> another“AB Dick - Normal” might be all you need to separate jobs requiring metal plates from jobs requiringpaper plates. If you have different presses, presetting a plate charge with the proper sized plateeliminates a step in the estimating process.Be consistent in your use of preset charges. If only some of your press definitions have negs <strong>and</strong>plates automatically attached, expect the person entering the job to experience some level ofconfusion. Preset plate charges on all press definitions.There are plenty of other operations you can be inconsistent with <strong>and</strong> not have to add to everypress definition. The key is to title the press definition as appropriately as possible <strong>and</strong> attach thebasic charges that will make sense to the user. Group similar press definitions together in a wellorganized manner so it makes sense <strong>and</strong> is easy for your staff to make a selection.Managing Speed TablesSpeed tables let you set up presses with realistic throughput based on the length of the job.Generally, the longer the press run, the closer the machine can come to its rated speed since thereare fewer stops for adjustment on a long run once the job is running properly.<strong>PrintSmith</strong> allows you to define speed tables that you designate in a press definition. When you adda speed table, the press is termed a variable speed press because <strong>PrintSmith</strong> uses the speed tableto look up the speed based on the length of the job.There are two steps to setting up a variable speed press: creating the speed table <strong>and</strong> assigning itto the press. As seen in the Press Definition window:“Variable” means thatspeed is calculatedbased on job length.Speed Table button usedto select tables to beassigned or edited.Name of SelectedSpeed TableOnce a speed table has been assigned to a press definition, the Speed Table name is displayed tothe right of the Speed Table button. Clicking the Speed Table Name opens the table for editing.Creating A Speed TableIf the press does not have a speed table, clicking the Speed Table button displays a list of all thespeed tables.<strong>Offset</strong> And <strong>Copier</strong> <strong>Pricing</strong> 289
<strong>PrintSmith</strong> <strong>Session</strong> <strong>H<strong>and</strong>outs</strong>Assign TableClear AssignmentCreate New TableDelete Selected TableCloses Window Without PerformingAn ActionYou can create an unlimited number of speed tables. However, you are probably able to operatewith just a few since you can assign the same table to more than one press definition. The Save Ascomm<strong>and</strong> in the File menu can be used to copy a speed table <strong>and</strong> give it a new name.Notes: Changing a speed table in any press definition changes the base table, which may beattached to other press definitions using that table.Clicking the New button opens the table definition window.This window is used throughout the pricing system to set up price lists. It is also used for wastecharts. In this context, the window is used to specify the name of the speed table. For speed tables,<strong>PrintSmith</strong> determines the button settings <strong>and</strong> only the Interpolate button can be changed.Usually this window is much smaller, use the zoom box to change the size of the window <strong>and</strong> showor hide these configuration details.InterpolationNote the setting of the Interpolate button. Because it is enabled, <strong>PrintSmith</strong> calculates intermediatevalues if the quantity being looked up doesn’t exactly match a quantity in the table. For example, ifyou had a table with a quantity of 1000 <strong>and</strong> a speed of 4000 <strong>and</strong> the next entry in the table had aquantity of 2000 <strong>and</strong> a speed of 5000 <strong>and</strong> you wanted to find the speed for a run of 1500,<strong>PrintSmith</strong> would return a speed of 4500. Because 1500 is exactly in the middle of 1000 <strong>and</strong> 2000quantities, the speed, 4500, is half the difference between 4000 <strong>and</strong> 5000. You can, if you wish,disable this button. If it is disabled, the speed jumps to the next entry with no intermediate values.This setting can result in the price for 1100 being less than the price for 1000 - so we recommendyou leave it enabled.<strong>Offset</strong> And <strong>Copier</strong> <strong>Pricing</strong> 290
<strong>PrintSmith</strong> <strong>Session</strong> <strong>H<strong>and</strong>outs</strong>Entering Data in Speed TablesAfter entering the name of the table, enter the quantities <strong>and</strong> speeds, click the OK button <strong>and</strong> thenew speed table is created.The first zero quantitydenotes the end of thelist. key changes column key changes linearrow keys on keyboardchange selectionAs the quantity increases, so should the press speed, reducing the unit labor cost on longer runs.The entire list need not be used. At least the first two lines must be defined.You can specify up to 15 different quantity/speed combinations. When you enter the quantities,they should be sequential with the smallest quantity at the top of the list <strong>and</strong> at least the first twoquantities are specified. The maximum quantity does not need to be the largest quantity you willever run. When the quantity in the job is larger than the largest value in the speed table, the lastspeed in the table is used.Normally, the press speed should increase at higher quantities, but it does not have to. You could,for example, reduce the effective speed when the quantity reaches the point where the pressusually has to be reloaded. Higher press speeds result in shorter run times <strong>and</strong> a smaller laborcharge.Modifying A Speed TableOnce a table has been assigned to a press, click the name of the assigned table to open. You canchange the speed table <strong>and</strong> click the OK button to save the changes.Notes: Remember, the speed table may be used by other press definitions <strong>and</strong> any changes youmake, affect those press definitions too.Changing The Selected Speed TableTo use a different speed table, click the Speed Table button. <strong>PrintSmith</strong> opens the Speed Table list.Select a speed table, or click the Clear button to remove the existing speed table assignment. Tosee a graphical representation of a speed table, hold down the key on Macintosh or the key on Windows <strong>and</strong> the key when you click on the Speed Table name.Changing The Name Of A Speed TableIn order to change the name of an existing speed table, you must open the speed table. If it isalready assigned to a press, select the press definition <strong>and</strong> then click the speed table name. If ithas not been assigned to any press yet, you must assign it to one at least temporarily.<strong>Offset</strong> And <strong>Copier</strong> <strong>Pricing</strong> 291
<strong>PrintSmith</strong> <strong>Session</strong> <strong>H<strong>and</strong>outs</strong>When the window is open, click the zoom box in the upper right had corner of the window title sothe name of the table is visible in an edit field. Click the edit field <strong>and</strong> type in a new name. Whenyou click the OK button, the name is changed.Notes: Changing the name of a speed table automatically changes the speed table name on allpress definitions using that table.Deleting a Speed TableTo delete a Speed Table, click the Speed Table button. When the Speed Table list opens, selectthe Speed Table <strong>and</strong> click the Delete button.Notes: Remember, the speed table may be used by other press definitions. Before deleting aspeed table, make sure it is not being used by any other press definition.Managing Waste ChartsEven though there is a system wide waste chart, <strong>PrintSmith</strong> recognizes each type of press canhave different spoilage characteristics. To support this, each press definition can have its ownwaste chart.The procedures for managing waste charts are nearly identical to those used for speed tables.There are two steps to setting up a waste chart for a press: creating the waste chart <strong>and</strong> assigningit to the press definition. Once a waste chart has been assigned to a press definition the name ofthe waste chart is displayed to the right of the Waste Chart button.Creating A Waste ChartIf the press does not currently have a waste chart, clicking the Waste Chart button displays a list ofall the waste charts in the system.Assign Selected Waste ChartClear AssignmentCreate New Waste ChartDelete Selected Waste ChartCloses Window Without PerformingAn ActionYou can define a waste chart for each press; however, it is likely that you will be able to operatewith just a few waste charts. You can assign the same waste chart to more than one pressdefinition.Notes: Changing a waste chart in one press definition changes it in all the press definitions usingthat chart.<strong>Offset</strong> And <strong>Copier</strong> <strong>Pricing</strong> 292
Clicking the New button opens the Waste Chart definition window.<strong>PrintSmith</strong> <strong>Session</strong> <strong>H<strong>and</strong>outs</strong>This window is used throughout the pricing system to set up price lists. It is also used for speedtables. For waste charts, the button settings are determined by <strong>PrintSmith</strong>, <strong>and</strong> cannot be changed.Note that the Interpolate button has been grayed out <strong>and</strong> cannot be changed. Because it isenabled, <strong>PrintSmith</strong> calculates intermediate values if the quantity being looked up does not exactlymatch a quantity in the table. The result is a smooth curve.The entire list must be used. Run length must increase from top to bottom. As the quantityincreases, the waste percentage should decrease in small enough increments. Avoid the number ofwasted sheets becoming smaller on longer runs.A complete waste chart consists of 15 quantity/percentage combinations. The maximum quantitydoes not need to be the largest quantity you will ever run. When the quantity in the job is largerthan the largest value in the waste chart, the last percentage in the chart is used.Use the Print comm<strong>and</strong> in the File menu to print a waste chart.<strong>Offset</strong> And <strong>Copier</strong> <strong>Pricing</strong> 293
Modifying A Waste Chart<strong>PrintSmith</strong> <strong>Session</strong> <strong>H<strong>and</strong>outs</strong>Once a chart has been assigned to a press, click the name of the waste chart to open it. You canchange the waste chart <strong>and</strong> click the OK button to save the changes.Notes: Remember, the waste chart may be used by other press definitions <strong>and</strong> any changes youmake, affect those press definitions too.Changing The Selected Waste ChartTo use a different waste chart, click the Waste Chart button. <strong>PrintSmith</strong> opens the Waste ChartList. Select a new chart, or click the Clear button to remove the existing waste chart assignment.Changing The Name Of A Waste ChartIn order to change the name of an existing waste chart, you must open the waste chart. If it isalready assigned to a press, select the press definition <strong>and</strong> then click the Waste Chart Name. If ithas not been assigned to any press yet, you must assign it to one at least temporarily.When the window is open, click the zoom box in the upper right had corner of the window title sothe name of the table is visible in an edit field. Select the edit field <strong>and</strong> enter a new name. Whenyou click the OK button the name is changed.Overview of Press Definitions <strong>and</strong> EstimatingThe press definition is used in the Printing <strong>and</strong> List pricing methods in the Estimator. A press willalways default in these jobs, but you have complete control over which press definition is used inany job <strong>and</strong> can change it at any time. When you select a stock from the stock list, if there is apress definition designated in that stock definition, that press is used in the job. If there is no pressdesignated in the stock definition or the job is for customer stock or special order, the default presswill be selected.One obvious use for press definitions is to describe the various machines in your shop. Perhapsless obvious is that the press definition is another way of describing how a particular stock or job isrun – how hard it is to set up, how fast it can run, <strong>and</strong> so on. With this in mind, alternative uses forthe press definition could be to describe classes of jobs such as business cards, carbonless, <strong>and</strong>so on. The press definition then is used to describe the running characteristics of a particular job. Itis also possible to use press definitions to specify production characteristics of some copiersalthough copier definitions are usually better suited for this purpose.<strong>Offset</strong> And <strong>Copier</strong> <strong>Pricing</strong> 294
<strong>PrintSmith</strong> <strong>Session</strong> <strong>H<strong>and</strong>outs</strong>Determining Press Production ValuesYour press definitions are very important, as labor is often the largest component in a printing job. Ifyou use a price list from one of the commercial price list bureaus or from a franchise you may nothave a clear idea what your production values are. This section provides some guidelines fordeveloping these factors.The formula that <strong>PrintSmith</strong> uses to calculate the labor component of several types of jobs includessome of the factors - abbreviated as follows:• aimp = 5000 Average Impressions/Hour• rate = 50.00 Labor Rate• markup = 1.5 Labor Markup• setup = 12 Initial set up time (minutes)• head = 5 Setup Add’l Head (minutes)• run = 8 Setup Add’l Run (minutes)• waste = 10% quantity x waste percent x number of passes (the waste percentage is taken fromthe waste chart)<strong>Copier</strong> DefinitionsAnother major pricing method is defined using copier definitions. You might own only one copierbut offer several differing pricing methods. Each definition can have its own formula, with a uniquematrix, <strong>and</strong> attached charges. Using this format, <strong>PrintSmith</strong> can h<strong>and</strong>le any pricing situation. Youhave the ability to enter 100 copier pricing definitions.Select <strong>Copier</strong> Definitions from the <strong>Pricing</strong> menu.<strong>Offset</strong> And <strong>Copier</strong> <strong>Pricing</strong> 295
The <strong>Copier</strong> Definition window is displayed.<strong>PrintSmith</strong> <strong>Session</strong> <strong>H<strong>and</strong>outs</strong>CostingInformationLike charges <strong>and</strong> press definitions, selecting the Print comm<strong>and</strong> from the File menu will print alisting of copier definitions.<strong>Offset</strong> And <strong>Copier</strong> <strong>Pricing</strong> 296
Select Print from the File menu comm<strong>and</strong>. The following report will print.<strong>PrintSmith</strong> <strong>Session</strong> <strong>H<strong>and</strong>outs</strong>Enter all of your copier costs into the costing field.Then select the pricing method you desire. This information will be used for costing all copier jobs.A popular pricing method for copies is based on a matrix of copies <strong>and</strong> originals.<strong>Offset</strong> And <strong>Copier</strong> <strong>Pricing</strong> 297
Select the 8.5 x 11 B&W Copy definition in the window.<strong>PrintSmith</strong> <strong>Session</strong> <strong>H<strong>and</strong>outs</strong>In this example, this copier is named 8.5 x 11 B&W Copy, runs at 90 copies per minute, uses thepricing method of Copies <strong>and</strong> Originals, <strong>and</strong> has an ID of 2 - for reporting work in progress.Sales from this copier definition are recorded in sales category HS Copy. No charges are attachedto the Add Charges button. The matrix used is the copy cost method.The copy markup is set to 1 <strong>and</strong> the stock price comes from the <strong>Copier</strong> 1 field in the stockdefinition. The second side is priced by counting as more originals.Click on Edit Matrix <strong>and</strong> the following table opens:Enter your base copier rate. This is usually the base 20# bond rate. <strong>PrintSmith</strong> can automaticallyadd a retail paper up charge to this matrix by looking back at the stock definition. Another popularmethod is to enter the basic click charge in this matrix <strong>and</strong> have <strong>PrintSmith</strong> automatically add theactual cost of the stock. There are many options!<strong>Offset</strong> And <strong>Copier</strong> <strong>Pricing</strong> 298
<strong>PrintSmith</strong> <strong>Session</strong> <strong>H<strong>and</strong>outs</strong><strong>PrintSmith</strong> uses copier <strong>and</strong> stock definitions to determine the price for copier jobs. You can createup to 100 copier definitions to describe the various kinds of copier pricing styles in your business.For example, high speed, convenience, color, contract, engineering, large format are all possiblepricing styles that can be set up in a copier definition.Method menu indicates the pricing style used with this copier definition.The buttons at the bottom of the window are used in conjunction with the currently selected copierdefinition as follows:Add/ChangeThis button is used to save the current contents of the window; it creates a new copier definition, orupdates the selected definition.Stock Price ListThe Stock Price List button allows you to generate a price list for any copier definition with aparticular paper attached. This is particularly useful in setting <strong>PrintSmith</strong> up as you can “tune” yourcopier pricing for a particular stock without continually going back <strong>and</strong> forth between stock <strong>and</strong>copier definitions.<strong>Offset</strong> And <strong>Copier</strong> <strong>Pricing</strong> 299
<strong>Copier</strong> Price ListThe <strong>Copier</strong> Price List button allows you to generate a price list for any copier definition withoutconsidering stock cost.DeleteDeletes the selected copier definition.Clear/Close<strong>PrintSmith</strong> <strong>Session</strong> <strong>H<strong>and</strong>outs</strong>If you have entered any data or selected a definition, the “Clear” button clears the name <strong>and</strong> setsup a new definition with the same pricing setup so you can create a new definition. The “Close”button closes the <strong>Copier</strong> Definitions window.Default <strong>Copier</strong> Selection In The EstimatorThere are three copier pricing methods: Black & White (B&W), Color, <strong>and</strong> Large Format (LF).These pricing methods each have a different default copier, indicated to the right of the copiernamesDefaultcopierselectionSet copiertypeYou should set the Default type for each copier type; otherwise, <strong>PrintSmith</strong> uses the first copier ofeach listed type as the default. The type must be set first before the definition is made the default.To set the default copiers:1. Select <strong>Pricing</strong> > <strong>Copier</strong> Definitions from the main menu. The <strong>Copier</strong> Definitions windowopens.2. Click in the Default B&W column to the left of the copier Definition Name that should be thedefault B&W copier.3. Click in the Default Color column to the left of the copier Definition Name that should be thedefault Color copier.4. Click in the Default LF column to the left of the copier Definition Name that should be thedefault Large Format copier.5. Select File > Save to apply changes.Managing <strong>Copier</strong> DefinitionsSelecting <strong>Copier</strong> DefinitionsClicking once on an item in the copier list displays the definition in the bottom section of thewindow.Creating a New <strong>Copier</strong> DefinitionWhen the <strong>Copier</strong> Definitions comm<strong>and</strong> is first selected, the window opens with a blank copierdefinition. Enter a name, enter the pricing information, <strong>and</strong> click the Add button. New definitions areadded to the end of the list. You can move a new definition to a different position in the list bydragging it. Refer to the Organizing <strong>Copier</strong> Definitions section for additional information.<strong>Offset</strong> And <strong>Copier</strong> <strong>Pricing</strong> 300
Copying an Existing <strong>Copier</strong> Definition<strong>PrintSmith</strong> <strong>Session</strong> <strong>H<strong>and</strong>outs</strong>The easiest way to duplicate a copier definition is to select it, hold down the key (Mac) or key (Win), <strong>and</strong> drag the copier you want to copy to a new location in the list. When yourelease the mouse, the definition is copied. Enter a new name <strong>and</strong> save the changes.An alternative method is to select the copier <strong>and</strong> click the Clear button. This action sets up a new,untitled definition using exactly the same pricing set up as the definition you wanted to copy. Typein a new name <strong>and</strong> click the Add button.You can also use the Edit menu comm<strong>and</strong>s to copy <strong>and</strong> paste definitions. Make sure you click onthe Change button before pasting in your new copier definition. Failure to do so results in pastingover whatever copier definition is highlighted. New definitions are added to the end of the list. Youcan move a new definition to a different position in the list by dragging. Refer to the Organizing<strong>Copier</strong> Definitions section for additional information.Changing an Existing <strong>Copier</strong> DefinitionSelecting an item in the copier list displays the definition in the bottom section of the window. Youcan change any of the menu selections or data fields <strong>and</strong> click the Change button or the Savecomm<strong>and</strong> in the File menu.Deleting a <strong>Copier</strong> DefinitionTo delete a copier definition, select the definition <strong>and</strong> click the Delete button. When first setting upyour pricing system you can safely delete any copier definition. After you are up <strong>and</strong> running, usecaution when deleting definitions. You can still delete any copier definition, but you shouldunderst<strong>and</strong> that if the definition has been used by other parts of the pricing system or by theestimator, you might wish to use an alternate strategy such as moving it to the end of the list <strong>and</strong>/orrenaming it.When you create a copier job a copier definition is selected. When the job is saved, the fact that aparticular copier was used is also saved. The copier definition itself does not become part of thejob. When the job is copied to a new job or changed in any way, <strong>PrintSmith</strong> uses the copierdefinition in the pricing system to adjust the prices. <strong>PrintSmith</strong> can find the definition if you’vechanged the name or location in the copier list, but not if it was deleted. When this happens,<strong>PrintSmith</strong> warns you that the definition is missing <strong>and</strong> prompts you to select a new one.If you attach a copier definition to a stock definition <strong>and</strong> the copier definition has been or will bedeleted, <strong>PrintSmith</strong> automatically selects the default copier. This may be confusing to the user <strong>and</strong>will generate a different price.If you make major changes to the pricing system, you may want to call attention to the fact thatdeleting a copier definition changed pricing. When you use an old job that was priced with the “old”pricing system the Estimator will warn you <strong>and</strong> recommend selecting a definition.Organizing <strong>Copier</strong> DefinitionsIt is possible to set default copiers in the <strong>Copier</strong> Definitions window. The first copiers listed nolonger have to be the defaults. The default copier will automatically be selected in the <strong>Copier</strong>dropdown list in the Job window.<strong>Offset</strong> And <strong>Copier</strong> <strong>Pricing</strong> 301
To set the default copiers:1. Select <strong>Pricing</strong> > <strong>Copier</strong> Definitions from the main menu. The <strong>Copier</strong> Definitions windowopens.2. Click in the Default B&W column to the left of the copier Definition Name that should be thedefault B&W copier.<strong>PrintSmith</strong> <strong>Session</strong> <strong>H<strong>and</strong>outs</strong>3. Click in the Default Color column to the left of the copier Definition Name that should be thedefault Color copier.4. Click in the Default LF column to the left of the copier Definition Name that should be thedefault Large Format copier.5. Select File > Save to apply changes.<strong>Copier</strong> <strong>Pricing</strong> StylesThere are nine pricing methods available. Selecting a pricing method determines how copier jobsare priced for that definition.These nine pricing methods represent three styles: Cost Plus, Flat Rate, <strong>and</strong> Matrix pricing. Thereare several variations possible with each style. The following guidelines will help you choose thepricing style best suited for any pricing requirement. When you choose a pricing method, thedefinition window changes to display pricing specifications for that method. It’s important toremember that all of this information can reside in the same definition simultaneously, even if it isn’tbeing used. For example, all copier definitions house machine specifications that are very useful inrecording actual or estimated costs even if they aren’t used to generate prices. Job costing stilluses the information.Notes: You can capture your costs for copying by entering machine specifications even if youdecide not to use the cost plus pricing method. Job Costing uses this costing information <strong>and</strong>, whenused with our optional DownLoader <strong>and</strong> Report Writer, you can perform even more extensive costanalysis on the resulting data.Cost Plus <strong>Pricing</strong> StyleThis pricing method is suited for two different kinds of pricing. The first <strong>and</strong> most obvious generatesprices based on actual costs to purchase, maintain, <strong>and</strong> run the machine. A mark up is applied tothese actual costs plus stock to produce a retail price.The second is Copy Range <strong>Pricing</strong> style. This is similar to a matrix pricing style using the matrix asa step table. For example, you would use Copy Range pricing if you want:• the first 10 copies to be priced at 5¢ per copy <strong>and</strong> the rest at 3¢• 20 copies would be 80¢; 50¢ for the first 10 <strong>and</strong> 30¢ for the last 10.• This can be an effective way of providing quantity based pricing as the unit price on the job is4¢.<strong>Offset</strong> And <strong>Copier</strong> <strong>Pricing</strong> 302
<strong>PrintSmith</strong> <strong>Session</strong> <strong>H<strong>and</strong>outs</strong>It is easy to set up <strong>and</strong> is fairly safe because you clearly identify the lowest price you’re willing tocharge <strong>and</strong> charge a premium for short run work. It is also very easy to explain to your customer<strong>and</strong> can give them the impression you are cheaper than the competition, even if that’s not the case.These two different ways of implementing pricing are actually complementary, you can use bothtogether. For example, you could set up the cost plus specifications to cover your actual costs <strong>and</strong>use the copy range to provide desired profit levels on a job.Flat Rate <strong>Pricing</strong> StyleThis pricing method is generally used for short run situations such as convenience copies orspecial purpose like engineering copies where you might charge by linear inches or square areainstead of by clicks.Matrix <strong>Pricing</strong> StyleThis style encompasses the “Copies <strong>and</strong> Originals”, “Copies per Original”, <strong>and</strong> “Total of all Copies”methods. These methods are suitable any time you want the unit price to change based on thelength of the job where the “Copy Range” method described in the “Cost Plus Style” above is toolimited. Each method differs in the way the matrix is used to derive the price. Each definition has itsown unique matrix, which ranges in size from 1 to 20 columns depending on pricing specifications.Elements of <strong>Copier</strong> DefinitionsIn the sections that follow, we examine each pricing style in detail <strong>and</strong> describe the purpose of eachfield <strong>and</strong> how it is used to generate pricing. But first, we will go over those parts of the definitionwindow common to all copier definitions.FieldMachine IDNameMachine NameCopies/MinuteOutput DescriptionProduction locationOEM Device IDCost CenterDefinitionA number, from 1 to 255, identifying the machine. If you use more than one copierdefinition for each actual machine, you should identify the machine with a number.The Work In Progress report uses this to sort jobs by the machine they will beproduced on rather than the definition to price the job.Up to 50 characters identifying the copier.A Machine Name is the actual hardware name for the <strong>Copier</strong>. Used by the Trackermodule.The number of copies per minute the machine is rated for, or your actualthroughput, whichever is less.Default value is “copied.”A Production Location is the name of a process set to indicate what stage a job is atin the overall production process. Production Locations are defined in theProduction Locations table <strong>and</strong> support the Tracker module.Required for Fiery integration.For use with the Scheduling Module<strong>Offset</strong> And <strong>Copier</strong> <strong>Pricing</strong> 303
FieldDefinition<strong>PrintSmith</strong> <strong>Session</strong> <strong>H<strong>and</strong>outs</strong>Printer TypeSelect a Printer Type for each copier. If this is your first <strong>PrintSmith</strong> installation, oryou are upgrading from a version prior to 8.0, you should go through your list ofcopiers <strong>and</strong> select the Printer Type for each copier.You can:• Select BW, Color, or both. For example, you may have a color copier that youalso use as a black <strong>and</strong> white copier when needed.• Select LF (Large Format) only. Notice that some options in this windowchange for Large Format.Integrated deviceMethod MenuSales Cat MenuCharges buttonTurn on for Fiery integration.This is used to select the pricing method of the copier.Used to select a sales category for tracking jobs revenue priced with this copierdefinition.You can add up to 10 charges to a copier definition. These charges areautomatically added to the job when this copier is selected.Cost Plus <strong>Pricing</strong>When the Cost Plus method is selected, the <strong>Copier</strong> Definition window is designed to directly enteryour costs for copying, even if you are using complicated lease/purchase/maintenance contracts.<strong>Offset</strong> And <strong>Copier</strong> <strong>Pricing</strong> 304
FieldDefinition<strong>PrintSmith</strong> <strong>Session</strong> <strong>H<strong>and</strong>outs</strong>Open Days/YearThe number of days your business is open during the year. If you’renormally open 5 days a week, the number is 5 x 52 or 260 days (minus anyholidays).Open Hours/DayThe number of regularly scheduled business hours. This should includescheduled overtime <strong>and</strong> second shifts.Monthly Payment Your monthly payment for the copier. If you own the copier, enter 0.Monthly Maintenance Your monthly maintenance charge. Most vendors have st<strong>and</strong>ardmaintenance charges to which they may or may not add Click Charges.The basic maintenance charge goes here. If you do your own maintenance,enter a reasonable periodic charge for your costs in maintaining themachine. Don’t include toner or other consumables. Do includereplacement parts if you’ve budgeted for them.Monthly LaborMonthly labor rate that corresponds to this copier. If you incorporated thisinto other monthly rate fields, you probably want to redistribute your figures.% Time In Use Your estimate of the percentage of time the machine is usually in use. Ifyou’re open for 8 hours a day <strong>and</strong> the machine is usually in use for 4 hours,enter 50%.Machine Cost Per Copy <strong>PrintSmith</strong> based on the previous factors calculates this figure. The formulais:Click CostHourly costing rateManufacturer’s charge per copy.Cost per hour of running this machine. Account for any overhead implicit inrunning a job, including personnel <strong>and</strong> equipment. Use this value tocompare with the actual job cost, <strong>and</strong> determine how much you are losing ifthe job costs more than this rate.Labor/copyToner/CopyDeveloper/CopyCopy MarkupMaximum Size, MinimumSizeMinimum Width, MaximumWidthAdditional charge for labor for each copy.Additional charge for toner for each copy.Additional charge for developer <strong>and</strong> other consumables for each copy.Markup to be applied to the effective copy rate. The effective copy rate isthe total of the machine cost per copy plus labor, toner <strong>and</strong> developer. Ifyou’ve set up costing using the copy range, this is also added to theeffective copy rate.Minimum <strong>and</strong> maximum stock size that can be run on this machine.Not available for Large Format.Large Format only. Minimum <strong>and</strong> maximum width of the stock that can berun on this machine.<strong>Offset</strong> And <strong>Copier</strong> <strong>Pricing</strong> 305
FieldDefinition<strong>PrintSmith</strong> <strong>Session</strong> <strong>H<strong>and</strong>outs</strong>Copy RangeThree different quantities/cost combinations can be entered. This is usefulfor entering the different click cost schedules offered by copier vendors <strong>and</strong>for adjusting stock cost at different quantity levels.Stock cost is calculated from the stock definition <strong>and</strong> marked up using thest<strong>and</strong>ard stock markup in the stock definition. This may be marked upagain if a markup is specified in the copy range table. Special order <strong>and</strong>customer stock use the default stock cost entered in the Stocks <strong>and</strong> SizesPreference panel. Enter this information into all copier definitionsregardless of the pricing method used since <strong>PrintSmith</strong> uses this data asthe basis for calculating costs in the costing system.Modifying Stock Calculations <strong>and</strong> Second Side <strong>Pricing</strong>In all other pricing methods there are options for determining how stock is calculated <strong>and</strong> how thesecond side is priced. You can use these options <strong>and</strong> adjust second side pricing with the cost plusmethod by temporarily changing the pricing method to Copies <strong>and</strong> Originals, making your selection<strong>and</strong> returning to the Cost Plus pricing method. Only the Side 2 factor, the Price 2 sided by menu<strong>and</strong> the Stock Price Is menu are used, all other settings are ignored. It is important to designate theproper calculation of stock cost to avoid unexpected pricing. Normally, the marked up stock cost isused.Notes: Special Order <strong>and</strong> Customer Stock cannot use copier 1 <strong>and</strong> copier 2 because there is nostock definition. The stock cost entered in the job is used. An alternative is to create custom stockdefinitions for Special Order <strong>and</strong> Customer Stock <strong>and</strong> disable the customer stock <strong>and</strong> special orderbuttons in the Job Selection window.All side 2 pricing options are valid although Use First Side Rate <strong>and</strong> Use Second Side rate areidentical because the rate is always the same. The click charge is doubled, but not the stock cost.All other selections affect both click charges <strong>and</strong> stock charges.<strong>Offset</strong> And <strong>Copier</strong> <strong>Pricing</strong> 306
<strong>PrintSmith</strong> <strong>Session</strong> <strong>H<strong>and</strong>outs</strong>Flat Rate <strong>Pricing</strong>In this pricing method, the click charge is unaffected by quantity – one copy has the same unit priceas a million, 100 copies of one original is the same as one copy of 100 originals. This may beuseful for pricing on a convenience copier; however, it is difficult to be competitive with this type ofpricing.FieldFlat Rate Field DefinitionsDefinitionRate/CopyThis is the flat amount charged for each copy.Stock MarkupSide 2 FactorYou override the st<strong>and</strong>ard stock markup by enabling “Use <strong>Copier</strong>s stockmarkup” this markup will be used.Used for pricing 2 sided copies with a factor for the second side. The pricefor single copies is determined, <strong>and</strong> then multiplied by this factor.<strong>Offset</strong> And <strong>Copier</strong> <strong>Pricing</strong> 307
<strong>PrintSmith</strong> <strong>Session</strong> <strong>H<strong>and</strong>outs</strong>Calculating Stock CostThe stock selection <strong>and</strong> stock cost in the job are ignored when the stock price is “included in rate”.Only the copy rate is used for pricing.Marked Up Stock Cost adds the cost of the stock to the rate per copy. The stock cost is marked upusing the markup in the stock definition unless “Use <strong>Copier</strong>’s stock markup” is turned on in whichcase it uses the “Stock Markup” shown to the left of the button to mark up the cost of the stock. Forspecial order <strong>and</strong> customer stock, the stock markup or customer stock markup is used respectively.If stock price is From <strong>Copier</strong> 1 In Stock Definition or From <strong>Copier</strong> 2 In Stock Definition the rate istaken directly from the stock definition <strong>and</strong> is not marked up. If Use <strong>Copier</strong>s Stock Markup is turnedon, the rate is marked up before it is used.Calculating 2 Sided CopyingSide two can be calculated using:• side 2 factor, which multiplies the side 1 price by the side 2 factor field• not changing the price• by using the first side rate (which doesn’t add in stock a second time)• by counting as more originalsMatrix <strong>Pricing</strong>Matrix pricing uses a matrix in the copier definition to generate a “click” charge, to determine avolume based discount, or for Copy Range (stepped) pricing. The three matrix based pricingmethods differ primarily in the size of the matrix <strong>and</strong> how the quantities in the job are used tolookup the cost or discount factor in the matrix.To edit the matrix for a copier definition, click the Edit Matrix button. You determine what type ofmatrix by selecting the Matrix Is Copy Cost, Matrix Is Discount Table, or Matrix Is Step Tablebutton.This area is used to edit the matrix <strong>and</strong> also determine whether the contents of the matrix are to betreated as click charges or discount factors.<strong>Offset</strong> And <strong>Copier</strong> <strong>Pricing</strong> 308
<strong>PrintSmith</strong> <strong>Session</strong> <strong>H<strong>and</strong>outs</strong><strong>Copier</strong> Matrix TypesThe type of copier matrix used depends on the pricing method selected in the definition.The examples below demonstrate the st<strong>and</strong>ards.Single ColumnUse Side 2 RateThese two types of matrices can be used for Copies per Original <strong>and</strong> Total Of All Copies pricingmethods.Copies <strong>and</strong> Originals<strong>Offset</strong> And <strong>Copier</strong> <strong>Pricing</strong> 309
<strong>PrintSmith</strong> <strong>Session</strong> <strong>H<strong>and</strong>outs</strong>Copies <strong>and</strong> Originals Using Second Side RateCopies per Original <strong>and</strong> Total of All Copies use the single column version, while the 10-columnversion is used for Copies <strong>and</strong> Originals. Both of these basics are available in a two sided versionwhen you select Using Second Side Rate for 2 sided pricing.Notes: Changing the pricing method or matrix type does not change the data in the matrix. If youenter data for all 10 columns for one <strong>and</strong> two sided copying this information is retained even if it isno longer used.Selected MethodMatrix TypesMatrixCopies And Originals The rate is located based on the number of copies row <strong>and</strong> the number oforiginals column. There are 10 columns (20 on a 2 sided matrix) availablefor pricing. The first column with a zero for the number of originals marksthe last column in the matrix.Copies Per Originals This method uses a single column pricing matrix (which may have 1 or 2sides). The rate is looked up in the matrix using the number of copies. TheOriginals field is not used in the lookup.Total Of All CopiesThis method also uses a single column matrix. The total number of copies(ordered x sheets x sets) made determines the rate in either a 1 or 2 sidedmatrix.Square Area And OriginalsTotal Of Square AreaSquare Area <strong>and</strong> CopiesSquare Area per CopyThis method is used to support large format pricing based on the squarearea of the original being copied. You would use this method if you developa unit price for job based on the size of one piece <strong>and</strong> then multiply it by thenumber of pieces. This is a matrix pricing style. The matrix looks the sameexcept that instead of Number of Copies it shows Total Square Area.This method supports large format pricing. A unit price based on the totalsquare area of the job is multiplied by the number of units of area. Forexample, a job with 100 square units would look at 100 on the matrix <strong>and</strong>multiply the rate by 100 calculating the retail price. This is a “matrix” pricingstyle. The matrix looks the same except instead of “Number of Copies” itdisplays “Total Square Area”.Supports large format pricing. Rate is based on the entire square area ofthe copies produced <strong>and</strong> the number of copies. Requires that you open thepricing matrix to edit the sales price per square unit.Supports large format pricing. Rate is the square area of each copy, <strong>and</strong>can be looked up in the matrix using the number of copies. Requires thatyou open the pricing matrix to edit the sales price per square unit.<strong>Offset</strong> And <strong>Copier</strong> <strong>Pricing</strong> 310
Matrix is Copy Cost<strong>PrintSmith</strong> <strong>Session</strong> <strong>H<strong>and</strong>outs</strong>If you price copies using a cost table which varies by quantity <strong>and</strong>/or number of originals, <strong>and</strong>choose to add a premium on certain types of stock, this is they type of matrix to use.The stock price is derived from the stock definition <strong>and</strong> is marked up using either the stock markupor the copier definition’s stock markup when “Use <strong>Copier</strong>’s stock markup” is selected.The click charge is marked up using the copier markup. The stock charge <strong>and</strong> click charge areadded together resulting in a final price.Matrix is Discount TableIf you price copies by setting a st<strong>and</strong>ard price for each stock which then is discounted based on thequantity <strong>and</strong>/or number of originals, you should use this style. The base rate in the copier definitionis the basic click charge for a single copy of one original.Matrix is Step TableIf you price each range of copies separately <strong>and</strong> add them up, use this step style of matrix.Example of a step table: If the first 3 entries in the table were 100 at .06, 200 at .05, <strong>and</strong> 300 at .04<strong>and</strong> the quantity to price were 250. It would be calculated as follows:100 x.06 = 6.00100 x.05 = 5.0050 x.04 = 2.00Total = 6.00+ 5.00 + 2.00 = 13.00This is similar to the copy range table available in the Cost Plus method except there are 14 ranges<strong>and</strong> many more options for h<strong>and</strong>ling multiple originals, stock pricing <strong>and</strong> two sided copying. Thestock charge is calculated using the same rules as Copy Cost Matrix.Square Area from run sizeCalculates the area from the run sheet. You can use this if any of the “Square Area” pricingmethods is usedSquare Area from Finished sizeCalculates the area from the finished sheet. You can use this if any of the “Square Area” pricingmethods is used.Stock PriceThe stock component of the copy price is determined using the following rules:included in rateStock Price Ismarked up stock costResulting Stock ChargeNo separate stock charge is calculated.The cost for each sheet is marked up using the stock cost (or st<strong>and</strong>ardstock or customer markup for special order <strong>and</strong> customer stock). Thiscan be overridden using “Use copier’s stock markup”.<strong>Offset</strong> And <strong>Copier</strong> <strong>Pricing</strong> 311
Stock Price Isfrom <strong>Copier</strong> 1 in stock definitionfrom <strong>Copier</strong> 2 in stock definitionResulting Stock ChargeOnly works with “in stock” papers <strong>and</strong> adds the up charge listed in thecopier 1 field from the stock definition, otherwise it defaults to “markedup stock cost”. This value is only marked up when “Use <strong>Copier</strong>s stockmarkup” is selected.The same as copier one except for value taken from stock definition.<strong>PrintSmith</strong> <strong>Session</strong> <strong>H<strong>and</strong>outs</strong>The discount factor is looked up in the matrix <strong>and</strong> multiplied by the total of the base rate <strong>and</strong> thestock price. This is the click charge for this quantity.Using Matrix Based <strong>Pricing</strong>If the matrix is a copy cost matrix, the price per copy is calculated:(cost x markup) + (stock cost x markup)If the matrix is a discount table, the price per copy is calculated:(rate x discount factor)If the matrix is a step table, the price is calculated in a somewhat more complicated fashion.There can be as many as 15 rows <strong>and</strong> 10 columns in the matrix <strong>and</strong> may have separate columnsfor single <strong>and</strong> double sided copying. Any bottom row containing 0 in the Number of Copies columnis the last row used in the lookup. In the “Copies <strong>and</strong> Originals” (10 column) matrix, the bottomcolumn with a 0 in Number of Originals is the last column used.There is no interpolation between intermediate values. If the quantity being looked up is greaterthan the number of copies in a row, the next row is used. Likewise, if the number of originals beinglooked up (Copies <strong>and</strong> Originals only) is greater than the quantity atop the column, the next columnis used.<strong>Pricing</strong> For 2 Sided CopiesDefinitionPrice 2 sided by not changingpricePrice 2 sided by using firstside ratePrice 2 sided by using secondside ratePrice 2 sided by counting asmore originalsPrice 2 sided by using side 2factorThe Price 2 Sided By Not Changing Price option means there is nodifference in price between one sided <strong>and</strong> two sided copyingThe Price 2 Sided By Using First Side Rate Option doubles the price forclicks (but not for stock which is added only once) using a single sided ratematrix.The Price 2 Sided B By Using Second Side Rate option uses a 2 sidedmatrix. The rate looked up in the matrix is from the side 2 column on a twosided job. This click charge is doubled <strong>and</strong> added to the stock charge.The Price 2 Sided By Counting As More Originals option has the effect ofdoubling the number of originals prior to performing the lookup. This doesnot affect the stock charge, which is not doubled. This is equivalent topricing a single sided job as twice the amount ordered except for the stockcharge. It would price 100 two sided the same as 200 one sided copies <strong>and</strong>add a stock charge for 100 sheets.The Price 2 Sided By Using Side 2 Factor option calculates the price forsingle sided copying <strong>and</strong> multiplies it by the factor specified in thedefinition.<strong>Offset</strong> And <strong>Copier</strong> <strong>Pricing</strong> 312
<strong>PrintSmith</strong> <strong>Session</strong> <strong>H<strong>and</strong>outs</strong>Adding Charges to <strong>Copier</strong> DefinitionsCharge definitions offer much flexibility <strong>and</strong> can be attached to a copier definition. In order entry,when you select a copier, any preset charges are automatically added to the job. If you change to adifferent copier, the charges attached to the old copier are discarded.To add charges to a copier definition, click the Add Charges button. The Charge Selector window isdisplayed.The window is divided into two areas, the top section is used for making new selections, <strong>and</strong> thebottom displays current selections <strong>and</strong> is used to remove preset charges from the list. The top partof the window presents a hierarchy. At the top level are the charge comm<strong>and</strong>s. Below each chargecomm<strong>and</strong> is a list of the categories defined in the comm<strong>and</strong> window. Below each category are thecharge definitions themselves.Up to 10 preset charges are displayed in the bottom of the window. You can remove a presetcharge by selecting it <strong>and</strong> clicking the Remove button. If you change a charge definition that ispreset in a copier definition, <strong>PrintSmith</strong> will use the latest definition when the charge is added to ajob.Click the Close button when you have finished your selections.Strategies For Using Preset ChargesThe biggest advantage in using preset charges is having ability to quickly generate complex quotesin a more consistent manner. Often, complex quotes can be delegated to less knowledgeableemployees with a much greater degree of confidence. It also can serve as a tickler – the mostcommon charges automatically add to each job <strong>and</strong> the user can delete any charges that don’tapply to the situation. It’s easier to remove unnecessary elements in a job than to anticipate whatyou might have forgotten.There are many different strategies for defining copier definitions <strong>and</strong> deciding which chargesshould be preset. Be consistent in your use of preset charges. Adding stapling should be attachedto all copier definitions that are used for multiple originals. There are some operations you caneasily add to a few select copiers. You could set up a Carbonless copier definition, which includescharges for padding. Another copier definition for h<strong>and</strong>-collated Carbonless jobs which include theh<strong>and</strong> collating. Keep it simple <strong>and</strong> make it easy for your staff to use.<strong>Offset</strong> And <strong>Copier</strong> <strong>Pricing</strong> 313
<strong>PrintSmith</strong> <strong>Session</strong> <strong>H<strong>and</strong>outs</strong>Using Copy Range <strong>Pricing</strong>The copy range table can be used to generate a pricing curve, or to set up pricing for special clickcosts at various quantities. The following table shows how <strong>PrintSmith</strong> uses this to adjust prices:Qty Cost/Copy Effect1 .03 Starting at first copy <strong>and</strong> ending with Qty from next line (1-99 in this example),adds 3¢ per copy100 .02 Starting with 100th copy <strong>and</strong> ending with Qty from next line (100-499 in thisexample), adds 2¢ per copy.500 .01 Starting with 500th copy <strong>and</strong> any additional copies, adds 1¢ per copy.Using the above table with copier definitions with no other costs:• 1 copy would cost $0.03• 100 copies would cost $2.99. (99 x 0.03) + (1 x 0.02)• 1000 copies would cost $15.98. (99 x 0.03) + (400 x 0.02) + (501 x 0.01)<strong>Offset</strong> And <strong>Copier</strong> <strong>Pricing</strong> 314


