AS-80 Operating.pdf - uri=spal-usa
AS-80 Operating.pdf - uri=spal-usa
AS-80 Operating.pdf - uri=spal-usa
- No tags were found...
Create successful ePaper yourself
Turn your PDF publications into a flip-book with our unique Google optimized e-Paper software.
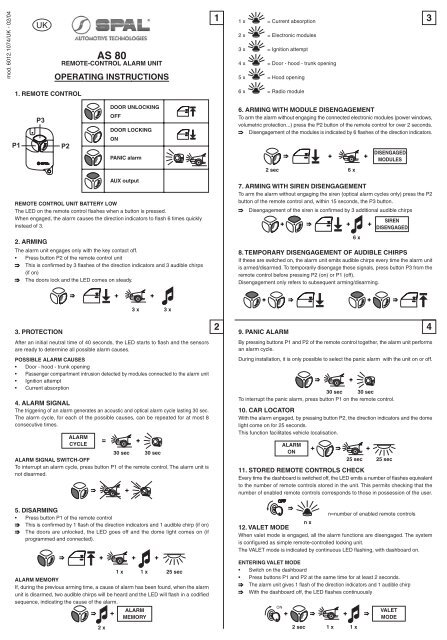
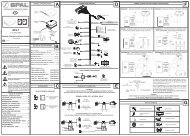
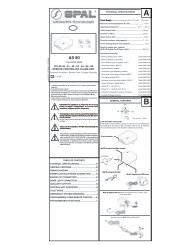
mod. 6012.1074/UK - 02/04UK<strong>AS</strong> <strong>80</strong>REMOTE-CONTROL ALARM UNITOPERATING INSTRUCTIONS11 x = Current absorption2 x = Electronic modules3 x = Ignition attempt4 x = Door - hood - trunk opening5 x = Hood opening31. REMOTE CONTROL6 x = Radio moduleDOOR UNLOCKINGOFFDOOR LOCKINGONPANIC alarm6. ARMING WITH MODULE DISENGAGEMENTTo arm the alarm without engaging the connected electronic modules (power windows,volumetric protection...) press the P2 button of the remote control for over 2 seconds.Disengagement of the modules is indicated by 6 flashes of the direction indicators.DISENGAGEDMODULES2 sec 6 xAUX outputREMOTE CONTROL UNIT BATTERY LOWThe LED on the remote control flashes when a button is pressed.When engaged, the alarm causes the direction indicators to flash 6 times quicklyinstead of 3.2. ARMINGThe alarm unit engages only with the key contact off.• Press button P2 of the remote control unitThis is confirmed by 3 flashes of the direction indicators and 3 audible chirps(if on)The doors lock and the LED comes on steady.7. ARMING WITH SIREN DISENGAGEMENTTo arm the alarm without engaging the siren (optical alarm cycles only) press the P2button of the remote control and, within 15 seconds, the P3 button.Disengagement of the siren is confirmed by 3 additional audible chirps6 xSIRENDISENGAGED8. TEMPORARY DISENGAGEMENT OF AUDIBLE CHIRPSIf these are switched on, the alarm unit emits audible chirps every time the alarm unitis armed/disarmed. To temporarily disengage these signals, press button P3 from theremote control before pressing P2 (on) or P1 (off).Disengagement only refers to subsequent arming/disarming.3. PROTECTION3 x 3 xAfter an initial neutral time of 40 seconds, the LED starts to flash and the sensorsare ready to determine all possible alarm causes.POSSIBLE ALARM CAUSES• Door - hood - trunk opening• Passenger compartment intrusion detected by modules connected to the alarm unit• Ignition attempt• Current absorption4. ALARM SIGNALThe triggering of an alarm generates an acoustic and optical alarm cycle lasting 30 sec.The alarm cycle, for each of the possible causes, can be repeated for at most 8consecutive times.ALARMCYCLE30 sec 30 secALARM SIGNAL SWITCH-OFFTo interrupt an alarm cycle, press button P1 of the remote control. The alarm unit isnot disarmed.29. PANIC ALARMBy pressing buttons P1 and P2 of the remote control together, the alarm unit performsan alarm cycle.During installation, it is only possible to select the panic alarm with the unit on or off.30 sec 30 secTo interrupt the panic alarm, press button P1 on the remote control.10. CAR LOCATORWith the alarm engaged, by pressing button P2, the direction indicators and the domelight come on for 25 seconds.This function facilitates vehicle localisation.ALARMON25 sec25 sec11. STORED REMOTE CONTROLS CHECKEvery time the dashboard is switched off, the LED emits a number of flashes equivalentto the number of remote controls stored in the unit. This permits checking that thenumber of enabled remote controls corresponds to those in possession of the user.45. DISARMING• Press button P1 of the remote controlThis is confirmed by 1 flash of the direction indicators and 1 audible chirp (if on)The doors are unlocked, the LED goes off and the dome light comes on (ifprogrammed and connected).1 x 1 x 25 secALARM MEMORYIf, during the previous arming time, a cause of alarm has been found, when the alarmunit is disarmed, two audible chirps will be heard and the LED will flash in a codifiedsequence, indicating the cause of the alarm.ALARMMEMORY2 xn=number of enabled remote controlsn x12. VALET MODEWhen valet mode is engaged, all the alarm functions are disengaged. The systemis configured as simple remote-controlled locking unit.The VALET mode is indicated by continuous LED flashing, with dashboard on.ENTERING VALET MODE• Switch on the dashboard• Press buttons P1 and P2 at the same time for at least 2 seconds.The alarm unit gives 1 flash of the direction indicators and 1 audible chirpWith the dashboard off, the LED flashes continuously2 sec1 x1 xVALETMODE
EXITING FROM VALET MODE• Switch on the dashboard• Press buttons P1 and P2 at the same time for at least 2 seconds.The alarm unit gives 1 flash of the direction indicators and 1 audible chirpVALETMODE13. AUTOMATIC DOOR LOCKING AT SWITCH-ONIf engaged, the alarm automatically locks the doors 10 seconds after the dashboardhas switched on.When the dashboard switches off, the doors are automatically unlocked.10 sec2 sec14. ALARM P<strong>AS</strong>SIVE AUTOARMINGIf engaged, the alarm engages automatically 30 seconds after the vehicle has beenleft (last door closed).The passive autoarming of the alarm does not lock the doors and does not engagethe electronic modules connected to the alarm unit, and is indicated in the same wayas arming from remote control.ALARMON30 secDISARMINGWith the alarm unit armed in passive mode, when a door is opened, an intermittentaudible chirp is heard lasting 10 seconds, during which time the alarm unit can bedisarmed before this generates an alarm cycle.10 sec15. ENGINE CUT P<strong>AS</strong>SIVE AUTOARMINGIf engaged, the alarm automatically cuts the engine 90 seconds after the dashboardswitches off.Passive arming of the engine cut is indicated by the LEDs coming on with short switchoffs.DISARMING90 sec• Switch on the dashboard• Press button P1 of the remote control unit• Alternatively, arm/disarm the alarm system.16. AUTO REARMIf engaged, the alarm automatically engages 90 seconds after disarming from remotecontrol, unless a door has been opened meantime. The alarm engages without lockingthe doors and without switching on the connected electronic modules.1 x1 x90 sec 3 x 3 x17. AUTO REARM WITH DOOR LOCKINGIf engaged, the alarm automatically engages 90 seconds after disarming from remotecontrol, unless a door has been opened meantime.The alarm engages, locking the doors and maintaining the settings defined duringprevious arming.90 sec 3 x 3 x18. ANTI-CARJACKIf engaged, in case of the car being broken into, the alarm unit gives alarm signalsand engages the engine cut.The anti-carjack function can work in two distinct ways, active or passive, dependingon the carjack mode.The anti-carjack function is only operative after it has been engaged.56ENGAGEMENT• With the dashboard switched on and doors LOCKED, press the P2 button from the remote control.The LED comes on steady.DISENGAGEMENT• With the dashboard switched on and doors LOCKED, press the P1 button from the remote control.The LED goes off.20. EMERGENCY SYSTEM DISARMINGEmergency disarming codeANTI-CARJACKONANTI-CARJACKOFFANTI-CARJACK - OPERATIONACTIVE MODE - CARJACK DURING VEHICLE DRIVING• The LED comes on steady - anti-carjack on• Opening and closing of a door (the drivers is forced by the carjacker to leave thevehicle)The LED goes off and, after 20 seconds, starts to flashThe alarm fails to respond to the remote controlAfter 2 minutes, the control unit performs an alarm cycle, without arming theengine cutWhen the engine is next switched off, the engine cut engages• The only way to release the engine is to re-enable the remote control and enterthe emergency disarming codeP<strong>AS</strong>SIVE MODE - CARJACK ON FETCHING VEHICLE• The LED comes on steady - anti-carjack on• Switch the engine off before opening a door• Exit from the car and lock it. The alarm works normally• On returning to the car, disarm the alarm by means of the remote control• Enter the emergency disarming codeIf the disarming code is not entered, the LED remains on steadyThe alarm fails to respond to the remote controlAfter 2 minutes, the control unit performs an alarm cycle, without arming theengine cutWhen the engine is next switched off, the engine cut engages• The only way to release the engine is to re-enable the remote control and enterthe emergency disarming code19. AUX OUTPUT ENGAGEMENTWhen the button P2 on the remote control is pressed twice, the AUX output of thealarm is engaged. This can be used to control various vehicle electric functions.The output remains engaged for as long as the button is kept pressed the secondtime.AUX OUTPUTONfigure 1 figure 2 figure 3 figure 4The emergency disarming code (factory set = 1111) can be customised by the user.Note down the new emergency disarming code in the spaces provided.EMERGENCY SYSTEM DISARMING PROCEDURE• Switch the dashboard on and off 3 times in rapid successionThe LED starts to flash• Switch the dashboard on after counting a number of flashes equal to the firstfigure of the emergency disarming code.The LED goes off - FIRST FIGURE ENTERED• Switch off the dashboardThe LED starts to flash again• <strong>AS</strong>witch on the dashboard after counting a number of flashes equal to the secondfigure of the emergency disarming code.The LED goes off - SECOND FIGURE ENTERED• Switch off the dashboardThe LED starts to flash again…• Repeat the operation for all four figures of the emergency disarming code.After entering the fourth exact figure, the control unit goes off, unlocking the doorsand giving 1 flash of the direction indicators and two audible chirps.If the emergency system disarming procedure is performed during an alarm cycle,the entering of the first exact figure causes the siren to go off.… … ………3 x 1 2 3 91 x78SPAL srl - Via per Carpi 26/B - 42015 Correggio (RE) - ITALY - Tel.+39/0522/731311 - Fax.+39/0522/693611 - www.spal.it - E-mail: aftermarket@spal.it


