Fisher ES and EAS easyâe Valves CL125 through CL600
Fisher ES and EAS easyâe Valves CL125 through CL600
Fisher ES and EAS easyâe Valves CL125 through CL600

You also want an ePaper? Increase the reach of your titles
YUMPU automatically turns print PDFs into web optimized ePapers that Google loves.
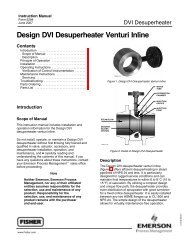
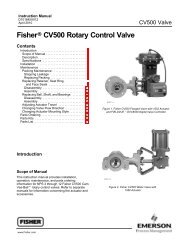
Instruction ManualD100397X012<strong>ES</strong> ValveDecember 20104. Inspect the existing valve plug. If the plug is in good condition, it can be reused with the new ENVIRO‐SEALstem/bellows assembly. To remove the existing valve plug from the stem, first, place the existing plug stemassembly <strong>and</strong> valve plug in a soft‐jaw chuck or other type of vise so that the jaws grip a portion of the valve plugthat is not a seating surface. Drive out or drill out the pin (key 8).5. Then, reverse the plug stem assembly in the soft‐jaw chuck or vise. Grip the valve stem in an appropriate place <strong>and</strong>unscrew the existing plug from the valve stem.CAUTIONWhen installing a valve plug on the ENVIRO‐SEAL stem/bellows assembly, the valve stem must not be rotated. Damage tothe bellows may result.To avoid damaging parts, do not grip the bellows shroud or other parts of the stem/bellows assembly. Grip only the flatareas on the stem where it extends out of the top of the bellows shroud.NoteThe ENVIRO‐SEAL stem/bellows assembly has a one‐piece stem.6. To attach the valve plug to the stem of the new ENVIRO‐SEAL stem/bellows assembly, it is necessary to first attachthe plug to the adaptor (key 24). Locate the adaptor. Notice that a hole has not been drilled in the threads wherethe plug screws onto the adaptor. Secure the valve plug in a soft‐jaw chuck or other type of vise. Do not grip theplug on any seating surface. Position the plug in the chuck or vise for easy threading of the adaptor. Thread theadaptor into the valve plug <strong>and</strong> tighten to the appropriate torque value.7. Select the proper size of drill bit <strong>and</strong> drill <strong>through</strong> the adaptor using the hole in the valve plug as a guide. Removeany metal chips or burrs <strong>and</strong> drive in a new pin to lock the plug/adaptor assembly together.8. Attach the plug/adaptor assembly to the ENVIRO‐SEAL stem/bellows assembly by first securing the stem/bellowsassembly in a soft‐jaw chuck or other type of vise so that the jaws of the chuck or vise grip the flats of the stemextending out of the top of the bellows shroud. Screw the valve plug/adaptor assembly onto the valve stem.Tighten as necessary to align the pin hole in the stem with one of the holes in the adaptor. Secure the adaptor tothe stem with a new pin.9. Inspect the seat ring (key 9) <strong>and</strong> soft seat parts (keys 21, 22, <strong>and</strong> 23). Replace, if necessary.10. Place a new gasket (key 10) into the valve body in place of the bonnet gasket. Install the new stem/bellowsassembly with valve plug/adaptor by placing it into the valve body on top of the new bellows gasket.11. Place a new gasket (key 22) over the stem/bellows assembly. Place the new ENVIRO‐SEAL bonnet over thestem/bellows assembly.12. Properly lubricate the bonnet stud bolts. Install <strong>and</strong> tighten the bonnet hex nuts to the proper torque.13. Install new packing <strong>and</strong> the metal packing box parts according to the appropriate arrangement in figure 3.14. Install the packing flange. Properly lubricate the packing flange stud bolts <strong>and</strong> the faces of the packing flange nuts.For ENVIRO‐SEAL or HIGH‐SEAL live‐loaded packing, refer to the note at the beginning of the Maintenance section.For graphite packing, tighten the packing flange nuts to the maximum recommended torque shown in table 7. Then,loosen the packing flange nuts, <strong>and</strong> retighten them to the recommended minimum torque shown in table 7.For other packing types, tighten the packing flange nuts alternately in small equal increments until one of the nutsreaches the minimum recommended torque shown in table 7. Then, tighten the remaining flange nuts until thepacking flange is level <strong>and</strong> at a 90‐degree angle to the valve stem.15. Install travel indicator parts, stem locknuts, <strong>and</strong> mount the actuator on the valve body according to the procedurein the appropriate actuator instruction manual.15