CFTECH - Classic Ford
CFTECH - Classic Ford
CFTECH - Classic Ford
- No tags were found...

Create successful ePaper yourself
Turn your PDF publications into a flip-book with our unique Google optimized e-Paper software.
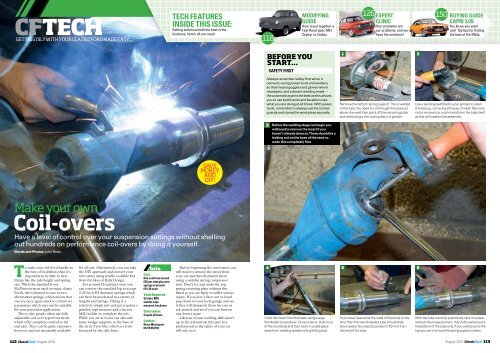
<strong>CFTECH</strong>Getting oily with your classic ford made easy...tech featuresinside this issue:Getting technical with the best in thebusiness, here’s all you need.118modifyingguideHow to put together aFast Road-spec Mk1Zephyr or Zodiac.126 expertclinicYour problems areour problems, and wehave the solutions!150<strong>Classic</strong><strong>Ford</strong> buying Letters guide:capri 3.0sYou know you wantone! Top tips for findingthe best of the Mk3s.Before youstart...Safety FIRST1 2Always remember safety first when itcomes to using power tools and welders,so that means goggles and gloves wherenecessary, and a decent welding mask —the automatic type is the best as this allowsyou to use both hands and be able to seewhat you are doing at all times. With powertools, remember to always use the correctguards and clamp the work piece securely.Remove the bottom spring support. This is weldedto the tube. You need to cut through the tube justabove the weld then grind off the remaining tubeand weld using a thin cutting disc in a grinder.Use a sanding pad fitted to your grinder to cleanthe tube up, removing all traces of weld. Take carenot to remove too much metal from the tube itselfas this will weaken the assembly.3Before the welding stage can begin youwill need to remove the insert if youhaven’t already done so. There should be alocking nut on the base of the strut soundo this completely first.savemoneyandDIY!Make your ownCoil-oversHave a level of control over your suspension settings without shellingout hundreds on performance coil-overs by doing it yourself.Words and Photos John BettsTo make your old <strong>Ford</strong> handle tothe best of its abilities then it’simportant to be able to alterthings like the ride height and springrate. With the standard frontMcPherson strut used on many classic<strong>Ford</strong>s, this is limited to one or twoaftermarket springs, which means thatyou are once again stuck to certain setparameters which may not be suitablefor your particular application.This is why people often use fullyadjustable coil-over type front strutswhich offer complete control to theend user. They can be quite expensivehowever and not necessarily availablefor all cars. Alternatively, you can takethe DIY approach and convert yourown struts using readily available kitsfrom the likes of Rally Design.For around 25 quid per strut youcan convert the standard leg to accept2.25-inch ID diameter springs whichcan then be purchased in a variety oflengths and ratings. Fitting is arelatively simple job and just requires agrinder, tape measure and a decentMIG welder to complete the job.While you are at it you can also addsome wedge supports to the base ofthe strut if you like, which is a trickfavoured by the rally boys.InfoCost:Kits cost from around£25 per strut plus newsprings at around£15-20 each.Tools Required :Grinder, MIGwelder, tapemeasure, hacksaw.Time taken:Couple of hours.Contact:Retro Motorsport01279 452799Before beginning the conversion youwill need to remove the struts fromyour car and then dismantle themusing a suitable spring compressortool. Don’t try and undo the topspring retaining plate without thisfitted as you are likely to suffer seriousinjury. If you don’t have one to handpop down to your local garage and seeif they will dismantle them for you orask around and see if you can borrowone from a mate.Likewise if your welding skills aren’tup to the job entrust this part to aprofessional as the safety of your carwill rely on it.4 56Undo the insert from the base using a largeflat-bladed screwdriver. Once undone, slide it outof the strut body and then store in a safe placeaway from welding splatter and grinding dust.If you have cleaned all the weld off the body of thestrut then the new threaded tube should slidedown easily. You need to position it 50 mm fromthe end of the tube.With the tube correctly positioned, tack it in place,recheck the measurement, then fully weld aroundthe bottom of the tube only. If you weld around thetop you can’t remove the spring support collars.112 August 2010 August 2010 113
CFTech7Another popular modification is the wedge support at the base of the strut body whereit meets the lower section. This is a trick done to rally cars to further support the stubaxle assembly and the strut body.8This is easily done with some 3 mm steel cut toapproximately 60x45 mm. This should be cut tosize and once the paint has been removed fromthe strut it can be tacked into position.9Tack it in three places at each corner to hold it inplace then run a continuous weld around it. Youwill need your welding plant set quite high for thisto ensure penetration.1012All it needs now is a lick of paint then reassembling with your new spring and installingon your car. Spring rates will depend on the engine set-up and use the car will get. Askaround or contact some of the specialists to see what others are using.You’ll need to add a wedge on both sides as youcan see here and then repeat the process on theother strut. There’s no need to clean the welds up,just paint when they have cooled down.11You can see the difference between a standardstrut and the converted adjustable coil-over. Usingthis set-up allows you to fine-tune the setting andyou’ll have more clearance to run wider wheels.114 August 2010