MODEL: WITNESS SEMI-AUTOMATIC PISTOL - EAA
MODEL: WITNESS SEMI-AUTOMATIC PISTOL - EAA
MODEL: WITNESS SEMI-AUTOMATIC PISTOL - EAA
- No tags were found...
You also want an ePaper? Increase the reach of your titles
YUMPU automatically turns print PDFs into web optimized ePapers that Google loves.
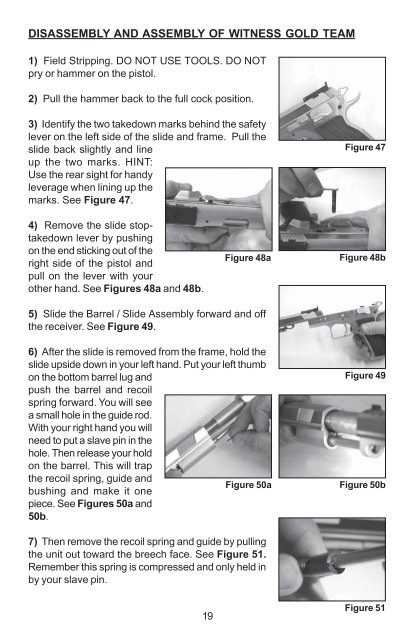
DISASSEMBLY AND ASSEMBLY OF <strong>WITNESS</strong> GOLD TEAM1) Field Stripping. DO NOT USE TOOLS. DO NOTpry or hammer on the pistol.2) Pull the hammer back to the full cock position.3) Identify the two takedown marks behind the safetylever on the left side of the slide and frame. Pull theslide back slightly and lineup the two marks. HINT:Use the rear sight for handyleverage when lining up themarks. See Figure 47.Figure 474) Remove the slide stoptakedownlever by pushingon the end sticking out of theright side of the pistol andpull on the lever with yourother hand. See Figures 48a and 48b.Figure 48aFigure 48b5) Slide the Barrel / Slide Assembly forward and offthe receiver. See Figure 49.6) After the slide is removed from the frame, hold theslide upside down in your left hand. Put your left thumbon the bottom barrel lug andpush the barrel and recoilspring forward. You will seea small hole in the guide rod.With your right hand you willneed to put a slave pin in thehole. Then release your holdon the barrel. This will trapthe recoil spring, guide andFigure 50abushing and make it onepiece. See Figures 50a and50b.Figure 49Figure 50b7) Then remove the recoil spring and guide by pullingthe unit out toward the breech face. See Figure 51.Remember this spring is compressed and only held inby your slave pin.19Figure 51


