Download Parts List - Butts of Bawtry
Download Parts List - Butts of Bawtry
Download Parts List - Butts of Bawtry
- No tags were found...

You also want an ePaper? Increase the reach of your titles
YUMPU automatically turns print PDFs into web optimized ePapers that Google loves.
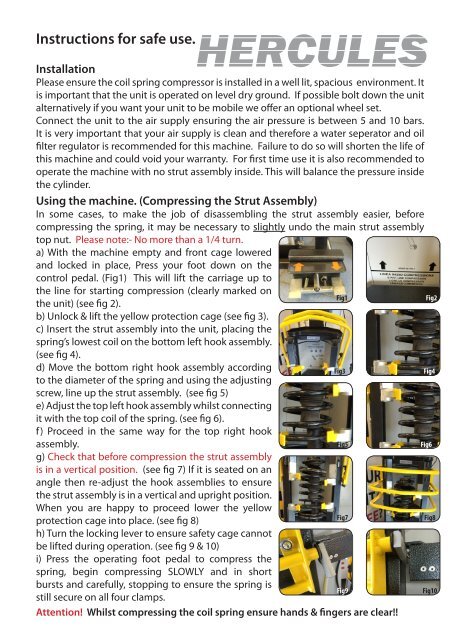
Instructions for safe use.HERCULESInstallationPlease ensure the coil spring compressor is installed in a well lit, spacious environment. Itis important that the unit is operated on level dry ground. If possible bolt down the unitalternatively if you want your unit to be mobile we <strong>of</strong>fer an optional wheel set.Connect the unit to the air supply ensuring the air pressure is between 5 and 10 bars.It is very important that your air supply is clean and therefore a water seperator and oilfilter regulator is recommended for this machine. Failure to do so will shorten the life <strong>of</strong>this machine and could void your warranty. For first time use it is also recommended tooperate the machine with no strut assembly inside. This will balance the pressure insidethe cylinder.Using the machine. (Compressing the Strut Assembly)In some cases, to make the job <strong>of</strong> disassembling the strut assembly easier, beforecompressing the spring, it may be necessary to slightly undo the main strut assemblytop nut. Please note:- No more than a 1/4 turn.a) With the machine empty and front cage loweredand locked in place, Press your foot down on thecontrol pedal. (Fig1) This will lift the carriage up tothe line for starting compression (clearly marked onFig1the unit) (see fig 2).b) Unlock & lift the yellow protection cage (see fig 3).c) Insert the strut assembly into the unit, placing thespring’s lowest coil on the bottom left hook assembly.(see fig 4).d) Move the bottom right hook assembly accordingFig3to the diameter <strong>of</strong> the spring and using the adjustingscrew, line up the strut assembly. (see fig 5)e) Adjust the top left hook assembly whilst connectingit with the top coil <strong>of</strong> the spring. (see fig 6).f) Proceed in the same way for the top right hookassembly.Fig5g) Check that before compression the strut assemblyis in a vertical position. (see fig 7) If it is seated on anangle then re-adjust the hook assemblies to ensurethe strut assembly is in a vertical and upright position.When you are happy to proceed lower the yellowFig7protection cage into place. (see fig 8)h) Turn the locking lever to ensure safety cage cannotbe lifted during operation. (see fig 9 & 10)i) Press the operating foot pedal to compress thespring, begin compressing SLOWLY and in shortbursts and carefully, stopping to ensure the spring isFig9still secure on all four clamps.Attention! Whilst compressing the coil spring ensure hands & fingers are clear!!Fig2Fig4Fig6Fig8Fig10