Download Parts List - Butts of Bawtry
Download Parts List - Butts of Bawtry
Download Parts List - Butts of Bawtry
- No tags were found...

Create successful ePaper yourself
Turn your PDF publications into a flip-book with our unique Google optimized e-Paper software.
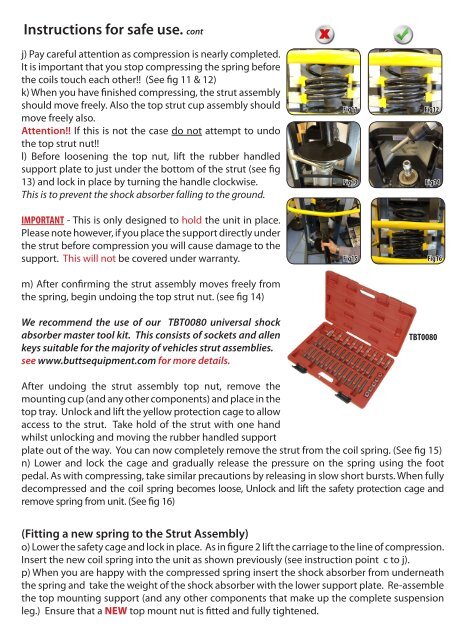
Instructions for safe use. contj) Pay careful attention as compression is nearly completed.It is important that you stop compressing the spring beforethe coils touch each other!! (See fig 11 & 12)k) When you have finished compressing, the strut assemblyshould move freely. Also the top strut cup assembly shouldmove freely also.Attention!! If this is not the case do not attempt to undothe top strut nut!!l) Before loosening the top nut, lift the rubber handledsupport plate to just under the bottom <strong>of</strong> the strut (see fig13) and lock in place by turning the handle clockwise.This is to prevent the shock absorber falling to the ground.IMPORTANT - This is only designed to hold the unit in place.Please note however, if you place the support directly underthe strut before compression you will cause damage to thesupport. This will not be covered under warranty.m) After confirming the strut assembly moves freely fromthe spring, begin undoing the top strut nut. (see fig 14)We recommend the use <strong>of</strong> our TBT0080 universal shockabsorber master tool kit. This consists <strong>of</strong> sockets and allenkeys suitable for the majority <strong>of</strong> vehicles strut assemblies.see www.buttsequipment.com for more details.Fig11Fig13Fig15Fig12Fig14Fig16TBT0080After undoing the strut assembly top nut, remove themounting cup (and any other components) and place in thetop tray. Unlock and lift the yellow protection cage to allowaccess to the strut. Take hold <strong>of</strong> the strut with one handwhilst unlocking and moving the rubber handled supportplate out <strong>of</strong> the way. You can now completely remove the strut from the coil spring. (See fig 15)n) Lower and lock the cage and gradually release the pressure on the spring using the footpedal. As with compressing, take similar precautions by releasing in slow short bursts. When fullydecompressed and the coil spring becomes loose, Unlock and lift the safety protection cage andremove spring from unit. (See fig 16)(Fitting a new spring to the Strut Assembly)o) Lower the safety cage and lock in place. As in figure 2 lift the carriage to the line <strong>of</strong> compression.Insert the new coil spring into the unit as shown previously (see instruction point c to j).p) When you are happy with the compressed spring insert the shock absorber from underneaththe spring and take the weight <strong>of</strong> the shock absorber with the lower support plate. Re-assemblethe top mounting support (and any other components that make up the complete suspensionleg.) Ensure that a NEW top mount nut is fitted and fully tightened.