Web Instructions To Get You Started (pdf) - Cresskill Public Schools
Web Instructions To Get You Started (pdf) - Cresskill Public Schools
Web Instructions To Get You Started (pdf) - Cresskill Public Schools

You also want an ePaper? Increase the reach of your titles
YUMPU automatically turns print PDFs into web optimized ePapers that Google loves.
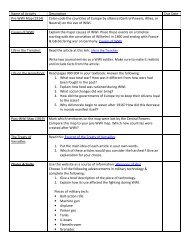
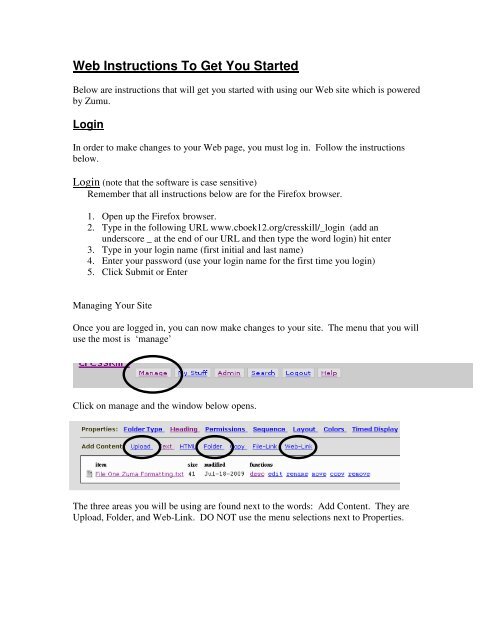
<strong>Web</strong> <strong>Instructions</strong> <strong>To</strong> <strong>Get</strong> <strong>You</strong> <strong>Started</strong>Below are instructions that will get you started with using our <strong>Web</strong> site which is poweredby Zumu.LoginIn order to make changes to your <strong>Web</strong> page, you must log in. Follow the instructionsbelow.Login (note that the software is case sensitive)Remember that all instructions below are for the Firefox browser.1. Open up the Firefox browser.2. Type in the following URL www.cboek12.org/cresskill/_login (add anunderscore _ at the end of our URL and then type the word login) hit enter3. Type in your login name (first initial and last name)4. Enter your password (use your login name for the first time you login)5. Click Submit or EnterManaging <strong>You</strong>r SiteOnce you are logged in, you can now make changes to your site. The menu that you willuse the most is ‘manage’Click on manage and the window below opens.The three areas you will be using are found next to the words: Add Content. They areUpload, Folder, and <strong>Web</strong>-Link. DO NOT use the menu selections next to Properties.
<strong>You</strong>r <strong>Web</strong> PageI have created a <strong>Web</strong> page for all of you—follow the steps below to access your page.1. Once you login, our homepage will appear2. Click on <strong>Schools</strong> and select your school3. <strong>To</strong> the left, is a list of menu selections4. Click on Teacher <strong>Web</strong>sites. Click on your name5. <strong>You</strong> are now in your folder and on your “so called” home page or.6. This is where you are authorized to add, delete, and edit your page.<strong>To</strong> edit your page: this area is used to insert images/clip art and text that will welcomeyour visitors.Editing Information on Any Page1. Open your folder (takes you toyour “folder page”)2. Click edit3. Click on WYSIWYGWYSIWYG:what you see is what you get4. Type information5. Click Update6. Click exit—your pageis now updated
<strong>To</strong> Add Folders, Upload files and <strong>Web</strong> LinksFolders, files and links will appear below the Edit area.Setting up Folders:Folders allow you to expand your section to include all the information you need toinclude on the website.Creating a Bullet Formatted Folder1. Open your web page2. Click Manage to get to your Manage page3. Click Folder on the Add Content line (not folder type)4. Enter Folder Name5. Select List as your folder type6. Select Bullet as your subtype7. Click Submit then click Exit8. Click on the newly created folder9. Add whatever content you wish for example Text10. Enter File Name, Description and Text11. Click Submit and then Exit12. This text file now appears in the editing section as a bullet13. View your folder and see the bulleted Text file.Creating a Block Formatted Folder1. Follow the steps 1-3 above2. Enter Folder Name3. Select List as your folder type4. Select Blocks as your subtypeFile name appears tothe left5. Enter a Description of the file—this is needed for the Block Format6. Click Submit then Exit7. Select the folder you just created8. Click text in the Add Content area to add a text file (page)9. Enter file name10. Enter Description11. Click Submit then Exit12. Click on Folder to see resultsDescription appearsto the rightClick here to open the file containing theassignments for the month of September
Upload Files (you might want to change your file to a PDF, see directions on lastpage concerning PDF)1. Go to your main page2. Click Manage3. Click Upload4. Click Browse to find the file on your computer5. Select the file6. Click Open7. Click Submit to upload the file (depending on the size of the file this could takesome time)8. Click Exit9. Check and make sure the file opens.10. Go to manage to change the file name, add a description, move it or remove it.(these are functions you will find next to each file)<strong>Web</strong> LinksThis allows you to link to a web page outside your site.1. Go to your main page2. Click manage3. Click <strong>Web</strong> Link4. Enter the Link Nameyou might need to follow these instructions nowbefore you move on to step 55. Enter or paste the URL6. Enter a description (optional)7. Click Submit8. Wait until it is uploaded then click Exit• Open up a new browser window(firefox) by going to the top of thepage and clicking File / NewWindow.• Go to your desired web site• Copy the URL• Go back to your web site (step 4and then move to step 5).CalendarsThe Calendar is a folder—it is great for posting assignments and test dates. Calendars area great way to inform students and parents as to what is going on in your class.Creating a Calendar1. Go to the section of your web where you would like to insert a Calendar2. Click Manage3. Enter Folder name4. Change Folder type to Calendar5. Subtype: standard6. Enter description (optional)7. Click Submit, then Exit8. Go back to the page where your calendar is and click on it.
Editing your Calendar<strong>You</strong> can edit your calendar by day or month. I strongly suggest bulk editing!!!!Use the bulk edit option to enter many dates quickly by clicking the name of the month atthe top of the calendar. Do Not click in the individual boxes to edit. If you haveproblems, email wstatuto.1. Click the name of the month at the top of the calendar to get into bulk editing2. Go to the date (number). There is a number of every day of the calendar3. Type in your assignment or test4. If you have more than one assignment, hit enter for each one (this will create abullet)5. Click Update, wait for it to update and then click Exit.6. Now view your calendar7. Go back into your calendar and delete things you do not want and click submitand exit.8. Again, view your changes.Hide Files and Unhide Files1. Go to the page where your file is located2. Click manage3. Rename the file with un underscore before the name4. Click Submit, wait, then click Exit5. <strong>To</strong> unhide files, follow steps 1 and 2 above6. Then at the top of page put a check in the box next to show hidden files7. Locate your file and rename it without the underscore8. Click Submit, wait, then click ExitAbout PDFPortable Document Format (PDF) is a file format created by Adobe Systems in 1993for document exchange. PDF is used for representing two-dimensional documents in amanner independent of the application software, hardware, and operating system. [1]It is recommended that word document files be converted to PDF’s before uploadingthem to your website. <strong>You</strong> will need to download Cute<strong>pdf</strong> on your computer. It’s FREEand easy to download. Go to www.cute<strong>pdf</strong>.com<strong>To</strong> change a file to PDF1. Open up you file2. Click File / Print3. Select CutePDF or CutePDF Writer as you printer selection
4. Click OK5. Save your file in desired location6. Click SaveThese instructions will get you started. Any problems, don’t hesitate to contact me.Wendy Statuto