ADOBE CONNECT - jeffline
ADOBE CONNECT - jeffline
ADOBE CONNECT - jeffline

Create successful ePaper yourself
Turn your PDF publications into a flip-book with our unique Google optimized e-Paper software.
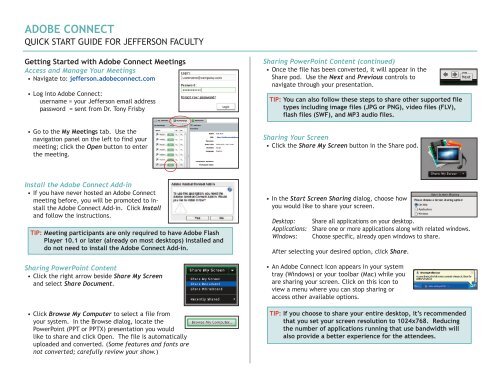
<strong>ADOBE</strong> <strong>CONNECT</strong>QUICK START GUIDE FOR JEFFERSON FACULTYGetting Started with Adobe Connect MeetingsAccess and Manage Your Meetings• Navigate to: jefferson.adobeconnect.com• Log into Adobe Connect:username = your Jefferson email addresspassword = sent from Dr. Tony Frisby• Go to the My Meetings tab. Use thenavigation panel on the left to find yourmeeting; click the Open button to enterthe meeting.Sharing PowerPoint Content (continued)• Once the file has been converted, it will appear in theShare pod. Use the Next and Previous controls tonavigate through your presentation.TIP: You can also follow these steps to share other supported filetypes including image files (JPG or PNG), video files (FLV),flash files (SWF), and MP3 audio files.Sharing Your Screen• Click the Share My Screen button in the Share pod.Install the Adobe Connect Add-in• If you have never hosted an Adobe Connectmeeting before, you will be promoted to installthe Adobe Connect Add-in. Click Installand follow the instructions.TIP: Meeting participants are only required to have Adobe FlashPlayer 10.1 or later (already on most desktops) installed anddo not need to install the Adobe Connect Add-in.Sharing PowerPoint Content• Click the right arrow beside Share My Screenand select Share Document.• Click Browse My Computer to select a file fromyour system. In the Browse dialog, locate thePowerPoint (PPT or PPTX) presentation you wouldlike to share and click Open. The file is automaticallyuploaded and converted. (Some features and fonts arenot converted; carefully review your show.)• In the Start Screen Sharing dialog, choose howyou would like to share your screen.Desktop:Applications:Windows:Share all applications on your desktop.Share one or more applications along with related windows.Choose specific, already open windows to share.After selecting your desired option, click Share.• An Adobe Connect icon appears in your systemtray (Windows) or your toolbar (Mac) while youare sharing your screen. Click on this icon toview a menu where you can stop sharing oraccess other available options.TIP: If you choose to share your entire desktop, it’s recommendedthat you set your screen resolution to 1024x768. Reducingthe number of applications running that use bandwidth willalso provide a better experience for the attendees.
Audio Communications• For best results with Adobe Connect, use a headsetw/microphone. The computer speakers are notrecommened, as they cause echo and feedback. Ifyou intend to use this feature, it is recommendedthat you first run through the Audio Setup Wizard.To do this, begin by selecting Meeting > AudioSetup Wizard...• The wizard guides you through four steps inwhich you are asked to test your speakers,select a microphone, and optimize the audio.If you’ve never used Adobe Connect before, you may see a Flash Playersettings box asking for permission to use your camera and mic. SelectingRemember will skip this prompt in the future.• Locate the Microphone button near the topof the application. Click the button once toactivate VoIP. A green microphone iconindicates that the mic is on. You can use thearrow beside the icon to mute your mic oradjust your volume.TIP: If you’re having problems with the VoIP audio, you canenable the Speex codec in Audio Preferences. SelectMeeting > Preferences > Audio.Sharing Webcam Video• You can easily share webcam video with meetingattendees. To do this, make sure your webcam isplugged in and click either the webcam button orthe Start My Webcam button on a Video pod. Agreen camera icon indicates that the webcam is on.• The webcam will give you a preview of what willbe shared. If you are happy with the preview,you can click Start Sharing to broadcast yourwebcam to all participants.• The Video pod will accommodate multiplewebcams and scale the images appropriately;you don’t need to open a separate pod foreach presenter.Start SharingPreviewStop My WebcamSharing Webcam Video (continued)• If you’d like to adjust the settings foryour webcam to increase or decreasethe quality based on available bandwidth,click preferences from the Video podoptions menu, or select Meeting >Preferences > Video.Managing Attendees• Meeting attendees fall into three roles:Host:Presenter:Organizes and facilitates the meetingMay assist in meeting facilitation, presentingcontent, or sharing their screen.Participant: Largely a spectator in the meeting whocan chat, respond to polls, and changetheir status.• There are two easy ways to change anyparticipant’s role. Hovering over a the nameof a participant will bring up a menu withseveral options giving you the ability tochoose a role for the individual.• Additionally, the Attendees pod supports drag anddrop functionality. Click and drag users from one roleto another.TIP: If you wish to change the role of multiple attendees at thesame time, hold down Control (Windows/Linux) or Command(Mac) while selecting usernames and then drag and drop toset the role.Learn MoreOnline training videos are available at:http://tv.adobe.com/show/learn-adobe-connect-8/To get your class set up with Adobe Connect, contact:Tony Frisby, Director AISR Education Servicestony.frisby@jefferson.edu