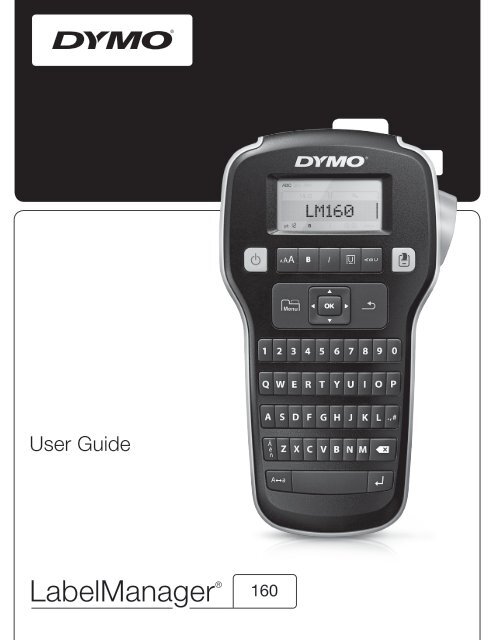
LabelManager 160 User Guide - DYMO
LabelManager 160 User Guide - DYMO
LabelManager 160 User Guide - DYMO

Create successful ePaper yourself
Turn your PDF publications into a flip-book with our unique Google optimized e-Paper software.
<strong>User</strong> <strong>Guide</strong><strong>LabelManager</strong> ® <strong>160</strong>
Copyright© 2011 Sanford, L.P. All rights reserved.No part of this document may be reproduced or transmitted in any form or by any means or translated into anotherlanguage without the prior written consent of Sanford, L.P.Trademarks<strong>DYMO</strong> and <strong>LabelManager</strong> are registered marks in the US and other countries. All other trademarks are the property oftheir respective holders.
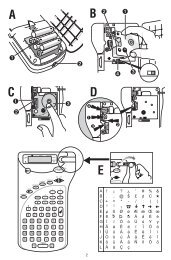
MenuThe key displays the Symbols/Clip Art andSettings tabs.Pressing the key toggles between the Symbols/Clip Art and Settings tabs.Symbols/Clip Art tabYou can use the Symbols and Clip Art menu to insertsymbols and clip art on your labels.You can use the Settings menu to change the language,label width, and units of measure settings.Using Clip Art, Symbols, andSpecial CharactersSettingstabYou can add clip art, symbols, punctuation, and otherspecial characters to your labels.Adding Clip ArtThe label maker includes the clip art shown on page 9.To insert clip art1 Press .2 Press and to select Clip Art.3 Press .4 Use the navigation keys to select the desired image.5 Press to add the image to your label.Adding SymbolsThe label maker supports the extended symbol setshown on page 9.To insert a symbol1 Press .2 Press and to select Symbols.3 Press .4 Use the navigation keys to select the desired symbol.5 Press to add the symbol to your label.You can quickly access the punctuation symbols bypressing .Adding International CharactersThe label maker supports the extended Latin characterset.Pressing followed by a letter displays all of the availablevariations of that letter.For example, if you press and then the letter a,you will see à á â ã ä and so on through all thevariations available.To add accented characters1 Press and then press an alpha character.The accent variations for that alpha characterare displayed.2 Use the navigation keys to select the character youwant and press .You can also access the accent variations for aletter by pressing and briefly holding the correspondingalpha key.Formatting Your LabelYou can choose from several format options to enhancethe appearance of your labels.Changing the Font SizeSix font sizes are available for your labels.The font sizes available depend on the label widthselected. The font size applies to all characters on a label.Label WidthFont Sizes Available6 mm (1/4”) 8, 10, 12 point9 mm (3/8”) 8, 10, 12, 16, 20 point12 mm (1/2”) 8, 10, 12, 16, 20, 24 pointTo change the font size Press until the desired font size is displayed.Changing the Font StyleTwo font styles are available: bold and italic. These stylescan be combined.Font styles are applied to all symbols andalphanumberic characters. However, font styles are notapplied to clip art.To change the font style Press to add or remove bold. Press to add or remove italic.The style is instantly visible in the display.7
Adding Box and Underline StylesYou can highlight the text by adding a box orunderline style.Five styles are available:Caring for Your Label MakerYour label maker is designed to give you long andtrouble-free service, while requiring very littlemaintenance. Clean your label maker regularly to keep itworking properly. Clean the cutter blade each time youreplace the label cassette.Print headcleaning toolTo add a box or underline Press until the desired box or underline styleis displayed.A label can be underlined or enclosed within a box, butnot both together.When adding an underline on a two-line label, each line isunderlined. When adding a box on a two-line label, bothlines are enclosed in a single box.Creating Vertical LabelsYou can print labels with the text oriented vertically.When printing two-line vertical labels, the label will printwith the second line of text after the first line.To create a vertical label1 Press .2 Enter text.3 Press to print.The underline style will not print on a vertical label.Creating Two-Line LabelsYou can print a maximum of two lines on a label. Only oneline of text can be printed on 6 mm (1/4”) labels.To create a two-line label1 Enter text for the first line and press .The symbol appears. This symbol is not printed.2 Enter text for the second line.3 Press to print.To clean the cutter bladeFigure 71 Remove the label cassette.Print headPressand hold2 Press and hold the cutter button to expose the cutterblade. See Figure 7.3 Use a cotton ball and alcohol to clean both sides ofthe blade.The cutter blade is extremely sharp. Use cautionwhen cleaning.To clean the print head1 Remove the label cassette.2 Remove the print head cleaning tool from inside thelabel compartment cover. See Figure 7.3 Gently wipe the padded side of the tool across theprint head.8
Clip Art© ® !Symbols' " , . ;! ? ¡ ¿ _’§:/ \@ & # % ‰[ ]• ° ∞€ $ ¢ £ ¥+ - * ÷ √^ ~ ≈ = ≠± < > ≤ ≥½¼( ) { }₀ ₁ ₂ ₃ ₄₅ ₆ ₇ ₈ ₉⁰ ¹ ² ³ ⁴⁵ ⁶ ⁷ ⁸ ⁹α β γ δ εζ η θ ι κλ μ ν ξ οπ ρ σ τ υφ χ ψ ωΑ Β Γ Δ ΕΖ Η Θ Ι ΚΛ Μ Ν Ξ ΟΠ Ρ Σ Τ ΥΦ Χ Ψ Ω|¾⅓☺9
TroubleshootingReview the following possible solutions if you encounter a problem while using your label maker.Problem/Error MessageNo displayPoor print qualityPoor cutter performancePrinting...Too many characters!Exceeded maximum number of characters in bufferToo many lines!Exceeded maximum number of linesSolution• Ensure the label maker is turned on.• Replace batteries or connect the optional power adapter.• Replace batteries or connect the optional power adapter.• Ensure label cassette is installed properly.• Clean the print head. See Caring for Your Label Maker.• Replace the label cassette.Clean the cutter blade. See Caring for Your Label Maker.No action required. Message disappears when printing is finished.Additional characters cannot be added.• Delete a line to fit text within the label width.• Insert a wider label cassette.Only one line of text is allowed on 6 mm (1/4”) labels.Up to two lines of text are allowed on 9 mm (3/8”) and 12 mm (1/2”)labels.Replace batteries or connect the optional power adapter.Battery lowInsert cassette!No label cassette is inserted.Label jam!Motor is stalled due to label jam.How do I remove the backing from the label?Insert a label cassette. See Inserting and Removing the LabelCassette.• Remove jammed label; replace label cassette.• Clean the cutter blade. See Caring for Your Label Maker.<strong>DYMO</strong> labels have an easy-to-peel split back.1 Locate the split on the label backing.2 Gently pinch the label length-wise, foldingtoward the printed side of the label. The labelbacking will separate.3 Carefully peel away the backing from the label.Split backingIf you need further assistance, visit the <strong>DYMO</strong> Web site at www.dymo.com.10
Documentation FeedbackWe are constantly working to produce the highest quality documentation for our products. We welcome your feedback.Send us your comments or suggestions about our user guides. Please include the following information with yourfeedback:• Product name, model number, and <strong>User</strong> <strong>Guide</strong> page number• Brief description of instructions that are inaccurate or unclear, areas where more detail is needed, and so onWe also welcome your suggestions about additional topics you would like to see covered in the documentation.Send email messages to: documentation@dymo.comKeep in mind that this email address is only for documentation feedback. If you have a technical question, contactCustomer Support.Environmental InformationThe equipment that you have bought requires the extraction and use of natural resources for its production. It may containsubstances that are hazardous to health and the environment.In order to avoid the dissemination of those substances in our environment, and to diminish the pressure on naturalresources, we encourage you to use the appropriate take-back systems. These systems will reuse or recycle most of thematerials of your end-of-life equipment in an environmentally sound way.The crossed-bin symbol marked on your device indicates you should use these systems.If you need more information on the collection, reuse, and recycling of this product, please contact your local or regionalwaste administration.You can also contact <strong>DYMO</strong> for more information on the environmental performance of our products.This product is CE marked in accordance with the EMC directive and the low voltage directive and is designed to conform with the following international standards:US FCC Class B CompatibilitySafety - UL, CUL, TUV, CE, T-Mark, SAA, BABT, C-TickEMC - EMI CompatibilityEN 55022; EN 61000 (+ addendums)RoHS 2002/95/EC11