Student Email Instructions - Wheelock College
Student Email Instructions - Wheelock College
Student Email Instructions - Wheelock College
- No tags were found...

Create successful ePaper yourself
Turn your PDF publications into a flip-book with our unique Google optimized e-Paper software.
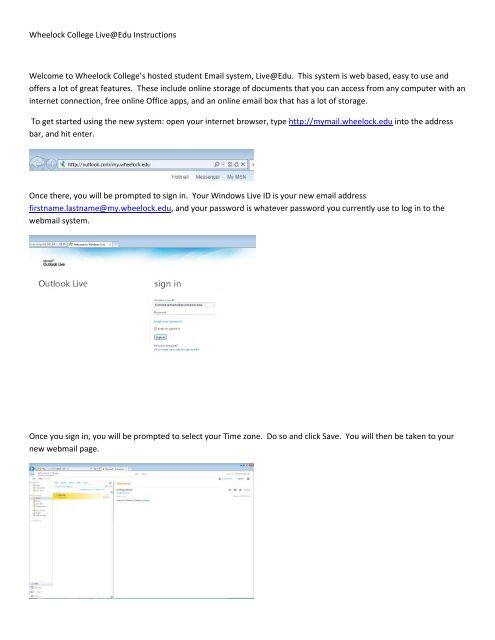
<strong>Wheelock</strong> <strong>College</strong> Live@Edu <strong>Instructions</strong>Welcome to <strong>Wheelock</strong> <strong>College</strong>’s hosted student <strong>Email</strong> system, Live@Edu. This system is web based, easy to use andoffers a lot of great features. These include online storage of documents that you can access from any computer with aninternet connection, free online Office apps, and an online email box that has a lot of storage.To get started using the new system: open your internet browser, type http://mymail.wheelock.edu into the addressbar, and hit enter.Once there, you will be prompted to sign in. Your Windows Live ID is your new email addressfirstname.lastname@my.wheelock.edu, and your password is whatever password you currently use to log in to thewebmail system.Once you sign in, you will be prompted to select your Time zone. Do so and click Save. You will then be taken to yournew webmail page.
This should have a similar look and functionality to your previous webmail page. In order to access the Officeapplications and file storage capabilities that are built into the system, simply click the Office link at the top of the pageand then click the Your Documents link.This will bring you to a screen that shows all the documents you have saved here. It also has links to create new Word,Excel, PowerPoint, or OneNote documents. Clicking the Mail link at the top will bring you back to the Webmail page.Clicking the Word icon will bring you to a page where you can create a new document. Type in a Name for thedocument and then click Save.
You are then brought to the new Word document to begin typing. When finished, save the document, then click theSkyDrive link at the top of the page. This will bring you back to the page where your documents are listed. You shouldnow see the document you just created.It’s the same with the Excel Icon. Name it and click Save
You are then brought to the spreadsheet.And again with the PowerPoint Icon. Name and Save.Then, select the style you would like to use for your presentation.
Then create your Presentation.You can always return to the page where all your documents are listed by clicking the Skydrive link at the top of everydocument page.