

Download - O Scale Trains Magazine Online
Download - O Scale Trains Magazine Online
Download - O Scale Trains Magazine Online
- No tags were found...

You also want an ePaper? Increase the reach of your titles
YUMPU automatically turns print PDFs into web optimized ePapers that Google loves.
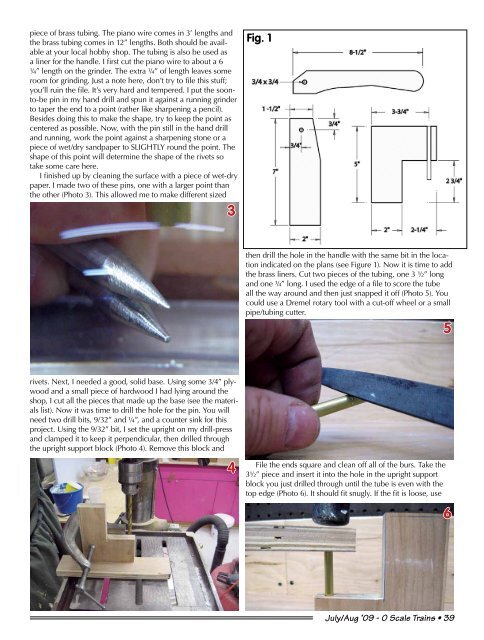
piece of brass tubing. The piano wire comes in 3’ lengths andthe brass tubing comes in 12” lengths. Both should be availableat your local hobby shop. The tubing is also be used asa liner for the handle. I first cut the piano wire to about a 6¼” length on the grinder. The extra ¼” of length leaves someroom for grinding. Just a note here, don’t try to file this stuff;you’ll ruin the file. It’s very hard and tempered. I put the soonto-bepin in my hand drill and spun it against a running grinderto taper the end to a point (rather like sharpening a pencil).Besides doing this to make the shape, try to keep the point ascentered as possible. Now, with the pin still in the hand drilland running, work the point against a sharpening stone or apiece of wet/dry sandpaper to SLIGHTLY round the point. Theshape of this point will determine the shape of the rivets sotake some care here.I finished up by cleaning the surface with a piece of wet-drypaper. I made two of these pins, one with a larger point thanthe other (Photo 3). This allowed me to make different sized3Fig. 1then drill the hole in the handle with the same bit in the locationindicated on the plans (see Figure 1). Now it is time to addthe brass liners. Cut two pieces of the tubing, one 3 ½” longand one ¾” long. I used the edge of a file to score the tubeall the way around and then just snapped it off (Photo 5). Youcould use a Dremel rotary tool with a cut-off wheel or a smallpipe/tubing cutter.5rivets. Next, I needed a good, solid base. Using some 3/4” plywoodand a small piece of hardwood I had lying around theshop, I cut all the pieces that made up the base (see the materialslist). Now it was time to drill the hole for the pin. You willneed two drill bits, 9/32” and ¼”, and a counter sink for thisproject. Using the 9/32” bit, I set the upright on my drill-pressand clamped it to keep it perpendicular, then drilled throughthe upright support block (Photo 4). Remove this block and4File the ends square and clean off all of the burs. Take the3½” piece and insert it into the hole in the upright supportblock you just drilled through until the tube is even with thetop edge (Photo 6). It should fit snugly. If the fit is loose, use6July/Aug ’09 - O <strong>Scale</strong> <strong>Trains</strong> • 39


