Word VBA Techniques - Susan Dorey Designs
Word VBA Techniques - Susan Dorey Designs
Word VBA Techniques - Susan Dorey Designs
- No tags were found...

You also want an ePaper? Increase the reach of your titles
YUMPU automatically turns print PDFs into web optimized ePapers that Google loves.
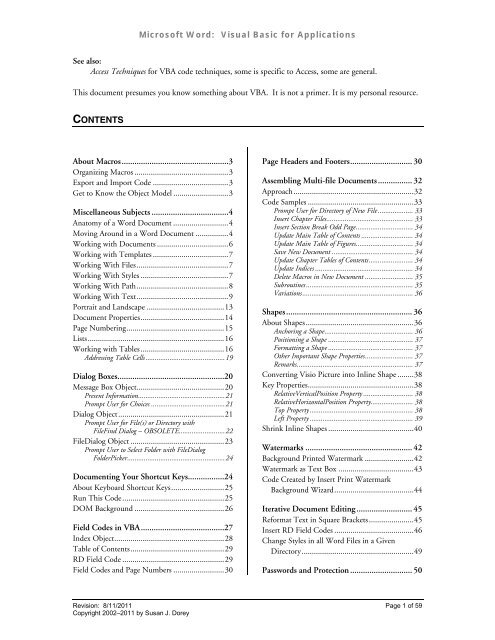
Microsoft <strong>Word</strong>: Visual Basic for ApplicationsSee also:Access <strong>Techniques</strong> for <strong>VBA</strong> code techniques, some is specific to Access, some are general.This document presumes you know something about <strong>VBA</strong>. It is not a primer. It is my personal resource.CONTENTSAbout Macros..................................................3Organizing Macros ..............................................3Export and Import Code .....................................3Get to Know the Object Model ...........................3Miscellaneous Subjects ....................................4Anatomy of a <strong>Word</strong> Document ...........................4Moving Around in a <strong>Word</strong> Document ................4Working with Documents ...................................6Working with Templates .....................................7Working With Files.............................................7Working With Styles ...........................................7Working With Path.............................................8Working With Text.............................................9Portrait and Landscape ......................................13Document Properties.........................................14Page Numbering................................................15Lists...................................................................16Working with Tables.........................................16Addressing Table Cells...........................................19Dialog Boxes..................................................20Message Box Object...........................................20Present Information...............................................21Prompt User for Choices ........................................21Dialog Object....................................................21Prompt User for File(s) or Directory withFileFind Dialog – OBSOLETE.........................22FileDialog Object ..............................................23Prompt User to Select Folder with FileDialogFolderPicker.....................................................24Documenting Your Shortcut Keys.................24About Keyboard Shortcut Keys..........................25Run This Code..................................................25DOM Background ............................................26Field Codes in <strong>VBA</strong>.......................................27Index Object......................................................28Table of Contents..............................................29RD Field Code ..................................................29Field Codes and Page Numbers .........................30Page Headers and Footers............................. 30Assembling Multi-file Documents................ 32Approach...........................................................32Code Samples ....................................................33Prompt User for Directory of New File ................... 33Insert Chapter Files............................................... 33Insert Section Break Odd Page............................... 34Update Main Table of Contents ............................ 34Update Main Table of Figures............................... 34Save New Document ............................................ 34Update Chapter Tables of Contents........................ 34Update Indices ..................................................... 34Delete Macros in New Document .......................... 35Subroutines.......................................................... 35Variations............................................................ 36Shapes........................................................... 36About Shapes.....................................................36Anchoring a Shape................................................ 36Positioning a Shape .............................................. 37Formatting a Shape .............................................. 37Other Important Shape Properties.......................... 37Remarks............................................................... 37Converting Visio Picture into Inline Shape ........38Key Properties....................................................38RelativeVerticalPosition Property ........................... 38RelativeHorizontalPosition Property....................... 38Top Property........................................................ 38Left Property ........................................................ 39Shrink Inline Shapes ..........................................40Watermarks .................................................. 42Background Printed Watermark ........................42Watermark as Text Box .....................................43Code Created by Insert Print WatermarkBackground Wizard.......................................44Iterative Document Editing .......................... 45Reformat Text in Square Brackets......................45Insert RD Field Codes .......................................46Change Styles in all <strong>Word</strong> Files in a GivenDirectory.......................................................49Passwords and Protection ............................. 50Revision: 8/11/2011 Page 1 of 59Copyright 2002–2011 by <strong>Susan</strong> J. <strong>Dorey</strong>
Microsoft <strong>Word</strong>: Visual Basic for ApplicationsInteracting with an Access Database..............51Automation ...................................................52Inventorying Macros .....................................52Relevant Object Models.....................................53Iterating Procedures in Modules ........................55Basic Logic to Inventory Macros ........................56Inventorying Files ......................................... 56Relevant Objects................................................57Code..................................................................57Revision: 8/11/2011 Page 2 of 59Copyright 2002–2011 by <strong>Susan</strong> J. <strong>Dorey</strong>
Microsoft <strong>Word</strong>: Visual Basic for ApplicationsABOUT MACROSRecording keyboard actions is a good way to get the needed code, then you can edit it into an efficientmacro.Organizing MacrosMacros (in newer versions of <strong>Word</strong>) are stored in modules. They may reside in any kind of <strong>Word</strong> file,document or template. All the macros in a file comprise a Project.By default new recorded macros are created in the NewMacros project of normal.dot.It can be helpful to organize macros into modules. Perhaps you put all macros used together in the samemodule. Perhaps you put utility macros, like those that transpose two adjacent characters, in the samemodule. But if you have 100 macros, it is better if they are distributed across 5 or so modules.You can create a module in the <strong>VBA</strong> editor with menu Insert, Module.You can rename a module: First select the module, then use menu View, Properties Window. to open thesame-named window. Properties are listed in tabular format with the names in the left column and thevalues in the right column. Select the value for the Name property and retype it. Click elsewhere for it totake effect.You can move a macro from one module to another: In the Code window select the text of the macro,cut it, open the Code window of the new module, position the cursor, and paste the text.You can delete a module: select it then use menu File, Remove.Export and Import CodeA module’s code can be exported as a .bas text file. Such a file can be imported into a different project.This can be a convenient method for copying code from one <strong>Word</strong> file to another.Get to Know the Object ModelBecause <strong>VBA</strong> is an object-oriented language, you will be most effective if you understand the <strong>Word</strong> objectmodel and how to manipulate it. Basically the model has objects. Objects are grouped into collectionswhich are an object unto themselves. Objects may have child objects and/or parent objects. Objects alsohave methods and properties. When you are trying to figure out how to do something, you must identifythe relevant object and property or method. Sometimes you start with the property or method and workbackward to the object. Look in the help file for a diagram.Revision: 8/11/2011 Page 3 of 59Copyright 2002–2011 by <strong>Susan</strong> <strong>Dorey</strong> <strong>Designs</strong>
Microsoft <strong>Word</strong>: Visual Basic for ApplicationsMISCELLANEOUS SUBJECTSAnatomy of a <strong>Word</strong> DocumentWhen you are editing a <strong>Word</strong> document with <strong>VBA</strong>, it can be important to understand the differentparts—objects—and how to deal with them. You could study the <strong>Word</strong> Object Model, which you canfind in the <strong>VBA</strong> Help file. Key objects that I have needed to handle include:Object Parent Object ContentsWindow Application all the (open) windowsPane Window the window panes for a given windowDocument Application an open documentSection Document sections are used to hold text formatted differently than the basedocument, including multiple columns and different pageorientation and/or marginsFootnotesDocumentThere are special properties that return a particular object:ActiveDocument. Returns a Document object for the document that is active, i.e., the document with thefocus.ActiveWindow. Returns a Window object for the active window, i.e., the window with the focus.ActivePane. Returns a Pane object for the active pane in specified window.SeekView. Returns or sets a View object with the document element displayed in print layout view. Ituses the WdSeekView constant to specify which view: main document, header, footer, endnotes,footnotes. There are several variations of header and footer: current, first, even, primary. This property canincur a run time error of 5894 if the view is not Print Layout.Examples:ActiveDocument.ActiveWindow.ActivePaneActiveDocument.ActiveWindow.View.SeekView = wdSeekMainDocumentIf ActiveDocument.ActiveWindow.View.SeekView wdSeekMainDocument Then . . .The following code will change the view/pane to Normal view, even when the document is in print layoutview and the header is open. Hence, it is very useful for resetting the state of the document prior toediting.ActiveDocument.ActiveWindow.View.Type = wdNormalViewMoving Around in a <strong>Word</strong> DocumentBy “moving” I mean moving the cursor. This is accomplished with methods of the Selection object. Theselection can be extended or collapsed to an insertion point. The principal methods are those that reflectthe keyboard direction keys: Home, End, Up, Down, Left, Right.Use the Select property to return the Selection object. If the Selection property is used without an objectqualifier, the object is assumed to be the active pane of the active document window. It may be advisableto not assume what the active pane is.Revision: 8/11/2011 Page 4 of 59Copyright 2002–2011 by <strong>Susan</strong> <strong>Dorey</strong> <strong>Designs</strong>
Microsoft <strong>Word</strong>: Visual Basic for ApplicationsWhich, unfortunately, gets us into panes. A window has more than one pane if the window is split or theview is not print layout view and information such as footnotes or comments are displayed. From this itseems safe to assume that the first pane is the one that opens when the document is first opened.To close all but the first pane:MsgBox ActiveDocument.ActiveWindow.Panes.CountIf ActiveDocument.ActiveWindow.Panes.Count > 1 ThenFor i = 2 To ActiveDocument.ActiveWindow.Panes.CountActiveDocument.ActiveWindow.Panes(i).CloseNextEnd IfSimilarly don’t assume the cursor is in the main body of the document, it might be in a header/footer orfootnote. The following code will incur a run time error if the document is not in print layout view.If ActiveDocument.ActiveWindow.View.SeekView wdSeekMainDocument ThenActiveDocument.ActiveWindow.View.SeekView = wdSeekMainDocumentBetter:If ActiveDocument.ActiveWindow.View.Type = wdPrintView ThenIf ActiveDocument.ActiveWindow.View.SeekView wdSeekMainDocument ThenActiveDocument.ActiveWindow.View.SeekView = wdSeekMainDocumentEnd IfEnd IfTo go to the first character:Selection.HomeKey Unit:=wdStoryIn the previous example, wdStory is one value of the WdUnits constants. Other values: wdCharacter,wd<strong>Word</strong>, wdSentence, wdParagraph, wdSection, wdCell, wdColumn, wdRow, wdTable.To go to the first character and select the first paragraph:Selection.HomeKey Unit:=wdStorySelection.MoveDown Unit:=wdParagraph, Count:=1, Extend:=wdExtendTo release selection by moving cursor to the right:Selection.MoveRight Unit:=wdCharacter, Count:=1To move down 8 paragraphs:Selection.MoveDown Unit:=wdParagraph, Count:=8To move to the start of the current line:Selection.HomeKey Unit:=wdLineTo move to the end of the current line:Selection.EndKey Unit:=wdLineTo move to the end of the document:Selection.EndKey Unit:=wdStoryMove cursor:Selection.MoveRight Unit:=wdCharacter, Count:=1, Extend:=wdExtendRevision: 8/11/2011 Page 5 of 59Copyright 2002–2011 by <strong>Susan</strong> <strong>Dorey</strong> <strong>Designs</strong>
Microsoft <strong>Word</strong>: Visual Basic for ApplicationsCollapse a range or selection to the starting or ending position. After a range or selection is collapsed, thestarting and ending points are equal. You can optionally specify the direction in which to collapse therange, as start or end.• If you use wdCollapseEnd to collapse a range that refers to an entire paragraph, the range is locatedafter the ending paragraph mark (the beginning of the next paragraph).• Using wdCollapseEnd to collapse a selection that refers to the last table row causes the cursor to belocated after the end of the table.• Using wdCollapseStart to collapse a selection that refers to a table row causes the cursor to be locatedin the first cell of that row. If you collapsed a group of rows, say after inserting them, the cursor islocated in the first cell of the first row.Selection.CollapseCollapse the selection to an insertion point at the beginning of the previous selection.Selection.Collapse Direction:=wdCollapseStartWorking with DocumentsDocuments collection consists of all open documents.Open a named document:Documents.Open FileName, ConfirmConversions, ReadOnly, AddToRecentFiles, PasswordDocument,PasswordTemplate, Revert, WritePasswordDocument, WritePasswordTemplate, Format, Encoding,Visible, OpenConflictDocument, OpenAndRepair, DocumentDirection, NoEncodingDialogExample:Documents.Open FileName:="C:\MyFiles\MyDoc.doc", ReadOnly:=TrueDocuments.Open “c:\data\this.doc”Close the active document:ActiveDocument.Close SaveChanges, OriginalFormat, RouteDocumentExample: ActiveDocument.Close wdSaveChangesSave the active document:expression.Save(NoPrompt, OriginalFormat)Example: ActiveDocument.Save TrueCreate new empty document:expression.Add(Template, NewTemplate, DocumentType, Visible)Example: Documents.AddMake a document the active one:Documents(1).ActivateDocuments("Report.doc").ActivateRun-time errors for files and directories:53 - file not found55 - file already open57 - device I/O error75 - path/file access error76 - path not foundRevision: 8/11/2011 Page 6 of 59Copyright 2002–2011 by <strong>Susan</strong> <strong>Dorey</strong> <strong>Designs</strong>
Microsoft <strong>Word</strong>: Visual Basic for ApplicationsSometimes you need to know the actual filename. The following properties apply to a Document objectand to a Template object.PropertyExampleFullNamec:\Data\Templates\normal.dotNamenormal.dotPathc:\Data\TemplatesPathSeparator \Working with TemplatesGenerally there are two kinds of templates:1. global template2. document templateBoth templates are identified in the “Templates and Add-Ins” dialog box. They are opened automaticallywhen you start <strong>Word</strong>. The universal document template is commonly called normal.dot and may belocated anywhere on a local drive. When a particular document template is attached to a particulardocument, the template is opened when the document is opened.The Template object applies to the Application and Global objects. It is described somewhat in thesection Inventorying Macros on page 52.Templates have the same filename properties as Documents.Working With FilesActiveDocument is a property that returns a Document object. ActiveDocument.Name returns thefilename of the active document.You can perform some task for all the files in a given directory. See section Change Styles in all <strong>Word</strong> Filesin a Given Directory on page 49 for a sample.You can perform some task for all the files in a given directory structure. This is described in MicrosoftAccess <strong>Techniques</strong> in the section titled “Walking A Directory Structure” (page 186 the last time I looked).Working With StylesCopy a style to a document:Dim strFilename As StringDim strTemplate As StringstrFilename = ActiveDocument.FullNamestrTemplate = "C:\Data\CMS\Template for CMS Operations Guide.dot"Application.OrganizerCopy Source:=strTemplate, Destination:=strFilename,Name:="Default Paragraph Font", Object:=wdOrganizerObjectStylesRevision: 8/11/2011 Page 7 of 59Copyright 2002–2011 by <strong>Susan</strong> <strong>Dorey</strong> <strong>Designs</strong>
Microsoft <strong>Word</strong>: Visual Basic for ApplicationsApplication.OrganizerCopy Source:=strTemplate, Destination:=strFilename,Name:="Bold", Object:= wdOrganizerObjectStylesBuilt-in styles cannot be deleted from a document.Delete a custom style from the document:Dim strFilename As StringstrFilename = ActiveDocument.FullNameApplication.OrganizerDelete Source:=strFilename, Name:=”unwantedStyleName”,Object:=wdOrganizerObjectStylesList the styles in use in a given document:Sub ListStylesInUse()Dim docTem As DocumentSet docTem = Documents.Open("c:\Data\From Others\StaceyDuke\NGI_Detailed_Design_Template_v01.doc")Dim docNew As DocumentSet docNew = Documents.AddDim s As StyleFor Each s In docTem.StylesIf s.InUse ThendocNew.ActivateSelection.InsertAfter s.NameLocal & vbCrLfSelection.Collapse Direction:=wdCollapseEndEnd IfNextEnd SubDoes a given style exist in the document? If you try to access a named style that does not exist, you will geta 5122 run time error, “This style name does not exist.”Msgbox StyleExists("Heading 1")Function StyleExists(strStyle as string) as BooleanDim tOn Error Resume NextStyleExists=TrueSet t=ActiveDocument.Styles(strStyle)If Err.Number0 then StyleExists=falseErr.ClearEnd FunctionWorking With PathThere are several functions which can be used to work with a path:• CurDir returns or sets the current path-directory. NOT ALWAYS RELIABLE• ActiveDocument.Path is reliable. Use it to get the path of a document that is open.• ChDrive changes the current default drive.• ChDir changes the current default directory.• MkDir creates a directory.• RmDir deletes an empty directory.• Kill deletes one or more files in a drive or directory. If argument is a directory, all the files in thatdirectory are deleted. Wildcards may be used in filename argument.• ChangeFileOpenDirectory sets the directory in which <strong>Word</strong> searches for files. The specifieddirectory’s contents are listed the next time the File Open dialog box is opened.Revision: 8/11/2011 Page 8 of 59Copyright 2002–2011 by <strong>Susan</strong> <strong>Dorey</strong> <strong>Designs</strong>
Microsoft <strong>Word</strong>: Visual Basic for ApplicationsFunction CurDir returns or sets the current path-directory. If there is no argument, it returns the currentdirectory. If there is an argument, it sets the current directory to the value of the argument.Syntax:CurDir[(drive)]Example:' Assume current path on C drive is "C:\WINDOWS\SYSTEM" (on Microsoft Windows).' Assume current path on D drive is "D:\EXCEL".' Assume C is the current drive.Dim MyPathMyPath = CurDir' Returns "C:\WINDOWS\SYSTEM".MyPath = CurDir("C") ' Returns "C:\WINDOWS\SYSTEM".MyPath = CurDir("D") ' Returns "D:\EXCEL".ChDrive "D"' Make "D" the current drive.ChDir "D:\TMP"' Make "TMP” the current directory on D drive.ChDir ".."' Moves up one directory in Microsoft Windows.ChDir "MYDIR"' Make "MYDIR" the current directory on current drive.MkDir "MYDIR"' Create directory "MYDIR" on current drive.MkDir "D:\MYDIR" ' Create directory "MYDIR" on D drive.RmDir "MYDIR"' Delete directory "MYDIR" on current drive.Kill "*.TXT"' Delete all files ending in .TXT in current directory.Kill "c:\DATA\THIS.DOC" ' Delete named file in named path.ChangeFileOpenDirectory "c:\Data\this.doc"Working With TextRefer to all text in the current document:ActiveDocument.ContentSelect the whole word in which the cursor is located; cursor may be at the beginning, end, or in themiddle:Selection.Expand wd<strong>Word</strong>InsertAfter is a method of Selection or Range object.The essential tasks are(1) position the cursor(2) enter the textInterspersing fields in text characters can make this more complex.You can insert special characters such as quotation marks, tab characters, and nonbreaking hyphens byusing the Visual Basic Chr function. You can also use the following Visual Basic constants: vbCr, vbLf,vbCrLf, and vbTab.Entering text is done with a range or selection object. The relevant methods and properties are:• Method Selection.TypeText. Optionally the text can replace the original contents of theselection.• Method Selection.TypeParagraph inserts a new, blank paragraph. If the selection isn't collapsedto an insertion point, it is replaced by the new paragraph.Revision: 8/11/2011 Page 9 of 59Copyright 2002–2011 by <strong>Susan</strong> <strong>Dorey</strong> <strong>Designs</strong>
Microsoft <strong>Word</strong>: Visual Basic for Applications• Property Selection/range.Text returns or sets the text.• Method Selection/range.InsertBefore and Selection/range.InsertAfter which insertsthe specified text at the beginning/end of a selection/range. After this method is applied, theselection/range expands to include the new text. For the InsertAfter method, if the selection/rangeends with a paragraph mark that also happens to be the end of the document (and perhaps a footer),the text is inserted before the final paragraph mark.• Method Selection/range.InsertParagraph replaces the specified range or selection with anew paragraph.• Method Selection/range.InsertParagraphAfter inserts a paragraph mark after aselection/range.• Method Selection/range.InsertParagraphBefore inserts a paragraph before after aselection/range.• Method Selection/range.InsertSymbol inserts a named symbol in place of the specifiedselection/range.• Method Selection/range.Collapse collapses a selection/range to the starting or endingposition. After a selection/range is collapsed, the starting and ending points are equal. If you usewdCollapseEnd to collapse a range that refers to an entire paragraph, the range is located after theending paragraph mark (the beginning of the next paragraph).• Method Selection/range.Move collapses the specified selection/range (must be object variable)to its start or end position and then moves the collapsed object by the specified number of units. IfCount is a positive number, the object is collapsed to its end position and moved forward in thedocument by the specified number of units. If Count is a negative number, the object is collapsed toits start position and moved backward by the specified number of units. The default value is 1. Youcan also control the collapse direction by using the Collapse method before using the Move method.If the range or selection is in the middle of a unit or isn't collapsed, moving it to the beginning orend of the unit counts as moving it one full unit.This method seems to be a generic version of methods MoveLeft and MoveRight. It seems to be a way ofsetting the cursor for actions that necessitate a range, such as inserting a field.Entering a field is done:• Method Selection.Fields.Add inserts a field in a named range. If the range isn't collapsed, thefield replaces the range.Entering a field after text and following it with text requires:• before adding a field: collapse the range• after adding a field: set the range end to the field endExamples of entering text:a. With method Selection.TypeText. In the example below a field is entered in between text characters:Selection.TypeText Text:="Revision: "Selection.Fields.Add Range:=Selection.Range, Type:=wdFieldEmpty, Text:= _"SAVEDATE \@ ""M/d/yyyy""Selection.TypeText Text:=vbTab & "Page "b. With property range.Text This technique requires additional actions to move the cursor beforeand/or after entering text characters and fields.rf.Text = "My entered text"Revision: 8/11/2011 Page 10 of 59Copyright 2002–2011 by <strong>Susan</strong> <strong>Dorey</strong> <strong>Designs</strong>
Microsoft <strong>Word</strong>: Visual Basic for ApplicationsFor a footer, the text is usually either new or replaces existing text. Thus the text is written at thebeginning of the area in a sequential manner.1.1 set a header-footer object = footerDim ftr As HeaderFooterSet ftr = ActiveDocument.Sections(1).Footers(wdHeaderFooterPrimary)1.2 set a range object = the range of the header-footer objectDim rf As RangeSet rf = ftr.Range1.3 is there text present? If so prompt user to keep or replace.Dim appTitle As StringDim msgText As StringappTitle = "Initialize Footer"msgText = "Footer is not empty. Do you want to replace it?"If rf.Text vbCr Then ' not emptySubEnd IfIf MsgBox(msgText, vbYesNo, appTitle) = vbYes Then rf.Text = "" Else Exit1.4 enter text charactersrf.InsertBefore Text:="Revision: "rf.InsertAfter Text:=”Concatenated text.”The problem is inserting fields in the desired location. My preferred footer is:Revision: , Page of It seems as though the sequence is:1. insert text “Revision: “ into range (assuming the range is empty, InsertBefore is fine)2. collapse range to end point3. insert field savedate4. collapse range to end point5. insert tab as vbTab and “page “ with InsertAfter6. collapse range to end point7. insert field pagenum8. collapse range to end point9. insert text “ of “ with InsertAfter10. collapse range to end point11. insert field numpages12. collapse range to end point13. insert paragraph break as vbCrLf with InsertAfter14. collapse range to end point15. insert field filenameThe code that works:Sub InitFooterNew()'' Initialize page footer with save date, page number, and file name.'Dim appTitle As StringDim msgText As StringDim ftr As HeaderFooterRevision: 8/11/2011 Page 11 of 59Copyright 2002–2011 by <strong>Susan</strong> <strong>Dorey</strong> <strong>Designs</strong>
Microsoft <strong>Word</strong>: Visual Basic for ApplicationsDim rf As RangeDim fld As FieldappTitle = "Initialize Footer"msgText = "Footer is not empty. Do you want to replace it?"Set ftr = ActiveDocument.Sections(1).Footers(wdHeaderFooterPrimary)Set rf = ftr.RangeIf rf.Text vbCr Then ' not emptyIf MsgBox(msgText, vbYesNo, appTitle) = vbYes Then rf.Text = "" Else ExitSubEnd Ifrf.InsertBefore Text:="Revision: "rf.Collapse Direction:=wdCollapseEndSet fld = ActiveDocument.Fields.Add(Range:=rf, Type:=wdFieldSaveDate,Text:="\@ ""M/d/yyyy""", _PreserveFormatting:=False)rf.End = fld.Result.Endrf.InsertAfter Text:=vbTab & "Page "rf.Collapse Direction:=wdCollapseEndActiveDocument.Fields.Add Range:=rf, Type:=wdFieldPage,PreserveFormatting:=Falserf.End = fld.Result.Endrf.InsertAfter Text:=" of "rf.Collapse Direction:=wdCollapseEndActiveDocument.Fields.Add Range:=rf, Type:=wdFieldNumPages,PreserveFormatting:=Falserf.End = fld.Result.Endrf.InsertParagraphAfterrf.Collapse Direction:=wdCollapseEndActiveDocument.Fields.Add Range:=rf, Type:=wdFieldFileName, Text:="\p",PreserveFormatting:=FalseEnd Sub------------I found this code to add text to every footer. The StoryType property has a wd constant, the values in themacro are8 = wdEvenPagesFooterStory9 = wdPrimaryFooterStor11 = wdFirstPageFooterStorySub InsertTextAfterCurrentTextInFooters()Dim myRng As RangeFor Each myRng In ActiveDocument.StoryRangesSelect Case myRng.StoryTypeCase Is = 8, 9, 11DomyRng.Collapse Direction:=wdCollapseEndmyRng.InsertAfter vbCr & "Your text here"Set myRng = myRng.NextStoryRangeLoop Until myRng Is NothingCase Else'Do nothingEnd SelectNextEnd SubRevision: 8/11/2011 Page 12 of 59Copyright 2002–2011 by <strong>Susan</strong> <strong>Dorey</strong> <strong>Designs</strong>
Microsoft <strong>Word</strong>: Visual Basic for ApplicationsPortrait and LandscapeMacros are useful for changing the orientation of document text. In addition the margins and styles ofthe page headers and footers must be changed accordingly.Sub MakeSectionLandscape()' First, set orientation and margins' Second, correct headers and footers: link to previous, styles, page numberingDim cntSections, thisSection, nextSectioncntSections = ActiveDocument.Sections.CountthisSection = Selection.Information(wdActiveEndSectionNumber)Landscape'x = MsgBox("Count of sections = " + CStr(cntSections), vbOKOnly)'y = MsgBox("Number of this section = " + CStr(thisSection), vbOKOnly)If thisSection < cntSections ThennextSection = thisSection + 1ActiveDocument.Sections(nextSection).Headers(wdHeaderFooterPrimary).LinkToPrevious = FalseActiveDocument.Sections(nextSection).Footers(wdHeaderFooterPrimary).LinkToPrevious = FalseEnd IfWith ActiveDocument.Sections(thisSection).Headers(wdHeaderFooterPrimary) 'this section.LinkToPrevious = False.Range.Style = "HeaderLandscape"End WithWith ActiveDocument.Sections(thisSection).Footers(wdHeaderFooterPrimary).LinkToPrevious = False.PageNumbers.RestartNumberingAtSection = False.Range.Style = "FooterLandscape"End WithEnd SubSub MakeSectionPortrait()' First, set orientation and margins' Second, correct headers and footers: link to previous, styles, page numberingDim cntSections, thisSection, nextSectioncntSections = ActiveDocument.Sections.CountthisSection = Selection.Information(wdActiveEndSectionNumber)Portrait'x = MsgBox("Count of sections = " + CStr(cntSections), vbOKOnly)'y = MsgBox("Number of this section = " + CStr(thisSection), vbOKOnly)If thisSection < cntSections ThennextSection = thisSection + 1ActiveDocument.Sections(nextSection).Headers(wdHeaderFooterPrimary).LinkToPrevious = FalseActiveDocument.Sections(nextSection).Footers(wdHeaderFooterPrimary).LinkToPrevious = FalseEnd IfWith ActiveDocument.Sections(thisSection).Headers(wdHeaderFooterPrimary) 'this section.LinkToPrevious = False.Range.Style = "Header"End WithWith ActiveDocument.Sections(thisSection).Footers(wdHeaderFooterPrimary).LinkToPrevious = FalseRevision: 8/11/2011 Page 13 of 59Copyright 2002–2011 by <strong>Susan</strong> <strong>Dorey</strong> <strong>Designs</strong>
Microsoft <strong>Word</strong>: Visual Basic for Applications.PageNumbers.RestartNumberingAtSection = False.Range.Style = "Footer"End WithEnd SubSub Portrait()' sets page layout to Portrait'With Selection.PageSetup.Orientation = wdOrientPortrait.TopMargin = InchesToPoints(1.1).BottomMargin = InchesToPoints(1.1).LeftMargin = InchesToPoints(1.25).RightMargin = InchesToPoints(1.25).HeaderDistance = InchesToPoints(0.4).FooterDistance = InchesToPoints(0.3)End WithEnd SubSub Landscape()With Selection.PageSetup.Orientation = wdOrientLandscape.TopMargin = InchesToPoints(1.1).BottomMargin = InchesToPoints(1.1).LeftMargin = InchesToPoints(0.5).RightMargin = InchesToPoints(0.5).HeaderDistance = InchesToPoints(0.4).FooterDistance = InchesToPoints(0.3)End WithEnd SubSub MakeHeaderLandscape()If ActiveWindow.View.SplitSpecial wdPaneNone ThenActiveWindow.Panes(2).CloseEnd IfIf ActiveWindow.ActivePane.View.Type = wdNormalView Or ActiveWindow. _ActivePane.View.Type = wdOutlineView ThenActiveWindow.ActivePane.View.Type = wdPrintViewEnd IfActiveWindow.ActivePane.View.SeekView = wdSeekCurrentPageHeaderSelection.WholeStorySelection.Style = ActiveDocument.Styles("HeaderLandscape")Selection.EscapeKeySelection.MoveDown Unit:=wdLine, Count:=1Selection.WholeStorySelection.Style = ActiveDocument.Styles("FooterLandscape")Selection.EscapeKeyActiveWindow.ActivePane.View.SeekView = wdSeekMainDocumentEnd SubDocument PropertiesA Document object can have one or more DocumentProperty objects. There are two kinds of documentproperties: built-in and custom. Each kind has its own collection of DocumentProperty objects. TheRevision: 8/11/2011 Page 14 of 59Copyright 2002–2011 by <strong>Susan</strong> <strong>Dorey</strong> <strong>Designs</strong>
Microsoft <strong>Word</strong>: Visual Basic for Applicationsbasic elements of a document property are its name and value; the DocumentProperty object hascorresponding properties of the same name.You can return a collection of document properties. You can return a specific document property. Andyou can add, change, and delete members of the collection.• Use the BuiltInDocumentProperties property to return the collection of built-in documentproperties.• Use the CustomDocumentProperties property to return the collection of custom documentproperties.• Use a constant to refer to a specific document property:Dim int<strong>Word</strong>s As Integerint<strong>Word</strong>s = ActiveDocument.BuiltInDocumentProperties(wdProperty<strong>Word</strong>s)• Set the value of a specific document property:ActiveDocument.BuiltInDocumentProperties("Title").Value = "CMS OperationsGuide"• Use a literal to refer to a specific document property. But be careful because if the documentproperty does not exist, an error will occur.x = ActiveDocument.CustomDocumentProperties("VersionNum").Valuex = Documents("Sales.doc").CustomDocumentProperties("VersionNum").Value• Use the Add method to add a property to a collection.Documents("Sales.doc").CustomDocumentProperties.Add _Name:="YourName", LinkToContent:=False, Value:=thename, _Type:=msoPropertyTypeStringPage NumberingPage numbering is usually done with field codes: Page, SectionPages, and NumPages. The field codeshave optional switches for the style of the number (e.g., roman or arabic).PageNumbers collection. Use PageNumbers(index), where index is the index number, to return a singlePageNumber object. In most cases, a header or footer contains only one page number, which is indexnumber 1.PageNumbers(1).Alignment = wdAlignPageNumberCenterPageNumbers properties: | Application Property | ChapterPageSeparator Property | Count Property |Creator Property | DoubleQuote Property | HeadingLevelForChapter Property | IncludeChapterNumberProperty | NumberStyle Property | Parent Property | RestartNumberingAtSection Property |ShowFirstPageNumber Property | StartingNumber Property. Note that formatting properties apply to allobjects in the collection.PageNumbers methods: | Add Method | Item MethodPageNumbers parent Objects: | HeaderFooterDetermine the page number at the current cursor positionRevision: 8/11/2011 Page 15 of 59Copyright 2002–2011 by <strong>Susan</strong> <strong>Dorey</strong> <strong>Designs</strong>
Microsoft <strong>Word</strong>: Visual Basic for ApplicationsSelection.Information (wdActiveEndPageNumber)Determine the number of pages in a document• Selection.Information(NumberOfPagesInDocument)• ActiveDocument.BuiltInDocumentProperties("Number of Pages")• ActiveDocument.Content.ComputeStatistics(wdStatisticPages)The third method is the most reliable, but the slowest.ListsActiveDocument.ListsFor Each li InActiveDocument.ListsList.ListParagraphList.SingleListTemplateList.StyleNameList.CanContinuePreviousListreturns the Lists collectionreturns an individual list; lists are in reverse order, from the endof the document forwardreturns all the paragraphs in the listreturns True/False if the entire list uses the same list templatereturns the name of the stylereturns a WdContinue constant that indicates whetherformatting from previous list can be continued:wdContinueDisabledwdContinueListwdResetListWorking with TablesThe hierarchy of relevant objects. Collection names are followed by en empty pair of parentheses:Tables()TableRows()RowCells()CellColumns()ColumnCells()CellBorders()BorderShadingRangeCells()CellHow many tables are there in the document:ActiveDocument.Tables.CountHow to tell if the cursor is in a table:If Selection.Information(wdWithInTable) = True. . .Revision: 8/11/2011 Page 16 of 59Copyright 2002–2011 by <strong>Susan</strong> <strong>Dorey</strong> <strong>Designs</strong>
Microsoft <strong>Word</strong>: Visual Basic for ApplicationsSelect the table in which the cursor is located:Selection.Tables(1)Select the first table.ActiveDocument.Tables(1).Range.SelectorActiveDocument.Tables(1).SelectDeselect the table while leaving cursor at the beginning of it:Selection.MoveLeft Unit:=wdCharacter, Count:=1Selection.MoveRight Unit:=wdCharacter, Count:=1Create a table at the current cursor position. The Range object is required, it is the range where you wantthe table to appear. The table replaces the range, if the range isn't collapsed.ActiveDocument.Tables.Add Range:=Selection.Range, NumRows:=1, NumColumns:=4,DefaultTableBehavior:=wd<strong>Word</strong>9TableBehaviorCreate a table at the beginning of the document:Set myRange = ActiveDocument.Range(Start:=0, End:=0)ActiveDocument.Tables.Add Range:=myRange, NumRows:=3, NumColumns:=4Move to the next cell on the right:Selection.MoveRight Unit:=wdCellSelect the last row in a table:ActiveDocument.Tables(1).Rows.Last.Range.SelectInsert one row when the cursor is in the table:Selection.InsertRows 1Insert one row regardless of where cursor is, add a row after the first row:ActiveDocument.Tables(1).Rows.Add BeforeRow:=.Rows(1)Insert a row at the bottom of a table:ActiveDocument.Tables(1).Rows.AddMake the first row in the selected table a repeating heading row:Selection.Tables(1).Rows(1).HeadingFormat = TrueIs the second row in the selected table a repeating heading row:If Selection.Tables(1).Rows(2).HeadingFormat = TrueThen . . .Change the font formats within the selected table:Selection.Tables(1).Range.Font.Size = 9Change the font formats within a row:Selection.Tables(1).Rows(1).Range.Font.Italic = TrueSet a paragraph format within a row:Selection.Tables(1).Rows(1).Range.ParagraphFormat.KeepWithNext = TrueRevision: 8/11/2011 Page 17 of 59Copyright 2002–2011 by <strong>Susan</strong> <strong>Dorey</strong> <strong>Designs</strong>
Microsoft <strong>Word</strong>: Visual Basic for ApplicationsGenerally formatting all table rows is done like:With Selection.Tables(1).AllowAutoFit = False.TopPadding = InchesToPoints(0.03).BottomPadding = InchesToPoints(0.03).LeftPadding = InchesToPoints(0.08).RightPadding = InchesToPoints(0.08)With .Borders(wdBorderLeft).LineStyle = wdLineStyleDouble.LineWidth = wdLineWidth050pt.Color = wdColorGray25End WithEnd WithSelect the table that is the subject of a variable (set via the object model):Dim i As LongDim docTables As TablesSet docTables = ActiveDocument.TablesWith docTablesFor i = 1 To .CountWith docTables(i). . .docTables(i).Select. . .End WithNextEnd WithIterate through all tables in the active document:Dim i as LongWith ActiveDocument.TablesFor i = 1 To .Count. . .NextEnd WithDelete a single row:ActiveDocument.Tables(1).Rows(1).DeleteCaution when deleting a group of rows: if you use a For loop to delete rows 3 through 7 of a 7-row table,when you delete row 3, the next row becomes 3; your code will fail trying to access a row that is no longerin the table (4). In this case use a reverse loop, starting with the last row and deleting the previous ones.Delete the contents of a row, leaving the row empty:ActiveDocument.Tables(1).Rows(2).SelectSelection.DeleteDelete all but the first row (this example is a backwards loop):For i = ActiveDocument.Tables(1).Rows.Count To 2 Step -1ActiveDocument.Tables(1).Rows(i).DeleteNextSort a table:ActiveDocument.Tables(1).Sort ExcludeHeader:=True, FieldNuumber:=1,SortFieldType:=wdSortFieldAlphanumeric, SortOrder:=wdSortOrderAscendingRevision: 8/11/2011 Page 18 of 59Copyright 2002–2011 by <strong>Susan</strong> <strong>Dorey</strong> <strong>Designs</strong>
Microsoft <strong>Word</strong>: Visual Basic for ApplicationsUp to two more columns may be specified for the sort as FieldNumber2 and FieldNumber3.ExcludeHeader is by default false. SortFieldType is by default alphanumeric. SortOrder is by defaultascending. The default “field” is the first column. Hence this next example is the same as the first example:ActiveDocument.Tables(1).Sort ExcludeHeader:=TrueCount rows and columns., This makes a handy tool to add to a toolbar or menu.Dim rCnt1, rCnt2, xrCnt1 = Selection.Tables(1).Rows.CountrCnt2 = Selection.Tables(1).Columns.Countx = MsgBox("Row count = " + CStr(rCnt1) + ", Column count = " + CStr(rCnt2),vbOKOnly)Addressing Table CellsUse Cell(row, column), where row is the row number and column is the column number, or Cells(index),where index is the index number, to return a Cell object. The following example applies shading to thesecond cell in the first row.Set myCell = ActiveDocument.Tables(1).Cell(Row:=1, Column:=2)myCell.Shading.Texture = wdTexture20Percent<strong>Word</strong> adds a end-of-cell mark, Chr(07), at the end of each cell.The contents of a cell can be accessed with the Range object: Note, this also returns the end-of-cellmarker.Set myRange = ActiveDocument.Tables(1).Cell(1,2).Rangethis may not work, you may have to do more:Set myTable = ActiveDocument.Tables(1)Set myRange = ActiveDocument.Range(myTable.Cell(1, 1).Range.Start,myTable.Cell(1, 2).Range.End)Or:ActiveDocument.Tables(1).Cell(1,2).Range.Text = “wow”Return cell contents without end-of-cell marker (not sure this is necessary):Set myRange = ActiveDocument.Tables(1).Cell(1, 2).RangemyRange.MoveEnd Unit:=wdCharacter, Count:=-1cellText = myRange.TextSet value of a cell:ActiveDocument.Tables(1).Cell(1,1).Range.Text = “this text”Delete the contents of a cell:ActiveDocument.Tables(1).Cell(1,1).SelectSelection.DeleteDelete a cell (why would you ever do this?):ActiveDocument.Tables(1).Cell(1,1).DeleteReturn a numbered cell in the last row of a table:ActiveDocument.Tables(1).Rows.Last.Cells(1)ActiveDocument.Tables(1).Rows.Last.Cells(2) )Revision: 8/11/2011 Page 19 of 59Copyright 2002–2011 by <strong>Susan</strong> <strong>Dorey</strong> <strong>Designs</strong>
Microsoft <strong>Word</strong>: Visual Basic for ApplicationsDIALOG BOXESMessage Box ObjectThe basic syntax isMsgBox(prompt[, buttons] [, title] [, helpfile, context])The button constants are:The first group of values describes the number and type of buttons displayed in the dialog box; the secondgroup describes the icon style; the third group determines which button is the default; and the fourthgroup determines the modality of the message box. Buttons can be combined—no more than one buttonfrom each group—by adding their numbers You can add numbers:vbYesNo + vbCriticalvbOKOnlyvbOKCancelvbAbortRetryIgnorevbYesNoCancelvbYesNovbRetryCancelvbCriticalvbQuestionvbExclamationvbInformationvbDefaultButton1vbDefaultButton2vbDefaultButton3vbDefaultButton4vbApplicationModalvbSystemModalvbMsgBoxHelpButtonVbMsgBoxSetForegroundvbMsgBoxRightDisplay OK button only.Display OK and Cancel buttons.Display Abort, Retry, and Ignore buttons.Display Yes, No, and Cancel buttons.Display Yes and No buttons.Display Retry and Cancel buttons.Display Critical Message icon.Display Warning Query icon.Display Warning Message icon.Display Information Message icon.First button is default.Second button is default.Third button is default.Fourth button is default.Application modal; the user must respond to the message boxbefore continuing work in the current application.System modal; all applications are suspended until the userresponds to the message box.Adds Help button to the message boxSpecifies the message box window as the foreground windowText is right alignedMsgBox can return an integer corresponding to the button selected:vbOKOKvbCancelCancelvbAbortAbortvbRetryRetryvbIgnoreIgnorevbYesYesRevision: 8/11/2011 Page 20 of 59Copyright 2002–2011 by <strong>Susan</strong> <strong>Dorey</strong> <strong>Designs</strong>
Microsoft <strong>Word</strong>: Visual Basic for ApplicationsvbNoNoPresent InformationDim msgTitle as String, msgText as StringmsgTitle = "the process title"msgText = "Count of sections = " + CStr(cntSections)MsgBox msgText, vbOKOnly, msgTitlePrompt User for ChoicesYou can use MsgBox to prompt the user for simple choices by directing the user to press a button thatcorresponds with a certain condition.msgTitle = "Aggregate Document Files for NPI Business Requirements"msgText = "Where are the the document files located? " + vbCrLfmsgText = msgText + "Select [Yes] for " & HomeDirectory + vbCrLfmsgText = msgText + "Select [No] for " & WorkDirectoryc = MsgBox(msgText, vbYesNoCancel, msgTitle)On Error Resume NextSelect Case cCase vbYesChangeFileOpenDirectory (HomeDirectory)Case vbNoChangeFileOpenDirectory (WorkDirectory)Case ElseExit SubEnd SelectIf Err.Number = 4172 ThenmsgText = "That directory does not exist. Stopping."MsgBox msgText, vbOKOnly, msgTitleExit SubEnd IfOn Error GoTo ErrorHandlerDialog ObjectThe object model has a Dialogs collection that represents all the built-in dialog boxes in <strong>Word</strong>. Thecollection has two parents: Application and Global.Use Dialogs(index), where index is a wd<strong>Word</strong>Dialog constant that identifies the dialog box, to return asingle Dialog object. Dialog boxes you are likely to use include:wdDialogEditFindwdDialogFileFindwdDialogFileOpenwdDialogFilePrintwdDialogFileSaveAsThe Dialog object has methods:• Display: Displays the specified built-in <strong>Word</strong> dialog box until either the user closes it or thespecified amount of time has passed.• Execute: Applies the current settings of a Microsoft <strong>Word</strong> dialog box.• Show: Displays and carries out actions initiated in the specified built-in <strong>Word</strong> dialog box.Revision: 8/11/2011 Page 21 of 59Copyright 2002–2011 by <strong>Susan</strong> <strong>Dorey</strong> <strong>Designs</strong>
Microsoft <strong>Word</strong>: Visual Basic for Applications• Update: Updates the values shown in a built-in Microsoft <strong>Word</strong> dialog box.The Show method of the Dialog object displays and executes any action taken in a built-in <strong>Word</strong> dialogbox. The return value (Long) indicates which button was clicked to close the dialog box:Return value Description-2 The Close button.-1 The OK button.0 (zero) The Cancel button.> 0 (zero) A command button: 1 is the first button, 2 is the second button, and so on.Open a particular dialog box:Dialogs(wdDialogFileOpen).ShowThis example displays the built-in Find dialog box, with "Hello" in the Find What box.Dim dlgFind As DialogSet dlgFind = Dialogs(wdDialogEditFind)With dlgFind.Find = "Hello".ShowEnd WithThis example displays the built-in Open dialog box showing all file types.With Dialogs(wdDialogFileOpen).Name = "*.*".ShowEnd WithThis example prints the active document, using the settings from the Print dialog box.Dialogs(wdDialogFilePrint).ExecutePrompt User for File(s) or Directory with FileFind Dialog –OBSOLETEThis used to work, but the better approach with <strong>Word</strong> 2003 is to use the FileDialog object.Dim pn, r, t, mr = MsgBox("Select directory from the following window, then [Open].",vbOKCancel, t)If r = vbCancel Then EndWith Dialogs(wdDialogFileFind).Display.Updatepn = .SearchPathEnd Withm = "Confirm directory: " + pnr = MsgBox(m, vbOKCancel, t)If r = vbCancel Then EndRevision: 8/11/2011 Page 22 of 59Copyright 2002–2011 by <strong>Susan</strong> <strong>Dorey</strong> <strong>Designs</strong>
Microsoft <strong>Word</strong>: Visual Basic for ApplicationsFileDialog ObjectNew with Office 2003 is the FileDialog object. It provides file dialog box functionality similar to thefunctionality of the standard Open and Save dialog boxes found in Microsoft Office applications.The object can to used in four ways, determined by a single parameter, DialogType:ConstantActionmsoFileDialogOpen lets users select one or more files that you can then open in the hostapplication using the Execute methodmsoFileDialogSaveAs lets users select a single file that you can then save the current file asusing the Execute methodmsoFileDialogFilePicker lets users select one or more files; the file paths that the user selects arecaptured in the FileDialogSelectedItems collectionmsoFileDialogFolderPicker lets users select a path; the path that the user selects is captured in theFileDialogSelectedItems collectionIt has two methods:• Execute: carries out a user's action right after the Show method is invoked.• Show: Displays a file dialog box and returns a Long indicating whether the user pressed the actionbutton (-1) or the cancel button (0). When you call the Show method, no more code will executeuntil the user dismisses the file dialog box. In the case of Open and SaveAs dialog boxes, use theExecute method right after the Show method to carry out the user's action.Has properties:• AllowMultiSelect: if the user is allowed to select multiple files from a file dialog box. Has no effecton Folder Picker dialog boxes or SaveAs dialog boxes because users should never be able to selectmultiple files in these types of file dialog boxes.• InitialFileName: Set or returns a String representing the path and/or file name that is initiallydisplayed in a file dialog box.• Title: Sets or returns the title of a file dialog box displayed using the FileDialog object.Display the Open dialog box and limit the user to select only one item:Dim dlgOpen As FileDialogSet dlgOpen = Application.FileDialog( FileDialogType:=msoFileDialogOpen)With dlgOpen.AllowMultiSelect = False.ShowEnd WithThe FileDialog object has two sub objects.• FileDialogSelectedItems• FileDialogFilterFileDialogFilter object represents a file filter in a file dialog box displayed through the FileDialog object.Each file filter determines which files are displayed in the file dialog box. It has a collectionFileDialogFilters.Access the collection:Revision: 8/11/2011 Page 23 of 59Copyright 2002–2011 by <strong>Susan</strong> <strong>Dorey</strong> <strong>Designs</strong>
Microsoft <strong>Word</strong>: Visual Basic for ApplicationsApplication.FileDialog(msoFileDialogOpen).FiltersClear the default filters:Application.FileDialog(msoFileDialogFilePicker).Filters.ClearAdd a filter that includes all files:Application.FileDialog(msoFileDialogFilePicker).Filters.Add "All files", "*.*"Add a filter that includes GIF and JPEG images and make it the first item in the list:Application.FileDialog(msoFileDialogFilePicker).Filters.Add "Images", "*.gif;*.jpg; *.jpeg", 1Prompt User to Select Folder with FileDialog FolderPickerThis code can be used in a number of places.dim strDir As StringstrDir = PromptForDirectoryIf strDir = "" Then Exit Sub. . .Function PromptForDirectory()‘ returns empty string if no directory selectedDim strDir As StringDim r As LongDim dlgOpen As FileDialogSet dlgOpen = Application.FileDialog(FileDialogType:=msoFileDialogFolderPicker)repeat:With dlgOpen.Title = "Select Directory".InitialFileName = "C:\".AllowMultiSelect = FalseIf .Show = 0 Thenr = MsgBox("Do you want to cancel this macro?", vbYesNo, "SelectDirectory")If r = vbYes ThenExit FunctionElseGoTo repeatEnd IfEnd IfstrDir = .SelectedItems(1)End Withr = MsgBox("You selected " & strDir, vbYesNo, "Select Directory")If r = vbNo Then GoTo repeatPromptForDirectory = strDirEnd FunctionDOCUMENTING YOUR SHORTCUT KEYSThis can be done with <strong>VBA</strong>.Revision: 8/11/2011 Page 24 of 59Copyright 2002–2011 by <strong>Susan</strong> <strong>Dorey</strong> <strong>Designs</strong>
Microsoft <strong>Word</strong>: Visual Basic for ApplicationsAbout Keyboard Shortcut KeysShortcut keys—combinations of keys—can be assigned to menu items, toolbar items, macros, <strong>Word</strong>commands, styles, fonts, and common symbols. Menu and toolbar items have Alt shortcut keys which areidentified by underlining. For example, the File menu is presented in the menu bar as File where theunderlining indicates that [Alt+F] is the shortcut key.There are two ways of creating custom shortcut keys:• For menu and toolbar items, open the Customize dialog box, select the desired menu or toolbaritem, then click [Modify Selection] to open a context menu. In the Name text box, type theampersand character (&) to the left of the letter you want to use for an Alt shortcut key.• For all objects, open the Customize Keyboard dialog box, select the desired object as an item in acategory, enter the desired shortcut key combination, and save it. If you assign an Alt shortcut keythat is already in use (as visible on the menu or a toolbar), your new assignment has precedence(until you delete it). So use caution.Run This Code1. Open an empty <strong>Word</strong> document.2. Run the code:CustomizationContext = NormalTemplateFor Each aKey In KeyBindingsSelection.InsertAfter aKey.Command & vbTab _& aKey.KeyString & vbCrSelection.Collapse Direction:=wdCollapseEndNext aKey3. Select all text in the <strong>Word</strong> document and convert text to a table separating text into columns withtabs.4. Reformat the table to suit yourself.Or run:Sub DocumentKeys()Documents.Add DocumentType:=wdNewBlankDocumentCustomizationContext = NormalTemplateFor Each aKey In KeyBindingsSelection.InsertAfter aKey.Command & vbTab _& aKey.KeyString & vbCrSelection.Collapse Direction:=wdCollapseEndNext aKeyMsgBox "Count of custom shortcut keys = " & KeyBindings.CountSelection.WholeStorySelection.ConvertToTable Separator:=wdSeparateByTabs, NumColumns:=2, _AutoFitBehavior:=wdAutoFitContentWith Selection.Tables(1).AllowPageBreaks = False.AllowAutoFit = True.Style = "Table Grid".ApplyStyleHeadingRows = True.ApplyStyleLastRow = True.ApplyStyleFirstColumn = True.ApplyStyleLastColumn = TrueRevision: 8/11/2011 Page 25 of 59Copyright 2002–2011 by <strong>Susan</strong> <strong>Dorey</strong> <strong>Designs</strong>
Microsoft <strong>Word</strong>: Visual Basic for ApplicationsEnd WithSelection.MoveRight Unit:=wdCharacter, Count:=1End SubYou can differentiate between types of commands easily. They are typically either style names, <strong>Word</strong>command names, or macro names. The latter have names like Normal.General.Keep; Normal is the nameof the template file, General is the name of the module, and Keep is the name of the macro.DOM BackgroundThe relevant DOM collection is KeyBindings. This is a collection of KeyBinding objects that representthe custom key assignments in the current context. (Custom key assignments are made in the CustomizeKeyboard dialog box.) The collection excludes Alt keys assigned to menu and toolbar items. Thecollection is returned by property KeyBindings, a property of the Application and Global objects.Property Context: Returns an object that represents the storage location of the specified key binding.Note that built-in key assignments (for example, CTRL+I for Italic) return the Application object as thecontext. Any key bindings you add will return a Document or Template object, depending on thecustomization context in effect when the KeyBinding object was added.Methods:Item: returns a single item; expression.Item(Index)Key: Returns a KeyBinding object that represents the specified custom key combination. If the keycombination doesn't exist, this method returns Nothing.MsgBox KeyBindings(1).CommandProperty CustomizationContext: Returns or sets a Template or Document object that represents thetemplate or document in which changes to menu bars, toolbars, and key bindings are stored. Correspondsto the value of the Save in box on the Commands tab in the Customize dialog box. Applies to theApplication object and to the Global object.Examples:CustomizationContext = NormalTemplateCustomizationContext = ActiveDocument.AttachedTemplateObject KeyBinding: Represents a custom key assignment in the current context.Application PropertyCommand Property: the command assigned to the key combinationCommandParameter Property: the command parameterContext Property: the storage location (example: normal.dot)Creator PropertyKeyCategory Property: WdKeyCategory constants:wdKeyCategoryAutoTextwdKeyCategoryCommandwdKeyCategoryDisablewdKeyCategoryFontwdKeyCategoryMacrowdKeyCategoryNilwdKeyCategoryPrefixRevision: 8/11/2011 Page 26 of 59Copyright 2002–2011 by <strong>Susan</strong> <strong>Dorey</strong> <strong>Designs</strong>
Microsoft <strong>Word</strong>: Visual Basic for ApplicationswdKeyCategoryStylewdKeyCategorySymbolKeyCode Property: unique number for first key in the combinationKeyCode2 Property: unique number for second key in the combinationKeyString Property: the key combination string for the specified keys (for example, CTRL+SHIFT+A)Parent PropertyProtected PropertyFIELD CODES IN <strong>VBA</strong>The Fields collection belongs to three objects: Document, Range, and Selection.There is a Fields collection and a Field object. The Fields collection is a child of Range and Selection.The Field object has properties:• Code property returns a Range object that contains all the text enclosed by the { } including leadingand trailing spaces.• Result property returns a Range object that represents the field’s result.• Type property returns an expression that is a value of the WdfieldType constant. Sample values:wdFieldNumPages, wdFieldPage, wdFieldSaveDate, wdFieldSectionPages, wdFieldSequence,wdFieldIndex, wdFieldIndexEntry, wdFieldTOC.• Kind property identifies the field as a constant value:wdFieldKindCold has no resultwdFieldKindHot result is automatically updatedwdFieldKindNone invalidwdFieldKindWarm result auto updated when source changes or can be manually updatedField methods:• Select• Copy• Cut: removes the field and puts it on the Clipboard.• Delete• Add• Update: updates the field’s result.A Range object’s Text property returns the text in the range. Can be useful for extracting the text in afield’s result.The Add method: Adds a Field object to the Fields collection. Returns the Field object at the specifiedrange.expression.Add(Range, Type, Text, PreserveFormatting)expression Required. An expression that returns a Fields object.Range Required Range object. The range where you want to add the field. If the range isn'tcollapsed, the field replaces the range.Type Optional Variant. Can be any WdFieldType constant. The default value is wdFieldEmpty.Text Optional Variant. Additional text needed for the field. For example, if you want to specify aswitch for the field, you would add it here.Revision: 8/11/2011 Page 27 of 59Copyright 2002–2011 by <strong>Susan</strong> <strong>Dorey</strong> <strong>Designs</strong>
Microsoft <strong>Word</strong>: Visual Basic for ApplicationsPreserveFormatting Optional Variant. True to have the formatting that's applied to the fieldpreserved during updates.Selection.Collapse Direction:=wdCollapseEndActiveDocument.Fields.Add Range:=Selection.Range, _Type:=wdFieldListNum, Text:="\s 3"To remove all XE field codes:Dim fld As FieldFor each fld in ActiveDocument.FieldsIf fld.Type = wdFieldIndexEntry Then fld.DeleteNextIf you iterate through field codes at the Document level, you only access those in the Main Text story. Toiterate through all field codes in the document, you have to iterate through the StoryRanges at the toplevel, then for each StoryRange you can iterate through its Fields collection.You can access fields in page headers/footers with the HeadersFooters collection.How to access a particular field code? How to learn if a document has a particular field code?• Access the nth field code: ActiveDocument.Fields(n)• x = ActiveDocument.StoryRanges(wdPrimaryFooterStory).Fields.CountField methods:• Unlink: replaces the field with its most recent result (converts it to plain text)When a document has a table of contents created by the TOC field code, an iteration of the Fieldscollection will return one field for the TOC itself (13) and two fields for each TOC entry (37FieldPageRef and 88 Hyperlink).Dim sty as RangeDim fc As FieldFor Each sty in MyDoc.StoryRangesIf sty.Fields.Count 0 ThenFor Each fc In sty.FieldsMsgBox “Select Case fc.TypeCase wdFieldSaveDatefc.UnlinkCase wdFieldDatefc.DeleteCase wdFieldPrintDatefc.DeleteEnd SelectNext fcEnd IfNext styIndex ObjectThe Index object is a member of the collection Indexes. It has properties:• Type: constant wdIndexType has values wdIndexRunin, wdIndexIndent.Revision: 8/11/2011 Page 28 of 59Copyright 2002–2011 by <strong>Susan</strong> <strong>Dorey</strong> <strong>Designs</strong>
Microsoft <strong>Word</strong>: Visual Basic for ApplicationsMethods:• Update: updates the values.Table of ContentsThe object is TableOfContents. It belongs to the collection TablesOfContents, which belongs to theobject Document.Methods:• UpdatePageNumbers: updates only the page numbers.• Update: updates the entries (“update entire table”).ActiveDocument.TablesOfContents(1).UpdateThe following code updates the page numbers in TOCs other than the first one. This is useful in a multichapterdocument with a master TOC and individual chapter TOCs.Dim t as TableOfContentsFor Each t in ActiveDocument.TablesOfContentsIf not t is ActiveDocument.TablesOfContents(1) Thent.UpdatePageNumbersEnd IfNextorDim t as TableOfContentsFor Each t in ActiveDocument.TablesOfContentsIf t is ActiveDocument.TablesOfContents(1) Thent.UpdateElset.UpdatePageNumbersEnd IfNextRD Field CodeURL strings always encode space characters to prevent the possibility of being misunderstood. URLencoding of a character consists of a "%" symbol, followed by the two-digit hexadecimal representation(case-insensitive) of the ISO-Latin code point for the character. As hex 20 is the representation of a space,“%20” is used in lieu of the space character in URL-encoded strings.When you copy a filename from a website into an RD field, it will be encoded. And while you can createan RD field with spaces in the filename, the filename becomes encoded after the document with the RDfield is saved. For instance,“RD “Using%20SharePoint.doc” \f”The encoded value may be useful when the file in question resides on a web server, but not on a file server.Use a simple function like the following example to replace “%20” with a space.Revision: 8/11/2011 Page 29 of 59Copyright 2002–2011 by <strong>Susan</strong> <strong>Dorey</strong> <strong>Designs</strong>
Microsoft <strong>Word</strong>: Visual Basic for ApplicationsPrivate Function URLDecode(URLtoDecode As String) As StringURLDecode = Replace(URLtoDecode, "%20", " ")End FunctionField Codes and Page NumbersIf you needed to change a switch in a field code, you would have to edit the Result property. If youneeded to change the numbering style, you might do some string manipulationNUMPAGES \* romanNUMPAGES \* arabicReplace(Field.Code, “arabic”, “roman”)Or you could replace one field with another. In the following example, the cursor is immediately to theleft of a Page field:Selection.MoveRight Unit:=wdCharacter, Count:=1, Extend:=wdExtendSelection.Fields.Add Range:=Selection.Range, Type:=wdFieldEmpty, Text:= _"PAGE \* roman ", PreserveFormatting:=TrueWhy would you need to do this when the HeaderFooter.PageNumbers property is supposed to return aPageNumbers collection that represents all the page number fields included in the specified header orfooter? Because when I changed the PageNumbers.NumberStyle property, the NumPages field did notchange, only the Page field.How would you find the page number field codes?PAGE HEADERS AND FOOTERSHeadersFooters is the main collection, has HeaderFooter objects. A collection belongs to each section,e.g., ActiveDocument.Sections(n).Each section can have several HeaderFooter objects represented by the following WdHeaderFooterIndexconstants: wdHeaderFooterEvenPages, wdHeaderFooterFirstPage, and wdHeaderFooterPrimary (returnsan odd-numbered header/footer when there are different odd and even ones).Headers property returns a HeadersFooters collection that represents the headers for the specified sectionWith ActiveDocument.Sections(1).Headers(wdHeaderFooterFirstPage).Range.InsertAfter("First Page Text").Range.Paragraphs.Alignment = wdAlignParagraphRightEnd WithFooters property returns a HeadersFooters collection that represents the footers for the specified sectionWith ActiveDocument.Sections(1).Headers(wdHeaderFooterPrimary).Range.Text = "Header text".Footers(wdHeaderFooterPrimary).Range.Text = "Footer text"End WithThe Exist property indicates if the specified type of header/footer exists.If secTemp.Headers(wdHeaderFooterFirstPage).Exists = True Then . . .Revision: 8/11/2011 Page 30 of 59Copyright 2002–2011 by <strong>Susan</strong> <strong>Dorey</strong> <strong>Designs</strong>
Microsoft <strong>Word</strong>: Visual Basic for ApplicationsThe InsertAfter method inserts the specified text at the end of a Range object or Selection object. Afterthis method is applied, the range or selection expands to include the new text. If you use this methodwith a range or selection that refers to an entire paragraph, the text is inserted after the ending paragraphmark (the text will appear at the beginning of the next paragraph). To insert text at the end of aparagraph, determine the ending point and subtract 1 from this location (the paragraph mark is onecharacter), as shown in the following example.Set doc = ActiveDocumentSet rngRange = _doc.Range(doc.Paragraphs(1).Start, _doc.Paragraphs(1).End - 1)rngRange.InsertAfter _" This is now the last sentence in paragraph one."HeaderFooter objects can have a Range sub-object but not a Selection sub-object. The Range object isestablished with the Range property:ActiveDocument.Section(1).Headers(wdHeaderFooterPrimary).RangeText can be inserted at the end of a header with the InsertAfter property on a Range object.ActiveDocument.Section(1).Headers(wdHeaderFooterPrimary).Range.InsertAfter“Draft”ActiveDocument.Section(1).Headers(wdHeaderFooterPrimary).Range.InsertAftervbCrLf + “Draft”To select the inserted paragraph, use the Paragraphs collection:ActiveDocument.Section(1).Headers(wdHeaderFooterPrimary).Range.Paragraphs(Last)To apply a style to a Range object:Selection.Range.Style = "Bolded"ActiveDocument.Section(1).Headers(wdHeaderFooterPrimary).Range.Paragraphs.Last.Style = "Watermark"Selection.Style = ActiveDocument.Styles("Watermark")To do something to every header, do it for each header in each section (but perhaps not to headers linkedto previous ones, see below):Sub PutWatermarkTextInAllHeaders()' inserts text at end of each headerWorkDirectory = "C:\Data\NPI Requirements\"ChangeFileOpenDirectory (WorkDirectory)Documents.Open FileName:="All Business Requirements.doc"Dim sec As SectionDim cnt As IntegerDim s As Integercnt = ActiveDocument.Sections.Count'For Each sec In ActiveDocument.Sections 1 skip first pageFor s = 2 To cntSet sec = ActiveDocument.Sections(s)sec.Headers(wdHeaderFooterPrimary).Range.InsertAfter vbCrLf + "Draft"sec.Headers(wdHeaderFooterPrimary).Range.Paragraphs.Last.Style =ActiveDocument.Styles("Watermark")NextEnd SubProperty LinkToPrevious returns True/False reflecting if current HeaderFooter object is linked to theprevious one. Can be used to change the setting. If you put a two-column table inside a continuousRevision: 8/11/2011 Page 31 of 59Copyright 2002–2011 by <strong>Susan</strong> <strong>Dorey</strong> <strong>Designs</strong>
Microsoft <strong>Word</strong>: Visual Basic for Applicationssection break, you do not want to change that section’s header. Continuous sections are linked to theprevious heading. The following code works when only continuous sections are linked to the previousheading. (On the other hand there’s no point in changing a header that is linked to a previous one.)If sec.Headers(wdHeaderFooterPrimary).LinkToPrevious = False Then ' ignoresection break continuoussec.Headers(wdHeaderFooterPrimary).Range.InsertAfter vbCrLf + "Draft"sec.Headers(wdHeaderFooterPrimary).Range.Paragraphs.Last.Style =ActiveDocument.Styles("Watermark")End IfASSEMBLING MULTI-FILE DOCUMENTSLarge and/or complex documents can be written such that each chapter is its own file and the entiredocument is assembled by concatenating the chapter files with <strong>VBA</strong> code and saved as a single file. Thekey issues for this assembly are:• maintaining page headers and footers• maintaining page margins• maintaining page numbers and styles• handling a mix of page orientations (landscape and portrait)ApproachThe approach I use these days is as follows:a. Use a master document that contains the front matter (title page, revision history, TOC, list offigures) and the macro that concatenates the chapter files. The user opens this file and runs themacro. The macro does the rest.b. Prompt user for directory in which to save the finished document.c. Move cursor to the end of the document.d. Insert each file. Before all but the first file insert a section break next page.e. When an inserted file has a landscape orientation, before inserting it change the orientation of theopen document and change the styles of the page header and footer text. After inserting the file andthe section break next page, reset the orientation to portrait and change the styles of the page headerand footer.f. After the last file:g. Update the table of contents.h. For any chapter table of contents, update only its page numbers.i. Save the file with a new name in the location from step b.j. Remove all macros from the new file.k. Leave document open on first page in print layout view.Now you should check the new document for correctness. Check the table of contents for correct pagenumbering. Check the page headers and footers to be sure that the title page has none, that they matcheach page’s orientation, and that they reflect the correct chapter name. If you find problems, you mustmake a note of them, close this file, correct the chapter files, and start over. When all is well, change theversion number and revision date on the title page and save the document with a different name.Some formatting details:• The master document has portrait orientation.Revision: 8/11/2011 Page 32 of 59Copyright 2002–2011 by <strong>Susan</strong> <strong>Dorey</strong> <strong>Designs</strong>
Microsoft <strong>Word</strong>: Visual Basic for Applications• Each page is in its own section, i.e., there is a section break next page between each page, includingafter the last page.• The title page has no header and footer.• The other front matter pages share the same header and footer. The last page—where the firstchapter file will be inserted—is not linked to the previous header and footer.• Page numbering starts on the second page with “ii”. Page numbering on the last page is reset to startwith “1”.• The chapter files have the same size of header and footer so they will look seamless whenconcatenated.• The chapter files have one header and footer. They do not have different header/footer for the firstpage, nor do they have different ones for odd and even pages. If your chapters have several headersand/or footers, you may have to tinker with the code here.Code SamplesPrompt User for Directory of New FileSub GetDir()Dim strDir As StringWith Application.FileDialog(msoFileDialogFolderPicker).InitialFileName = "C:\".ShowstrDir = .SelectedItems(1)End WithMsgBox "You selected " & strDirEnd SubInsert Chapter FilesThe key method is InsertFile. Each file is inserted in order, preceded by a page break next section. Caremust be taken to know where the cursor is. After InsertFile the cursor is at the end of the contents of theinserted file. Because this may change with different versions of <strong>Word</strong>, be sure to confirm this with a test.If the cursor does not move you will need code to move the cursor: Selection.EndKey Unit:=wdStory.‘ use strChapDir only if documents are in a different directoryDim strChapDir As StringstrChapDir = "\\www.your-url.com\whee\more\"Selection.EndKey Unit:=wdStory' go to end of docActiveWindow.ActivePane.View.Type = wdPrintViewSelection.InsertFile FileName:=strChapDir & "Component Design.doc"LinkFooterToPreviousSelection.InsertBreak Type:=wdSectionBreakNextPageWhen a chapter begins in landscape orientation, change the orientation in the new document to match.LandscapeSelection.InsertFile . . .‘ a subroutine‘ landscape fileWhen the previous chapter ended in landscape and the new one is portrait, change the orientation in thenew document to match.Revision: 8/11/2011 Page 33 of 59Copyright 2002–2011 by <strong>Susan</strong> <strong>Dorey</strong> <strong>Designs</strong>
Microsoft <strong>Word</strong>: Visual Basic for ApplicationsSelection.InsertBreak Type:=wdSectionBreakNextPagePortaitSelection.InsertFile . . . ‘ portrait fileInsert Section Break Odd PageWhen you are compiling a document to be printed on both sides (duplex), you may want it to adhere tothe book publishing verso-recto convention: the first page of the “book,” of each section, and the firstchapter of a section, is a recto page (right-handed). All recto pages will have odd numbers and all versopages (left-handed) will have even numbers.The way to make this happen is by setting Mirror Margins on and using section break next page (yes,there is a wdSectionBreakOddPage, but it does not work the way you want or expect.)Dim r As Integerr = MsgBox("Will document be printed duplex?", vbYesNo, "Build OperationsGuide")If r = vbYes Then ActiveDocument.PageSetup.mirrormargins = TrueThen when youSelection.InsertBreak Type:=wdSectionBreakNextPageit will insert a section break odd page at the correct point.Update Main Table of ContentsActiveDocument.TablesOfContents(1).UpdateUpdate Main Table of FiguresActiveDocument.TablesOfFigures(1).UpdateSave New DocumentActiveDocument.SaveAs FileName:=strDir & "All One File.doc", FileFormat:=_wdFormatDocument, AddToRecentFiles:=TrueUpdate Chapter Tables of ContentsSub UpdateChapterTOCs()Dim t As TableOfContentsFor Each t In ActiveDocument.TablesOfContentsIf Not t Is ActiveDocument.TablesOfContents(1) Thent.UpdatePageNumbersEnd IfNextEnd SubUpdate IndicesSub UpdateIndexes()Dim it As IndexFor Each i In ActiveDocument.Indexesi.UpdateNextEnd SubRevision: 8/11/2011 Page 34 of 59Copyright 2002–2011 by <strong>Susan</strong> <strong>Dorey</strong> <strong>Designs</strong>
Microsoft <strong>Word</strong>: Visual Basic for ApplicationsDelete Macros in New DocumentIn this code, the macros reside in a module named BuildDocuments.Sub DeleteModuleInAll()Application.OrganizerDelete Source:=ActiveDocument.Name, _Name:="BuildDocuments", Object:=wdOrganizerObjectProjectItemsEnd SubSubroutinesSub LinkFooterToPrevious()With Selection.Sections(1).Footers(wdHeaderFooterPrimary).PageNumbers.NumberStyle = wdPageNumberStylearabic.RestartNumberingAtSection = FalseEnd WithWith Selection.Sections(1).Footers(wdHeaderFooterPrimary).LinkToPrevious = TrueEnd WithEnd SubSub Portrait()' First, set orientation and margins' Second, change stylesWith Selection.PageSetup.Orientation = wdOrientPortrait.TopMargin = InchesToPoints(1.1).BottomMargin = InchesToPoints(0.9).LeftMargin = InchesToPoints(1.25).RightMargin = InchesToPoints(1.25).HeaderDistance = InchesToPoints(0.5).FooterDistance = InchesToPoints(0.4)End WithActiveWindow.ActivePane.View.SeekView = wdSeekCurrentPageHeaderSelection.WholeStorySelection.Style = ActiveDocument.Styles("Header")Selection.EscapeKeySelection.MoveDown Unit:=wdLine, Count:=1Selection.WholeStorySelection.Style = ActiveDocument.Styles("Footer")Selection.EscapeKeyActiveWindow.ActivePane.View.SeekView = wdSeekMainDocumentEnd SubSub Landscape()With Selection.PageSetup.Orientation = wdOrientLandscape.TopMargin = InchesToPoints(1.1).BottomMargin = InchesToPoints(0.9).LeftMargin = InchesToPoints(0.5).RightMargin = InchesToPoints(0.5).HeaderDistance = InchesToPoints(0.5).FooterDistance = InchesToPoints(0.4)End WithActiveWindow.ActivePane.View.SeekView = wdSeekCurrentPageHeaderSelection.WholeStoryRevision: 8/11/2011 Page 35 of 59Copyright 2002–2011 by <strong>Susan</strong> <strong>Dorey</strong> <strong>Designs</strong>
Microsoft <strong>Word</strong>: Visual Basic for ApplicationsSelection.Style = ActiveDocument.Styles("HeaderLandscape")Selection.EscapeKeySelection.MoveDown Unit:=wdLine, Count:=1Selection.WholeStorySelection.Style = ActiveDocument.Styles("FooterLandscape")Selection.EscapeKeyActiveWindow.ActivePane.View.SeekView = wdSeekMainDocumentEnd SubVariationsSub SetVersionNumber()msgText = "Which version of the document is this?"Dim v As Stringv = InputBox(msgText, msgTitle, cv)ActiveDocument.CustomDocumentProperties.Add _Name:="VersionNum", LinkToContent:=False, Value:=v, _Type:=msoPropertyTypeStringEnd SubSub DraftWatermark()' insert draft watermarkmsgText = "Do you want the DRAFT watermark to appear in the document?"c = MsgBox(msgText, vbYesNo, msgTitle)If c = vbYes Then SetDraftWatermarkEnd SubSHAPESThe detail here is meant to support writing macros to manipulate shapes, hence the discussion of theobject model.Represents an object in the drawing layer, such as an AutoShape, freeform, OLE object, ActiveX control,or picture. The Shape object is a member of the Shapes collection, which includes all the shapes in themain story of a document or in all the headers and footers of a document.A shape is usually attached to an anchoring range. You can position the shape anywhere on the page thatcontains the anchor.There are three objects that represent shapes: the Shapes collection, which represents all the shapes on adocument; the ShapeRange collection, which represents a specified subset of the shapes on a document(for example, a ShapeRange object could represent shapes one and four on the document, or it couldrepresent all the selected shapes on the document); the Shape object, which represents a single shape on adocument. If you want to work with several shapes at the same time or with shapes within the selection,use a ShapeRange collection.About ShapesAnchoring a ShapeEvery Shape object is anchored to a range of text. A shape is anchored to the beginning of the firstparagraph that contains the anchoring range. The shape will always remain on the same page as its anchor.Revision: 8/11/2011 Page 36 of 59Copyright 2002–2011 by <strong>Susan</strong> <strong>Dorey</strong> <strong>Designs</strong>
Microsoft <strong>Word</strong>: Visual Basic for ApplicationsYou can view the anchor itself by setting the ShowObjectAnchors property to True. The shape's Top andLeft properties determine its vertical and horizontal positions. The shape's RelativeHorizontalPosition andRelativeVerticalPosition properties determine whether the position is measured from the anchoringparagraph, the column that contains the anchoring paragraph, the margin, or the edge of the page.If the LockAnchor property for the shape is set to True, you cannot drag the anchor from its position onthe page.Positioning a ShapeThe position of the shape can be described in English by its vertical and horizontal position relative to aline, paragraph, margin, or page. Four properties can be used:• RelativeVerticalPosition identifies what object controls the vertical position• Top specifies the vertical position• RelativeHorizontalPosition identifies what object controls the horizontal position• Left specifies the horizontal positionYou use a combination of these properties. For example, to center a shape vertically relative to the page:Top = wdShapeCenter, RelativeVerticalPosition = wdRelativeVerticalPositionPageFormatting a ShapeUse the Fill property to return the FillFormat object, which contains all the properties and methods forformatting the fill of a closed shape. The Shadow property returns the ShadowFormat object, which youuse to format a shadow. Use the Line property to return the LineFormat object, which contains propertiesand methods for formatting lines and arrows. The TextEffect property returns the TextEffectFormatobject, which you use to format <strong>Word</strong>Art. The Callout property returns the CalloutFormat object, whichyou use to format line callouts. The WrapFormat property returns the WrapFormat object, which you useto define how text wraps around shapes. The ThreeD property returns the ThreeDFormat object, whichyou use to create 3-D shapes. You can use the PickUp and Apply methods to transfer formatting from oneshape to another.Use the SetShapesDefaultProperties method for a Shape object to set the formatting for the default shapefor the document. New shapes inherit many of their attributes from the default shape.Other Important Shape PropertiesUse the Type property to specify the type of shape: freeform, AutoShape, OLE object, callout, or linkedpicture, for instance. Use the AutoShapeType property to specify the type of AutoShape: oval, rectangle,or balloon, for instance.Use the Width and Height properties to specify the size of the shape.The TextFrame property returns the TextFrame object, which contains all the properties and methods forattaching text to shapes and linking the text between text frames.RemarksShape objects are anchored to a range of text but are free-floating and can be positioned anywhere on thepage. InlineShape objects are treated like characters and are positioned as characters within a line of text.You can use the ConvertToInlineShape method and the ConvertToShape method to convert shapes fromone type to the other. You can convert only pictures, OLE objects, and ActiveX controls to inline shapes.Revision: 8/11/2011 Page 37 of 59Copyright 2002–2011 by <strong>Susan</strong> <strong>Dorey</strong> <strong>Designs</strong>
Microsoft <strong>Word</strong>: Visual Basic for Applications<strong>Word</strong>Art objects may not be anchored.Converting Visio Picture into Inline ShapeSub ConvertVisioPicture()' When Visio drawing is pasted as Picture, it becomes a shape withan anchor and' is essentially free-floating.' This macro converts it to an Inline Shape which is treated liketext characters' and positioned within a line of text.If Selection.ShapeRange.Type = msoPicture ThenSelection.ShapeRange.ConvertToInlineShapeEnd IfEnd SubKey PropertiesRelativeVerticalPosition PropertySpecifies to what the vertical position of a frame, a shape, or a group of rows is relative. Read/writeCan be one of the following WdRelativeVerticalPosition constants.wdRelativeVerticalPositionLineRelative to line.wdRelativeVerticalPositionMarginRelative to margin.wdRelativeVerticalPositionPageRelative to page.wdRelativeVerticalPositionParagraph Relative to paragraph.RelativeHorizontalPosition PropertySpecifies to what the horizontal position of a frame, a shape, or a group of rows is relative. Read/writeCan be one of the following WdRelativeHorizontalPosition constants.wdRelativeHorizontalPositionCharacter Relative to character.wdRelativeHorizontalPositionColumn Relative to column.wdRelativeHorizontalPositionMargin Relative to margin.wdRelativeHorizontalPositionPageRelative to page.Top PropertyReturns or sets the vertical position of the specified shape or shape range in points. Can also be any validconstant, especially WdShapePosition (see Left Property for values). Read/write Single.expression.Topexpression Required. An expression that returns one of the above objects.RemarksThe position of a shape is measured from the upper-left corner of the shape's bounding box to the shape'sanchor. The RelativeVerticalPosition property controls whether the shape's anchor is positioned alongsidethe line, the paragraph, the margin, or the edge of the page.Revision: 8/11/2011 Page 38 of 59Copyright 2002–2011 by <strong>Susan</strong> <strong>Dorey</strong> <strong>Designs</strong>
Microsoft <strong>Word</strong>: Visual Basic for ApplicationsFor a ShapeRange object that contains more than one shape, the Top property sets the vertical position ofeach shape.ExampleAs it applies to Shape object.This example sets the vertical position of the first shape in the active document to 1 inch from the top ofthe page.With ActiveDocument.Shapes(1).RelativeVerticalPosition = wdRelativeVerticalPositionPage.Top = InchesToPoints(1)End WithThis example sets the vertical position of the first and second shapes in the active document to 1 inchfrom the top of the page.With ActiveDocument.Shapes.Range(Array(1, 2)).RelativeVerticalPosition = wdRelativeVerticalPositionPage.Top = InchesToPoints(1)End WithThis example was created automatically by wizard:Selection.ShapeRange.Top = wdShapeCenterLeft PropertyReturns or sets a Single that represents the horizontal position, measured in points, of the specified shapeor shape range. Can also be any valid constant. Read/write.WdShapePosition can be one of these WdShapePosition constants.wdShapeBottom At the bottom.wdShapeCenter In the center.wdShapeInside Inside the selected range.wdShapeLeftOn the left.wdShapeOutside Outside the selected range.wdShapeRightOn the right.wdShapeTopAt the top.expression.Leftexpression Required. An expression that returns one of the above objects.RemarksThe position of a shape is measured from the upper-left corner of the shape's bounding box to the shape'sanchor. The RelativeHorizontalPosition property controls whether the anchor is positioned alongside acharacter, column, margin, or the edge of the page.For a ShapeRange object that contains more than one shape, the Left property sets the horizontal positionof each shape.ExampleAs it applies to the Shape object.This example sets the horizontal position of the first shape in the active document to 1 inch from the leftedge of the page.With ActiveDocument.Shapes(1)Revision: 8/11/2011 Page 39 of 59Copyright 2002–2011 by <strong>Susan</strong> <strong>Dorey</strong> <strong>Designs</strong>
Microsoft <strong>Word</strong>: Visual Basic for Applications.RelativeHorizontalPosition = _wdRelativeHorizontalPositionPage.Left = InchesToPoints(1)End WithThis example sets the horizontal position of the first and second shapes in the active document to 1 inchfrom the left edge of the column.With ActiveDocument.Shapes.Range(Array(1, 2)).RelativeHorizontalPosition = _wdRelativeHorizontalPositionColumn.Left = InchesToPoints(1)End WithShrink Inline ShapesIn my work I frequently insert Visio drawings into <strong>Word</strong> documents. I insert the drawings as Picture(Enhanced Metafile), because it conserves file size while being able to print on different printers. I stylethe drawings by inserting a border with an inside margin. When the drawing is wider than the textboundaries, I resize it to fit within the text boundaries (text and diagrams are left justified).I prefer to use macros to do this. I have a macro which adds the border with inside margin (to put somespace between it and the diagram), but have been adjusting the size manually. Now I want to do thisautomatically. I’ll create a new macro for the shrinking and call it from the border macro.Approach:1. Make sure the requirements are met. If any are not, display an error message and stop.a. Only one pane open. This is so the code can assume the first pane, reasonable for my use.b. Only one column of text. For ease of programming, but reasonable for my use.c. Cursor is immediately to the right of an inline shape. The program has to know where to findthe drawing and be sure it is an inline shape.d. Drawing is wider than column width. Otherwise no shrinking would be necessary.2. Set width of inline shape = text column width.3. Collapse selection to the insertion point.Doing this manually uses the following UI features:• “Paste Special” dialog box to insert the drawing. On the Edit menu.• “Format Picture” dialog box to change the size settings and insert inside margins. On the Formatmenu.• “Borders and Shading” dialog box to insert the border. On the Format menu.Relevant <strong>VBA</strong> objects:• TextColumns collection. A child object of the Page Setup object.• TextColumns(x).Width property returns/sets the width of the actual line of text in points.• InlineShapes collection. A child object of the Selection, Document, and Range objects.• InlineShapes(x).LockAspectRatio method returns/sets value to true/false. True is needed here. While<strong>Word</strong> may set this by default, it is wise not to count on it. I want the aspect ratio of my drawings toremain unchanged.• InlineShapes(x).Reset method removes changes made to the inline shape. In the context of aninserted Visio drawing, a drawing wider than the column is automatically resized to fit. When I addRevision: 8/11/2011 Page 40 of 59Copyright 2002–2011 by <strong>Susan</strong> <strong>Dorey</strong> <strong>Designs</strong>
Microsoft <strong>Word</strong>: Visual Basic for Applicationsa border with inside margins, it no longer fits. So it is best to reset the shape to 100% of its naturalsize before making my own changes.• InlineShapes(x).Width property returns/sets the width of the shape in points.• InlineShapes(x).ScaleWidth property returns/sets the scale of the width as a percentage of its originalsize.• InlineShapes(x).ScaleHeight property returns/sets the scale of the height as a percentage of itsoriginal size.• InchesToPoints() function converts inches to points.• Selection.Type property returns the type of the selection. Value wdSelectionInlineShape is neededhere.• Panes collection. A child object of the ActiveWindow object.• Panes.Count property returns the number of panes open.Surprises:• I first tried to shrink the shape by decrementing the ScaleWidth, as this is what I do with <strong>Word</strong>’s UI.But the code .ScaleWidth = .ScaleWidth - 1 actually incremented the value.• When I ran the macro to set the border and inside margin before resizing, the ScaleWidth changeddifferently from the ScaleHeight, thus distorting the aspect ratio.• I found it necessary to run InlineShapes(x).Reset before comparing the shape width with the textcolumn width.• Before setting the border and inside margins but after doing the reset and setting the shape width,the ScaleHeight was 100% while the ScaleWidth was less. If I did this manually, doing the resetafter inserting the drawing changed the ScaleHeight and ScaleWidth to 100%. Then changing thepicture width caused the ScaleHeight and ScaleWidth to change equally. The solution in the macrois to set ScaleHeight = ScaleWidth after changing the width.• I notice that Reset is on both the Size and Picture tabs of the “Format Picture” dialog box. Theydiffer in their effect on the size of the drawing: Reset on the Picture tab does not change the size,only the cropping and image controls.Design:• Because this code is run before that for the border and inside margin, the actual width of the shapeneeds to be the column width less the combined left and right margins.Code:Sub ShrinkPictureToPageWidth()Dim title, msg As StringDim x, y, z As Longtitle = "Shrink Picture to Page Width"z = ActiveDocument.ActiveWindow.Panes.CountIf z > 1 Thenmsg = "Cannot shrink picture while more than 1 pane is open. Pane count = "& zMsgBox msg, vbOKOnly, titleExit SubEnd IfSelection.Collapse (wdCollapseEnd)z = Selection.PageSetup.TextColumns.CountIf z > 1 Thenmsg = "Cannot shrink picture when there is more than one column. Columncount = " & zMsgBox msg, vbOKOnly, titleExit SubEnd IfRevision: 8/11/2011 Page 41 of 59Copyright 2002–2011 by <strong>Susan</strong> <strong>Dorey</strong> <strong>Designs</strong>
Microsoft <strong>Word</strong>: Visual Basic for ApplicationsSelection.MoveLeft Unit:=wdCharacter, Count:=1, Extend:=wdExtendIf Selection.Type wdSelectionInlineShape Thenmsg = "Object is not an inline shape, cannot continue."MsgBox msg, vbOKOnly, titleExit SubEnd Ifx = Selection.PageSetup.TextColumns(1).WidthWith Selection.InlineShapes(1).LockAspectRatio = msoTrue.Resety = .Width - InchesToPoints(0.4)If y
Microsoft <strong>Word</strong>: Visual Basic for ApplicationsFontItalic Required . MsoTrue to italicize the <strong>Word</strong>Art font.Left Required Single. The position, measured in points, of the left edge of the <strong>Word</strong>Art shape relative tothe anchor.Top Required Single. The position, measured in points, of the top edge of the <strong>Word</strong>Art shape relative tothe anchor.Anchor Optional Variant. A Range object that represents the text to which the <strong>Word</strong>Art is bound. IfAnchor is specified, the anchor is positioned at the beginning of the first paragraph in the anchoring range.If this argument is omitted, the anchoring range is selected automatically and the <strong>Word</strong>Art is positionedrelative to the top and left edges of the page.Example:Sub NewTextEffect()ActiveDocument.Shapes.AddTextEffect _PresetTextEffect:=msoTextEffect11, _Text:="This is a test", FontName:="Arial Black", _FontSize:=36, FontBold:=msoTrue, _FontItalic:=msoFalse, Left:=1, Top:=1, _Anchor:=ActiveDocument.Paragraphs(1).RangeEnd SubSub SetDraftWatermark()' DOES NOT WORK AS DESIRED' ONLY PUTS WATERMARK ON FIRST PAGEDim wm As ShapeSet wm = ActiveDocument.Shapes.AddTextEffect(powerpluswatermarkobject1, _"DRAFT", "Arial Black", 40, False, False, 0, 0)wm.Name = "Watermark"wm.Rotation = 315wm.LockAspectRatio = Truewm.Height = InchesToPoints(0.77)wm.Width = InchesToPoints(2.04)wm.RelativeHorizontalPosition = wdRelativeVerticalPositionMarginwm.RelativeVerticalPosition = wdRelativeVerticalPositionMarginwm.Left = wdShapeCenterwm.Top = wdShapeCenterwm.TextEffect.NormalizedHeight = Falsewm.Line.Visible = Falsewm.Fill.Visible = Truewm.Fill.ForeColor.RGB = RGB(196, 120, 120)wm.Fill.Transparency = 0.5wm.WrapFormat.AllowOverlap = Truewm.WrapFormat.Side = wdWrapNonewm.WrapFormat.Type = 3End SubWatermark as Text BoxThis approach works. There are two versions, the first is a subroutine, the second is standalone.Sub PutWatermarkTextInAllHeaders()' inserts text at end of each header' acts on current document, should be calledDim sec As SectionDim cnt As IntegerRevision: 8/11/2011 Page 43 of 59Copyright 2002–2011 by <strong>Susan</strong> <strong>Dorey</strong> <strong>Designs</strong>
Microsoft <strong>Word</strong>: Visual Basic for ApplicationsDim s As Integercnt = ActiveDocument.Sections.Count' For Each sec In ActiveDocument.Sections' skip first section which is title pageFor s = 2 To cntSet sec = ActiveDocument.Sections(s)If sec.Headers(wdHeaderFooterPrimary).LinkToPrevious = False Then 'ignore section break continuoussec.Headers(wdHeaderFooterPrimary).Range.InsertAfter vbCrLf + "DRAFT"sec.Headers(wdHeaderFooterPrimary).Range.Paragraphs.Last.Style =ActiveDocument.Styles("Watermark")End IfNextEnd SubSub PutWatermarkTextInNamedDocument()' inserts text at end of each headerWorkDirectory = "C:\Data\NPI Requirements\"ChangeFileOpenDirectory (WorkDirectory)Documents.Open FileName:="All Business Requirements.doc"Dim sec As SectionDim cnt As IntegerDim s As Integercnt = ActiveDocument.Sections.Count'For Each sec In ActiveDocument.SectionsFor s = 2 To cntSet sec = ActiveDocument.Sections(s)If sec.Headers(wdHeaderFooterPrimary).LinkToPrevious = False Then 'ignore section break continuoussec.Headers(wdHeaderFooterPrimary).Range.InsertAfter vbCrLf + "DRAFT"sec.Headers(wdHeaderFooterPrimary).Range.Paragraphs.Last.Style =ActiveDocument.Styles("Watermark")End IfNextCode Created by Insert Print Watermark Background WizardThis watermark was defined with text in a given font, size, and color and positioned diagonally.Apparently it can be positioned differently.Sub SetDraftWatermark()'' SetDraftWatermark Macro' Macro recorded 3/22/2006 by <strong>Susan</strong> J. <strong>Dorey</strong>'ActiveDocument.Sections(1).Range.SelectActiveWindow.ActivePane.View.SeekView = wdSeekCurrentPageHeaderSelection.HeaderFooter.Shapes.AddTextEffect(PowerPlusWaterMarkObject1, _"DRAFT", "Arial Black", 40, False, False, 0, 0).SelectSelection.ShapeRange.Name = "PowerPlusWaterMarkObject1"Selection.ShapeRange.TextEffect.NormalizedHeight = FalseSelection.ShapeRange.Line.Visible = FalseSelection.ShapeRange.Fill.Visible = TrueSelection.ShapeRange.Fill.SolidSelection.ShapeRange.Fill.ForeColor.RGB = RGB(196, 120, 120)Selection.ShapeRange.Fill.Transparency = 0.5Revision: 8/11/2011 Page 44 of 59Copyright 2002–2011 by <strong>Susan</strong> <strong>Dorey</strong> <strong>Designs</strong>
Microsoft <strong>Word</strong>: Visual Basic for ApplicationsSelection.ShapeRange.Rotation = 315Selection.ShapeRange.LockAspectRatio = TrueSelection.ShapeRange.Height = InchesToPoints(0.77)Selection.ShapeRange.Width = InchesToPoints(2.04)Selection.ShapeRange.WrapFormat.AllowOverlap = TrueSelection.ShapeRange.WrapFormat.Side = wdWrapNoneSelection.ShapeRange.WrapFormat.Type = 3Selection.ShapeRange.RelativeHorizontalPosition = _wdRelativeVerticalPositionMarginSelection.ShapeRange.RelativeVerticalPosition = _wdRelativeVerticalPositionMarginSelection.ShapeRange.Left = wdShapeCenterSelection.ShapeRange.Top = wdShapeCenterActiveWindow.ActivePane.View.SeekView = wdSeekMainDocumentEnd SubITERATIVE DOCUMENT EDITINGHere are some samples of iterative document editing.Reformat Text in Square BracketsThe following macro illustrates several points:• how to make the same kind of change throughout a document• use of FindTextIn this example, the text enclosed by square brackets is set to italics. I use square brackets to insert myeditor/author comments in a document that is in development. Sometimes I highlight this text.Sub SetNotesToItalics()'' Loops through active document, finds instances of paired [], then sets textinbetween to italics. This is necessary because <strong>Word</strong> in all its wisdom removesthe italics in an inconsistent and unpredictable manner; reinstating it eachtime I edit a document is a time-consuming nuisance.Dim x As Integerx = 0Do While x = 0With Selection.Find.ClearFormatting.Execute FindText:="["End WithIf Selection.Find.Found = False Thenx = 1Exit DoEnd IfSelection.MoveRight Unit:=wdCharacter, Count:=1' next code extends selection through next occurrence of "]",' then decreases selection by one character to unselect the ] characterWith Selection.Extend Character:="]".MoveLeft Unit:=wdCharacter, Count:=1, Extend:=wdExtendIf .Font.Italic = False ThenRevision: 8/11/2011 Page 45 of 59Copyright 2002–2011 by <strong>Susan</strong> <strong>Dorey</strong> <strong>Designs</strong>
Microsoft <strong>Word</strong>: Visual Basic for Applications.Font.Italic = True' applies italics to selectionEnd IfSelection.MoveRight Unit:=wdCharacter, Count:=2 'unselect textEnd WithLoopEnd SubInsert RD Field CodesThis code constitutes a single module.Attribute VB_Name = "TOC"Option Compare TextPrivate cntAll As IntegerPrivate cntMod As IntegerPrivate title As StringPrivate thisDoc As DocumentPrivate strDir As StringSub PutTCInEachRDFile()' Context: active document contains field codes to build TOC from referenceddocuments, that is TOC and RD field codes.' Referenced documents do not have high-level heading that identifies them,instead the Title property and header do.' So, an improved TOC is built based on both the heading styles in thereferenced documents and a TC field code' at the beginning of each referenced document that uses the text of the Titleproperty; this is effected with' the TITLE field code embedded within the TC field code.' This macro (1) determines the path of the referenced documents and (2) readsthe RD field codes in active document.' For each, it opens the file and inserts a TC field code if one is not alreadypresent.Dim oField As FieldDim strCode As StringDim strMsg As StringDim oDoc As DocumentcntAll = 0cntMod = 0title = "Put TC in Each RD File"Set thisDoc = ActiveDocumentIf DirectoryOK = False ThenMsgBox "Macro cancelled because no directory selected.", vbOKOnly, titleExit SubEnd If'With ActiveDocument.ActiveWindow.View' .ShowAll = False' .ShowHiddenText = False' .ShowFieldCodes = False' .Type = wdPrintView'End WithRevision: 8/11/2011 Page 46 of 59Copyright 2002–2011 by <strong>Susan</strong> <strong>Dorey</strong> <strong>Designs</strong>
Microsoft <strong>Word</strong>: Visual Basic for ApplicationsFor Each oField In ActiveDocument.FieldsIf oField.Type = wdFieldRefDoc ThencntAll = cntAll + 1' get filename, strip off RD textstrCode = Trim$(oField.Code)strCode = Trim$(Mid$(strCode, InStr(strCode, " ")))' strip off leading \f switchIf LCase$(Left$(strCode, 2)) = "\f" ThenstrCode = Trim$(Mid$(strCode, 3))End If' strip off trailing \f switchIf LCase$(Right$(strCode, 2)) = "\f" ThenstrCode = Trim$(Left$(strCode, Len(strCode) - 2))End If' strip off leading double primeIf Asc(strCode) = 34 ThenstrCode = Trim$(Mid$(strCode, 2, Len(strCode) - 2))End If' open filestrCode = URLDecode(strCode)Set oDoc = Documents.Open(FileName:=strDir & "\" & strCode)oDoc.Activate'With oDoc.ActiveWindow.View' .ShowAll = False' .ShowHiddenText = False' .ShowFieldCodes = False' .Type = wdPrintView'End With' run macro to insert TC fieldIf AlreadyHasTC = False ThenInsertTCTitleoDoc.Close wdSaveChangescntMod = cntMod + 1ElseoDoc.Close wdDoNotSaveChangesEnd IfthisDoc.ActivateEnd IfNext oFieldstrMsg = "Count of referenced documents: " & cntAll & vbCrLf & "Count of docswith new TC field code: " & cntModMsgBox strMsg, vbOKOnly, titleEnd SubFunction DirectoryOK()' the original design had this function performing a ChDir, but its resultsproved unreliableIf MsgBox("Are documents in directory: " & ActiveDocument.Path, vbYesNo, title)= vbYes ThenstrDir = ActiveDocument.PathDirectoryOK = TrueExit FunctionEnd IfDirectoryOK = GetDir()End FunctionRevision: 8/11/2011 Page 47 of 59Copyright 2002–2011 by <strong>Susan</strong> <strong>Dorey</strong> <strong>Designs</strong>
Microsoft <strong>Word</strong>: Visual Basic for ApplicationsFunction GetDir()With Application.FileDialog(msoFileDialogFolderPicker).InitialFileName = ActiveDocument.PathIf .Show = -1 ThenstrDir = .SelectedItems(1)MsgBox "You selected " & strDirGetDir = TrueElse'The user pressed Cancel.GetDir = FalseEnd IfEnd WithEnd FunctionFunction AlreadyHasTC()' is the first line a TC field? If created automatically it will comprise 2field codes, TC and TITLE, types 9 and 15.' first select first paragraphSelection.HomeKey Unit:=wdStorySelection.MoveDown Unit:=wdParagraph, Count:=1, Extend:=wdExtendWith SelectionIf .Fields.Count = 0 ThenAlreadyHasTC = FalseElseIf .Fields.Count > 0 And .Fields(1).Type = wdFieldTOCEntry ThenAlreadyHasTC = TrueElseAlreadyHasTC = FalseEnd IfEnd WithSelection.MoveRight Unit:=wdCharacter, Count:=1' release selectionEnd FunctionPrivate Function URLDecode(URLtoDecode As String) As StringURLDecode = Replace(URLtoDecode, "%20", " ")End FunctionSub InsertTCTitle()' Macro inserts TC field code with value = TITLE field code.' To be used with documents being included with RD field code into consolidatedTOC' and having no Heading 1 styled paragraph.' Creates TC formatted like: { TC "{ TITLE }" \l 1 }, then generates value ofTITLE field code.'Selection.HomeKey Unit:=wdStorySelection.TypeParagraphSelection.MoveUp Unit:=wdLine, Count:=1Selection.Range.Style = ActiveDocument.Styles(wdStyleNormal)Selection.Fields.Add Range:=Selection.Range, Type:=wdFieldEmpty,PreserveFormatting:=FalseSelection.TypeText Text:="TC """Selection.Fields.Add Range:=Selection.Range, Type:=wdFieldEmpty,PreserveFormatting:=FalseSelection.TypeText Text:="TITLE"Selection.MoveRight Unit:=wdCharacter, Count:=2Revision: 8/11/2011 Page 48 of 59Copyright 2002–2011 by <strong>Susan</strong> <strong>Dorey</strong> <strong>Designs</strong>
Microsoft <strong>Word</strong>: Visual Basic for ApplicationsSelection.TypeText Text:=""" \l 1"Selection.MoveLeft Unit:=wdCharacter, Count:=7Selection.Fields.UpdateSelection.MoveLeft Unit:=wdCharacter, Count:=1Selection.Fields.UpdateSelection.MoveLeft Unit:=wdCharacter, Count:=8Selection.Fields.UpdateSelection.HomeKey Unit:=wdLineSelection.MoveDown Unit:=wdLine, Count:=1End SubChange Styles in all <strong>Word</strong> Files in a Given DirectoryMy need was to change certain styles in all <strong>Word</strong> files in a given directory. I found, through trial anderror, that the best way to change styles is with Organizer.Note that in this example the name of the directory is hard-coded. You could instead prompt the user forthe directory name. The first SUB can be used to apply other changes to all files in a directory structure.Sub ChangeFilesInDirectoryWithFSO()Dim cntAll As LongDim cntChanged As LongcntAll = 0cntChanged = 0Dim strPath As StringDim fso As ObjectSet fso = CreateObject("Scripting.FileSystemObject")strPath = "C:\Data\CMS\Ops Guide Chapters"'strPath = "C:\Data\Ops Guide Chapters"Dim ThisFolderSet ThisFolder = fso.GetFolder(strPath)Application.ScreenUpdating = FalseDim fsSet fs = ThisFolder.FilesFor Each f In fscntAll = cntAll + 1If Right(f.Name, 3) = "doc" ThenDocuments.Open f.Path, AddToRecentFiles:=FalsecntChanged = cntChanged + 1OrganizerCopyStylesActiveDocument.Close SaveChanges:=wdSaveChangesEnd IfNext fApplication.ScreenUpdating = TrueMsgBox "Count of files read: " & cntAll & vbCrLf & "Count of files changed: " &cntChanged, vbOKOnly, "Change Files in Directory"End SubThe following macro was recorded. I selected all the styles in the dialog box, so they all were namedindividually in the macro. I then deleted the lines for the styles I did not want to copy. I also added codeto use variables. I could not figure out how to do a Find-and-Replace to get rid of the continuation marks.Sub OrganizerCopyStyles()Dim strFilename As StringRevision: 8/11/2011 Page 49 of 59Copyright 2002–2011 by <strong>Susan</strong> <strong>Dorey</strong> <strong>Designs</strong>
Microsoft <strong>Word</strong>: Visual Basic for ApplicationsDim strTemplate As StringstrFilename = ActiveDocument.FullNamestrTemplate = "C:\Data\CMS\Template for CMS Operations Guide.dot"Application.OrganizerCopy Source:=strTemplate, Destination:=strFilename,Name:="Default Paragraph Font", Object:=wdOrganizerObjectStylesApplication.OrganizerCopy Source:=strTemplate, Destination:=strFilename,Name:="Bold", Object:= _wdOrganizerObjectStylesApplication.OrganizerCopy Source:= _strTemplate, Destination:= _strFilename, Name:="Normal", Object:= _wdOrganizerObjectStylesApplication.OrganizerCopy Source:= _strTemplate, Destination:= _strFilename, Name:="CaptionAutoNum", _Object:=wdOrganizerObjectStyles. . .End SubPASSWORDS AND PROTECTIONThere can be three passwords in a <strong>Word</strong> document:a. password to open the document, set on Tools, Options, Save tabb. password to modify the document, set on Tools, Options, Save tabc. document protection password, set on Tools, Protect Document; this password can apply to trackedchanges, comments, or forms<strong>VBA</strong> modules can have a password. It can lock the project for viewing and/or restrict viewing properties.It is set from menu Tools, Project Properties, Protection tab.So far I have not learned how to detect these with <strong>VBA</strong>.ProtectionThe Document object has property ProtectionType which returns the protection type for the specifieddocument. Can be one of the following WdProtectionType constants: wdAllowOnlyComments,wdAllowOnlyFormFields, wdAllowOnlyReading, wdAllowOnlyRevisions, or wdNoProtection.The Document object has two methods related to protection:• Protect: Applies protection. If the document is already protected, this method generates an error.• Unprotect: Removes protection from the specified document. If the document isn't protected, thismethod generates an error.expression.Protect(Type, NoReset, Password, UseIRM, EnforceStyleLock)where:Type: is a WdProtectionType constantsNoReset: applies only to Type = wdAllowOnlyFormFieldsPassword: the password required to remove protection from the specified document;optional.UseIRM: Specifies whether to use Information Rights Management (IRM) when protecting thedocument from changes; optional.EnforceStyleLock: Specifies whether formatting restrictions are enforced in a protected document;optional.Revision: 8/11/2011 Page 50 of 59Copyright 2002–2011 by <strong>Susan</strong> <strong>Dorey</strong> <strong>Designs</strong>
Microsoft <strong>Word</strong>: Visual Basic for Applicationsexpression.UnProtect(Password)wherePassword: The password string used to protect the document; optional. Passwords are case-sensitive. Ifthe document is protected with a password and the correct password isn't supplied, a dialog box promptsthe user for the passwordIf Doc.ProtectionType wdNoProtection Then Doc.UnprotectIf ActiveDocument.ProtectionType := wdNoProtection ThenActiveDocument.Unprotect Password:="readonly"End IfRead-OnlyThere are two document properties that involve read-only:• ReadOnlyRecommended property• ReadOnly propertyThe ReadOnly property only returns the value, it cannot be used to set the value.The ReadOnlyRecommended property is read/write meaning it returns the current value and can changethe current value.You can turn off Read-Only Recommended when saving a document:ActiveDocument.SaveAs FileName:="C:\Temp\MyFile.doc",Password:="", WritePassword:="", ReadOnlyRecommended:=FalseActiveDocument.ReadOnlyRecommended = TrueINTERACTING WITH AN ACCESS DATABASEIf you are using data in an Access database to control processing of one or more <strong>Word</strong> documents, youcan use DAO and not Access directly. In this casefirst set a reference to Microsoft DAO 3.6 Object Library.Define an object corresponding to an Access database using DAO:Private dbsThis As DatabaseOpen database:Set dbsThis = DBEngine.OpenDatabase("\\server\share\Data\Migrate.mdb")Use a recordset to iterate through a table or query:Private rstQ As RecordsetSet rstQ = dbsMigrate.OpenRecordset("<strong>Word</strong>FilesNotChecked")With rstQDo Until .EOFtxtFilename = ![FullName]Documents.Open FileName:=txtFilename, ReadOnly:=False,AddToRecentFiles:=False. . ..Edit![ControlDate] = Now().UpdateLoopRevision: 8/11/2011 Page 51 of 59Copyright 2002–2011 by <strong>Susan</strong> <strong>Dorey</strong> <strong>Designs</strong>
Microsoft <strong>Word</strong>: Visual Basic for Applications.CloseEnd WithSet rstQ = NothingSet dbsThis = NothingAUTOMATIONAutomation is the running of one application from a second. Examples: (1) editing a <strong>Word</strong> documentwith code in an Access database and (2) using data from an Access table to control processing of a <strong>Word</strong>document.Per Microsoft: You can use another Office application's objects (or the objects exposed by any otherapplication or component that supports Automation) without setting a reference in the References dialogbox by using the CreateObject or GetObject function and declaring object variables as the generic Objecttype. If you use this technique, the objects in your code will be late-bound, and as a result you will not beable to use design-time tools such as automatic statement completion or the Object Browser, and yourcode will not run as fast.Early-Bound DeclarationsEarly binding allows you to declare an object variable as a programmatic identifier, or class name, ratherthan as an Object or a Variant data type. The programmatic identifier of an application is stored in theWindows registry as a subkey below the \HKEY_CLASSES_ROOT subtree. For example, theprogrammatic identifier for Access is "Access.Application"; for Excel it is "Excel.Application."When you are using early binding, you can initialize the object variable by using the CreateObject orGetObject function or by using the New keyword if the application supports it. All Office 2000applications can be initialized by using the New keyword. Because the Outlook 2000 programmingenvironment for Outlook items supports only scripting, you can't use early binding declarations of anysort in its VBScript programming environment; however, you can use early binding in <strong>VBA</strong> code in alocal Outlook <strong>VBA</strong> project or COM add-in, or in Automation code that works with Outlook fromanother host application.Use early binding whenever possible. Early binding has the following advantages:• Syntax checking during compilation rather than at run time.• Support for statement-building tools in the Visual Basic Editor.• Support for built-in constants. If you use late binding, you must define these constants in your codeby looking up the values in the application's documentation.• Better performance—significantly faster with early binding than with late binding.INVENTORYING MACROS<strong>Word</strong> provides you with two tools to see which macros you have: the Macros dialog box and the VisualBasic IDE (with the Project Explorer). Both make it difficult to actually find a macro when you have morethan one module.It is possible to write VB code to inventory your macros in a non-hierarchical list.Revision: 8/11/2011 Page 52 of 59Copyright 2002–2011 by <strong>Susan</strong> <strong>Dorey</strong> <strong>Designs</strong>
Microsoft <strong>Word</strong>: Visual Basic for ApplicationsYou need a reference to the VBIDE—Microsoft Visual Basic for Applications Extensibility,VBE6EXT.OLB.1 This library provides objects that you can use to work with the Visual Basic Editor andany <strong>VBA</strong> projects that it contains. Help for this object model is available in VBOB6.CHM.2 It can be usefulto place a shortcut to this help file on the Desktop.Relevant Object ModelsThe relevant <strong>Word</strong> object model objects:Entity Type DescriptionTemplates collection all templates that are currently available including opentemplate files, document template attached to open documents,and loaded global templatesTemplate object a DOT fileVBProject object see the VBIDE object modelVBProject property returns the VBProject object for the specified template ordocument; applies to Document and Template objectsSet normProj = NormalTemplate.VBProjectSet currProj = ActiveDocument.VBProjectFullName property name of document/template file including the pathNormalTemplate property returns a Template object that refers to the Normal template(normal.dot)3; applies to the Application and Global objectsAttachedTemplate property returns a Template object that refers to the template attached tothe specified document, this is the document template and isusually “normal.dot”; applies to the Document objectA problem with AttachedTemplate is that it is often used prefixed with ActiveDocument. If there is nodocument open, there will be an error. The solution is to test the value of the count of open documents:If Documents.Count >= 1 ThenMsgBox ActiveDocument.NameElseMsgBox "No documents are open"End IfThe relevant VBIDE object model:VBE+VBProjectsVBProject+ReferencesReference+VBComponentsVBComponent1 The VBIDE file is located in directory C:\Program Files\Common Files\Microsoft Shared\<strong>VBA</strong>\<strong>VBA</strong>6\.2 The help file is located in directory C:\Program Files\Common Files\Microsoft Shared\<strong>VBA</strong>\<strong>VBA</strong>6\1033\.3 It is safe to assume there is ALWAYS a normal.dot file. Even if you delete it, <strong>Word</strong> recreates it.Revision: 8/11/2011 Page 53 of 59Copyright 2002–2011 by <strong>Susan</strong> <strong>Dorey</strong> <strong>Designs</strong>
Microsoft <strong>Word</strong>: Visual Basic for Applications+PropertiesPropertyCodeModuleEntity Type DescriptionVBE object root object (in Excel this is VBIDE)ActiveVBProject property returns active project (in the Project window); applies to VBEobjectVBProjects collection all projects that are open in the VBIDECount property returns count of items in a collectionVBProject object refers to a <strong>VBA</strong> project that is open in the Visual Basic EditorVBComponents collection refers to all components in the current projectVBComponent object component in the project, such as a standard module, classmodule, or formVBComponent.Type property returns type of moduleFind method searches active module for a specified stringGetSelection method returns the selection in a code paneItem method returns the indexed member of a collectionCountOfLines method returns count of lines in procedure (macro)ProcCountLines property returns the count of all lines in a named procedure, includingblank or comment lines preceding the procedure declarationand, if the procedure is the last procedure in a code module,any blank lines following the procedure; applies to aCodeModuleProcOfLine property returns the name of the procedure that the specified line is inLines property returns a string containing the specified number of lines;applies to a CodeModuleVBE property returns the root of the VBE object; applies to all collections andobjectsName property returns/sets name of the objectFileName property full path name of the document/template file for the currentproject; see NOTE belowType property type of object ; “1” for code moduleExamples of use:MsgBox VBE.ActiveVBProject.NameMsgBox ActiveDocument.AttachedTemplate.FullNameMsgBox NormalTemplate.FullNameMsgBox VBE.VBProjects(1).VBComponents(1).NameSet normproj = NormalTemplate.VBProjectDim norm As VBProjectSet norm = VBE.VBProjects("Normal")Revision: 8/11/2011 Page 54 of 59Copyright 2002–2011 by <strong>Susan</strong> <strong>Dorey</strong> <strong>Designs</strong>
Microsoft <strong>Word</strong>: Visual Basic for ApplicationsNOTE: After the following code located in normal.dot was run:Set norm = VBE.VBProjects("Normal")strFileName = norm.FileNamevariable strFileName = “c:\documents and settings\owner\normal”This is in error because this normal.dot is located in c”\data\template\”.An accurate approach is to use the FullName property that applies to a document or template file.Iterating Procedures in ModulesIn this context it is important to remember that a module can contain declaratives, subs, and functions.The subs and functions are procedures. How to iterate procedures?Found basic idea on http://www.cpearson.com/excel/vbe.aspx. It inventories macros in a module byiterating through the lines of code, recognizing a macro, getting its information, and moving on to thenext macro. It wrote the information to an Excel spreadsheet. My code, below, writes information to atable in a <strong>Word</strong> document.In this example I limit the template file to normal.dot wherever it may be.Sub InventoryMacros()Dim LineNum As LongDim NumLines As LonglngLineCount = 0NewDocForInventory' opens blank doc, inserts tableDim norm As VBProjectSet norm = NormalTemplate.VBProjectstrFileName = NormalTemplate.FileNameDim modl As VBComponentFor Each modl In norm.VBComponentsstrModuleName = modl.NameWith modl.CodeModuleLineNum = .CountOfDeclarationLines + 1Do Until LineNum >= .CountOfLinesstrMacroName = .ProcOfLine(LineNum, vbext_pk_Proc)LineNum = .ProcStartLine(strMacroName, vbext_pk_Proc) + _.ProcCountLines(strMacroName, vbext_pk_Proc) + 1lngLineCount = .ProcCountLines(strMacroName, vbext_pk_Proc)WriteLineLoopEnd WithNext modlEnd SubSub WriteLine()Selection.TypeText Text:=strFileNameSelection.MoveRight Unit:=wdCellSelection.TypeText Text:=strModuleNameSelection.MoveRight Unit:=wdCellSelection.TypeText Text:=strMacroNameSelection.MoveRight Unit:=wdCellSelection.TypeText Text:=lngLineCountSelection.MoveRight Unit:=wdCellSelection.MoveLeft Unit:=wdCharacter, Count:=1Revision: 8/11/2011 Page 55 of 59Copyright 2002–2011 by <strong>Susan</strong> <strong>Dorey</strong> <strong>Designs</strong>
Microsoft <strong>Word</strong>: Visual Basic for ApplicationsSelection.InsertRows 1Selection.Collapse Direction:=wdCollapseStartEnd SubThis code is fine as long as you are using only the document template. You can expand it to select adifferent template (which I did).Basic Logic to Inventory Macros1. Which document/template fileuse the Normal template normal.dot?if No prompt for file — must be normal.dotopen fileset object for template:if Documents.Count = 0 ThenSet tmpl = NormalTemplate.VBProjectElseSet tmpl = ActiveDocument.AttachedTemplate.VBProjectEnd Ifcreate new <strong>Word</strong> doc, create table with one row of 4 columns (filename, module name, macro name,count of lines)for each moduleget macro namewrite inINVENTORYING FILESGoal: Dynamically create an index of files in a given directory, save it as a <strong>Word</strong> document. Provide forportability of the program code so that it can be easily shared with others.Functionality: Index is created as a table populated with file properties. Index can be re-created any time.Architecture: Program logic is composed of <strong>Word</strong> <strong>VBA</strong> macros that reside in a <strong>Word</strong> document file namedIndex.doc. The content of the document is title, table (holding index), directions, and macrobutton (usedto run the indexing macro). The <strong>Word</strong> document is thus self-sufficient. A copy can be placed into anydirectory for which an index is desired, and emailed to others.Example of index:FilenameLast Tango in Paris.docDate Last Saved6-1-1988 3:48:34 PMLogic:Document file is open when macro is run. Table exists and is formatted; the first row is a repeating headerrow.BEGIN1. Get current directory.2. IF table existsdelete all but first two rows (row #1 is heading row)Revision: 8/11/2011 Page 56 of 59Copyright 2002–2011 by <strong>Susan</strong> <strong>Dorey</strong> <strong>Designs</strong>
Microsoft <strong>Word</strong>: Visual Basic for ApplicationsELSEcreate table and format it3. Position cursor at the end of the table. Insert rows to hold all files in the current directory, except forthe Index file itself. (This technique keeps new rows from being flagged as repeating header rows.)4. Initialize row counter to 1.5. For each file in the current directory, except the active one and temporary ones (filename begins with“~”)a. increment row counterb. set value of first cellc. set value of second cell6. Sort table on first column.7. Delete empty rows. These will exist if any files were excluded (the temporary files).8. Display message box with count of files.ENDRelevant ObjectsDocumentTable, RowFileSystemObjectCodePrivate txtDir As StringPrivate txtFile As StringPrivate cntFiles As IntegerPrivate rowIdx As IntegerPrivate idxTbl As TableSub IndexCurrentDirectory()' Get current directory and filenametxtDir = ActiveDocument.PathtxtFile = ActiveDocument.NamecntFiles = 0If ActiveDocument.ActiveWindow.Panes.Count > 1 ThenFor i = 2 To ActiveDocument.ActiveWindow.Panes.CountActiveDocument.ActiveWindow.Panes(i).CloseNextEnd IfActiveDocument.ActiveWindow.View.Type = wdNormalView' if table existsIf ActiveDocument.Tables.Count = 0 Then CreateIndexTableSet idxTbl = ActiveDocument.Tables(1)If ActiveDocument.Tables.Count > 1 ThenMsgBox "Fatal error: There should be only one table!", vbOKOnly, "Index theCurrent Directory"Exit SubRevision: 8/11/2011 Page 57 of 59Copyright 2002–2011 by <strong>Susan</strong> <strong>Dorey</strong> <strong>Designs</strong>
Microsoft <strong>Word</strong>: Visual Basic for ApplicationsEnd If' delete all but first two rows, row 2 will be overwritten by first indexedfileIf idxTbl.Rows.Count > 1 ThenFor i = idxTbl.Rows.Count To 3 Step -1idxTbl.Rows(i).DeleteNextEnd If' establish connection to the current directoryDim fso As ObjectSet fso = CreateObject("Scripting.FileSystemObject")strPath = txtDirDim ThisFolderSet ThisFolder = fso.GetFolder(strPath)Set fs = ThisFolder.Files' size the table to hold the actual number of filesIf fs.Count > 2 Thenn = fs.Count - 1 ' exclude the Index fileidxTbl.Rows.Last.Select ' selects last rowSelection.Collapse Direction:=wdCollapseEndSelection.MoveLeft Unit:=wdCharacter, Count:=1Selection.InsertRows nSelection.Collapse Direction:=wdCollapseStartEnd If' position on first rowrowIdx = 1' For each file in the current directoryFor Each f In fsIndexThisFile f.Name, f.DateLastModifiedNext f' sort table on first columnidxTbl.Sort ExcludeHeader:=True' Make first table row a repeating headeridxTbl.Rows(1).HeadingFormat = True' delete empty rows' these will correspond to the temporary files that were not indexedWith idxTblFor j = .Rows.Count To 1 Step -1If Len(.Cell(j, 1).Range.Text) = 2 Then .Rows(j).DeleteNext jEnd With' Display message box with count of filesMsgBox "Files indexed = " & cntFiles, vbOKOnly, "Index the Current Directory"End SubSub IndexThisFile(n, d)' insert row in table for file in directoryIf n = txtFile Then Exit Sub' exclude the active Index fileIf Left(n, 1) = "~" Then Exit Sub ' exclude temporary filesRevision: 8/11/2011 Page 58 of 59Copyright 2002–2011 by <strong>Susan</strong> <strong>Dorey</strong> <strong>Designs</strong>
Microsoft <strong>Word</strong>: Visual Basic for ApplicationsrowIdx = rowIdx + 1idxTbl.Rows(rowIdx).Cells(1).Range.Text = nidxTbl.Rows(rowIdx).Cells(2).Range.Text = dcntFiles = cntFiles + 1End SubSub CreateIndexTable()' create table and format itSelection.EndKey Unit:=wdStory'move to end of documentActiveDocument.Tables.Add Range:=Selection.Range, NumRows:=1, NumColumns:=2,DefaultTableBehavior:=wd<strong>Word</strong>9TableBehaviorActiveDocument.Tables(1).Cell(1, 1).Range.Text = "Filename"ActiveDocument.Tables(1).Cell(1, 2).Range.Text = "Last Save Date"Set idxTbl = ActiveDocument.Tables(1)End SubRevision: 8/11/2011 Page 59 of 59Copyright 2002–2011 by <strong>Susan</strong> <strong>Dorey</strong> <strong>Designs</strong>