PMK-JLP-M
PMK-JLP-M
PMK-JLP-M
- No tags were found...

You also want an ePaper? Increase the reach of your titles
YUMPU automatically turns print PDFs into web optimized ePapers that Google loves.
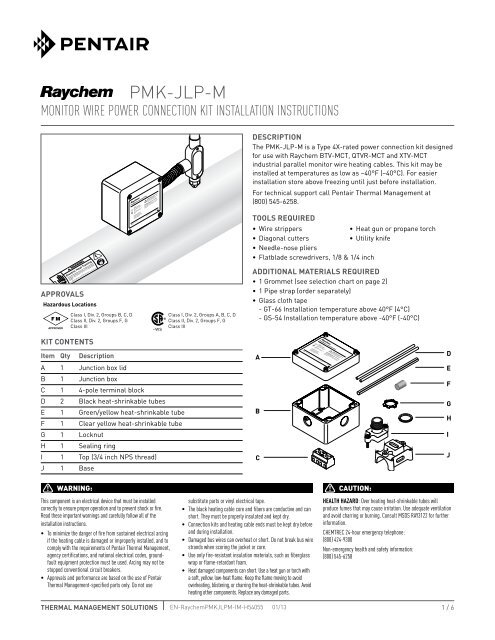
Identify Heating Cable TypeOuter jacketPlastic wrapMonitorwireBraidOuter jacketMonitor wireBraidInner jacketInner jacketConductive coreBus wireBTV-MCT, QTVR-MCTConductive fiberSpacerBus wireXTV-MCT12WARNING: Use of the wrong grommet can result inleaks, cracked components, shock or fire, and willinvalidate approvals and certifications.• Allow approximately 18 in (46 cm) of heating cable forinstallation.• Determine correct grommet (order separately) fromchart below.Heating cable3BTV1-MCT3BTV2-MCT5BTV1-MCT5BTV2-MCT10BTV1-MCT10BTV2-MCT10QTVR1-MCT10QTVR2-MCT20QTVR1-MCT20QTVR2-MCTGrommetNNNNFFGGFFHeating cable5XTV1-MCT-T35XTV2-MCT-T310XTV1-MCT-T310XTV2-MCT-T315XTV1-MCT-T215XTV2-MCT-T320XTV1-MCT-T220XTV2-MCT-T2GrommetNNNNNNNN18 in(46 cm)3 4• Slide parts onto heating cable.WARNING: Do not cut through braid into innerjacket. This could result in a short circuit.• Lightly scoreouter jacket.7 1/2 in(190 mm)• Bend heating cable tobreak jacket at score,then peel off jacket.THERMAL MANAGEMENT SOLUTIONS EN-Raychem<strong>PMK</strong><strong>JLP</strong>M-IM-H54055 01/13 2 / 6
5• Push braid back toward outerjacket to create a pucker.6• Bend heating cable and work it through opening in braid.• At pucker, open braidusing screwdriver.7For XTV-MCT Only:• Remove plastic wrap.8• Determine heating cable type and continue as shown.BTV-MCT, QTVR-MCTGo to Step 9AXTV-MCTGo to Page 4, Step 9B9A BTV-MCT and QTVR-MCT10A BTV-MCT and QTVR-MCTWARNING: Damaged monitor wire insulation cancause a short. Do not score inner jacket next to themonitor wire.• Lightly score partiallyaround inner jacketas shown. Do notscore jacketover monitorwire.Monitor wire9 1/2 in(241 mm)• Notch core.1/4 in(6 mm)• Bend heating cable to break jacket at score, then peel offjacket. Use diagonal cutters to remove remaining jacketnext to monitor wire.• Peel bus wire from core.THERMAL MANAGEMENT SOLUTIONS EN-Raychem<strong>PMK</strong><strong>JLP</strong>M-IM-H54055 01/133 / 6
11A BTV-MCT and QTVR-MCT• Score core between bus wires andinner jacket.• Bend and snap core.• Peel core from bus wires and remove anyremaining material from bus wires.Go to Step 129B XTV-MCTWARNING: Do not cut or damage bus wires.Damaged bus wires can overheat or short.10B XTV-MCT• Cut and remove fiber strands.• Lightly scorearound innerjacket as shown.Be careful not tocut monitor wireinsulation.6 1/2 in(165 mm)• Bend heating cable tobreak jacket at score,then peel off jacket.11B XTV-MCT• Score and remove center spacer.• Remove any remaining fibermaterial from bus wires.12• Remove insulation from end of monitorwire. Do not cut wire strands.1/2 in(13 mm)THERMAL MANAGEMENT SOLUTIONS EN-Raychem<strong>PMK</strong><strong>JLP</strong>M-IM-H54055 01/13 4 / 6
13• Slide two blacktubes onto buswires and green/yellow tube ontobraid.Note: See Step 15 for proper heatingtechniques.14• Center clear yellow tube over end of base jacket.• Heat tube until it shrinks and adhesive flows out ends.While still hot, pinch between wires and hold for 5seconds.1/2 in(13 mm)• Use a heat gun or propane torch to heat tubes untilthey are fully recovered.15Instructions for Using a Heat Gun or Torch:• Read important warnings on Page 1 and follow safetyprecautions provided with heat gun or torch.• When using a torch use a soft yellow, low-heat flame.Apply just enough heat to do the job.• Keep torch or heat gun moving continuously to distributethe heat evenly to avoid overheating, blistering orcharring the heating cable and heat-shrinkabletubes.• Replace any heat-damaged parts.16• Seat grommet andposition parts sothat 1 in. (25 mm) ofheating cable outerjacket extends pasttop of threads.• Tighten screws.1 in(25 mm)17 18• Fasten base to pipewith strap.• Loop and tape extraheating cable to pipe.• Install sealing ring.• Install box with locknut.Pipe strapTHERMAL MANAGEMENT SOLUTIONS EN-Raychem<strong>PMK</strong><strong>JLP</strong>M-IM-H54055 01/135 / 6
19• Connect wires to terminal block.Terminal blockHeating cable bus wiresBraidGroundNØSignal light or othermonitoring device.Monitor wireEnd seal connectionfor -MCT heating cable120/277 Vac shown20• Install lid.• Apply insulation and cladding.• Weather-seal the stand entry.• Leave these installation instructions with the end userfor future reference.Use a conduit drainto prevent condensationand water build-upWeather sealInsulationWWW.THERMAL.PENTAIR.COMNORTH AMERICAEurope, Middle East, AfricaAsia PacificLatin AmericaTel: +1.800.545.6258Fax: +1.800.527.5703Tel: +1.650.216.1526Fax: +1.650.474.7711thermal.info@pentair.comTel: +32.16.213.511Fax: +32.16.213.603thermal.info@pentair.comTel: +86.21.2412.1688Fax: +86.21.5426.2917cn.thermal.info@pentair.comTel: +55.11.2588.1400Fax: +55.11.2588.1410thermal.info@pentair.comPentair, BTV, QTVR and XTV are owned by Pentair or its global affiliates. All other trademarks are the property of their respective owners. Pentair reservesthe right to change specifications without prior notice.© 1991-2013 Pentair. PN 198417-000THERMAL MANAGEMENT SOLUTIONS EN-Raychem<strong>PMK</strong><strong>JLP</strong>M-IM-H54055 01/136 / 6