Heat-Tracing Systems for Hazardous Division 1 Locations
Heat-Tracing Systems for Hazardous Division 1 Locations
Heat-Tracing Systems for Hazardous Division 1 Locations

Create successful ePaper yourself
Turn your PDF publications into a flip-book with our unique Google optimized e-Paper software.
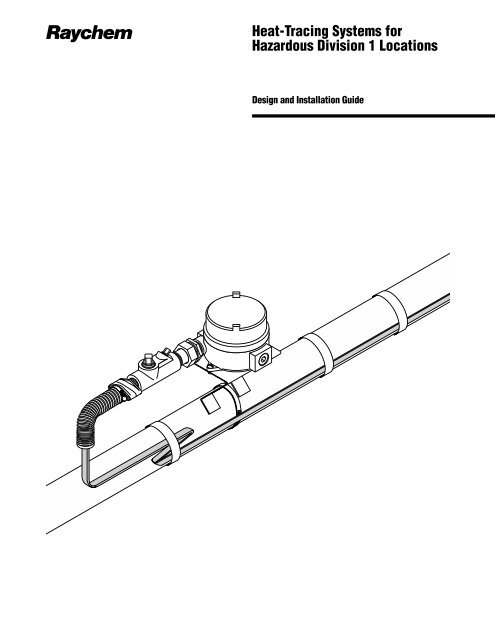
R<strong>Heat</strong>-<strong>Tracing</strong> <strong>Systems</strong> <strong>for</strong><strong>Hazardous</strong> <strong>Division</strong> 1 <strong>Locations</strong>Design and Installation Guide
WARNING: Fire and shock hazard.This heat-tracing system must be installed correctly to ensure proper operation and toprevent shock and fire. Read these important warnings and carefully follow all theinstallation instructions.• There is a danger of fire from sustained electrical arcing if the heating cable is damagedor improperly installed. To comply with Raychem requirements, agency certifications,and the National Electrical Code, and to protect against the risk of fire, ground-faultequipment protection must be used on each heating-cable circuit. Arcing may not bestopped by conventional circuit breakers.• Approvals and per<strong>for</strong>mance are based on the use of Raychem-specified parts only.Do not substitute parts or use vinyl electrical tape.• Bus wires will short if they contact each other. Keep bus wires separated.• Components and cable ends must be kept dry be<strong>for</strong>e and during installation.• The black heating-cable core and fibers are conductive and can short. They must beproperly insulated and kept dry.• Damaged bus wires can overheat or short. Do not break bus wire strands when scoringthe jacket or core.• Damaged heating cable can cause electrical arcing or fire. Do not use metalattachments such as pipe straps or tie wire. Use only Raychem-approved tapes andcable ties to secure the cable to the pipe.• Do not attempt to repair or energize damaged cable. Remove damaged sections at onceand replace them with a new length, using the appropriate Raychem splice kit. Replacedamaged components.• Reusing the grommet, or using the wrong grommet, can cause leaks, crackedcomponents, shock, or fire. Be sure the new type of grommet is correct <strong>for</strong> the heatingcable being installed. Use a new grommet whenever the cable has been pulled out ofthe termination.• Use only fire-resistant insulation materials, such as fiberglass wrap or flame-retardantfoam.
Table of Contents1. Introduction1.1 Scope 11.2 Typical System with Components 11.3 <strong>Division</strong> 1 <strong>Heat</strong>-<strong>Tracing</strong> Cables 11.4 Electrical Connections and Components 21.5 Electrical Protection 22. Thermal Design2.1 Introduction 32.2 Special Requirements 32.3 <strong>Heat</strong>ing Cable Selection 33. Electrical Design3.1 Introduction 123.2 Special Considerations 123.3 Circuit Breaker Selection 124. Components and Electrical Connections4.1 Power Connections, Splices, Tees, and End Seals 154.2 Core Sealing 164.3 Attachment Tapes 164.4 Electric Traced Labels 164.5 Thermostats 175. Installation5.1 Approvals and Warranty 195.2 <strong>Heat</strong>ing Cable Installation Requirements 195.3 <strong>Heat</strong>ing Cable Installation 195.4 Component Installation Requirements 255.5 HAK-C-100 Connection Kit Description 265.6 HAK-C-100 Connection Kit Installation 275.7 Thermal Insulation Requirements 355.8 Thermostat Controls 355.9 Power Supply and Electrical Protection Requirements 365.10 <strong>Heat</strong>ing Cable Testing 376. Operation, Maintenance, and Repair6.1 Operation and Inspection 396.2 Troubleshooting 407. Answers to Frequently Asked Questions 42AppendicesAppendix A: System Approvals 45Appendix B: Alternate Voltage Adjustment Factors 46Appendix C: Ground-Fault Equipment Protection Devices 47Appendix D: <strong>Heat</strong>-Shrink Core Sealer Installation 48Appendix E: Field In<strong>for</strong>mation Required <strong>for</strong> FM Approval 51Appendix F: FM Required <strong>Division</strong> 1 Installation Record 52Appendix G: Inspection Record 53Appendix H: BTV <strong>Heat</strong>ing Cable Selection <strong>for</strong> Insulated Plastic Pipes 54Appendix I: Effect of Aluminum Tape on Raychem <strong>Heat</strong>ing Cable 54Appendix J: <strong>Hazardous</strong> Gases and Vapors 55
1. Introduction1.1 ScopeThis guide applies to Raychem heat-tracing systems covered by Factory Mutual (FM) Approval orCanadian Standards Association (CSA) Certification <strong>for</strong> <strong>Division</strong> 1 hazardous locations. Theseapplications are defined by the National Fire Protection Association (NFPA) 70, National Electrical Code(NEC) Article 500, and the Canadian Electrical Code (CEC) Part I, Section 18.1.2 Typical System with ComponentsTo groundfaultprotectedpowerPower connectionSplice or tee(as required)Glass tapeProtectivetubingPipe strap<strong>Heat</strong>ing cable*Thermal insulation is required on all heat-traced pipe.Thermalinsulation*End seal1.3 <strong>Division</strong> 1 <strong>Heat</strong>-<strong>Tracing</strong> CablesRaychem Corporation offers solid-core and fiber-wrapped heating cables <strong>for</strong> <strong>Division</strong> 1 areas asshown below.The design sections of this guide will help determine the heating cable best suited <strong>for</strong> your application.Table 1 in Section 2.0, Thermal Design, gives the per<strong>for</strong>mance data <strong>for</strong> these heating cables. All systemcomponents are specifically designed and approved <strong>for</strong> <strong>Division</strong> 1 applications. No parts can besubstituted or omitted.Tinnedcopper braidSelf-regulatingconductive coreFluoropolymerouter jacketInnerjacketCopper bus wireFM Approved HBTV-CT and HQTV-CT <strong>Heat</strong>ing CablesCSA Certified BTV-CT and QTVR-CT <strong>Heat</strong>ing CablesFluoropolymerouter jacketTinnedcopper braidInnerjacketSelf-regulatingconductive coreCopperbus wireFM Approved HXTV-CT <strong>Heat</strong>ing CablesCSA Certified XTV-CT <strong>Heat</strong>ing Cables1
1.4 Electrical Connections and ComponentsThe HAK-C-100 connection kit is FM Approved and CSA Certified. The kit must be used <strong>for</strong> all powerconnections, splices, tees, and end seals in <strong>Division</strong> 1 locations.If components are installed in a <strong>Division</strong> 2 or ordinary area, other Raychem industrial connection systemscan be used with the approved <strong>Division</strong> 1 heating cable.Junction box, mountingbracket, and pipe strapnot includedThe HAK-C-100connection kitNote: In addition to the HAK-C-100 connection kit, junction boxes, pipe straps, and mounting bracketsmust be ordered. Additional HAK-C-100 kits are needed <strong>for</strong> splices and tees. (Splices require one junctionbox and two HAK-C-100 kits; tees require one junction box and three HAK-C-100 kits.) See Section 4.0<strong>for</strong> a complete component assembly matrix and catalog numbers.WARNING: Fire hazard.There is a danger of fire from sustainedelectrical arcing if the heating cable isdamaged or improperly installed. Tocomply with Raychem requirements,certifications, and national electricalcodes, and to protect against the risk offire, ground-fault equipment protectionmust be used on each heating cable circuit.Arcing may not be stopped by conventionalcircuit breakers.1.5 Electrical ProtectionRaychem, the NEC, the CEC, FM, and CSA require ground-fault protection of equipment <strong>for</strong> all <strong>Division</strong> 1locations to reduce the risk of fire caused by damage or improper installation.These devices are commonly available with 30-mA trip levels and are rated up to 30 A <strong>for</strong> 120, 208, andsingle-phase 240 Vac grounded systems. Raychem also offers the TraceGuard 277 Vac ground-faultprotectedcircuit breaker with ratings up to 50 A.For recommended ground-fault equipment protection, see Appendix C.2
2. Thermal DesignWARNING: Fire and shock hazard.This electrical system must be designedand installed properly. To prevent fire orelectrical hazard, follow all warnings andinstructions in this guide and all literatureincluded in product packages.2.1 IntroductionThis design section covers the selection process <strong>for</strong> both FM Approved and CSA Certified systems. Thereare different steps required, depending on which approval agency is desired.2.2 Special RequirementsDue to the potentially hazardous nature of <strong>Division</strong> 1 locations, these requirements must be followedat all times.For FM Approved systems• Use only Raychem HBTV-CT, HQTV-CT, and HXTV-CT heating cables and Raychem HAK-C-100components specifically approved by FM. Do not substitute any parts.• Use ground-fault equipment protection devices (see Appendix C).• Send field in<strong>for</strong>mation from Appendix E to the Raychem Customer Service Center (fax 650-361-6711)<strong>for</strong> design verification.• Complete the <strong>Division</strong> 1 Installation Record in Appendix F. Installers are required to complete andsubmit a <strong>Division</strong> 1 Installation Record to the Raychem Customer Service Center.For CSA Certified systems• Use only Raychem BTV-CT, QTVR-CT, and XTV-CT heating cables andHAK-C-100 components specifically certified by CSA. Do not substitute any parts.• Use ground-fault equipment protection devices (see Appendix C).2.3 <strong>Heat</strong>ing Cable SelectionTo determine the heating cable catalog number, you must know:• T M : desired maintenance temperature (°F)• T A : minimum expected ambient temperature (°F)• Continuous exposure temperature (°F)• Pipe or tubing size• Thermal insulation type and thickness• Service voltage• Approval required (FM or CSA)• T-rating of the area or the lowest auto-ignition temperature (AIT), expressed in °C, in the area of use.T AThermal insulationT MPipe or tubingThe following steps in this section describe how to determine this in<strong>for</strong>mation.Note: All thermal and electrical design in<strong>for</strong>mation provided is based upon a standard installation:heating cable fastened with glass tape to an insulated metal pipe. The appendices in this guide areprovided to assist you in calculating alternative installation methods. Consult your Raychemrepresentative <strong>for</strong> design assistance, if needed.3
Note: Publication NFPA 325 gives ignitiontemperatures <strong>for</strong> many hazardous materials.Note: Keep all records of T-rating determination.The Raychem Customer Service Center will ask <strong>for</strong>this in<strong>for</strong>mation to fill orders. This in<strong>for</strong>mationmust be recorded in Appendix E and sent toRaychem.The purpose of the T-rating is to ensure thatelectrical equipment does not exceed the autoignitiontemperatures of flammables handled in ahazardous (Classified) area.Step 1: Collect the thermal design application in<strong>for</strong>mation:Example:• T M : 40°F (4.44°C) [water freeze protection]• T A : –20°F (28.89°C)• Maximum continuous exposure temperature: 100°F (37.78°C)• Pipe or tubing size: 6" steel• Thermal insulation type and thickness: 2" calcium silicate• Service voltage: 240 V• Approval required (FM or CSA): FM• Material with the lowest AIT, expressed in °C, in the hazardous area: Benzene, AIT = 498°CStep 2. Determine the T-rating requirement:If the T-rating of the area has been defined, then select a heating cable from Table 1 (page 6) having aT-rating equivalent to or less than the T-rating of this area (<strong>for</strong> example, T6 is a lower T-rating than T3).Example 1: The T-rating <strong>for</strong> the area is defined as T3.If the T-rating <strong>for</strong> the area has not been defined, use one of the following methods.For FM Approval:• Select material with the lowest AIT in °C.• Multiply ignition temperature by 0.8.• This temperature is the maximum allowable heating cable sheath temperature.For CSA Certification:• Select material with the lowest AIT.• This temperature is the maximum allowable heating cable sheath temperature.Example 2: The material in the area with the lowest AIT is the fluid benzene, with an AIT of 498°C.For FM approval: T-rating = 80% x AIT (°C)= .8 x 498°C= 399°CFor CSA: T-rating = 498°CThe heating cable selected cannot have a maximum sheath temperature greater than the lowest AIT<strong>for</strong> the area.Step 3. Calculate the temperature differential (∆T):∆T = T M – T AExample:Calculate ∆T = T M – T ACalculate ∆T = 40°F – (–20°F) [4.44°C – (–28.89°C)]Calculate ∆T = 60°F (15.56°C)Note: <strong>Heat</strong>-loss calculations are based onIEEE Standard 515-1996, Equation 1.Step 4. Determine the pipe heat loss:From Table 3 (page 8), match the pipe size and insulation thickness with the temperature differential (∆T)to find the base heat loss of the pipe (Q B ).Example:From Table 3, 6" pipe, 2" insulation, and ∆T = 60°F (15.56°C), Q B must be calculated throughinterpolation:Q B = 4.2 W/ft + 10/50 x (8.8 – 4.2) = 4.2 + 0.9Q B = 5.1 W/ft @ T M = 40°F (4.44°C)4
Step 5. Compensate <strong>for</strong> insulation type:Multiply the base heat loss of the pipe (Q B ) from Step 4 by the appropriate insulation compensation factor(f) from Table 4 (page 8), to get the actual heat loss (Q T ).Q T = Q B x fExample:From Table 4, insulation factor (f) = 1.48 <strong>for</strong> calcium silicate:Q T = Q B x fQ B = 5.1 W/ft x 1.48Q T = 7.5 W/ft at 40°F (4.44°C)Step 6. Select the thermal output rating:From Graphs 1 and 2 on pages 10 and 11, match the actual heat loss per foot of pipe (Q T ) with thedesired maintenance temperature (T M ), and select from the power output ratings so that the power outputrating at T M equals or exceeds Q T .Example:Q T = 7.5 W/ftT M = 40°F (4.44°C)From Graphs 1 and 2, 8HBTV-CT exceeds 7.5 W/ft at 40°F (4.44°C).Q T = 7.5T M = 40°FShould the heat loss Q T be between the two heating-cable power output curves, select the higher-ratedheating cable. If the heat loss Q T is greater than the power output of the highest-rated heating cable,you can compensate with one of the following methods:• Use thicker insulation.• Use insulation material with a lower K factor.• Use two or more heating cables run in parallel.• Spiral the heating cable.Spiraling: If this method is selected, determine the spiral factor according to the following <strong>for</strong>mula:Spiral factor (length of heating cable/foot of pipe) =Q T<strong>Heat</strong>er thermal output at T MWhen the spiral factor exceeds 1.4 or the pipe size is less than 3" IPS, Raychem recommends using two ormore heating cables run in parallel.Only HBTV-CT and BTV-CT can be used on plastic pipes. See Appendix H <strong>for</strong> thermal output adjustmentfactors on plastic pipes.5
Step 7. Determine the heating cable family:Select the heating cable catalog number based on the following in<strong>for</strong>mation and Table 1 below:• Maintenance temperature• <strong>Heat</strong> loss calculated (Q T )• Service voltage• Approval requirement• T-rating as calculated by your required approval agency• Continuous exposure temperatureNote: Make sure that the maximum sheath temperature of the heating cable is not higher than the T-rating(refer to Step 2). Contact the Raychem Customer Service Center if the maximum sheath temperature of theheating cable selected exceeds the temperature calculated in Step 2.Table 1. <strong>Heat</strong>ing Cable Product Per<strong>for</strong>mance DataFM Approved CSA Certified Maximum continuous Maximum intermittent T-rating/Maximumheating cable heating cable exposure temperature* exposure temperature** sheath temperatureHBTV-CT BTV-CT 150°F (65°C) 185°F (85°C) T6 (185°F, 85°C)HQTV-CT QTVR-CT 225°F (110°C) 225°F (110°C) T4 (275°F, 135°C)5HXTV1, 2-CT 5XTV1, 2-CT-T3 250°F (121°C) 420°F (215°C) T3 (392°F, 200°C)10HXTV1, 2-CT 10XTV1, 2-CT-T3 250°F (121°C) 420°F (215°C) T3 (392°F, 200°C)15HXTV2-CT 15XTV2-CT-T3 250°F (121°C) 420°F (215°C) T3 (392°F, 200°C)15HXTV1-CT 15XTV1-CT-T2 250°F (121°C) 420°F (215°C) T2D (419°F, 215°C)20HXTV1-CT 20XTV1-CT-T2 250°F (121°C) 420°F (215°C) T2D (419°F, 215°C)20HXTV2-CT 20XTV2-CT-T2 250°F (121°C) 420°F (215°C) T2C (446°F, 230°C)* With the heating cable power on.** 1000 hours (power on/power off).Example:T M = 40°F (4.44°C)Actual heat loss calculated (Q T ) = 7.5 W/ft. Based on T M = 40°F (4.44°C) and Q T = 7.5 W/ft, an8-W/ft product is sufficient <strong>for</strong> the application (refer to Step 6).Service voltage = 240 VApproval requirement = FMT-rating as calculated by your required approval agency = 399°CContinuous exposure temperature = 100°F (37.78°C)There<strong>for</strong>e, choose 8HBTV2-CT.Step 8. Calculate the total length of heating cable required by combining lengths fromeach component of the piping system:Example:80-ft pipe length2 gate valves5 0.25-in steel-welded shoe supports1 power connection1 end seal(A) For the piping:Determine the amount of heating cable required <strong>for</strong> the pipeline length.<strong>Heat</strong>ing cable required <strong>for</strong> pipe length = 80 ft(B) For each valve:6Use Table 2 on the next page to calculate the amount of heating cable required.
Table 2. Amount of <strong>Heat</strong>ing Cable to Use per ValvePipe diameter (IPS)(inches)1/4 0.31/2 0.83/4 1.31 21 1/4 3.31 1/2 4.32 4.33 4.34 4.36 5.08 5.010 5.614 7.318 9.424 12.6Minimum amount of heating cable(feet)Note: Use TraceCalc 5 software to calculate the exact quantity required <strong>for</strong> the valve, based on Finite Element Analysis.<strong>Heat</strong>ing cable required <strong>for</strong> valves = Two 6" valves x 4.3 ft = 8.6 ft(C) For each pipe support shoe:Calculate the additional heat required as follows:Q SUPPORT= 0.7L x (T M – T A ), where L = Support length (ft)For pipe diameters less than 2 inches, thenumbers represent the maximum amountof heating cable that will fit on the valve.For pipe diameters between 2 and 6 inches,the numbers represent the maximumheating cable required to compensate <strong>for</strong>heat loss and a service loop.For pipe diameters greater than 6 inches, thenumbers represent the minimum amountrequired <strong>for</strong> a service loop and do notnecessarily compensate <strong>for</strong> total heat loss.Total heat loss from supports: 5 pipe supports x [0.7 x 1] x 60 = 210 W x 10% safety factor = 231 WCalculate the additional heating cable required by dividing the total support heat loss, Q sUPPORT,by theheating cable power output per foot at T M from the thermal output curves in Table 2.<strong>Heat</strong>ing cable required <strong>for</strong> supports =231 W8.8 W/ft= 26.3 ft(D) For components:Allow an additional 3 feet <strong>for</strong> each component. For this example, assume one power connection kit andone end seal, so total cable required <strong>for</strong> components is 6 feet.Total <strong>Heat</strong>ing Cable Required = (A) + (B) + (C) + (D)80 + 8.6 + 26.3 + 6 = 121 feet7
Table 3. Pipe <strong>Heat</strong> Loss*Temperature Pipe diameter (IPS) (inches)differential 1/4 1/2 3/4 1 1 1 /4 1 1 /2 2 2 1 /2Insulation ∆T Tubing size (inches)thickness (°F) (°C) 3 /4 1 1 1 /4 1 1 /2 20.5" 50 28 1.9 2.5 2.9 3.5 4.1 4.6 5.5 6.5100 56 3.9 5.2 6.1 7.2 8.6 9.6 11.5 13.5150 83 6.1 8.1 9.5 11.2 13.4 14.9 17.9 21.1200 111 8.5 11.3 13.2 15.6 18.6 20.7 24.9 29.21.0" 50 28 1.3 1.6 1.9 2.2 2.5 2.8 3.2 3.8100 56 2.7 3.4 3.9 4.5 5.2 5.8 6.8 7.8150 83 4.2 5.3 6.1 7.0 8.2 9.0 10.6 12.2200 111 5.8 7.4 8.4 9.7 11.3 12.4 14.6 16.9250 139 7.6 9.7 11.0 12.7 14.8 16.3 19.1 22.11.5" 50 28 1.1 1.3 1.5 1.7 1.9 2.1 2.4 2.8100 56 2.2 2.8 3.1 3.5 4.0 4.4 5.1 5.8150 83 3.5 4.3 4.8 5.5 6.3 6.9 8.0 9.1200 111 4.8 5.9 6.7 7.6 8.7 9.5 11.0 12.6250 139 6.3 7.8 8.7 9.9 11.4 12.4 14.4 16.5300 167 7.9 9.7 11.0 12.4 14.3 15.6 18.1 20.6350 194 9.6 11.9 13.3 15.1 17.4 19.0 22.0 25.12.0" 50 28 0.9 1.1 1.3 1.4 1.6 1.8 2.0 2.3100 56 2.0 2.4 2.7 3.0 3.4 3.7 4.2 4.8150 83 3.1 3.7 4.2 4.7 5.3 5.8 6.6 7.5200 111 4.3 5.2 5.8 6.5 7.4 8.0 9.2 10.4250 139 5.6 6.8 7.5 8.5 9.6 10.4 12.0 13.5300 167 7.0 8.5 9.4 10.6 12.1 13.1 15.0 17.0350 194 8.5 10.3 11.5 12.9 14.7 15.9 18.2 20.62.5" 50 28 0.9 1.0 1.2 1.3 1.4 1.6 1.8 2.0100 56 1.8 2.2 2.4 2.7 3.0 3.3 3.7 4.2150 83 2.8 3.4 3.7 4.2 4.7 5.1 5.8 6.5200 111 3.9 4.7 5.2 5.8 6.5 7.0 8.0 9.0250 139 5.1 6.1 6.8 7.6 8.5 9.2 10.5 11.7300 167 6.4 7.7 8.5 9.5 10.7 11.5 13.1 14.7350 194 7.8 9.3 10.3 11.5 13.0 14.0 15.9 17.93.0" 50 28 0.8 1.0 1.1 1.2 1.3 1.4 1.6 1.8100 56 1.7 2.0 2.2 2.4 2.7 2.9 3.3 3.7150 83 2.6 3.1 3.4 3.8 4.3 4.6 5.2 5.8200 111 3.6 4.3 4.8 5.3 5.9 6.4 7.2 8.0250 139 4.8 5.7 6.2 6.9 7.8 8.3 9.4 10.5300 167 6.0 7.1 7.8 8.7 9.7 10.4 11.8 13.2350 194 7.3 8.6 9.5 10.5 11.8 12.7 14.3 16.04.0" 50 28 0.7 0.9 0.9 1.0 1.1 1.2 1.4 1.5100 56 1.5 1.8 2.0 2.1 2.4 2.5 2.9 3.2150 83 2.4 2.8 3.0 3.4 3.7 4.0 4.4 4.9200 111 3.3 3.9 4.2 4.6 5.2 5.5 6.2 6.8250 139 4.3 5.1 5.5 6.1 6.7 7.2 8.1 8.9300 167 5.4 6.3 6.9 7.6 8.5 9.0 10.1 11.2350 194 6.6 7.7 8.4 9.3 10.3 11.0 12.3 13.6Table 4. Insulation factorsK factor at 50°F mean temp.Pre<strong>for</strong>med pipe insulation Insulation factor (f) (BTU/hr – °F – ft 2 /in)*Glass fiber (ASTM C547) 1.00 .25Calcium silicate (ASTM C533) 1.48 .37Cellular glass (ASTM C552) 1.48 .33Rigid cellular urethane (ASTM C591) 0.64 .16Foamed elastomer (ASTM C534) 1.16 .29Mineral fiber blanket (ASTM C553) 1.16 .30Expanded perlite (ASTM C610) 1.90 .48*Insulation manufacturers may publish different K-factors.8
3 3 1 /2 4 6 8 10 12 14 16 18 20 247.7 8.6 9.6 13.6 17.4 21.4 25.2 27.5 31.3 35.0 38.8 46.216.0 18.0 20.0 28.4 36.3 44.6 52.5 57.4 65.2 73.0 80.8 96.325.0 28.1 31.2 44.3 56.6 69.6 81.9 89.5 101.7 113.8 126.0 150.234.6 39.0 43.3 61.5 78.6 96.6 113.6 124.2 141.1 158.0 174.8 208.54.4 4.9 5.4 7.5 9.4 11.5 13.5 14.7 16.6 18.6 20.5 24.49.1 10.2 11.2 15.6 19.7 24.0 28.1 30.6 34.7 38.7 42.8 50.914.2 15.9 17.5 24.3 30.7 37.4 43.8 47.8 54.1 60.4 66.7 79.419.7 22.0 24.2 33.7 42.5 51.9 60.7 66.2 75.0 83.8 92.5 110.025.8 28.7 31.7 44.0 55.6 67.9 79.4 86.6 98.1 109.6 121.0 143.93.2 3.6 3.9 5.3 6.7 8.1 9.4 10.2 11.5 12.9 14.2 16.86.7 7.4 8.1 11.1 13.9 16.8 19.6 21.3 24.0 26.8 29.5 35.010.5 11.6 12.7 17.3 21.6 26.2 30.5 33.2 37.5 41.8 46.1 54.614.5 16.1 17.6 24.0 30.0 36.3 42.3 46.0 52.0 57.9 63.8 75.719.0 21.0 23.0 31.4 39.2 47.5 55.3 60.2 68.0 75.7 83.5 99.023.8 26.3 28.8 39.3 49.2 59.6 69.3 75.4 85.1 94.9 104.6 124.028.9 32.0 35.0 47.8 59.8 72.4 84.3 91.7 103.5 115.4 127.2 150.82.6 2.9 3.1 4.2 5.2 6.3 7.3 7.9 8.9 9.9 10.9 12.95.5 6.0 6.6 8.8 10.9 13.1 15.2 16.5 18.6 20.7 22.8 26.98.5 9.4 10.2 13.8 17.0 20.5 23.8 25.8 29.0 32.3 35.5 42.011.8 13.0 14.2 19.1 23.6 28.4 32.9 35.7 40.2 44.7 49.2 58.215.5 17.0 18.5 24.9 30.9 37.2 43.1 46.7 52.6 58.5 64.3 76.119.4 21.3 23.2 31.2 38.7 46.6 54.0 58.6 65.9 73.3 80.6 95.323.6 25.9 28.3 38.0 47.1 56.6 65.6 71.2 80.2 89.1 98.1 115.92.3 2.5 2.7 3.6 4.4 5.2 6.1 6.6 7.4 8.2 9.0 10.64.7 5.2 5.6 7.4 9.1 10.9 12.6 13.7 15.3 17.0 18.7 22.07.4 8.1 8.7 11.6 14.2 17.0 19.7 21.3 23.9 26.5 29.1 34.310.2 11.2 12.1 16.1 19.7 23.6 27.2 29.5 33.1 36.7 40.3 47.513.3 14.6 15.8 21.0 25.8 30.9 35.6 38.6 43.3 48.0 52.8 62.216.7 18.3 19.8 26.3 32.3 38.7 44.6 48.4 54.3 60.2 66.1 77.920.3 22.2 24.1 32.0 39.3 47.1 54.3 58.8 66.0 73.2 80.4 94.72.0 2.2 2.4 3.1 3.8 4.5 5.2 5.6 6.3 7.0 7.6 9.04.2 4.6 4.9 6.5 7.9 9.4 10.8 11.7 13.1 14.5 15.9 18.76.6 7.1 7.7 10.1 12.4 14.7 16.9 18.3 20.5 22.6 24.8 29.29.1 9.9 10.7 14.0 17.1 20.4 23.4 25.3 28.3 31.4 34.4 40.411.9 12.9 14.0 18.3 22.4 26.6 30.6 33.1 37.1 41.0 45.0 52.814.9 16.2 17.5 23.0 28.1 33.4 38.4 41.5 46.5 51.4 56.3 66.218.1 19.7 21.3 28.0 34.1 40.6 46.7 50.5 56.5 62.5 68.5 80.51.7 1.8 2.0 2.5 3.1 3.6 4.1 4.4 5.0 5.5 6.0 7.03.5 3.8 4.1 5.3 6.4 7.5 8.6 9.3 10.3 11.4 12.4 14.55.5 6.0 6.4 8.3 10.0 11.8 13.4 14.5 16.1 17.8 19.4 22.77.6 8.3 8.9 11.4 13.8 16.3 18.6 20.0 22.3 24.6 26.9 31.410.0 10.8 11.6 15.0 18.1 21.3 24.3 26.2 29.2 32.2 35.2 41.112.5 13.5 14.6 18.8 22.6 26.7 30.5 32.8 36.6 40.3 44.1 51.515.2 16.5 17.7 22.8 27.5 32.4 37.1 39.9 44.5 49.0 53.6 62.6*Pipe heat loss (QB) is shown in watts per foot.<strong>Heat</strong>-loss calculations are based on IEEE Std. 515,with the following provisions:• Pipes insulated with glass fiber in accordancewith ASTM C547.• Pipes located outdoors in a 20-mph wind.• No insulating air-space assumed between pipeand insulation.• No insulating air-space assumed between theinsulation and outer cladding.• Inclusion of a 10% safety factor.9
Graph 1. Thermal Output Ratings <strong>for</strong> HBTV/BTV and HQTV/QTVR Solid-Core <strong>Heat</strong>ing Cables on Insulated Metal Pipes (Nominal)2220A1816Power output (Watts/foot)1412108BCD6E42030 50 75 100 125 150175 200 225 250Pipe maintenance temperature (°F)FM Approved heating cablesCSA Certified heating cables*A 20HQTV1, 2-CT 20QTVR1, 2-CTB 12HQTV1, 2-CT 10QTVR1, 2-CTC 10HBTV1, 2-CT 10BTV1, 2-CTD 8HBTV1, 2-CT 8BTV1, 2-CTE 5HBTV1, 2-CT 5BTV1, 2-CT*Some other standard heating cables have approvals. Contact your Raychem representative or the Raychem Customer Service Center <strong>for</strong> further in<strong>for</strong>mation.Note: Watts/foot x 3.28 = Watts/meter(°F–32) x 5/9 =°C10
Graph 2. Thermal Output Ratings <strong>for</strong> HXTV/XTV Fiber-Wrapped <strong>Heat</strong>ing Cables on Insulated Metal Pipes (Nominal)2220A1816BPower output (Watts/foot)1412108C6D42030 50 75 100 125 150175 200 225 250Pipe maintenance temperature (°F)FM Approved heating cablesCSA Certified heating cables*A 20HXTV1, 2-CT 20XTV1, 2-CT-T2B 15HXTV1-CT 15XTV1-CT-T215HXTV2-CT15XTV2-CT-T3C 10HXTV1, 2-CT 10XTV1, 2-CT-T3D 5HXTV1, 2-CT 5XTV1, 2-CT-T3*Some other standard heating cables have approvals. Contact your Raychem representative or the Raychem Customer Service Center <strong>for</strong> further in<strong>for</strong>mation.11
3. Electrical DesignNote: Ground-fault circuit interrupters (GFCIs)provide leakage current to ground trip level of 4 to6 mA <strong>for</strong> personnel protection. Use of these devicesin the place of GFEPDs may cause nuisancetripping in some circumstances and will invalidatethe system approval <strong>for</strong> FM or CSA.WARNING: Fire hazard.There is a danger of fire from sustainedelectrical arcing if the heating cable isdamaged or improperly installed. Tocomply with Raychem requirements,certifications, and national electricalcodes, and to protect against the risk offire, ground-fault equipment protectionmust be used on each heating cable circuit.Arcing may not be stopped by conventionalcircuit breakers.3.1 IntroductionIn order to comply with requirements of Raychem and the NEC, FM, and CSA, ground-fault equipmentprotection devices (GFEPDs) providing a minimum leakage current to ground trip level of 30 mA mustbe used. GFEPDs are commonly available with current over-trip ratings up to 30 A <strong>for</strong> 120, 208, andsingle-phase 240-Vac grounded systems. See Appendix C <strong>for</strong> Raychem recommended GFEPDs.3.2 Special ConsiderationsIn temperature-sensitive applications, thermostatic control may be necessary. If maximum temperature isa concern, consult the Raychem Customer Service Center <strong>for</strong> design assistance.3.3 Circuit Breaker SelectionTo determine the circuit breaker sizing, you must know the following:• <strong>Heat</strong>er type• Total heater lengthUsing Table 5 on the next page, match your heating cable catalog number at the minimum startuptemperature with your total heating cable length to select a circuit breaker trip rating.Example:In the example in Section 2.0, Step 8, the total heating cable circuit length is 121 feet. As shown in Table 5,the maximum heating cable length allowed <strong>for</strong> 8HBTV-CT powered at 240 volts with a 0°F startuptemperature on a 15-A circuit breaker is 200 feet. Select the 15-A circuit breaker.Circuit breaker trip rating: 15 A12
Table 5. Circuit Breaker SelectionCircuit breaker trip ratings are based on Section 427-4 of the 1996 NEC. It says, in part, “…the rating orsetting of overcurrent devices supplying fixed electric heating equipment <strong>for</strong> pipelines and vessels shallnot be less than 125 percent of the total load of the heaters.” Refer to Appendix B <strong>for</strong> alternative voltageadjustment factors <strong>for</strong> 240-V heaters.Maximum <strong>Heat</strong>ing Cable Length (feet) vs. Circuit Breaker Trip Rating (amps)Startup 120 volt 240 volttemperature 15A 20A 30A 40A 50A 15A 20A 30A 40A 50A5HBTV-CT, 5BTV-CT50°F (10°C) 230 270 270 270 * 460 540 540 540 *0°F (–17.78°C) 140 185 270 270 * 280 375 540 540 *–20°F (–28.89°C) 120 160 245 270 * 245 325 490 540 *–40°F (–40°C) 105 145 215 270 * 215 290 435 540 *8HBTV-CT, 8BTV-CT50°F (10°C) 150 200 210 210 * 300 400 420 420 *0°F (–17.78°C) 100 130 200 210 * 200 265 400 420 *–20°F (–28.89°C) 85 115 175 210 * 175 235 350 420 *–40°F (–40°C) 75 105 155 210 * 155 210 315 420 *10HBTV-CT, 10BTV-CT50°F (10°C) 120 160 180 180 * 240 320 360 360 *0°F (–17.78°C) 75 105 155 180 * 155 210 315 360 *–20°F (–28.89°C) 65 90 135 180 * 135 185 275 360 *–40°F (–40°C) 60 80 120 165 * 120 165 245 330 *12HQTV-CT, 10QTVR-CT50°F (10°C) 100 130 195 195 * 200 265 390 390 *0°F (–17.78°C) 80 105 160 195 * 160 210 320 390 *–20°F (–28.89°C) 70 95 145 195 * 145 195 295 390 *–40°F (–40°C) 65 90 135 180 * 135 180 275 365 *20HQTV-CT, 20QTVR-CT50°F (10°C) 60 80 120 160 195 120 160 240 320 3900°F (–17.78°C) 45 60 95 125 160 95 125 190 255 320–20°F (–28.89°C) 40 55 85 115 145 85 115 175 235 295–40°F (–40°C) 40 55 80 110 135 80 110 165 220 275* These products cannot be used with a 50 A circuit breaker, due to possible bus wire overheating,which can damage the product.13
Table 5. Circuit Breaker Selection (continued)Maximum <strong>Heat</strong>ing Cable Length (feet) vs. Circuit Breaker Trip Rating (amps)Startup120 volt 240 volttemperature 15A 20A 30A 40A 50A 15A 20A 30A 40A 50A5HXTV-CT, 5XTV-CT50°F (10°C) 180 240 260 380 380 360 480 720 765 7650°F (–17.78°C) 155 210 315 380 380 315 420 630 765 765–20°F (–28.89°C) 150 200 300 380 380 300 400 600 765 765–40°F (–40°C) 145 190 285 380 380 285 380 570 765 76510HXTV-CT, 10XTV-CT50°F (10°C) 110 145 220 270 270 220 295 440 540 5400°F (–17.78°C) 95 130 195 260 270 195 260 385 515 540–20°F (–28.89°C) 90 120 185 245 270 185 245 370 490 540–40°F (–40°C) 85 110 175 230 270 175 230 355 465 54015HXTV-CT, 15XTV-CT50°F (10°C) 75 100 150 200 220 150 200 300 400 4400°F (–17.78°C) 65 85 130 175 220 130 175 265 350 440–20°F (–28.89°C) 60 80 125 165 210 125 165 250 335 420–40°F (–40°C) 55 75 120 155 200 120 155 235 320 40020HXTV-CT, 20XTV-CT50°F (10°C) 60 120 120 160 190 115 155 230 305 3800°F (–17.78°C) 55 70 110 145 185 105 140 210 275 345–20°F (–28.89°C) 50 70 105 140 170 100 130 200 260 330–40°F (–40°C) 45 70 100 135 165 95 120 190 245 325PowerLine 1Line 2Line 3Line 1 + Line 2 + Line 3 ≤ Maximum circuit length14
4. Components and Electrical Connections4.1 Power Connections, Splices, Tees, and End SealsAll power connections, splices, tees, and end seals in a <strong>Division</strong> 1 location must use the HAK-C-100connection kit, along with a <strong>Division</strong> 1 Nationally Recognized Testing Lab (NRTL) approved junction box,which must be ordered separately.Component matrixAdditional materials requiredNumber of Number of holes Junction boxConnection HAK-C-100 required on the catalog Mounting Pipetype kits required junction box number brackets strapsPower 1 2 HAK-JB2 1 1Splice 2 2 HAK-JB2 1 1Tee 3 3 HAK-JB3 1 1End seal 1 1 HAK-JB2 1 1HAK-JB2 (shown) and HAK-JB3 Junction Boxes.Two .25" dia. mounting holes4.81"4.25"insidedia.4.75"5.50"mountingC L6.13" O.A.2.81"5.23"O.A. (ref.)M100#2 66/6g(150 metric)box/cover threads3.5"dia. openingSealing gasket(standard)1.06"1.94"3.19"3.88".31" typ. 1.75"(2) 3/4-14 NPTconduit hubsNote:• HAK-JB2 and HAK-JB3 junction boxes include an approved hole plug. Kit connections are 3/4" NPT.• Any NRTL listed junction box suitable <strong>for</strong> a hazardous area may be used. However, some junctionboxes may not be compatible with the Raychem universal mounting bracket.15
4.2 Core SealingThere are two approved methods <strong>for</strong> core sealing: cold core sealing and heat-shrink core sealing. TheHAK-C-100 kit includes components <strong>for</strong> each core sealing method. Raychem recommends the cold coresealing method <strong>for</strong> easiest installation. Sections 5.5 and 5.6 describe the kit contents and installation <strong>for</strong>this method. For those customers that want to use the heat-shrink method, the kit contents and installationmethod are described in Appendix D.4.3 Attachment TapesGT-66 Glass Installation Tape• For general use on pipes other than stainless steel• 1/2" x 66' roll• Temperature class: 266°F (130°C)• Strap at 1-foot intervals• Minimum application temperature: 40°F (4°C)GS-54 Glass Installation Tape• For use on stainless steel pipes• 1/2" x 54' roll• Temperature class: 356°F (180°C)• Strap at 1-foot intervals• Minimum application temperature: –40°F (–40°C)AT-180 Aluminum Tape• For use on pipes other than stainless steel• 2 1/2" x 180' roll• Temperature class: 300°F (150°C)• Minimum application temperature: 32°F (0°C)Glass tapeacross heating cableAluminum tapeover heating cable1 FootTape RequirementsRolls needed per 100 feet of cableTape Pipe diameter (IPS)type 1/2" 1" 2" 3" 4" 6" 8"GT-66 0.6 1.2 4 4 6 8 10GS-54 0.6 1.4 4 6 6 10 12AT-180 Use 1 foot of tape per foot of pipe.4.4 ETL Electric Traced LabelsFor use on the outside of thermal insulationweather barrier to indicate presence of electricheat-tracing circuit.ELECTRICTRACEDR16
F MA PROVEDRLISTED3 5SRLISTED3 5SLR 34 56®F MA PROVED®LR 34 564.5 ThermostatsAMC-1H Ambient sensing thermostat <strong>for</strong> hazardous locationsApprovals<strong>Hazardous</strong> locationsClass I, <strong>Division</strong>s 1 and 2, Groups B, C, DClass II, <strong>Division</strong>s 1 and 2, Groups E, F, GClass IIIEnclosure NEMA 4, 7, 9Lacquer-coated cast aluminum housingStainless steel hardwareSensor typeFluid-filled (silicone) bulb and capillarySensor material300 series stainless steelConnectionScrew terminals accept #10–#14 AWGwire through 3/4" NPT conduit hub.Range15°F to 140°F (–9°C to 60°C)Sensor exposure limits–40°F to 160°F (–40°C to 71°C)Housing exposure limits–40°F to 160°F (–40°C to 71°C)SwitchSPDTElectrical rating22 A at 125/250/480 VacAccuracy±6°F (±3.3°C)Deadband3°F to 9°F (1.7°C to 5°C) above actuation temp.Set point repeatability±3°F (±1.7°C)®RListed(S E NOTE 1)EXPLOSION PRROFENCLOSURETHERMOSTAT FORHAZARDOUS LOCATIONSCLASS I, GROUPS B,C,DCLASS I, GROUPS E,F,GCAUTION:RChemelexAMC-1HMFG BY BARKSDALE CONTROLS FORLINE-SENSING THERMOSTATRaychem Corporation Menlo Park, CA 94025- 164F MAPPROVEDCLASS IIW50-7S-LS is <strong>for</strong> use with RMI and Auto-Trace, BTV, QTVR, XTV & KTVheating cables, <strong>for</strong> details see Chemelex Drawings No. 905419-AK EP COVER TIGHT WHILE CIRCUITS ARE LIVE.DISCONNECT DUPPLY CIRCUITS BEFORE OPENING.ALL CONDUITS ENTERING OR LEAVING ENCLOSURE MUST BESEALED WITHIN 18 INCHES OF ENCLOSURE WITH LISTEDSEAL O F FITTINGS. ATTENTION: GARDER LE COUVERCLEBIEN FERM´E LORSQUE LES CIRCUITS SONG SOUSTENSION, COUPER LE CIRCUIT AVANTD'ENLEVER LE COUVERCLE.TEMP. RANGE: 15°F TO 140°F(-9°C TO 60°C)NEMA 4, 7, 9 - STAINLE SST EL CAPILLARYEXPLOSION PROOFENCLOSURETHERMOSTAT FORHAZARDOUS LOCATIONSCLASS I, GOURPS B,C,DCLASS I, GROUPS E,F,GE507S-LS Line-sensing thermostat <strong>for</strong> hazardous locationsApprovals<strong>Hazardous</strong> locationsClass I, <strong>Division</strong>s 1 and 2, Groups B, C, DClass II, <strong>Division</strong>s 1 and 2, Groups E, F, GClass IIIEnclosure NEMA 4, 7, 9Lacquer-coated cast aluminum housingStainless steel hardwareSensor typeFluid-filled (silicone) bulb and 9-foot capillarySensor material300 series stainless steelConnectionScrew terminals accept #10–#14 AWGwire through 3/4" NPT conduit hub.Range25°F to 325°F (–4°C to 163°C)Sensor exposure limits–40°F to 420°F (–40°C to 215°C)Housing exposure limits–40°F to 160°F (–40°C to 71°C)SwitchSPDTElectrical rating22 A at 125/250/480 VacAccuracy±6°F (±3.3°C)Deadband3°F to 9°F (1.7°C to 5°C) above actuation temp.Set point repeatability±3°F (±1.7°C)®RListed(S E NOTE 1)EXPLOSION PRROFENCLOSURETHERMOSTAT FORHAZARDOUS LOCATIONSCLASS I, GROUPS B,C,DCAUTION:MFG BY BARKSDALE CONTROLS FORRChemelexE507S-LSLINE-SENSING THERMOSTATRaychem Corporation Menlo Park, CA 94025- 164F MAPPROVEDCLASS I, GROUPS E,F,GCLASS I IW50-7S-LS is <strong>for</strong> use with RMI and Auto-Trace, BTV, QTVR, XTV & KTVheating cables, <strong>for</strong> details see Chemelex Drawings No. 905419-AK EP COVER TIGHT WHILE CIRCUITS ARE LIVE.DISCONNECT DUPPLY CIRCUITS BEFORE OPENING.ALL CONDUITS ENTERING OR LEAVING ENCLOSURE MUST BESEALED WITHIN 18 INCHES OF ENCLOSURE WITH LISTEDSEAL O F FITTINGS. ATTENTION: GARDER LE COUVERCLEBIEN FERM´E LORSQUE LES CIRCUITS SONG SOUSTENSION, COUPER LE CIRCUIT AVANTD'ENLEVER LE COUVERCLE.TEMP. RANGE: 15°F TO 140°F(-9°C TO 60°C)NEMA 4, 7, 9 - STAINLE SST EL CAPILLARYEXPLOSION PROOFENCLOSURETHERMOSTAT FORHAZARDOUS LOCATIONSCLASS I, GOURPS B,C,DCLASS I, GROUPS E,F,G17
F MA PROVED(S E NOTE 1)RLISTED3 5S®LR 34 56E507S-2LS Line-sensing thermostat <strong>for</strong> hazardous locationsApprovals<strong>Hazardous</strong> locationsClass I, <strong>Division</strong>s 1 and 2, Groups B, C, DClass II, <strong>Division</strong>s 1 and 2, Groups E, F, GClass IIIEnclosure NEMA 4, 7, 9Lacquer-coated cast aluminum housingStainless steel hardwareSensor typeFluid-filled (silicone) bulb and 9-foot capillarySensor material300 series stainless steelConnectionScrew terminals accept #10–#14 AWGwire through 3/4" NPT conduit hub.Range25°F to 325°F (–4°C to 163°C)Sensor exposure limits–40°F to 420°F (–40°C to 215°C)Housing exposure limits–40°F to 160°F (–40°C to 71°C)SwitchDPSTElectrical rating22 A at 120/240/277 VacRelay coil120 Vac, 4 VAAccuracy±6°F (±3.3°C)Deadband3°F to 9°F (1.7°C to 5°C) above actuation temp.Set point repeatability±3°F (±1.7°C)®RListedEXPLOSION P ROFENCLOSURETHERMOSTAT FORHAZARDOUS LOCATIONSCLA S I, GROUPS B,C,DCLA S II, GROUPS E,F,GCAUTION:F MAPPROVEDMFG BY BARKSDALE CONTROLS FORRChemelexE507S-2LSLINE-SENSING THERMOSTATRaychem Corporation Menlo Park, CA 94025- 164W50-7S-LS is <strong>for</strong> use with RMI and Auto-Trace, BTV, QTVR, XTV & KTVheating cables, <strong>for</strong> details s e Chemelex Drawings No. 905419-AK EP COVER TIGHT WHILE CIRCUITS ARE LIVE.DISCO NECT DU PLY CIRCUITS BEFORE OPENING.ALL CONDUITS ENTERING OR LEAVING ENCLOSURE MUST BESEALED WITHIN 18 INCHES OF ENCLOSURE WITH LISTEDSEAL O F FI TINGS. A TENTION: GARDER LE COUVERCLEBIEN FERM´E LORSQUE LES CIRCUITS SONG SOUSTENSION, COUPER LE CIRCUIT AVANTD'ENLEVER LE COUVERCLE.TEMP. RANGE: 25°F TO 325°F(-4°C TO 163°C)NEMA 4, 7, 9 - STAINLE SST EL CAPILLARYEXPLOSION PR OFENCLOSURETHERMOSTAT FORHAZARDOUS LOCATIONSCLA S I, GOURPS B,C,DCLA S I, GROUPS E,F,GCLA S I18
5. InstallationWARNING: Fire and shock hazard.• Do not install damaged cable.• The black heating cable core and fibers areconductive and can short. They must beproperly insulated and kept dry.• Components and cable ends must be kept drybe<strong>for</strong>e and during installation.5.1 Approvals and WarrantyFor the FM Approval or CSA Certification and the Raychem warranty to apply, installers must follow theinstructions included in this guide. Installers must comply with all governing code requirements.5.2 <strong>Heat</strong>ing Cable Installation Requirements5.2.1 <strong>Heat</strong>ing Cable Storage• Store the heating cable in a clean, dry place.• Temperature range: –40 (40°C) to 140°F (60°C).• Protect the heating cable from mechanical damage.5.2.2 Preinstallation ChecksCheck materials received:• Review the heating cable design and compare the list of materials with the catalog numbers of heatingcables and electrical components received to confirm that proper materials are on-site. The heatingcable type is printed on its jacket.• Inspect heating cable and components <strong>for</strong> in-transit damage. Continuity and insulation resistance(megohmmeter) testing of each reel is recommended. See Section 5.10 <strong>for</strong> a test method.Check piping to be traced:• Make sure all mechanical pipe testing (<strong>for</strong> example, pipe pressure test) is complete.• Walk the system and plan the routing of the cable on the pipe.5.3 <strong>Heat</strong>ing Cable Installation5.3.1 <strong>Heat</strong>ing Cable Handling<strong>Heat</strong>ing cable handling tips:• Paint and pipe coating must be dry to the touch be<strong>for</strong>e heating cable installation.• When pulling the heating cable, avoid:- sharp edges- excessive pulling <strong>for</strong>ce- kinking and crushing- walking on the cable or running over it with equipment<strong>Heat</strong>ing cable pulling tips:• Use a reel holder that pays out smoothly with little tension.• Keep heating cable strung loosely but close to the pipe being traced, to avoid interference withsupports and equipment.• Leave a three-foot heating cable service loop at all power connection, splice, tee, and end seallocations.• Add additional heating cable to trace the fittings and supports, or <strong>for</strong> spiraling as required by the designspecifications. Consult Section 2.0, Thermal Design, <strong>for</strong> recommended allowances.• Protect heating cable from moisture, contamination, and mechanical damage.19
<strong>Heat</strong>ing cable minimum bend radius:To prevent conductor damage and possible shorting, heating cable should not be bent to a radius of lessthan 1 inch in the in-plane direction or less than 1/2 inch in the out-of-plane direction.In-plane minimumbend radius1/2"Out-of-plane minimumbend radius1"5.3.2 <strong>Heat</strong>ing Cable PositioningThe heating cable may be installed straight, spiraled, or in multiple runs as required by the designspecification or Raychem product literature.Install the heating cable on the lower section of the pipe (as shown) to protect it from damage, unlessusing the spiraling method described in Section 5.3.6.Install heating cable here5.3.3 <strong>Heat</strong>ing Cable Attachment RecommendationsGlass tapeacross heating cableAluminum tapeover heating cable1 Foot20
5.3.4 Cutting the <strong>Heat</strong>ing CableCut the heating cable after it is attached to the pipe. Be<strong>for</strong>e cutting it, confirm the tracing allowance perSection 2.3, Step 8.<strong>Heat</strong>ing cables can be cut to length without affecting the heat output per foot.5.3.5 Typical Installation DetailsWrap pipe fittings and pipe supports as shown in the following installation details to properly compensate<strong>for</strong> higher heat-loss rates at heat sinks and to allow easy mechanical maintenance.Consult the design specification or Raychem product literature <strong>for</strong> the tracing requirements <strong>for</strong> fittingsand supports.5.3.6 Spiraling MethodGlass tape(typical)Pipe length<strong>Heat</strong>ingcable<strong>Heat</strong>ingcable looplength.Step 1Wrap loopsin oppositedirection.Step 2Tape afterspiralingheatingcable onpipe.Step 3Apply glass tapebe<strong>for</strong>e spiralingheating cableon pipe.<strong>Heat</strong>ing cable loop length = Pipe length x Spiral factor(see Section 2, Thermal Design)Step 1. Make the starting heating cable loop as shown.Step 2. Grasp heating cable loop and wind around pipe.Step 3. Space evenly and attach to pipe.21
5.3.7 Valve (typical)Glass tape(typical)<strong>Heat</strong>ing cableThe drawing shows the general installation method. The heating cable configuration will vary <strong>for</strong> differentvalve shapes and pipe sizes.Refer to Section 5.3.1, <strong>Heat</strong>ing Cable Handling, <strong>for</strong> heating cable minimum bend radius.Refer to Table 2 in Section 2, Thermal Design, <strong>for</strong> amount of heating cable to use per valve.22
5.3.8 Elbow<strong>Heat</strong>ing cableGlass tape(typical)For pipe diameters 2"and larger, the heatingcable should be installedon the outside (long)radius of the elbow.5.3.9 FlangeGlass tape(typical)<strong>Heat</strong>ing cableLoop length istwice the diameterof the pipe.Note: Refer to page 20 <strong>for</strong> heating-cable minimum bend radius.23
5.3.10 Pipe Bar Hanger;;Bar hanger;;;;;;;;;;<strong>Heat</strong>ing cableBar hanger<strong>Heat</strong>ing cableGlass tape(typical)Do not clamp heatingcable with support.5.3.11 Pipe Support ShoeSupportshoe<strong>Heat</strong>ing cableGlass tape(typical);;Glass tape(typical)<strong>Heat</strong>ing cableNote: Refer to page 20 <strong>for</strong> heating-cable minimum bend radius.24
WARNING: Approvals and per<strong>for</strong>mance arebased on the use of Raychem-specifiedparts only. Do not substitute parts or usevinyl electrical tape.5.4 Component Installation RequirementsThe HAK-C-100 connection kit must be used in order to meet code, approval agency, and warrantyrequirements <strong>for</strong> <strong>Division</strong> 1 locations. Carefully follow all instructions and observe the following:• Use only Raychem <strong>Division</strong> 1 heating cables and the correct Raychem components, as specifiedin this manual.• Use a ground-fault equipment protection device <strong>for</strong> the circuit (see Section 5.9.4, GFEPD WiringSchematics).• Use the Installation Record, Appendix F, to ensure that the installation and checkout have beencompleted correctly.• To ensure explosionproof connections, all fittings must be tight. Use recommended tools.• Ketones and amines can dissolve the corrugated protective tubing. Protect the tubing from exposure tothese chemicals wherever they may be present.• Verify that the ambient temperature is above 32°F (0°C) be<strong>for</strong>e pouring seals.25
5.5 HAK-C-100 Connection Kit DescriptionThis kit includes approved components required <strong>for</strong> cold core sealing, to seal the entry of the Raychemheating cables into an approved junction box <strong>for</strong> power connections, splices, tees, and end seals.Junction box, mounting bracket, and pipe strap are ordered separately.An optional heat-shrink core sealer kit is provided <strong>for</strong> those customers wanting this option (see Appendix D).HAK-C-100 Kit contents:A 1 Sealing fitting and nippleB 1 UnionC 1 Packing fiberD 1 Sealing compoundE 1 Tubing clampF 1 Compression gland with threaded insertsG 1 Compression glandH 4 grommets (one each B, C, E, R)I 1 Ring terminalJ 2 Butt connectorsK 1 Corrugated tubingL 2 Cold leadsM 1 Terminal blockN 1 Core sealerO 1 Yellow/green heat-shrink tubing1 <strong>Heat</strong>-shrink core sealing kitAdditional materials that may be requiredand are available from Raychem:• Pipe strap, per pipe size• Junction box• Universal mounting bracket (UMB)• Tape: GT-66, GS-54Tools required:• Flatblade screwdriver• Utility knife• Needle nose pliers• Wire cutters/strippers• Pipe wrench• Ruler• Small volume of water• Crimp tool - Burndy MR8-9Q• Crimp tool - Panduit CT-100Junction box,Universal MountingBracket, and pipe strap(order separately)ONAMBLKCJIHDGEF26
5.6 HAK-C-100 Connection Kit Installation1. Fasten universal mounting bracket (UMB) on pipe, using appropriate size stainless steel pipe strap,or fabricate and locate suitable mounting plate <strong>for</strong> junction box within 24 inches of desiredconnection on pipe.Threaded inserts2. Thread compression gland half with threaded inserts into end of sealing fitting nearest verticalplug. Disassemble union. Thread female half of union onto nipple. Thread nipple into other end ofsealing fitting nearest angled plug.3. Thread male half of union into box entry. Assemble union halves together. Mount box on bracket.27
Cut18"WARNING: Correct grommet must be used<strong>for</strong> heating cable being installed orelectrical hazard could result.4. Corrugated tubing is provided. Measure length required to transition from compression gland topipe surface, and cut to length.WARNING: Fire hazard.Do not cut braid or bus wires. Damagedheating cable must be replaced.12"Do NotCut Braid5. Being careful not to damage braid, score around outer heating cable jacket 12 inches from theend that extends out of the junction box. Score from this point to end of heating cable. Removeouter jacket.28
6. Using a small screwdriver as an aid, spread braid at base to expose inner jacket of heating cable.Bend heating cable at base of braid while pushing it through and working insulated heating cable out.Pull heating cable completely out of braid. Twist braid to <strong>for</strong>m a tight pigtail. Slip yellow/green heatshrinktube over braid to prevent stray braid wires from touching bus wires. Make sure yellow/greenheat-shrink tube is located next to ring terminal to prevent interference with the sealing compound.Crimp ring terminal to braid pigtail using a Panduit CT-100 crimp tool. Trim braid if needed.4"7. Score around inner jacket 4 inches from end. Score from this point to end of heating cable. Flexalong score lines and remove inner jacket to expose polymer core material or fibers.3/4"8. For fiber heating cables, cut and remove all fiber strands. Score and remove center spacer. Cutheating cable conductors to 3/4 inch. Clean bus wires.29
1/4"3/4"9. For solid-core heating cables, notch core with diagonal cutters. Twist back and peel bus wire fromcore. Score core between bus wires at base jacket. Bend and snap core. Peel core free from bus wire.Cut heating cable conductors to 3/4 inch. Clean bus wires.10. Slide corrugated protective tubing, tubing clamp, and other half of compression gland (withoutinserts) onto heating cable. Select correct grommet (see tables on the next page) and slide ontoheating cable. Slide heating cable through all components and out top of junction box (seeillustration). Allow 18 inches of heating cable to extend beyond box.30
<strong>Heat</strong>ing Cable <strong>for</strong> FM Only5HBTV1, 2-CT8HBTV1, 2-CT10HBTV1, 2-CT12HQTV1, 2-CT20HQTV1, 2-CT5HXTV1, 2-CT, 10HXTV1, 2-CT, 15HXTV1, 2-CT, 20HXTV1, 2-CT*GrommetBCECER<strong>Heat</strong>ing Cable <strong>for</strong> CSA OnlyLBTV-CT5BTV1, 2-CT8BTV1, 2-CT10BTV1, 2-CT10QTVR1, 2-CT20QTVR1, 2-CTAll XTVKBCECER*8HXTV-CT and 18HXTV-CT are obsolete products. Call Raychem to determine “N” grommetavailability <strong>for</strong> these products.11. Following the test method outlined in Section 5.10.2 (and illustrated in Figure 1 of that section),per<strong>for</strong>m an insulation resistance test on the heating cable. Record these readings in the “InsulationResistance Testing” section of the FM Required <strong>Division</strong> 1 Installation Record, which is Appendix Fof this manual.1/4"1/2"12. Slide a cold lead into each leg of the core sealer and out the other end. Strip cold lead ends todimension shown.13. Crimp cold leads to heating cable bus wires, using a Burndy MR8-9Q crimp tool. Use large crimpopening <strong>for</strong> the cold lead and smaller opening <strong>for</strong> the bus wire. Slide the core sealer over crimpedconnectors until it bottoms out on heating cable.31
14. Fasten terminal to ground lug in junction box. Ground wire <strong>for</strong> heating cable braid must beconnected to junction box ground lug.Power ConnectionLeads to powerdistributionpanelGround wire<strong>Heat</strong>ingcableleadsBraidEnd SealSplice<strong>Heat</strong>ingcableleadsBraid<strong>Heat</strong>ingcableleadsBraid<strong>Heat</strong>ingcableleadsBraid<strong>Heat</strong>ingcableleadsBraidTee<strong>Heat</strong>ingcableBraid<strong>Heat</strong>ingcableBraid15. Make connections to terminal block. Do not connect ground wire or braid to terminal block.(Terminal block is installed “floating” in the junction box.)32
Center16. Remove large plug from sealing fitting. Pull heating cable back through component hardware,centering end of outer jacket in sealing fitting opening. Be sure no yellow/green tubing extendsinto seal fitting.17. Position grommet in cavity. Install screws in compression gland and tighten firmly. Be careful notto change position of heating cable in sealing fitting. Screw corrugated tubing onto end ofcompression gland. Install tubing clamp.33
Packing fiber18. Using packing fiber, pack around heating cable, <strong>for</strong>ming a dam to prevent sealing compoundfrom leaking.Note: Make sure the insulation resistance testing iscompleted prior to pouring seals. Refer to Step 11and Section 5.10.2, Figure 1.19. Mix sealing compound according to manufacturer’s recommendation on container. Sealing mixtureshould be a pourable paste. Pour into sealing fitting. Install fitting plug. Stow wires and terminalblock in junction box and install cover.34
5.7 Thermal Insulation Requirements5.7.1 Preinsulation ChecksVisually inspect the heating cable and components <strong>for</strong> correct installation and damage. Refer to Section 6.2,Troubleshooting, <strong>for</strong> a summary of symptoms, possible causes, and recommended corrections.5.7.2 Insulation Installation HintsCorrect temperature maintenance requires dry thermal insulation, properly installed.Check insulation type and thickness against the design specification, or consult Raychem productliterature <strong>for</strong> insulation data.Check that all pipework—including fittings, wall penetrations, and other areas—has been completelyinsulated.Insulate as soon as possible after tracing to prevent heating cable damage.5.7.3 MarkingMark the location of heating cable components on outside of insulation.Install “Electric Traced” labels along piping at 10-foot (3-meter) intervals on alternate sides.5.8 Thermostat ControlsFollow the installation instructions supplied with the thermostat. Use the proper wiring diagram <strong>for</strong> theheating cable layout and control method desired. Wire the thermostat using the normally closed (NC)terminals so that the contacts close with falling temperature.35
5.9 Power Supply and Electrical Protection Requirements5.9.1 Voltage RatingMake sure that the heating cable voltage rating is suitable <strong>for</strong> the available service voltage.5.9.2 Electrical LoadingSize overcurrent protective devices according to the design specification or applicable Raychem productliterature. If devices other than those specifically identified are used, consult the factory <strong>for</strong> the appropriatesizing in<strong>for</strong>mation.WARNING: Fire hazard.There is a danger of fire from sustainedelectrical arcing if the heating cable isdamaged or improperly installed. Tocomply with Raychem requirements,certifications, and national electricalcodes, and to protect against the risk offire, ground-fault equipment protectionmust be used on each heating cable circuit.Arcing may not be stopped by conventionalcircuit breakers.5.9.3 Ground-Fault ProtectionUse ground-fault equipment protection devices with a 30-mA trip level.5.9.4 GFEPD Wiring Schematics120 VacSchematicØNGFEPD(1 Pole, 120 V)Square D #QOBEPDCutler Hammer #QBGFEPBraidRaychemheating cableGFEPD(2 Pole, 208 V)Square D #QOBEPDCutler Hammer #QBGFEP208/240 VacSchematicØØNBraidRaychemheating cableGFEPD(1 Pole, 277 V)Raychem/Square DGFPD EHBEPD277 VacSchematicØNBraidRaychemheating cable36
5.10 <strong>Heat</strong>ing Cable Testing5.10.1 Insulation Resistance TestingInsulation resistance testing with a megohmmeter should be conducted be<strong>for</strong>e installation, be<strong>for</strong>e thermalinsulation, after insulation, be<strong>for</strong>e powering the circuits, and as part of the periodic system inspectionroutine. A 2500 Vdc tester should be used.First measure the resistance between the heating cable bus wires and the braid (Test A), then measure theresistance between the braid and the metal pipe (Test B).Insulation resistance testing is a reliable indicator of the electrical integrity of the system when all theinstallation instructions are properly followed.WARNING: Fire hazard.Megohmmeter test can produce sparks. Besure there are no flammable vapors in thearea be<strong>for</strong>e per<strong>for</strong>ming this test.5.10.2 Test MethodConnect the test as shown below:+ –12"Test ATest BFigure 1. Insulation Resistance TestImportant: Be sure to isolate the braid from ground be<strong>for</strong>e per<strong>for</strong>ming Test B. To per<strong>for</strong>m Test B aftersealing compound is poured into sealing fitting (as braid may contact sealing fitting or junction box),see Figure 2, Postinsulation Resistance Test, on the next page.Tests A and B should each be per<strong>for</strong>med at three voltages—500, 1000, and 2500 Vdc. If there is variationbetween these readings, refer to Section 6.2, Troubleshooting. Record the A and B insulation resistancevalues at 2500 Vdc in Appendix F.37
Test ATest B+ –Figure 2 . Postinsulation Resistance TestDisconnect braid and bus wires from terminals, disconnect union and pull cable out of the junction box,isolate the assembly from ground and conduit, and test as shown.When reinstalling assembly in the junction box, be sure core sealer is fully installed over the heating cable.5.10.3 Insulation Resistance CriteriaA clean, dry, properly installed circuit should measure thousands of megohms, regardless of heatingcable length or measuring voltage (0–2500 Vdc). The following criteria are provided to assist indetermining acceptability of an installation where optimum conditions may not apply.• All insulation resistance values should be greater than or equal to 1000 megohms.• Insulation resistance values from Test A, <strong>for</strong> any particular circuit, should not vary more than 25% as afunction of measuring voltage.• Insulation resistance values from Test B, <strong>for</strong> any particular circuit, should not vary more than 25% as afunction of measuring voltage.If any of the above conditions is not met, consult Section 6.2, Troubleshooting, <strong>for</strong> further details.38
6. Operation, Maintenance, and RepairWARNING: Damaged heating cable orcomponents can cause electrical shock,arcing, and fire. Do not attempt to repair orenergize damaged cable. Remove damagedsections at once and replace them with anew length using the appropriate Raychemsplice kit.6.1 Operation and Inspection6.1.1 <strong>Heat</strong>ing Cable OperationTemperature exposure must not exceed that specified in Raychem product literature. Exceeding thoselimitations will shorten product service life.Pipe insulation must be complete and dry to maintain the correct temperature.6.1.2 Periodic InspectionVisual inspection: <strong>Heat</strong>ing cable and pipe insulation should be checked periodically to make sure that nophysical damage has occurred.Insulation resistance testing: The system should be tested once a year in accordance with the instructions<strong>for</strong> the Postinsulation Resistance Test in Section 5.10.2, Figure 2.Functional testing of electrical protection and temperature control systems should be done as necessary.The Inspection Record (Appendix G) should be filled out during maintenance of each circuit in the system.6.1.3 Piping System Repair and MaintenanceDuring pipe repair work, disconnect heating cable circuits and protect heating cables from mechanical orthermal damage.Check heating cable installation after pipe repairs and restore thermal insulation following therecommendations in Section 5.7. Ensure that electrical protection devices are working properly.6.1.4 <strong>Heat</strong>ing Cable DamageDo not repair damaged heating cable. Remove entire damaged section and splice in a new length, usingRaychem HAK-C-100 kits.Refer to Section 6.2, Troubleshooting, <strong>for</strong> a summary of symptoms, possible causes, and recommendedcorrections.39
6.2 TroubleshootingSymptoms Probable Causes CorrectionInsulation resistance is less than expected Nicks or cuts in heating cable, with or without Check all connections in power, splice, tee, and end seal kitsor varies with voltage (500, 1000, 2500 Vdc). moisture present. <strong>for</strong> cuts in heating cable jackets, or <strong>for</strong> improper strippingdistances. Restrip heating cable to remove damaged areas orShort between braid and heating cable coreor braid and pipe.establish proper distances. If heating cable is not yet insulated,visually inspect <strong>for</strong> damage, especially at elbows and flangesand around valves. If system is insulated, disconnect heatingcable section between power kits, splices, etc., and test again toisolate damaged section of cable. Use Raychem DET2200fault locator or other appropriate device to locate fault. Replacedamaged heating cable sections.Meter needle oscillates rapidly or indicates Arcing created by damage to insulation or Same as above.charging and discharging.exposed electrical parts.Insulation resistance increases slowly with time. Moisture present between energized parts. Check all connections in power, splice, tee, and end seal kits <strong>for</strong>signs of moisture. Dry out connections and retest. Be sure allconduit entries are sealed, and that condensate in conduitcannot enter power connection boxes. If no water is present inconnections, isolate sections as described in correction outlinedabove. If heating cable core or bus wires are exposed to largequantities of water, replace heating cable. (Drying the heatingcable is not sufficient, as the power output of the heating cablecan be significantly reduced.)Insulation resistance decreases rapidly during Heavily wetted surfaces between energized parts. Same as above.or after the charging period.Circuit breaker trips. Nick or cut in heating cable or power feed wire Replace damaged cable.with moisture present.Circuit breaker undersized.Reestablish what the current loads are going to be, and resizethe breaker. Do not exceed maximum circuit length <strong>for</strong> heatingcable used. Check to see if existing power wire sizing iscompatible with larger-size breaker.Circuit oversized.Same as above.Start-up at too low a temperature.Same as above.Defective circuit breaker.Replace circuit breaker.Connections and/or splices shorting out. To locate shorting problems, follow these steps:• Visually inspect the power connections, splices, and endseals <strong>for</strong> proper installation; correct as necessary.• Check <strong>for</strong> visual indications of damage around the valves,pump, and any area where there may have been maintenancework.• Look <strong>for</strong> crushed or damaged insulation lagging along thepipe. Replace damaged sections of heating cable. Using amegohmmeter, test per installation instructions.Physical damage to heating cable is causinga direct short.Bus wires connected at the end.Excessive moisture in connection boxesor splices.Same as above.Check and seal junction box to ensure bus wires are securedproperly in terminal block. The heating cable may have beenpermanently damaged by excessive current and may need to bereplaced.Dry out and reseal connections and splices. Usinga megohmmeter, test per installation instructions.40
Symptoms Probable Causes CorrectionPower output appears correct but pipe Insulation is wet. Remove and replace with dry insulation, and secure propertemperatures are below design value.weatherproofing.Insufficient heating cable was used on valves, Splice in additional heating cable but do not go over maximumsupports, and other heat sinks.circuit length.Thermostat was set incorrectly.Reset thermostat.Improper thermal design.Check with the local or factory representative <strong>for</strong> designconditions; modify as recommended.Power output is zero or appears low. Low or no input voltage. Repair electrical supply lines and equipment.Circuit is shorter than the design shows, due Check routing and length of heating cable (use “as builts”).to splices or tees not being connected, or the Connect splices or tees, locate and replace the damaged heatingheating cable having been severed.cables, then recheck the power.Improper connection causing a high-resistance Recrimp with the correct procedure.connection.Control thermostat is wired in normally open Rewire in the normally closed position.position.Pipe is at an elevated temperature.Reduce pipe temperature. Check the pipe temperature. Verify thepower output of heating cable (see note below <strong>for</strong> method).<strong>Heat</strong>ing cable has been exposed to excessivemoisture or chemicals.<strong>Heat</strong>ing cable has been exposed toexcessivetemperatures.Note: The power output is temperature-sensitive and requires the following special procedure to determine its value:1. Check the pipe temperature under the thermal insulation at several locations.2. Power the heating cable and allow it to stabilize <strong>for</strong> 10 minutes, then measure current and voltage at the junction box.Replace damaged heating cable. Check the pipe temperature.Verify the power output of heating cable (see note below <strong>for</strong>method).Same as above.3. Calculate the power (watts/ft) of the heating cable by multiplying the current by the input voltage and dividing by the actual circuit length.Current (amps) x Volts (Vac) = Power (W/ft)Length (feet)4. See the Thermal Output Ratings Graphs on pages 10 and 11 <strong>for</strong> expected power output at measured temperature.41
7. Answers to Frequently Asked QuestionsA. ProductWhat is “new” about Raychem’s hazardous area product offering?• HBTV-CT products are new; we did not offer these lower-power products in the past.• HXTV-CT products are modified and are now identical to our standard XTV-CT product offering withthe exception of print logo. (Note: The HQTV-CT products are unchanged.)• The connection kit has been renamed, HAK-C-100, a heat-shrink connection kit has been added, andgrommets have been changed (no more “N” grommet).• The CID1 design and installation guide has been updated.What is “new” about the HAK-C-100 kit? How is it different from the old HAK-G-FM andHAK-G-CSA kits?The new HAK-C-100 is exactly the same as the old HAK-G-FM kit, with two exceptions:1. We added a heat-shrink connection kit from the HAK-G-CSA kit to the HAK-G-FM kit and basicallyconsolidated the two connection kits into one.2. We changed the grommets to reflect our standard grommet selection, since the new hazardous areaproducts are identical to our standard heating cable products, with the exception of print logo.Why does Raychem have different product names <strong>for</strong> the FM Approved hazardous areaversus the CSA Certified hazardous area product line?The FM requirements are based on IEEE 515 standards; the CSA requirements are based on CSA StandardC22.2-138. IEEE requires manufacturer review and approval of each application because IEEE wants toensure the cables are properly installed in these areas.When will TraceCalc software be updated to include the new hazardous area products?TraceCalc 5-Plus and TraceCalc 5-Quick software now include the new HBTV, HQTV, HXTV products.B. ApplicationWhat is required to get FM approval?• Field in<strong>for</strong>mation required <strong>for</strong> FM must be filled out (see Appendix E) and the in<strong>for</strong>mation approved byRaychem.• The approved FM CID1 heating cable must not exceed the T-rating <strong>for</strong> the area, or the heating cable’smaximum sheath temperature must not exceed 80% (as expressed in °C) of the auto-ignitiontemperature (AIT) <strong>for</strong> the hazardous materials in the area.• Postinstallation, the FM-required CID1 Installation Record (Appendix F) must be completed and sent toRaychem’s Customer Service Center, where it will be kept on file.42
Why is the Field In<strong>for</strong>mation <strong>for</strong>m required?This <strong>for</strong>m is required by FM as part of their approval. It has two purposes:1. It identifies the company and the contact person responsible <strong>for</strong> the hazardous area heat-tracingdesign.2. It identifies either the T-rating <strong>for</strong> the area or the lowest AIT of the hazardous substances in the area. Thisin<strong>for</strong>mation is used by Raychem to verify that the Raychem heating cable meets the area requirements.Note: The customer must identify the T-rating <strong>for</strong> the area. If this in<strong>for</strong>mation is not available, then thelowest AIT <strong>for</strong> the area must be identified. This section must be filled out by the person designing thesystem and/or the person most familiar with the hazardous location. Raychem cannot fill this section inbecause we cannot make any assumptions about the area being designed.What if I don’t know the AIT?If the T-rating is not known, then identifying the lowest AIT in the area should be done by contacting thesafety manager or project expert. Identifying the correct AIT is critical to ensure the safest design, and thisin<strong>for</strong>mation is required be<strong>for</strong>e Raychem can process the order. Raychem cannot make any assumptionsabout the area; there<strong>for</strong>e, this in<strong>for</strong>mation must be obtained from the area expert.What is the difference between the flash point and the AIT?The flash point of a liquid is the minimum temperature at which the liquid gives off sufficient vapor to <strong>for</strong>man ignitable mixture with air near the surface of the liquid or within the test vessel used. “Ignitable mixture”means a mixture that is within the flammable range (between the upper and lower limits), and thus iscapable of propagation of flame away from the source of ignition. The AIT of a substance is the minimumtemperature required to cause self-sustained combustion, independently of a flame or heated element.As an example of the difference between the flash point temperature and the AIT, gasoline is listed in theNFPA Guide to Fire Hazard Properties of Flammable Liquids, Gases and Volatile Solids 1994 Edition ashaving a flash point of –50°F (45.5°C) and an AIT of 880°F (471.1°C). This means that gasoline will <strong>for</strong>mvapors at temperatures above –50°F (45.5°C). These vapors could burn if exposed to a flame. However, onlyif the temperature exceeds 880°F (471.1°C) will those vapors self-ignite (without being exposed to a flame).If the heat tracing goes through a CID1 area but is terminated in an ordinary area, do youneed to use hazardous area components?If both ends of the heating cable are terminated in a CID2 area, then Raychem ordinary area industrialcomponents can be used with the approved CID1 heating cable, subject to acceptance by the authorityhaving approval jurisdiction. This statement is documented in the new CID1 design and installation guidein Section 1.4, page 2.Why would customers want to use the heat-shrink core sealing method (described inAppendix D)?In some climates, such as Alaska’s, customers prefer to use heat-shrink components because they areeasier to install in very cold temperatures when wearing gloves is necessary.Why does Raychem not use the new cold core seal in the new HAK-C-100 connection kit?The new cold core seal is more flexible and there<strong>for</strong>e not as robust as the sealing method designed <strong>for</strong> thehazardous area products.43
What happens if the end user does not fill out the FM-required CID1 Installation Record(Appendix F) after installing the product?The customer will not have an approved FM system. This <strong>for</strong>m must be filled out and returned to theRaychem Customer Service Center to complete the approval process.In North America, we are starting to hear about “Zone” approvals. How do theseapprovals relate to CID1 applications?The NEC declares that cables certified <strong>for</strong> use in CID1 areas may be used in Zone 1 areas, and cablescertified <strong>for</strong> use in CID2 areas may be used in Zone 2 areas. However, cables with Zone 1 or Zone 2approvals are not approved <strong>for</strong> CID1 or CID2 areas, respectively.The reason <strong>for</strong> this difference is that CID1 approvals cover hazardous areas not included in Zone 1 areas,so Zone 1-approved products may not necessarily be tested <strong>for</strong> all CID1 areas.What indicator light solution is available <strong>for</strong> CID1 areas?The E-100-L is not approved <strong>for</strong> CID1 areas, and currently Raychem does not offer an end-of-lineindicator light <strong>for</strong> these areas. However, as we upgrade our CID1 components in the coming months, wewill add this capability to those kits.C. InstallationIn the CID1 design guide, there is a new section describing the minimum bend radius.Why is the minimum bend radius important?It is important not to bend the heating cables less than one inch in the in-plane direction or less than halfan inch in the out-of-plane direction, to prevent bus wire damage.Which products can be used on plastic pipes?HBTV is the product that should be used on all types of standard plastic pipes. Typically, the maximumexposure temperature <strong>for</strong> PVC pipe (schedule 40) is 150°F. In some cases, plastic pipes can withstandhigher temperatures, which would sometimes allow HQTV to be used. TraceCalc can be used to see if aheating cable is appropriate to be used on a particular pipe.D. Operation and MaintenanceWhat is the warranty?The standard Raychem Industrial <strong>Heat</strong> <strong>Tracing</strong> warranty. An extended warranty is offered on these productsas well. A warranty package can be ordered, free of charge, through the Raychem Customer Service Center.How can I get more in<strong>for</strong>mation?For answers to questions not listed here, please contact the Raychem Customer Service Center at(800) 361-4525 in the U.S. and (800) 988-5171 in Canada.E. LogisticsOur policy on stocking these products has changed. These products can be stocked by our channelpartners; however, they then must accept responsibility <strong>for</strong> getting the Field In<strong>for</strong>mation and theInspection Records completed and returned to the Raychem Customer Service Center. The rep stockingthe product must verify the design requirements.44
Appendix A: System ApprovalsFM ApprovalRaychem HBTV-CT, HQTV-CT and HXTV-CT heating cables have the following approvals when used withan HAK-C-100 connection kit, and an approved junction box.Factory MutualClass I, <strong>Division</strong> 1, Groups B, C, and DClass II, <strong>Division</strong> 1, Groups E, F, and GClass III, <strong>Division</strong> 1F MAPPROVEDNote:HXTV-CT heating cables are FM-approved <strong>for</strong> use in Class II and Class III areas only if the individualsystem is specially engineered by Raychem.CSA CertificationRaychem BTV-CT, QTVR-CT and XTV-CT heating cables are CSA Certified when used with an HAK-C-100connection kit and an approved junction box.Class I, <strong>Division</strong> 1, Groups B, C, and DClass II, <strong>Division</strong> 1, Groups E, F, and GClass III, <strong>Division</strong> 1®45
Appendix B: Alternate Voltage Adjustment FactorsRaychem heating cables can be used with nominal variations (± 5%) in service voltages without causingsignificant changes in power output.The table below shows the effect of alternate voltages on 240 V Raychem heating cables as compared tothe nominal power output rating at 240 V. Note: When using circuit length adjustment factors that aregreater than 1.00, do not exceed the maximum circuit lengths shown below.Thermal Circuit length Maximum<strong>Heat</strong>ing output adjustment heating cablecable adjust factor factor circuit lengthOperating voltage: 208 Volts5HBTV2-CT, 5BTV2-CT 0.85 0.99 500 feet8HBTV2-CT, 8BTV2-CT 0.89 0.93 385 feet10HBTV2-CT, 10BTV2-CT 0.89 0.93 330 feet12HQTV2-CT, 10QTVR2-CT 0.85 0.98 365 feet20HQTV2-CT, 20QTVR2-CT 0.90 0.92 350 feet5HXTV2-CT, 5XTV2-CT-T3 0.84 1.00 720 feet10HXTV2-CT, 10XTV2-CT-T3 0.83 0.98 510 feet15HXTV2-CT, 15XTV2-CT-T3 0.85 0.97 415 feet20HXTV2-CT, 20XTV2-CT-T2 0.88 0.97 350 feetOperating voltage: 277 Volts5HBTV2-CT, 5BTV2-CT 1.12 1.07 585 feet8HBTV2-CT, 8BTV2-CT 1.08 1.08 465 feet10HBTV2-CT, 10BTV2-CT 1.08 1.05 395 feet12HQTV2-CT, 10QTVR2-CT 1.18 1.06 410 feet20HQTV2-CT, 20QTVR2-CT 1.07 1.06 430 feet5HXTV2-CT, 5XTV2-CT-T3 1.18 1.03 750 feet10HXTV2-CT, 10XTV2-CT-T3 1.17 1.06 575 feet15HXTV2-CT, 15XTV2-CT-T3 1.13 1.08 475 feet20HXTV2-CT, 20XTV2-CT-T2 1.10 1.11 440 feetExample:Adjust the power output of 8HBTV2-CT <strong>for</strong> a service voltage of 208 volts:The power output of 8HBTV2-CT at 40°F is 8.8 watts/ft. From the table above, the power output of8HBTV2-CT, if powered at 208 volts, is 89% of its 240-volt rating.Adjusted power output:8.8 W/ft x 89% = 7.8 w/ft at 208 voltsTo find the maximum heating cable circuit length <strong>for</strong> 8HBTV2-CT if started at 50°F and powered at208 volts:From the circuit breaker selection table, (Table 3), 8HBTV2-CT, if started at 50°F on a 15-amp circuitbreaker with a service voltage of 240 volts, has a maximum circuit length of 200 feet. From the tableabove, the circuit length adjustment factor <strong>for</strong> 8HBTV2-CT powered at 208 volts is 0.93.Adjusted maximum circuit length:200 x 0.93 = 186 ft at 208 voltsA 15-amp breaker is acceptable.46
Appendix C: Ground-Fault Equipment Protection DevicesGround-Fault Circuit Breaker Selection TableThe following breakers are available from your local Raychem distributor.Bolt-on styleManufacturer Square D Cutler Hammer (Westinghouse) Raychem TraceGuard*Voltage 120 208/240** 120 208/240** 27715 amps QOB115EPD QOB215EPD QBGFEP1015 QBGFEP2015 EHB14015EPD20 amps QOB120EPD QOB220EPD QBGFEP1020 QBGFEP2020 EHB14020EPD30 amps QOB130EPD QOB230EPD QBGFEP1030 QBGFEP2030 EHB14030EPD40 amps – – N/A QBGFEP2040 EHB14040EPD50 amps – – N/A QBGFEP2050 EHB14050EPDPanelboard NQOD NQOD POW-R-LINE 1 POW-R-LINE 1 NEHBPlug-on styleManufacturer Square D Cutler Hammer (Westinghouse) Raychem TraceGuard*Voltage 120 208/240** 120 208/240** 27715 amps QO115EPD QO215EPD QPGFEP1015 QPGFEP2015 N/A20 amps QO120EPD QO220EPD QPGFEP1020 QPGFEP2020 N/A30 amps QO130EPD QO230EPD QPGFEP1030 QPGFEP2030 N/A40 amps – – N/A QPGFEP2040 N/A50 amps – – N/A QPGFEP2050 N/APanelboard QO Load Center QO Load Center POW-R-LINE 1 POW-R-LINE 1Padlocks*** QO1PA GF12PA QLPB123PL QLPB123PL GFPOHPA-EH*Raychem’s TraceGuard 277 circuit breaker is manufactured by Square D.**Two-pole ground-fault breakers require 120 volts to power the internal electronics. 240-volt delta systems without a 120-volt neutral reference will require an additional trans<strong>for</strong>mer to providethe reference.*** Padlocks are required to comply with NEC section 427-55(a) if the circuit breaker is utilized <strong>for</strong> disconnecting.N/A = Not Available.Note: Bell alarm contacts may be ordered through your local electrical distributor by adding a “2100”suffix to the Square D part number or a “W1” suffix to the Westinghouse part number (example:QOB120EPD2100 is a 20-amp, 120-V breaker with bell alarm contacts).Neilsen-Kuljian Ground-Fault SensorsA Neilsen-Kuljian ground-fault sensor may be used <strong>for</strong>:• Ground-fault monitoring and alarm, per the exception to NEC Section 427-22• Applications where current or voltage exceeds the ratings of available ground-fault circuit breakers• Applications that require ground-fault trip levels other than 30 mA, such as 70 mA <strong>for</strong> VL heating cablesThe Neilsen-Kuljian ground-fault sensor has a ground-fault trip level adjustable from 1 to 100 mA. Aslong as a detected fault persists, the normally open switch will stay closed. It can be connected to analarm light or to the shunt-trip of a breaker. There is also an associated red light on the ground-faultsensor to indicate a fault. A green light is provided to indicate the presence of 120-Vac power. The sensoralso has a built-in TEST function, which simulates the fault and confirms that the unit is operational.Notes:1. When using 240-volt Raychem heating cables at operating voltages of 208 or 277 volts, use the circuit length adjustmentfactors in Appendix B.2. Circuit breaker trip rating should not exceed the maximum trip rating shown <strong>for</strong> heating cables of that product family.3. All Raychem heating cables must be installed in accordance with local codes and practices.47
Appendix D: <strong>Heat</strong>-Shrink Core Sealer InstallationA. <strong>Heat</strong>-Shrink Kit DescriptionAs part of the HAK-C-100 kit, an optional heat-shrink core sealer kit is provided <strong>for</strong> those customerswanting this option. The heat-shrink core sealer kit contains:• Two 6-inch black heat-shrinkable tubes• One 1-inch yellow heat-shrinkable tubeB. Installation InstructionsFollow the Section 5.6 instructions, but replace steps 5 through 9 with the following heat-shrink coresealer instructions.12"Do NotCut Braid5. Score around outer heating cable jacket 12 inches from end. Score from this point to end of heatingcable. Remove outer jacket, being careful not to damage braid.Using a small screwdriver as an aid, spread braid at base to expose inner jacket of heating cable.Bend heating cable at base of braid while pushing it through and working insulated heating cableout. Pull heating cable completely out of braid. Twist braid to <strong>for</strong>m a tight pigtail.6 1/2"6. Score around inner heating cable jacket 6 1/2 inches from end. Score from this point to end ofheating cable. Flex along score lines and remove the inner jacket to expose polymer core or fibers.Slip yellow/green heat-shrink tube over braid to prevent stray braid wires from touching bus wires.48
7a. For the fiber heating cables, cut and remove all fiber strands. Score and remove center spacer. Cleanbus wires.1/4"7b. For the solid core heating cables, notch core. Twist back and peel bus wire from core. Score corebetween bus wires at inner jacket. Bend and snap core. Peel core free from bus wire. Clean bus wires.49
8. Slide on black heat-shrinkable tubes. Use heat gun or mini-torch with soft yellow flame to gentlyheat tubes until they shrink. Because heat guns or mini-torches can cause fire or explosion inhazardous areas, be sure there are no flammable materials or vapors in the area. Twist braid to <strong>for</strong>ma tight pigtail. Slip yellow/green heat-shrink tube over braid to prevent stray braid wires fromtouching bus wires. Crimp ring terminal to braid pigtail using a Panduit CT-100 crimp tool. Trimbraid if needed.Center1/2"9. Center clear yellow tube over end of inner jacket. <strong>Heat</strong> tube until it shrinks and adhesive flows outends. While still hot, pinch between bus wires and hold <strong>for</strong> 5 seconds. Trim wire ends to 1/2 inch.50
Appendix E: Field In<strong>for</strong>mation Required <strong>for</strong> FM ApprovalThe purpose of this <strong>for</strong>m is to ensure that the heat-tracing system used in the <strong>Division</strong> 1 location is appropriate <strong>for</strong> that area classification. Send this <strong>for</strong>m to theRaychem Customer Service Center (fax number 650-361-6711). In the United States, the center’s toll-free fax number is 1-800-527-5703. In Canada, the tollfreefax number is 1-800-988-5172.This <strong>for</strong>m must be completely filled out be<strong>for</strong>e the <strong>Division</strong> 1 heating cable and components can be shipped to the customer.1) Purchase order number:____________________________________________________________________________________________2) Name of person filling out this <strong>for</strong>m:___________________________________________________________________________________3) Company: _________________________________ Address: ______________________________________ Phone: ( )4) How many HAK-C-100 component kits will you require? _____________________________5) Name and location of company where the <strong>Division</strong> 1 heating cable and components will be installed.Company Name: ________________________________________________________________________________________________Address:______________________________________________________________________________________________________City: __________________________________________ State: ___________________ Zip Code: _______________________________Contact Person: __________________________________________________________ Phone: _________________________________6) What is the T-classification of the area? (If none, fill out questions 7 and 8.)7) What substance in the area is influencing the decision to use <strong>Division</strong> 1 equipment? ___________8) What is the auto ignition temperature (AIT) expressed in °C, of the substance?______________________________________________________The maximum sheath temperature is 80% x AIT (expressed in °C).Note: This section must be filled out if no T-rating is available. See Section 7.0, Answers to Frequently Asked Questions, <strong>for</strong> the definition of AIT. Appendix Jreferences AIT temperatures <strong>for</strong> selected flammable gases and vapors.9) Design data<strong>Heat</strong>ing catalog number _____________________________Design safety factor __________________________________<strong>Heat</strong>ing trace ratio_________________________________Maintain temp.______________________________________Application: pipe, vessel ____________________________Normal operating temp.________________________________Size: ____________ Material: steel___ plastic____________Max. intermittent temp. ________________________________Min. ambient ____________________________________Insulation type ______________________________________Max. ambient ____________________________________ Thickness ___________ Oversized yes noInstalled: indoors _________ outdoors _________________Voltage ___________________________________________10)The user has been notified that ground-fault equipment protection devices are required <strong>for</strong> all <strong>Division</strong> 1 applications.All of the above in<strong>for</strong>mation is believed to be correct.Signature: ______________________________________________________________ Date: __________________________________For Raychem use onlyAttach this <strong>for</strong>m to the Raychem purchase order. Order number: __________________________________________________________________APPROVED BY:_____________________________________________________________ DATE: _________________________________(Customer Service Center)51
Appendix F: FM Required <strong>Division</strong> 1 Installation RecordTo complete the FM approval process, this <strong>for</strong>m must be returned to the Raychem Customer Service Center (fax number 650-361-6711) upon completion.Company Name Purchase Order No. Reference Drawing(s)Circuit ID No. Test Value/Remarks Date InitialsArea:Auto-ignition temperature (AIT)Group classification<strong>Heat</strong>er Circuit:<strong>Heat</strong>er typeSupply voltageCircuit lengthMaximum pipe temperature<strong>Heat</strong> temp. identification number (T-rating)Components:Power connectionEnd sealTee connectionSpliceGround-Fault Equipment Protection:Make and modelGround-fault equipment protection device trip level (mA)Installation Instructions:Correct components per manufacturer’s specificationSeal fittings opened and inspected (properly poured)Ground-leakage device testedInsulation Resistance Testing:Refer to Section 5.10.2, tests A and B.Use 2500 Vdc <strong>for</strong> self-regulating cables; use 1000 Vdc <strong>for</strong> MI cables.Instrument usedCalibration dateAs measured on the pipe be<strong>for</strong>e insulation is installed:*Insulation resistance between core and braid (Test A)Insulation resistance between braid and pipe (Test B)As measured after insulation is installed:*Insulation resistance between core and braid (Test A)Insulation resistance between braid and pipe (Test B)*Minimum insulation resistance must be 1000 mΩ. If less than 1000 mΩ, see Section 6.2, Troubleshooting.Circuit Ready to CommissionPrepared by Company DateApproved by Company Date52
Appendix G: Inspection RecordFor freeze protection circuits, per<strong>for</strong>m these checks be<strong>for</strong>e winter arrives.For temperature maintenance circuits, per<strong>for</strong>m these checks at least twice a year.Panel ID numberCircuit ID number<strong>Heat</strong>ing cable typeCircuit lengthDateVisual inspection <strong>for</strong> damaged,missing, or wet insulation andcladding.Visual inspection <strong>for</strong>overheating, corrosion,moisture, etc. in connections.Proper electrical groundand connection to heatingcable. Connections andheating cable are insulatedfrom connection box.Entire system energizedand functionalityof GFEPDs checked.Thermostat checked <strong>for</strong>moisture, corrosion, setpoint, switch operation.Capillary is protected.Megohmmeter tests per<strong>for</strong>medat power connection. Both buswires disconnected.InitialInitialInitialInitialInitialInstrument used:Last calibrated500 Vdc reading1000 Vdc reading2500 Vdc readingInitialCircuit voltage atpower connection.Circuit amperage.Pipe temperature at timeamps were measured.Watts/feetVolts x amps/feetAll connections, boxes,thermostats have beenresealed.End seals, covered splices,and tees are marked oninsulation cladding.ReadingReadingReadingInitialInitialInitial53
Appendix H: BTV <strong>Heat</strong>ing Cable Selection <strong>for</strong> Insulated Plastic PipesHBTV-CT and BTV-CT heating cables are ideal <strong>for</strong> heat-tracing plastic pipes. However, increasedresistance to heat transfer from the heating cable to the plastic pipe necessitates compensation of itsthermal output. Aluminum tape may be used to increase the thermal output of HBTV and BTV heatingcables on plastic pipes.The thermal output adjustment factors <strong>for</strong> typical applications are shown below.Thermal Output Adjustment Factors (pipe wall thickness 0.250" or less*)<strong>Heat</strong>ing Glass tape Aluminum tapecable across heating cable over heating cable5HBTV1-CT, 5BTV1-CT 0.55 0.755HXTV2-CT, 5BTV2-CT 0.50 0.758HBTV1-CT, 8BTV1-CT 0.50 0.708HBTV2-CT, 8BTV2-CT 0.45 0.6510HBTV1-CT, 10BTV1-CT 0.40 0.6010HBTV2-CT, 10BTV2-CT 0.45 0.70*Equivalent to 3 1/2" schedule 40 PVC pipe. For greater pipe wall thickness, consult the factory or yourRaychem representative.Glass tapeacross heating cableAluminum tapeover heating cable1 FootAppendix I: Effect of Aluminum Tape on Raychem <strong>Heat</strong>ing CableAluminum tape (AT-180) can be used with Raychem heating cable with nominal variations in power output. The chart below shows the multiplier <strong>for</strong> poweroutput and circuit length <strong>for</strong> both 120-volt and 240-volt Raychem heating cable as compared to the nominal ratings, when installed on carbon steel pipe.Note: When using circuit length adjustment factors, do not exceed the maximum circuit lengths shown below.Auto-Trace heating cablespowered at 120 Volts 240 VoltsPower output Circuit length Maximum heating Power output Circuit length Maximum heating<strong>Heat</strong>ing cable factor multiplier cable circuit length factor multiplier cable circuit length5HBTV-CT, 5BTV-CT 1.2 0.83 225 feet 1.2 0.83 450 feet8HBTV-CT, 8BTV-CT 1.2 0.77 160 feet 1.3 0.77 320 feet10HBTV-CT, 10BTV-CT 1.3 0.77 135 feet 1.2 0.83 300 feet12HQTV-CT, 10QTV-CT 1.15 0.83 130 feet 1.15 0.83 325 feet20HQTV-CT, 20QTV-CT 1.25 0.77 150 feet 1.25 0.77 300 feet5HXTV-CT, 5XTV-CT 1.15 0.83 320 feet 1.15 0.83 635 feet10HXTV-CT, 10XTV-CT 1.15 0.83 225 feet 1.15 0.83 450 feet15HXTV-CT, 15XTV-CT 1.15 0.83 180 feet 1.15 0.83 370 feet20HXTV-CT, 20XTV-CT 1.15 0.83 155 feet 1.15 0.83 320 feet54
Appendix J: <strong>Hazardous</strong> Gases and VaporsThe following pages contain excerpts from the National Fire Protection Association publication NFPA 497M“Classification of Gases, Vapors, and Dusts <strong>for</strong> Electrical Equipment in <strong>Hazardous</strong> (Classified) <strong>Locations</strong>1994 Edition.” The list includes the ignition temperatures and group classifications <strong>for</strong> Class I gases.Class II dusts and Class III fibers and filings are not listed.Note that considerable skill and judgment must be applied when deciding to what degree an area containshazardous concentrations of vapors, combustible dust, or easily ignitable fibers and filings. Many factors—such as temperature, barometric pressure, quantity of release, humidity, ventilation, and distance from thevapor source—must be considered. When in<strong>for</strong>mation on every factor concerned is properly evaluated, aconsistent classification of the selection and location of electrical equipment can be developed.For a complete list of properties of flammable liquids, gases, and solids, see NFPA 497M, “Classificationof Gases, Vapors, and Dusts <strong>for</strong> Electrical Equipment in <strong>Hazardous</strong> (Classified) <strong>Locations</strong> 1994 Edition.”Group Classification and Auto-ignition Temperature (AIT) of Selected Flammable Gases and VaporsMaterial Group °F °CAcetaldehyde C* 347 175Acetic Acid D* 867 464Acetic Anhydride D 600 316Acetone D* 869 465Acetone Cyanohydrin D 1270 688Acetonitrile D 975 524Acetylene A* 581 305Acrolein (inhibited) B* 455 235Acrylic Acid D 820 438Acrylonitrile D* 898 481Allyl Alcohol C* 713 378Allyi Chloride D 905 485Ammonia D* 928 498n-Amyl Acetate D 680 360Aniline D 1139 615Benzene D* 928 498Benzyl Chloride D 1085 5851,3-Butadiene B* 788 420Butane D* 550 2881-Butanol D* 650 3432-Butanol D* 761 405n-Butyl Acetate D* 790 421iso-Butyl Acetate D* 790 421n-Butyl Acrylate (inhibited) D 559 293Butylamine D 594 312Butylene D 725 385n-Butyraldehyde C* 425 218n-Butyric Acid D 830 443Carbon Monoxide C* 1128 609Chlorobenzene D 1099 593Cresol D 1038–1110 559–599Crotonaldehyde C* 450 232Cumene D 795 424Cyclohexane D 473 245Cyclohexene D 471 24455
56Material Group °F °CCyclohexanol D 572 300Cyclohexanone D 473 245Cyclopropane D* 938 503p-Cymene D 817 436n-Decanol D 550 288Decene D 455 235Diacetone Alcohol D 1118 603o-Dichlorobenzene D 1198 6471.1-Dichloroethane D 820 4381.2-Dichloroethylene D 860 460Dicyclopentadiene C 937 503Diethyl Benzene D 743–842 395–450Diethylene Glycol Monobutyl Ether C 442 228Diethylene Glycol Monomethyl Ether C 465 241Diethylamine C* 594 312Diethyl Ether C* 320 160N-N-Dimethyl Aniline C 700 371Di-isobutylene D* 736 391Di-isobutyl Ketone D 745 396Di-isopropylamine C 600 316Dimethylamine C 752 400Dimethyl Formamide D 833 455Dimethyl Sulfate D 370 1881.4-Dioxane C 356 180Dipentene D 458 237Di-N-propylamine C 570 299Dodecene D 491 255Epichlorohydrin C* 772 411Ethane D* 882 472Ethanol D* 685 363Ethyl Acetate D* 800 427Ethyl Acrylate (inhibited) D* 702 372Ethylamine D* 725 385Ethyl Benzene D 810 432Ethyl Chloride D 966 519Ethylene C* 842 450Ethylene Chlorohydrin D 797 425Ethylene Glycol Monobutyl Ether C 460 238Ethylene Glycol Monobutyl Ether Acetate C 645 340Ethylenediamine D* 725 385Ethylene Dichloride D* 775 413Ethylene Glycol Monoethyl Ether C 455 235Ethylene Glycol Monoethyl Ether Acetate C 715 379Ethylene Glycol Monomethyl Ether D 545 285Ethylenimine C* 608 320Ethylene Oxide B* 804 429Ethyl Formate D 851 4552-Ethylhexaldehyde C 375 1912-Ethyl Hexanol D 448 2312-Ethyl Hexyl Acrylate D 485 252Ethyl Mercaptan C* 572 300Formaldehyde (Gas) B 795 429
Material Group °F °CFormic Acid (90%) D 813 434Fuel Oils D 410–765 210–407Furfural C 600 316Furfuryl Alcohol C 915 490Gasoline D* 536–880 280–471Heptane D* 399 204Heptene D 500 260Hexane D* 437 2252-Hexanone D 795 424Hexene D 473 245Hydrazine C 74–518 23–270Hydrogen B* 968 520Hydrogen Cyanide C* 1000 538Hydrogen Sulfide C* 500 260Isoamyl Acetate D 680 360Isobutyl Acrylate D 800 427Isobutyraldehyde C 385 196Isophorone D 860 460Isoprene D* 428 220Isopropyl Acetate D 860 460Isoamyi Alcohol D 662 350Isopropylamine D 756 402Isopropyl Ether D* 830 443Iso-octyl Aldehyde C 387 197Kerosene D 410 210Liquefied Petroleum Gas D 761–842 405–450Mesityl Oxide D* 652 344Methane D* 999 630Methanol D* 725 385Methyl Acetate D 850 454Methyl Acrylate D 875 468Methylamine D 806 430Methyl n-Amyl Ketone D 740 393Methylcyclohexane D 482 250Methylcyclohexanoi D 565 296Methyl Ether C* 662 350Methyl Ethyl Ketone D* 759 404Methyl Formal C* 460 238Methyl Formate D 840 449Methyl Isobutyl Ketone D* 840 449Methyl Isocyanate D 994 534Methyl Methacrylate D 792 4222-Methyl-1-Propanol D* 780 4162-Methyl-2-Propanol D* 892 478alpha-Methyl Styrene D 1066 574Monoethanolamine D 770 410Monoisopropanolamine D 705 374 .Monomethyl Aniline C 900 482Monomethyl Hydrazine C 382 194Morpholine C* 590 310Naphtha (CoalTar) D 531 277Nitrobenzene D 900 48257
Material Group °F °CNitroethane C 778 414Nitromethane C 785 4181-Nitropropane C 789 4212-Nitropropane C* 802 428Nonane D 401 205Octane D* 403 206Octene D 446 230Pentane D* 470 2431-Pentanol D* 572 3002-Pentanone D 846 4521-Pentene D 527 275Propane D* 842 4501-Propanol D* 775 4132-Propanol D* 750 399Propionaldehyde C 405 207Propionic Acid D 870 466Propionic Anhydride D 545 285n-Propyl Acetate D 842 450Propylene D* 851 455Propylene Dichloride D 1035 557Propylene Oxide B* 840 449n-Propyl Ether C 419 215Propyl Nitrate B* 347 175Pyridine D* 900 482Styrene D* 914 490Tetrahydrofuran C* 610 321Tetrahydronaphthalene D 725 385Toluene D* 896 480Turpentine D 488 253Unsymmetrical Dimethyl Hydrazine (UDMH) C* 480 249Valeraldehyde C 432 222Vinyl Acetate D* 756 402Vinyl Chloride D* 882 472Vinylidene Chloride D 1058 570Vinyl Toluene t' 921 494Xylenes D* 867–984 464–529* Material has been classified by test.58
RWORLDWIDE HEADQUARTERSRAYCHEM HTS300 Constitution DriveMenlo Park, Cali<strong>for</strong>nia 94025-1164USAPhone: (800) 545-6258Fax: (650) 474-7517Fax-on-Demand: (800) 329-4494Info@raychemhts.comwww.raychemhts.comImportant: All in<strong>for</strong>mation, including illustrations, is believed to be reliable. Users, however, shouldindependently evaluate the suitability of each product <strong>for</strong> their application. Raychem HTS makes nowarranties as to the accuracy or completeness of the in<strong>for</strong>mation, and disclaims any liability regarding itsuse. Raychem HTS’s only obligations are those in the Raychem HTS Standard Terms and Conditions of Sale<strong>for</strong> this product, and in no case will Raychem HTS or its distributors be liable <strong>for</strong> any incidental, indirect, orconsequential damages arising from the sale, resale, use, or misuse of the product. Specifications are subjectto change without notice. In addition, Raychem HTS reserves the right to make changes—without notificationto Buyer—to processing or materials that do not affect compliance with any applicable specification.CANADARAYCHEM HTS1960 Blue Heron DriveLondon, OntarioCanada N6H 5L9Phone: (800) 545-6258Fax: (650) 474-7517ARGENTINARAYCHEM HTSRiobamba 1234 7-CC1116ABJ Buenos Aires,ArgentinaPhone: (54 11) 4 811 5000Fax: (54 11) 4 814 5020©1988, 1999, 2001 Raychem HTS Printed in USA (Y5274) H56075 02/01