You also want an ePaper? Increase the reach of your titles
YUMPU automatically turns print PDFs into web optimized ePapers that Google loves.
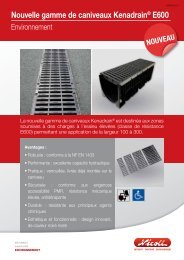
The <strong>Nicoll</strong> balconyoutletA complete balcony and roof waterdrainage system<strong>Nicoll</strong> has developed a new outlet for optimal drainage of run-off water in abalcony. It allows run-off and roof water to be drained simultaneously.Advantages• A perfect water tighness• Adapted to all types of balcony coatings and installations• Aes<strong>the</strong>tic slot-type design• Easy to install and clean2
A 100% practicalsolutionFlexibleThe new <strong>Nicoll</strong> balcony outlet is compatible with all on-site installationsituations: coring, re-entrants, on-site casting or pre-fabricationYou can cut <strong>the</strong> upper and lower body of <strong>the</strong> outlet and/or use <strong>the</strong>adjusting ring to achieve <strong>the</strong> height required for your finish (concrete,tiling, studded slabs, etc.).A perfect water tighnessSealing mat is required to avoid infiltrations of water onto <strong>the</strong> balcony. Itenables you to treat individual points with ease.If you are installing a model without a mat, <strong>the</strong> system cannot beconsidered watertight. In this case, we recommend that you seal <strong>the</strong>structure yourself.AttractiveThe aes<strong>the</strong>tic slot-type design fits in perfectly with all balconies andloggias.The outlet is available in three colours (light grey, white and sand), blendingin perfectly with concrete, tiling and downpipe tubes.Easy to cleanThe self-cleaning conical shape of <strong>the</strong> outlet, and <strong>the</strong> possibility ofremoving <strong>the</strong> grating in order to remove residue, makes it easy to clean.Easy to installCasing end-pieces allows to easily position <strong>the</strong> outlet wherever you want,with ease. It also enables you to create an expansion chamber for <strong>the</strong>downpipe tube. So <strong>the</strong>re’s no need to use an unsightly socket!The square-shaped finish makes tile-laying easy.THE <strong>Nicoll</strong> EXTRAThe drainage rely ring makes it possible to avoid any splashingtowards <strong>the</strong> exterior façades.i BâTIMENT i technical guide 3
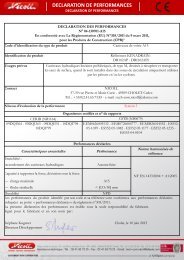
The systemComposition of <strong>the</strong> systemThe <strong>Nicoll</strong> balcony outlet comprises <strong>the</strong> following itemsHGFCoverStack tube gratingDrainage ringEUpper adjustable bodyDCAdjusting ringSealing mat (for <strong>the</strong> model with mat)BLower bodyaCasing end-pieceHow it works• The lower body, sealed into <strong>the</strong> slab, allows for <strong>the</strong> joining of <strong>the</strong> stack tube from <strong>the</strong> lower floor.• The sealing mat prevents <strong>the</strong> infiltration of water.• The upper body, which can be cut or height-adjusted using a ring, is positioned on <strong>the</strong> balcony finishing.• The upper body also allows you to position <strong>the</strong> stack tube from <strong>the</strong> upper floor.• The grating around <strong>the</strong> stack tube allows balcony water to drain via a slot.• The cover on <strong>the</strong> lowest storey completes <strong>the</strong> structure.4Technical Guide i BUILDING i
Technical characteristics• Available in 80 or 100 diameter.• Versions with or without sealing mat (polyester nonwovenmat 400 x 400 mm).• Elements exposed to <strong>the</strong> sun are made from anti-UV treatedPVC.• Impact resistant.• Complies with disabled access requirements and suitablefor bare feet.• Drainage rate: 5.5m3/h in accordance with standardEN1253.• Total system height: 330 mm max./160 mm min.• Grating dimensions: 116 x 116 mm.The rangeName Ø Light grey Sand WhiteWith sealing matBalcony outlet80 ABE80 ABE80S ABE80B100 ABE100 ABE100S ABE100BWithout sealing matBalcony outlet80 ABSE80 ABSE80S ABSE80B100 ABSE100 ABSE100S ABSE100BEach outlet is provided with a cover departure and a stack tubegrating. The cover grating will be used for balconies on <strong>the</strong> lowestfloors, <strong>the</strong> stack tube grating for <strong>the</strong> integration of <strong>the</strong> stack tube in <strong>the</strong>o<strong>the</strong>r cases.Did you know?To integrate <strong>the</strong> trap function into your outlet installation, simply create an inlet elbow(ref. CT8 or CT88) in an inspection box (ref. RETX or RPCT) at <strong>the</strong> foot of <strong>the</strong>downpipe.No more insufficient trap seal problems in summer! Your 70 mm trap seal will workperfectly all summer long and your structure will be easy to maintain.i BUILDING i technical guide5
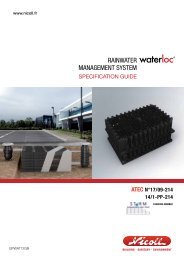
InstallationStage 1: installation of <strong>the</strong> lower body on <strong>the</strong> casing end piece160 à 220 mmABBAPosition and tack <strong>the</strong> casing end-piece (A)at <strong>the</strong> defined location of <strong>the</strong> slab traverseCut <strong>the</strong> lower body (B) according to <strong>the</strong>desired height depending on <strong>the</strong> thicknessof <strong>the</strong> slab (from 160 to 220 mm).Position <strong>the</strong> lower body (B) with its polystyreneprotection, into <strong>the</strong> casing end-piece (A).BAPour <strong>the</strong> concrete slab or plug with an anchoring mortar.The polystyrene protector is flush with <strong>the</strong> poured surface.After <strong>the</strong> slab has dried, remove <strong>the</strong> casingend piece (A).Stage 2: installation of <strong>the</strong> sealing matThe upper elements of <strong>the</strong> outlet are installed after <strong>the</strong> slab dries and <strong>the</strong> polystyrene protector is removed.CCCRemove <strong>the</strong> dust around <strong>the</strong> outlet. Position<strong>the</strong> sealing mat (C). Fold in 2.Remove <strong>the</strong> protective film.Glue <strong>the</strong> first part of <strong>the</strong> mat....... and rub it.CCCRemove <strong>the</strong> second part of <strong>the</strong> protectivefilm...… and glue <strong>the</strong> second part of <strong>the</strong> mat.Use a safety cutter to cut <strong>the</strong> central area intoa cross6Technical Guide i BUILDING i
www.nicoll.frS a ni t a r y<strong>Nicoll</strong>also leadsto serenityE n vi r o n m e ni n gti l dB uPAO <strong>Nicoll</strong> - Février 2012- Crédits Photos : <strong>Nicoll</strong> - Document non contractuelNICOLL is ISO 9001v2008 and ISO14001v2004 certifiedHead Office and factories: 37, rue Pierre & Marie Curie - BP 10966 - 49309 CHOLET Cedex // Tel. 02 41 63 73 83 - Fax 02 41 63 73 57For Requests <strong>documentation</strong>: export.nicoll@aliaxis.com// Technical enquiries: tech-com.nicoll@aliaxis.comSAS (business corporation) with a capital of €7,683,431 - 060 200 128 RCS Angers