Creating a Greensheet - Keller Williams Realty
Creating a Greensheet - Keller Williams Realty
Creating a Greensheet - Keller Williams Realty

You also want an ePaper? Increase the reach of your titles
YUMPU automatically turns print PDFs into web optimized ePapers that Google loves.
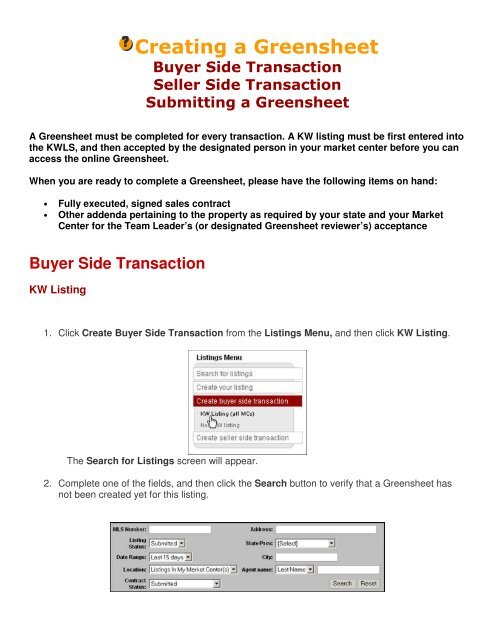
<strong>Creating</strong> a <strong>Greensheet</strong>Buyer Side TransactionSeller Side TransactionSubmitting a <strong>Greensheet</strong>A <strong>Greensheet</strong> must be completed for every transaction. A KW listing must be first entered intothe KWLS, and then accepted by the designated person in your market center before you canaccess the online <strong>Greensheet</strong>.When you are ready to complete a <strong>Greensheet</strong>, please have the following items on hand:• Fully executed, signed sales contract• Other addenda pertaining to the property as required by your state and your MarketCenter for the Team Leader’s (or designated <strong>Greensheet</strong> reviewer’s) acceptanceBuyer Side TransactionKW Listing1. Click Create Buyer Side Transaction from the Listings Menu, and then click KW Listing.The Search for Listings screen will appear.2. Complete one of the fields, and then click the Search button to verify that a <strong>Greensheet</strong> hasnot been created yet for this listing.
If a <strong>Greensheet</strong> has been created, a status flag will appear in the Contract column for this listing onthe displayed search results screen. Continue to Submitting a <strong>Greensheet</strong>.If a <strong>Greensheet</strong> has not been created, a status flag will only appear is the Listing column for thislisting on the displayed search results screen.3. Click on the listing link located in the MLS column. The Listing Details screen will appear.
4. Click the <strong>Greensheet</strong> button, which is located at the bottom of the Listing Details screen ofthe opened listing.The <strong>Greensheet</strong> screen will appear.5. Complete the appropriate fields based on your transaction. Fields in red font are required andmust be completed before you can save the <strong>Greensheet</strong>.Please see the table below for detailed field descriptions.FieldClose DateContract DateTypeClass<strong>Greensheet</strong>DescriptionGeneral InformationClick on the calendar icon, and then select the date this closing was funded. If enteringa new <strong>Greensheet</strong>, enter the expected date this closing will fund.Click on the calendar icon, and then select the date of the signed contract. In order forthe <strong>Greensheet</strong> to be accepted by the MC, this date needs to be in the current period ofthe local WinMORE system.Type/Class/SourceClick the arrow on the drop-down list, and then select one of the Type options. (Anexample of the “Other” option is a personal transaction with $0 company dollar.)Click the arrow on the drop-down list, and then select one of the Class options. This
Listing SideSelling SidePropertyMLS #MLS AreaStreet #Street NameCityState/ProvinceZip/Postal CodeCountySubdivisionMap GridSalutationBuyerAddressCityState/ProvinceZip/PostalPhoneFaxWill Owner OccupySalutationSellerAddressCityState/ProvinceZip/PostalPhoneFaxCompany NameAgent NameAddressCityState/ProvinceZip/PostalPhoneFaxAmount MC to Pay Co-field details additional information about the transaction.Click the arrow on the drop-down list, and then select one of the Listing Side options.This field denotes the marketing source; how you obtained the listing.Click the arrow on the drop-down list, and then select one of the Selling Side options.This field denotes the marketing source; how you obtained the listing.Click the arrow on the drop-down list, and then select one of the Property options.PropertyEnter the number obtained from your local Multiple Listing Service (MLS), if not alreadypre-populated.Area identifier from the local MLS map, if not already pre-populated.Enter the physical street number of the property being sold, if not already pre-populated.Enter the street name of the property being sold, if not already pre-populated.Enter the city of the property being sold, if not already pre-populated.Enter the state or province of the property being sold, if not already pre-populated.Enter the state or postal code of the property being sold, if not already pre-populated.Enter the county of the property being sold, if not already pre-populated.Enter the name of the subdivision where the property is located.Enter the map grid information (used by your MLS or from a MAPSCO) for the property,if applicable.BuyerClick the arrow on the drop-down list, and then select one of the Salutation options.Enter the first and last name of the buyer. Enter the name in this specific format: fist name first,then middle name, and then last name.Enter the current address or post office box of the buyer.Enter the current city of the buyer.Click the arrow on the drop-down list, and then select the current state/province of the buyer.Enter the current zip/postal code of the buyer.Enter the phone number of the buyer.Enter the fax number of the buyer.Click in the appropriate radio button to select if the buyer will occupy the property.SellerClick the arrow on the drop-down list, and then select the appropriatesalutation.Enter the first and last name of the seller. Enter the name in this specificformat: fist name first, then middle name, and then last name.Enter the physical street address or post office box where the seller ismoving.Enter the city where the seller is moving.Click the arrow on the drop-down list, and then select the currentstate/province of the seller.Enter the zip/postal code where the seller is moving.Enter the phone number of the seller.Enter the current fax number of the seller.Co-BrokerEnter the company name of the broker on the other side of this transaction.Enter the first and last name of the agent at the co-broker’s office.Enter address/post office box of the co-broker.Enter the city of the co-broker.Click the arrow on the drop-down list, and then select the state/province of the cobroker.Enter the zip/postal code of the co-broker.Enter the phone number of the co-broker.Enter the fax number of the co-broker.Enter the dollar amount that will be paid to the co-broker by your MC. Only enter an
BrokerTax ID#Have you talked to thisagent about <strong>Keller</strong><strong>Williams</strong>?Why not?Would be want thisagent on our team?Why?Company NameAddressCityState/ProvinceZip/PostalPhoneFaxLoan NumberLoan AmountLoan OfficerLoan TypeClose File ID#Company NameCompany TypeAddressCityState/ProvinceZip/PostalPhoneFaxClosing OfficerWho is paying forWarranty?Warranty ProviderWarranty ID#AddressCityState/ProvinceZip/PostalEarnest/Escrow MoneyHeld ByAmountamount if your MC is paying the co-broker.Enter the Tax ID number of the co-broker, if applicable in your state/province. Contactyour local real estate governing authority if you are not certain if this applies in yourarea.Click in the appropriate radio button to select if you have talked to this agent aboutjoining <strong>Keller</strong> <strong>Williams</strong>.Enter a reason why you have not talked to this agent about joining <strong>Keller</strong> <strong>Williams</strong>.Click in the appropriate radio button to select if you would want this agent on our team.Enter a reason explaining your answer as to whether or not you would want this agentto be on our team.Mortgage CompanyClick on the arrow of the drop-down list, and then select the name of the mortgagecompany. Enter the full mortgage company name if it is not listed.Enter the address or post office box for this mortgage company.Enter the city where this mortgage company is located.Click the arrow on the drop-down list, and then select the state/province where thismortgage company is located.Enter the zip/postal code for this mortgage company.Enter the phone number of this mortgage company.Enter the fax number of this mortgage company.Enter the loan number, if applicable.Enter the amount of the loan, if applicable.Enter the first and last name of the loan officer.Click on the arrow of the drop-down list, and then select the type of the loan.Closing CompanyEnter the close file ID#.Enter the full name of the closing company.Click on the arrow of the drop-down list, and then select the company type.Enter the closing company’s address or post office box.Enter the closing company’s city.Click on the arrow of the drop-down list, and then select the closing company’sstate/province.Enter the zip/postal code of the closing company.Enter the phone number of the closing company.Enter the fax number of the closing company.Enter the first and last names of the closing officer.Home Warranty InformationEnter the name of the person who will pay for the home warranty policy fee.Enter the name of the warranty provider.Enter the warranty ID number.Enter the address or post office box of the warranty provider.Enter the city of the warranty provider.Click on the arrow of the drop-down list, and then select the closing warranty provider’sstate/province.Enter the zip/postal code of the warranty provider.Earnest/Escrow Money InformationEnter the name of the company that is currently holding the funds received from thebuyer.Enter the amount of the earnest/escrow funds.NotesEnter any additional notes that you want to include regarding the transaction.Property Address
Sale PriceEnter the purchase price of the property as reflected on the sales contract in numeralsonly—no commas.Commission Percentage Enter the commission percent of either the listing and/or sale, if applicable. Thedesignated person in your MC will select the appropriate radio button.Commission Flat Enter the commission dollar amount in numerals only (no commas) of either the listingand/or sale, if applicable. If you have a percentage on one side and a flat commissionon the others side of the transaction, calculate the flat commission amount for bothsides and enter that amount. The designated person in your MC will select theappropriate radio button.Associate Detail Page 1MORE IDClick the magnifier icon to open the Associate Search window, and then select theassociate’s MORE ID.KW Associate Name This field will be pre-populated after the MORE ID field is completed.Associate Role Click on the arrow of the drop-down list, and then select one of the associate roleoptions.TypeClick on the arrow of the drop-down list, and then select one of the type options.ClassClick on the arrow of the drop-down list, and then select one of the class options.AgencyClick on the arrow of the drop-down list, and then select one of the agency options.Listing UnitEnter the listing unit amount (in numerals) only if the type is a listing or both. Leave filedblank for all other types. The listing side of a transaction represents one unit. If youhave multiple associates, the total listing units should be equal to one (1) unit.Sales UnitEnter the listing unit amount (in numerals) only if the type is a listing or both. Leave filedblank for all other types. The listing side of a transaction represents one unit. If youhave multiple associates, the total listing units should be equal to one (1) unit.Associate Written This field is auto-populated: (price multiplied by listing unit) + (price multiplied byVolumesales unit)=Associate Written VolumeGross Commission This field is auto-populated.Outside Referral Enter the percentage of gross commission paid to an outside referral (someone outsideyour MC) in numerals only.Concession to Buyer or Enter the amount in numerals only (approved by the TL) the MC has agreed to be takenSellerout of gross commission as a concession to close the transaction.Bonus/Admin Fee Enter the amount in numerals only to be paid in addition to the gross commission by thebuyer or seller as a bonus or administration fee.--split with MC or 100% Click on the arrow of the drop-down list, and then select one of the two options. Selectto agentif the bonus/admin fee will be shared with the MC or paid to 100% to the associate.SubtotalThis field is auto-populated: (Gross Commission subtracted by Outside Referralsubtracted by Concession to Buyer or Seller + Bonus/Admin)% Assoc. Commission Enter your commission split percentage with the MV in numerals only.SplitAssoc. Commission This field is auto-populated: Subtotal multiplied by % Assoc. Commission SplitSubtotal(Gross Commission subtracted by Outside Referral subtracted by Concession toBuyer or Seller) multiplied by % Assoc. Commission Split + BonusRoyalty RateThis field is auto-populated: Subtotal multiplied by Royalty Rate multiplied by Agent(A) Cap.Capped on FR? Select if you believe you have capped on associate royalty and no longer are requiredto pay this.Associate Royalty This field is auto-populated: Gross Commission multiplied by Royalty Rate multipliedby Agent (A) Cap.Associate Licensing This field will be available in the future.Inside Referral Enter the amount that another associate agrees to pay another associate within yourMC. Make sure you indicate which associate(s) are paying and which associate(s) arereceiving the referral amount.Associate 1099/T4 This field is auto-populated: Associate Commission subtracted by Associate RoyaltyIncomeadded/subtracted by Inside Referral Amounts.KW CaresEnter the KW Cares donation amount (in numerals only) to be deducted from yourcommission.Buyer’s Home Warranty Enter the buyer’s home warranty amount in numerals only.
Other DeductionsNet CommissionBroker/CompanyName/AgentDollar AmountPaid By: AssociateTax ID#AddressCityState/ProvinceZip/PostalPhoneFaxEmailEnter any other deductions to be paid in numerals only.This field is auto-populated: (if the % Assoc. Commission Split is less than zero, thenuse the Inside Referral amount; if it is more than zero, subtract % Assoc.Commission Split, Assoc. Commission Subtotal, Associate Royalty, InsideReferral, KW Cares, Other Deductions, Buyer’s Home Warranty.Outside ReferralsEnter the name of outside referral person’s broker, company or agent.Enter the amount of the referral to be paid in numerals only.Select the associate that will pay the referral amount.Enter Tax ID # in numerals only of the outside referral person.Enter the address of the outside referral person.Enter the city of the outside referral person.Enter the state/province of the outside referral person.Enter the zip/postal code of the outside referral person.Enter the phone number of the outside referral person.Enter the fax number of the outside referral person.Enter the email address of the outside referral person.6. Click the Save button to save your <strong>Greensheet</strong> information. Make sure <strong>Greensheet</strong> has beeninitiated message displays in the Status section on top of the screen.Seller Side TransactionIf you need to edit one of your listings, you can easily revise the listing details or listingfeatures (open house, virtual tour, listing link, or image) at any time.Editing the Listing DetailsYou can edit a listing detail and save your changes in a few simple steps.1. Click Search for Listings on the Listing Menu.2. Click on the link in the MLS column for the listing you want to edit.
The listing record will appear on the screen.3. Click the Edit button located at the bottom of the listing record to edit the listing details.
The Edit Listing Detail screen will appear.4. Edit one or more of the listing details fields, and then click the Next button located at thebottom of the screen to save your listing changes. Make sure the Listing was savedsuccessfully message displays on the screen.Tips and Tricks: Click the Back button to return to the View listinginformation screen.The MLS Information for Agent screen will appear.
5. Confirm the MLS information associated with the listing is correct, and then click the Savebutton.If the MLS information for the listing is incorrect:• Click one or more of Available MLS Choices to select the MLS where you havealready entered this listing, and then click the Add or Add All button. You can similarlyuse the Remove or Remove All button to remove the MLS from the listing.• Clicking the Change Listing Agent button will open a new screen that will allow you tosearch for the agent (by either the first or last name) for which you wish to assign thelisting . After locating the agent, simply click on the agent’s name to select it, and thenclick the Select button to save your new listing agent selection.• Enter the MLS number for the listing you are creating in the Number field for theappropriate MLS entity, and then click the Save button.Editing the Listing FeaturesTo edit a listing feature, you will need to first remove the incorrect listing feature, and then addor upload a new listing feature.1. Click Search for Listings on the Listing Menu.2. Click on the link in the MLS column for the listing you want to edit.
The listing record will appear on the screen.3. Click the appropriate tab to go to that section of the listing feature on the View ListingInformation screen.The appropriate listing feature section will appear. The image below shows the Listing Links
feature.4. Click the remove icon to delete the feature item (open house, virtual tour, listing link, orimage) from your listing. Make sure a message displays at the top of the screen indicating itwas successfully removed.5. Create or select a new listing feature, and then click the Add button or Upload button toadd/upload and save the listing feature you have created. Make sure a message displays atthe top of the screen indicating it was successfully added or uploaded and that the listingfeature displays in the Open Houses/Virtual Tours/Listing Links/Current Photos section.Submitting a <strong>Greensheet</strong>Before you submit your <strong>Greensheet</strong> for acceptance, ensure that all of the information saved inthe <strong>Greensheet</strong> is correct. To open a saved <strong>Greensheet</strong>, you must first go the Search forListings screen.Editing a <strong>Greensheet</strong>1. Complete one of the fields, and then click the Search button to locate your listing.
2. Click on the MLS Number link located in the MLS column. The Listing Details screen willappear.3. Click the <strong>Greensheet</strong> button, which is located at the bottom of the Listing Details screen ofthe opened listing.The existing <strong>Greensheet</strong> screen will appear.
4. Verify all the information on the <strong>Greensheet</strong> is correct. If you need to edit any information, doso by updating the specific fields with the correct information.5. Click the Save button to save the updated <strong>Greensheet</strong>.Make sure the message <strong>Greensheet</strong> has been initiated displays in the Status section on top of thescreen.Submitting a <strong>Greensheet</strong>When you have confirmed that all the information saved in the <strong>Greensheet</strong> is correct and youare ready to submit the listing, open the saved <strong>Greensheet</strong> by accessing the Search forListings screen.1. Complete one of the fields, and then click the Search button to verify to locate your listing.
2. Click on the listing link located in the MLS column. The Listing Details screen will appear.3. Click the <strong>Greensheet</strong> button, which is located at the bottom of the Listing Details screen ofthe opened listing.The <strong>Greensheet</strong> screen will appear.4. Verify all the information on the <strong>Greensheet</strong> is correct. If you need to edit any information, doso by updating the specific fields with the correct information, and then click the Save button.5. Click the Submit button when you are ready to submit the <strong>Greensheet</strong>.Make sure the message <strong>Greensheet</strong> has been submitted displays in the Status section on top ofthe screen.
If the <strong>Greensheet</strong> is returned to you by the Market Center, an email will be sent to you notifying youthat will need to revise and resubmit the <strong>Greensheet</strong>.For more information on the KWLS/GSO:• An Associate's Guide to Using the KWLS/GSO• A Market Center's Guide to Using the KWLS/GSO• KWConnect KWLS Training Video