Stage Boxes - Wenger Corporation
Stage Boxes - Wenger Corporation
Stage Boxes - Wenger Corporation
- No tags were found...

You also want an ePaper? Increase the reach of your titles
YUMPU automatically turns print PDFs into web optimized ePapers that Google loves.
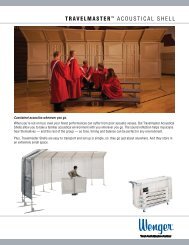
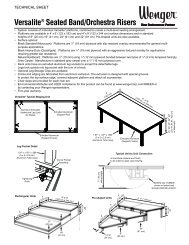
Owner’s Manual<strong>Stage</strong> <strong>Boxes</strong>Small <strong>Stage</strong> Box12”w x 16”d x 8”h(31cm x 41cm x 21 cm)Medium <strong>Stage</strong> Box18”w x 16”d x 12”h(45cm x 41cm x 31 cm)Large <strong>Stage</strong> Box24”w x 24”d x 18”h(61cm x 61cm x 45 cm)contentsImportant User Information . . . . . . . . . . . . . . . . . . . . . . . . . . .2General . . . . . . . . . . . . . . . . . . . . . . . . . . . . . . . . . . . . . .2Manufacturer . . . . . . . . . . . . . . . . . . . . . . . . . . . . . . . . .2Intended Use . . . . . . . . . . . . . . . . . . . . . . . . . . . . . . . . .2Warranty . . . . . . . . . . . . . . . . . . . . . . . . . . . . . . . . . . . . .2Safety Precautions . . . . . . . . . . . . . . . . . . . . . . . . . . . . . . . . .3<strong>Stage</strong> Box Load Limits . . . . . . . . . . . . . . . . . . . . . . . . . . . . . .3<strong>Stage</strong> Box Description . . . . . . . . . . . . . . . . . . . . . . . . . . . . . .4Stacking <strong>Stage</strong> <strong>Boxes</strong> . . . . . . . . . . . . . . . . . . . . . . . . . . . . . . .5Stacking Methods . . . . . . . . . . . . . . . . . . . . . . . . . . . . . .5Typical Arrangements . . . . . . . . . . . . . . . . . . . . . . . . . . .6Easy Chair or Throne . . . . . . . . . . . . . . . . . . . . . . . . . .6Stairway . . . . . . . . . . . . . . . . . . . . . . . . . . . . . . . . . . . .6Countertop or Bookcase . . . . . . . . . . . . . . . . . . . . . . .7Sofa or Couch . . . . . . . . . . . . . . . . . . . . . . . . . . . . . . . .7Storage . . . . . . . . . . . . . . . . . . . . . . . . . . . . . . . . . . . . . . . . . .8Maintenance . . . . . . . . . . . . . . . . . . . . . . . . . . . . . . . . . . . . . .8Replacement Parts . . . . . . . . . . . . . . . . . . . . . . . . . . . . . . . . .8Note:Note:Note:Please read and understand these instructions before using the <strong>Stage</strong> <strong>Boxes</strong>.Refer to the illustrations on the following pages. If you need additional information,contact the <strong>Wenger</strong> <strong>Corporation</strong> using the information below.Save these instructions.©<strong>Wenger</strong> <strong>Corporation</strong> 2012 Printed in USA 03/12 Part #029A150-02<strong>Wenger</strong> <strong>Corporation</strong>, 555 Park Drive, P.O. Box 448, Owatonna, Minnesota 55060-0448Questions? Call.....USA: 800-4WENGER (493-6437) • Worldwide: 1-507-455-4100 • www.wengercorp.com
impoRtant UseR infoRmationGeNeraLCopyright © 2012 by <strong>Wenger</strong> <strong>Corporation</strong>All rights reserved. No part of the contents of this manual may be reproduced, copied, or transmitted inany form or by any means including graphic, electronic, or mechanical methods or photocopying,recording, or information storage and retrieval systems without the written permission of the publisher,unless it is for the purchaser's personal use.Printed and bound in the United States of America.The information in this manual is subject to change without notice and does not represent a commitmenton the part of <strong>Wenger</strong> <strong>Corporation</strong>. <strong>Wenger</strong> <strong>Corporation</strong> does not assume any responsibility for anyerrors that may appear in this manual.In no event will <strong>Wenger</strong> <strong>Corporation</strong> be liable for technical or editorial omissions made herein, nor fordirect, indirect, special, incidental, or consequential damages resulting from the use or defect of thismanual.The information in this document is not intended to cover all possible conditions and situations that mightoccur. The end user must exercise caution and common sense when assembling or installing <strong>Wenger</strong><strong>Corporation</strong> products. If any questions or problems arise, call <strong>Wenger</strong> <strong>Corporation</strong> at 1-800-733-0393.MaNufaCturerThe <strong>Stage</strong> <strong>Boxes</strong> are manufactured by:<strong>Wenger</strong> <strong>Corporation</strong>555 Park DriveOwatonna, MN 550601-800-4WENGER (493-6437) • 1-507-455-4100www.wengercorp.comINteNDeD uSe• This product is intended for indoor use in normal ambient temperature and humidity conditions —it must not be exposed to prolonged outside weather conditions.• This product is intended to simulate basic furniture items in rehearsal and performance situationsand are not intended to provide structural support for heavy equipment or materials.WarraNtyThis product is guaranteed free of defects in materials and workmanship for five full years from dateof shipment. A full warranty statement is available upon request.2
safety pRecaUtionsThroughout this manual you may find cautions and warnings which are defined as follows.• WarNING means that failure to follow the instruction may result in serious injury or death.• CautIoN means that failure to follow the instruction may result in serious injury or damage toproperty.Read all of the safety instructions before using the <strong>Stage</strong> <strong>Boxes</strong>.! caUtionMake sure that anyoneworking with the <strong>Stage</strong> <strong>Boxes</strong>has read and understandsthese instructions.! caUtionFailure to comply withWarnings and Cautions inthis document can result indamage to property orserious injury.! caUtionNever stand on <strong>Stage</strong> <strong>Boxes</strong>that are stacked two or morehigh.! caUtion<strong>Stage</strong> <strong>Boxes</strong> must always besupported at the bottom ona full side.! caUtionNever use the <strong>Stage</strong> BoxFasteners to support loading.Fasteners are intended onlyto hold <strong>Stage</strong> <strong>Boxes</strong> in place.! caUtionNever use or store a <strong>Stage</strong>Box near an open flame orheat source.! caUtionNever alter, modify, or usea <strong>Stage</strong> Box in a way thatdoes not comply with theseinstructions.stage Box load limitsThe <strong>Stage</strong> Box is designed to support a maximum load of 125 pounds per square foot(610 kg per square meter).! caUtionDo not support more than125 pounds per square foot(610 kg per square meter) oneach <strong>Stage</strong> Box.3
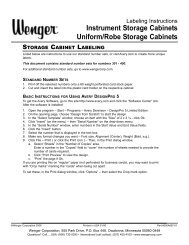
stage Box descRiption<strong>Stage</strong> BoxTop SurfaceFootPocketsFastenerMolded-inInsertMolded-inInsertFastenerRubberFoottypical <strong>Stage</strong> Box<strong>Stage</strong> BoxBottom SurfaceAttach two adjacent <strong>Stage</strong> <strong>Boxes</strong>together by aligning the Fastener to theMolded-in Insert, pushing the Fastenerinward, and turning the it clockwise.FastenerMolded-inInsertCross section view of fastener and Molded-in Insertattaching two <strong>Stage</strong> <strong>Boxes</strong> together.4
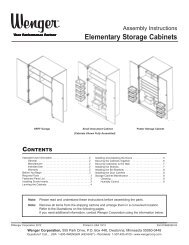
stacking stage <strong>Boxes</strong>StaCkING MethoDS1. When stacking <strong>Stage</strong> <strong>Boxes</strong>, always do one of the following:a. If stacking side to side or side to top surface, use the Fasteners to hold the <strong>Stage</strong> <strong>Boxes</strong>in place.b. If stacking the top surface to the bottom surface, insert the upper <strong>Stage</strong> Box Rubber Feet(on the bottom surface) into the Foot Pockets on the top surface of lower <strong>Stage</strong> Boxas shown below.Fastener1aSmall<strong>Stage</strong> BoxMolded-inInsertLarge<strong>Stage</strong> Box<strong>Stage</strong>BoxAlways insert the Rubber Feet on the upper<strong>Stage</strong> Box into the Foot Pockets on the lower<strong>Stage</strong> Box when stacking <strong>Stage</strong> <strong>Boxes</strong> bottomsurface to top surface.1b<strong>Stage</strong>BoxRubberFootRubberFootWhen stacking a <strong>Stage</strong> Box side surface to another<strong>Stage</strong> Box, attach the two together with the Fasteners.FootPockets2. When stacking <strong>Stage</strong> <strong>Boxes</strong>, the bottom side of each <strong>Stage</strong> Box must be supported over thebox’s entire bottom surface area.Never create a bridge by attaching the Fasteners and not supporting the <strong>Stage</strong> Box fromthe bottom. The Fasteners will not support loading.Never create a bridge by attaching theFasteners and not supporting the <strong>Stage</strong> Boxfrom the bottom.The entire bottom surfacemust be supported whenstacking <strong>Stage</strong> <strong>Boxes</strong>.These two <strong>Stage</strong> <strong>Boxes</strong> areattached by the Fasteners! caUtion<strong>Stage</strong> <strong>Boxes</strong> must always besupported at the bottom ona full side.! caUtionNever use the <strong>Stage</strong> BoxFasteners to support loading.Fasteners are intended onlyto hold <strong>Stage</strong> <strong>Boxes</strong> in place.! caUtionNever stand on <strong>Stage</strong> <strong>Boxes</strong>that are stacked two or morehigh.5
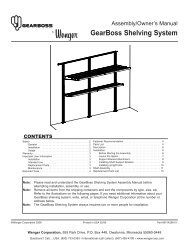
stacking stage <strong>Boxes</strong> (continUed)typICaL arraNGeMeNtSEasy Chair or Throne:1. Place a Large <strong>Stage</strong> Box with the Rubber Feet resting upon the floor.2. Place two Small <strong>Stage</strong> <strong>Boxes</strong> on one side of the large <strong>Stage</strong> Box with the small <strong>Stage</strong> Box topsurfaces facing inward.3. Attach the small <strong>Stage</strong> <strong>Boxes</strong> to each other and to the large <strong>Stage</strong> Box by engaging the Fasteners.Attach the <strong>Stage</strong> <strong>Boxes</strong>together with the FastenersSmall<strong>Stage</strong> <strong>Boxes</strong>(two)TopSurfaces! caUtionNever stand on <strong>Stage</strong> <strong>Boxes</strong>that are stacked two or morehigh.Large<strong>Stage</strong> BoxStairway:1. Attach two Medium <strong>Stage</strong> <strong>Boxes</strong> together with the Fasteners.2. Attach two Small <strong>Stage</strong> <strong>Boxes</strong> to the two Medium <strong>Stage</strong> <strong>Boxes</strong> with the Fasteners.Medium<strong>Stage</strong> <strong>Boxes</strong>(two)Attach the <strong>Stage</strong> <strong>Boxes</strong> togetherwith the FastenersSmall<strong>Stage</strong> <strong>Boxes</strong>(two)6
stacking stage <strong>Boxes</strong> (continUed)typICaL arraNGeMeNtS (CoNtINueD)Countertop or Bookcase:1. Place three Medium <strong>Stage</strong> <strong>Boxes</strong> with the 12-inch side of each onto the floor.2. Attach the three <strong>Boxes</strong> together with the Fasteners.3. Place three Medium <strong>Stage</strong> <strong>Boxes</strong> with the 12-inch side of each onto the three <strong>Boxes</strong> placedon the floor in step 1.4. Attach the three upper <strong>Boxes</strong> together with the Fasteners.5. Attach the three upper <strong>Boxes</strong> to the three lower <strong>Boxes</strong> with the Fasteners.Medium<strong>Stage</strong> <strong>Boxes</strong>(three)! caUtionNever stand on <strong>Stage</strong> <strong>Boxes</strong>that are stacked two or morehigh.Medium<strong>Stage</strong> <strong>Boxes</strong>(three)Attach all <strong>Stage</strong> <strong>Boxes</strong> togetherwith the FastenersSofa or Couch:1. Place three Large <strong>Stage</strong> <strong>Boxes</strong> with the Rubber Feet resting on the floor and attach themtogether with the Fasteners.2. Place six Small <strong>Stage</strong> <strong>Boxes</strong> with the 8-inch side resting on one side of the large <strong>Stage</strong> <strong>Boxes</strong>and the small <strong>Stage</strong> Box top surfaces facing inward.3. Attach the Small <strong>Stage</strong> <strong>Boxes</strong> to each other and to the Large <strong>Stage</strong> Box with the Fasteners.4. Place a Small <strong>Stage</strong> Box on each end of the assembly engaging the Rubber Feet andFoot Pockets as shown below.Small<strong>Stage</strong> BoxSmall<strong>Stage</strong> <strong>Boxes</strong>(six)Attach the <strong>Stage</strong> <strong>Boxes</strong>together with the FastenersLarge<strong>Stage</strong> <strong>Boxes</strong>(three)7
stoRage<strong>Stage</strong> <strong>Boxes</strong> can be stored by nesting the <strong>Boxes</strong> as follows:1. Insert a Small <strong>Stage</strong> Box into a Medium <strong>Stage</strong> Box.2. Insert the nested Small <strong>Stage</strong> Box and Medium <strong>Stage</strong> Box into a Large <strong>Stage</strong> Box.Medium<strong>Stage</strong> BoxSmall<strong>Stage</strong> BoxLarge<strong>Stage</strong> Boxmaintenance1. Clean the <strong>Stage</strong> Box surfaces with a mild detergent such as Formula 409 or Fantastic anda clean cotton cloth.2. Use a soft bristle brush on textured surfaces.3. Never use harsh detergents or abrasive products on <strong>Stage</strong> Box surfaces.4. Replace damaged Rubber Feet or Fasteners immediately.Replacement paRts123Item Description1 Fastener Assembly Screw2 Fastener Assembly Spring3 Fastener Assembly Washer4 Rubber Foot48