FastMig Pulse 350, 450 - Rapid Welding and Industrial Supplies Ltd
FastMig Pulse 350, 450 - Rapid Welding and Industrial Supplies Ltd
FastMig Pulse 350, 450 - Rapid Welding and Industrial Supplies Ltd
- No tags were found...

Create successful ePaper yourself
Turn your PDF publications into a flip-book with our unique Google optimized e-Paper software.
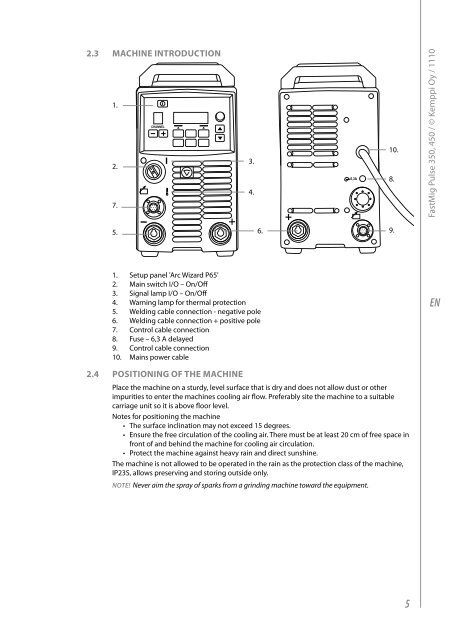
2.3 Machine introduction1.2.7.CHANNEL3.4.6,3A10.8.<strong>FastMig</strong> <strong>Pulse</strong> <strong>350</strong>, <strong>450</strong> / © Kemppi Oy / 11105.6.9.1. Setup panel 'Arc Wizard P65'2. Main switch I/O – On/Off3. Signal lamp I/O – On/Off4. Warning lamp for thermal protection5. <strong>Welding</strong> cable connection - negative pole6. <strong>Welding</strong> cable connection + positive pole7. Control cable connection8. Fuse – 6,3 A delayed9. Control cable connection10. Mains power cableEN2.4 Positioning of the machinePlace the machine on a sturdy, level surface that is dry <strong>and</strong> does not allow dust or otherimpurities to enter the machines cooling air flow. Preferably site the machine to a suitablecarriage unit so it is above floor level.Notes for positioning the machine• The surface inclination may not exceed 15 degrees.• Ensure the free circulation of the cooling air. There must be at least 20 cm of free space infront of <strong>and</strong> behind the machine for cooling air circulation.• Protect the machine against heavy rain <strong>and</strong> direct sunshine.The machine is not allowed to be operated in the rain as the protection class of the machine,IP23S, allows preserving <strong>and</strong> storing outside only.NOTE! Never aim the spray of sparks from a grinding machine toward the equipment.5