Owners Manual - Drive Medical
Owners Manual - Drive Medical
Owners Manual - Drive Medical

Create successful ePaper yourself
Turn your PDF publications into a flip-book with our unique Google optimized e-Paper software.
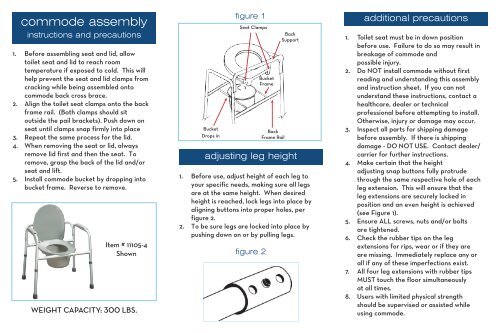
commode assemblyinstructions and precautions1. Before assembling seat and lid, allowtoilet seat and lid to reach roomtemperature if exposed to cold. This willhelp prevent the seat and lid clamps fromcracking while being assembled ontocommode back cross brace.2. Align the toilet seat clamps onto the backframe rail. (Both clamps should sitoutside the pail brackets). Push down onseat until clamps snap firmly into place3. Repeat the same process for the lid.4. When removing the seat or lid, alwaysremove lid first and then the seat. Toremove, grasp the back of the lid and/orseat and lift.5. Install commode bucket by dropping intobucket frame. Reverse to remove.Item # 11105-4Shownweight capacity: 300 lbs.BucketDrops infigure 1Seat ClampsBucketFrameBackFrame RailBackSupportadjusting leg height1. Before use, adjust height of each leg toyour specific needs, making sure all legsare at the same height. When desiredheight is reached, lock legs into place byaligning buttons into proper holes, perfigure 2.2. To be sure legs are locked into place bypushing down on or by pulling legs.figure 2additional precautions1. Toilet seat must be in down positionbefore use. Failure to do so may result inbreakage of commode andpossible injury.2. Do NOT install commode without firstreading and understanding this assemblyand instruction sheet. If you can notunderstand these instructions, contact ahealthcare, dealer or technicalprofessional before attempting to install.Otherwise, injury or damage may occur.3. Inspect all parts for shipping damagebefore assembly. If there is shippingdamage - DO NOT USE. Contact dealer/carrier for further instructions.4. Make certain that the heightadjusting snap buttons fully protrudethrough the same respective hole of eachleg extension. This will ensure that theleg extensions are securely locked inposition and an even height is achieved(see Figure 1).5. Ensure ALL screws, nuts and/or boltsare tightened.6. Check the rubber tips on the legextensions for rips, wear or if they areare missing. Immediately replace any orall if any of these imperfections exist.7. All four leg extensions with rubber tipsMUST touch the floor simultaneouslyat all times.8. Users with limited physical strengthshould be supervised or assisted whileusing commode.