invacare birdie & birdie compact - Independent Living Solutions
invacare birdie & birdie compact - Independent Living Solutions
invacare birdie & birdie compact - Independent Living Solutions

You also want an ePaper? Increase the reach of your titles
YUMPU automatically turns print PDFs into web optimized ePapers that Google loves.
Invacare®Birdie TMBirdie TM PlusBirdie TM CompactUser Manual
Quality DeclarationCongratulations with your new hoist Invacare®Birdie TM from Invacare® EC-Høng A/S.Your new hoist ismedical devices.-marked in accordance with directive 93/42/EEC concerningInvacare®Birdie TM is developed and constructed with consideration for the user and othershandling or assisting with lifting. Furthermore, the hoist is developed in accordance withthe European Standard EN 10535.Invacare®Birdie TM is supervised and quality controlled throughout the entire productionprocess, and the finished hoist is inspected by our finished goods control.Identification label and QA-mark are located on the hoist confirming that the finishedgoods control has approved the hoist.Please read the entire user’s manual before using the hoist.Invacare®EC-Høng A/S is certified according to ISO 9001 and ISO 13485.For and on behalf of Invacare®EC-Høng A/S:Brian MundelingR & D Manager
DEQUALITÄTSDEKLARATIONHerzlichen Glückwunsch zu Ihrem neuen Patientenlifter Invacare®Birdie TM , Birdie Plus TM and Birdie TM Compact von Invacare®EC-Høng A/S.Ihr neuer Patientenlifter ist gemäß der Richtlinie 93/42/EWG für Medizinprodukte CE-gekennzeichnet.Der Invacare®Birdie TM , Birdie Plus TM and Birdie TM Compact wurde unter Berücksichtigung der Bedürfnisse von Benutzer und Pflegepersonal entwickeltWährend des gesamten Herstellungsprozesses unterliegt der Invacare®Birdie TM , Birdie Plus TM and Birdie TM Compact einer ständigen Qualitätskontrolle und wird im Anschluss nochmals durchunsere Endkontrolle geprüft.Bitte lesen die gesamte Bedienungsanleitung, bevor Sie den Patientenlifter in Gebrauch nehmen.Invacare® EC-Høng A/S ist zertifiziert nach ISO 9001 und ISO 13485.NLKWALITEITSGARANTIEGefeliciteerd met de aanschaf van uw nieuwe plafondlift Birdie TM , Birdie Plus TM and Birdie TM Compact van Invacare® EC- Høng A/S.Invacare®Birdie TM , Birdie Plus TM and Birdie TM Compact is CE - gecertificeerd en goedgekeurd conform richtlijn 93/42/EEC betreffende medische hulpmiddelen.Invacare®Birdie TM , Birdie Plus TM and Birdie TM Compact is ontwikkeld en geconstrueerd met inachtneming van de behoeften van de gebruiker en verzorgers.Gedurende het gehele productieproces is het Birdie TM , Birdie Plus TM and Birdie TM Compact bed gecontroleerd op kwaliteitsaspecten en het complete plafondlift is na productie zorgvuldiggecontroleerd.Wij verzoeken u vriendelijk de gehele gebruikershandleiding te lezen voordat u het plafondlift in gebruik neemt.Invacare® EC-Høng A/S is ISO 9001 en ISO 13485 gecertificeerd.ITDICHIARAZIONE DI QUALITÀComplimenti per aver scelto il sollevatore da soffito Invacare®Birdie TM , Birdie Plus TM and Birdie TM Compact prodotto da Invacare® EC-Høng A/S.Il vostro nuovo il sollevatore da soffito è marcato CE - ai sensi della Direttiva 93/42/EEC relativa ai dispositivi medici.Il il sollevatore da soffito è stato progettato e costruito con un occhio di riguardo per gli utilizzatori e per i loro assistenti. Il sollevatore da soffito è stato oggetto di accurate verifichequalitative durante l’intero processo produttivo; una volta completato è stato controllato dal nostro servizio prodotti finiti.Prima di utilizzare il il sollevatore da soffito vi invitiamo a leggere integralmente il manuale d’uso.Invacare® EC-Høng A/S è un’azienda certificata ai sensi della Normativa ISO 9001 e ISO 13485.ESDECLARACIÓN DE CALIDADEnhorabuena por su nueva elevador de techo Invacare®Birdie TM , Birdie Plus TM and Birdie TM Compact de Invacare® EC-Høng A/S.Su nueva elevador de techo cuenta con el marcaje CE - de acuerdo a la directiva 93/42/EOF que hace referencia a los aparatos médicos.Invacare®Birdie TM , Birdie Plus TM and Birdie TM Compact ha sido diseñada y fabricada teniendo en cuenta a los usuarios y las personas que los asisten.El proceso de producción del modelo Invacare®Birdie TM , Birdie Plus TM and Birdie TM Compact ha sido supervisado en su totalidad y su calidad inspeccionada, por nuestro control de productoacabado.Por favor lea el manual antes de utilizar la elevador de techo.Invacare EC-Hong A/S es una empresa certificada ISO 9001 e ISO 13485FRDÉCLARATION DE QUALITÉFélicitations! Vous avez choisi votre nouveau lève-personnes Invacare®Birdie TM , Birdie Plus TM and Birdie TM Compact de Invacare® EC-Høng A/S.Votre nouveau lève-personnes est marqué CE conformément à la directive 93/42/EEC concernant les dispositifs médicaux.Invacare®Birdie TM , Birdie Plus TM and Birdie TM Compact a été développé et construit en considérant systématiquement les besoins de l’utilisateur et des tierces personnes lors de lamanipulation du lève-personnes ou de son utilisation. Invacare®Birdie TM , Birdie Plus TM and Birdie TM Compact a été supervisé et contrôlé tout au long du process de fabrication et le lèvepersonnesachevé a été inspecté par le contrôle des produits finis. Le lève-personnes répond aux exigences de l’analyse de risques de la norme NF EN 14971. Nous vous remercions de lire leManuel de l’Utilisateur dans son intégralité avant d’utiliser le lève-personnes.Invacare® EC-Høng A/S est certifiée ISO 9001 et ISO 13485.PTDECLARAÇÃO DE QUALIDADEParabéns pela sua nova elevador de transferência Invacare®Birdie TM , Birdie Plus TM and Birdie TM Compact da Invacare® EC-Høng A/S.A elevador de transferência tem a marca CE - em conformidade com a directiva 93/42/EEC referente a aparelhos médicos.A elevador de transferência foi concebida e desenhada, tendo em consideração o seu utilizador e o seu(s) assistente(s), que o ajudarão a manipular a elevador de transferência.Durante todo o processo de fabrico e produção, a elevador de transferência Invacare® Birdie TM , Birdie Plus TM and Birdie TM Compact foi supervisionada e a sua qualidade controlada, sendo oproduto final inspeccionado e testado pelo nosso controlo de qualidade. Por Favor, leia atentamente este manual de utilizador antes de utilizar a sua elevador de transferência.A Invacare ® EC-Høng A/S está certificada em conformidade com ISO 9001 e ISO 13485.
Table of Contents1. General . . . . . . . . . . . . . . . . . . . . . . . . . . . . . . . . . . . . . . . . . . . . . . . . 62. Main parts of the hoist . . . . . . . . . . . . . . . . . . . . . . . . . . . . . . . . . . . . 83. Unpacking, assembly and disassembly of the hoist . . . . . . . . . . . . . 94. Operating the hoist . . . . . . . . . . . . . . . . . . . . . . . . . . . . . . . . . . . . . 105. Emergency lowering, emergency lifting and emergency stop . . . 136. Accessories . . . . . . . . . . . . . . . . . . . . . . . . . . . . . . . . . . . . . . . . . . . . 147. Maintenance and cleaning . . . . . . . . . . . . . . . . . . . . . . . . . . . . . . . . 148. Waste disposal . . . . . . . . . . . . . . . . . . . . . . . . . . . . . . . . . . . . . . . . . 159. Trouble-shooting . . . . . . . . . . . . . . . . . . . . . . . . . . . . . . . . . . . . . . . 1610. Technical specifications . . . . . . . . . . . . . . . . . . . . . . . . . . . . . . . . . . 1711. Symbols . . . . . . . . . . . . . . . . . . . . . . . . . . . . . . . . . . . . . . . . . . . . . . . 19
Birdie TM , Birdie TM Plus and Birdie TM CompactThank you for choosing Invacare®’s Birdie TM mobile hoist. Invacare®’s Birdie TM are especially designed to lift thepatient to and from wheelchairs, beds, toilets and floors. Birdie TM hoists offer easy handling and increased comfortwithin the nursing sector. The design of Birdie TM provides a longer reach, wider leg span and a wider lifting range.The choice of either electrical or manual leg span combined with the large range of spreader bars and slingsavailable from Invacare®makes it easy to adjust the hoist for optimum patient care.Invacare®EC-Høng is certified according to DS/EN ISO 9001 and ISO 13485 which ensures that our customers arealways supplied with products of uniform quality.Throughout the entire production process, our materials and components are quality controlled by the operators.A final test is made when the product is fully assembled. If the product does not correspond to the qualitydemands of Invacare®EC-Høng, it will not pass quality control.In the event of a problem in connection with the delivered product, please contact your local Invacare®supplier.Invacare®will take no responsibility if the product is used or assembled in any way other than stated in this usermanual. Only accessories mentioned in this user manual may be used on the Birdie TM mobile hoists. This productmust only be operated by qualified staff who has received the necessary instruction and training.Please read this user manual carefully before you are using the mobile hoist.1. General••••••••Birdie TM , Birdie TM Plus and Birdie TM Compact are CE-marked in accordance with directive 93/42/EECconcerning medical devices.Birdie TM , Birdie TM Plus and Birdie TM Compact have been tested and approved according to EN/ISO 10535.Control unit and motors have been approved according to EN 60601.Birdie TM , Birdie TM Plus and Birdie TM Compact have undergone a risk analysis according to EN/ISO 14971.Control unit, motors and hand control are IPX4 protected.Lifting capacity: Birdie TM and Birdie TM Plus 170 kg, Birdie TM Compact 150 kg.The hoist has an expected lifetime of 8 years.The hoist will not operate when in charge mode.Disconnect the charger from the hoist before moving or using the hoist. Make sure the mains cable is notsqueezed or damaged when assembly or disassembly of the hoist or when moving the hoist.If the functions of the hoist change, please see the section “Maintenance and cleaning”.This product must be serviced and maintained by qualified personnel.
Please be aware of the following possible risks when using the hoists:The hoist must be carefully supervised if the patient is a child.Please note that it is more difficult to manoevre the hoist on carpeted or uneven/textured surfacesas opposed to wooden or flat surfaces; this is due to the starting forces required to initiatethe movement that may create additional friction exerted on the castors.It is recommended not to move the user with the jib at maximum height. Take great care whenmoving the hoist on carpeted, wet, slippery, rough or uneven surfaces. Never use on slopes.Caution! Never attempt to lift a patient outside the base area of the hoist. When lifting apatient from the floor, the patient must always be located between the two hoist legs, and neveroutside this area. To avoid injury, utmost care must be taken when raising and lowering a patient.Invacare®accepts no liability for any use, change or assembly of the Birdie TM , Birdie TM Plus andBirdie TM Compact hoists other than as stated in this user manual.There is a risk of squeezing and entrapment during operation and transport of the hoist.Never exceed the maximum recommended lifting capacity.It is important that the cables do not become entrapped or jammed in moving parts and castorsduring operation and transport.Important! Invacare®recommend that operation of any mobile lifting equipment is carried out bypersonnel with prior professional training in moving and handling techniques.Always choose the sling design and size according to the patient’s weight, size and physical ability.Always ensure, that the sling is applied correctly. Never leave a patient in the sling unattended.Please ensure that the hoist is not exposed to water, as this can cause damage.Locking pin must be located into the base position when transporting the hoist.Failure to do so may cause injury during handling.
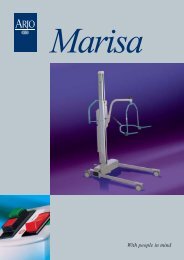
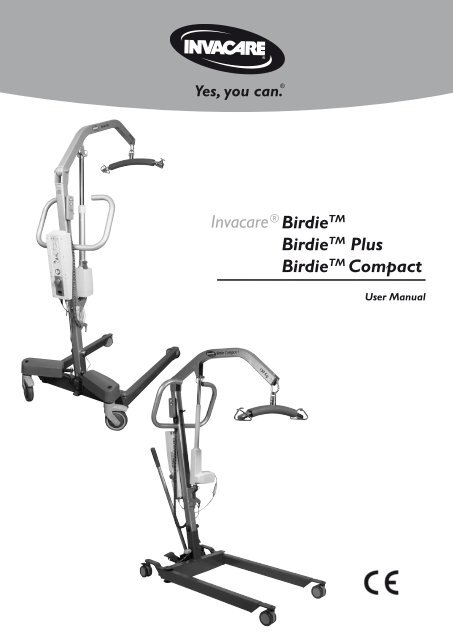
2. Main parts of the hoistJibMastHand controlControl unitEmergency stopBatteryLocking pinMotor for operationof electric legsHandle barMotorSpreader barManual emergencylowering handleBaseLeft legCarabinerHook for slingRight legCastorLeg spreaderhandle(optional)Foot pedalBirdie TM PlusBatteryControl unitCastor with brakeDisplayMotor for operationof electric legsTilt pedal
3. Unpacking, assembly and disassembly of the hoist•••The packaging is developed for optimal protection of the hoist.If you return the hoist, it must be packed asdelivered in the original box.You can order replacement boxes from Invacare®.Unpacking1.2.3.Should the packaging be damaged upon receipt,each part of the hoist must be examined for visible defects.In the event of any damage, please contact Invacare®.Carefully take out and identify all the parts in the box.The box contains the following parts:• 1 hoist• 1 mains cable• 1 user’s manual• 1 spreader bar• 1 manual leg spreader handle (optional)• 1 sling (optional)To prevent self-discharging of the battery or accidental operation ofthe hoist, the emergency stop is activated during shipping. Please rememberto deactivate the emergency stop and charge the batteryprior to first use.Assembling of the hoistThe hoists are easy to assemble without the use of tools.1.2.3.4...7.8.11.5.5.7.9.2.3. 4.9.Perform unpacking and assembly operation at floor levelTake out all the parts of the box (picture 1-4).Apply castor brakes before assembling hoist.Remove the locking pin and raise the mast of the hoist by pullingthe handle bar (picture 5-6).Insert the locking pin (picture 7 and 12-13 below). Ensure that the locking pin is correctlyinserted as the picture 12.Loosen the spreader bar by pulling it downwards (picture 8).Remove the pipe pin. Assemble the motor and the jib by using the pipe pin(picture 9-10).Correctly assembled hoist (picture 11).Activate the emergency stop before assembly or disassemblyto prevent entrapment/squeezing.Remove optional leg spreader handle before disassembly.7.6.8.10.11.There is a possible risk of squeezing of both limbs and wires during assembly and disassemblyof the hoist. Take the utmost care when lifting components during assembly - some parts areheavy. Always remember to adopt the correct lifting position.Ensure that the locking pin is correctly inserted.Locking pin correctlyinserted.12. 13.Locking pin incorrectlyinserted.
Disassembling of the hoist1. Lower the jib and narrow both legs completely, and activate the emergency stop button.2. Apply castor brakes before disassembling hoist.3. Remove the pipe pin and the motor piston from the jib, reinstall the pipe pin in the piston end, and lock themotor into the clips on the mast.4. Attach the spreader bar into the welded fork on the mast.. Remove the locking pin from the base of the mast, release the safety latch, lower the mast, and relocate thelocking pin into the mast near the suspension axle of the mast.The hoist can now be located in the packaging box, pulled on the rear wheels, or parked in an upright positionwith the mast/jib assembly pointing upwards4. Operating the hoistLifting capacityBirdie TM and Birdie TM Plus:Birdie TM Compact:170 kg.150 kg.Operation of the manual leg spreadThe manual leg span is operated by the 2 pedals on the leg section of the hoist.The pedals are operated from one side to the other to adjust the distancebetween the legs of the hoist.The hand control has 2 buttons – one to raise and one to lower the jib.1.2.3.Stand behind the hoist and take a firm hold of the handle bar using bothhands.Using your foot, press the left pedal on the base to increase the distancebetween the legs.Using your foot, press the right pedal to decrease the distance betweenthe legs.Operation of the electric legsThe distance between the legs is controlled by 2 electric motors controlledby the hand control.The hand control has 4 buttons: 2 for raising and lowering the jib and 2 foroperating the electric legs.Using the hand control1. Press “arrow up” on the hand control to raise the jib.2. Press “arrow down” on the hand control to lower the jib.3. Operation of the electric legs.123Operating forces of buttons: Max. 5 N.LED diodes on the control unitBirdie TM and Birdie TM Compact - the upper yellow diode will blink during charging, and switch to continuouslight when fully charged. The lower green diode will light continuously when the control unit is connected to themains, and light up when any button on the remote control is pressed, or when the electric emergency lowering isactivated.Birdie TM Plus - the left green diode will light continuously when the control unit is connected to the mains. Theyellow right diode will light continously during charging, and go out when the battery is fully charged. There is noindication when hand control buttens are pressed, or when the emergency lowering/raising system is activated.10
Brakes1. Stand behind the hoist and take a good hold of the handle bar.2. Press the pedals downwards by feet on the back castors to activate the brake.3. Press the pedals upwards by feet to release the brake.Moving the hoist1. Stand behind the hoist and take a good hold of the handle bar.2. Release the brakes of the back castors.3. Now the hoist can be pushed or pulled to the desired location.Note: To negotiate raised obstacles during movement of the unloaded hoist, it is recommended to pull the hoistbackwards. This operation should only be performed when the hoist is in the unloaded condition.Tilt pedalThe tilt pedal is used for tilting when the hoist must be moved from one room to another, to force a footstep.Place one foot on the tilt pedal, and pull the empty hoist rearwards to a suitable angle.WARNING! Never use the tilt pedal with a patient in the hoist.Mounting the spreader barThe spreader bar is easy mounted and dismounted on the carabineer hook:Open the carabineer hook with one finger, and mount or dismount the spreader bar.Use only spreader bars made for the Birdie TM mobile hoists.Make sure the spreader bar is suitable for the patient and the actual lift or transfer required.Carabineer correctly positioned onthe lifting arm, ready for use.Correctly attached spreader bar.Easy opening of the carabineer by pushingthe safety catch backwards with one fingerand attachment of the spreader bar.11
Fitting the slingSlings designed for 2- or 4-point spreader bars can be used with this mobile hoist, please refer to Invacare®’s slingbrochure for details.Note: The size of the sling and the width of the spreader bar should correspond.1.2.3.4...Choose the most appropriate sling for the patient. The carer must be trained in the use of hoists beforeperforming any transfers.Carefully inspect the hoist and the sling. If defective parts are found, the damaged parts must be replaced.Only use slings suited for the hoist and the patient.Place the patient in the sling as described in the sling manual. Pay special attention to the fact that the sling iscorrectly applied.Lower the jib and mount the straps of the sling. If the patient is in a sitting position, the jib must be lowered tochest height and the hoist must be moved as close as possible to the patient.Make sure that there are no obstructions when raising the jib. Ensure that brakes are not engaged beforelifting or lowering.Caution! Do not lift or lower a patient with the brakes applied. Always let the hoist find thecorrect centre of gravity. Make sure that the lifting area is between the legs of the hoist.Never operate the hoist when the patient is outside the base and leg area. Always be careful whenlifting or lowering a patient. Never exceed the maximum recommended lifting capacity.Charging the batteryThe hoists are equipped with an internal charger. It is recommended to charge the batteries regularly to ensureoptimal use of the hoist and prolong the life of the batteries. Furthermore, it is recommended to charge thebatteries before first use.The control unit is equipped with a sound signal, which will beep when operating with low battery capacity.It is recommended to charge the batteries as soon as the sound signal is heard. In addition, Birdie TM Plus isequipped with a display, indicating the approximately remaining battery capacity.How to charge the batteries:1. Connect the mains cable to the control unit and plug it in. It takes about 4 hours to charge the batteries.Charging must take place in a room with good air ventilation. The charger stops automatically when thebatteries are fully charged.2. Remember to disconnect the charger cable before using the hoist again.The emergency stop must not be activated - otherwise it will be impossible to chargethe batteries. While charging takes place the hoist cannot be used. Do not use or move the hoistwithout unplugging from the socket outlet. Do not attempt to use the hoist if the battery housingis damaged. Replace a damaged battery housing before further use.12
5. Emergency lowering, emergency lifting and emergency stopElectric emergency lowering Birdie TM , Birdie TM Compact and Birdie TM PlusIf the hand control fails, the jib can be lowered by using the circular switch for emergency lowering. This is locatedat the front of the control unit. The jib will be lowered as long as the button is pressed. On Birdie TM Plus thebutton should be operated by means of a sharp object, such as a pencil.Birdie TM and Birdie TM CompactBirdie TM PlusEmergency loweringEmergency loweringEmergency liftingElectric emergency lifting - Birdie TM PlusIf the hand control fails, the jib can be raised by using the button for emergency lifting. This is located at the frontof the control unit, and should be operated with a sharp object, such as a pencil. The jib will be lifted as long as thebutton is pressed.Manual emergency lowering - Birdie TM and Birdie TM PlusIn case of partial or total power failure, or if the battery runs down while usingthe hoist, Birdie TM and Birdie TM Plus is equipped with a manual emergencylowering system located at the bottom of the motor. The weight is preset for75 kg. If the patient’s weight is more or less than 75 kg, it might be necessaryto adjust the manual emergency lowering.Adjustment of the manual emergency lowering- Birdie TM and Birdie TM PlusIf the lowering speed has to be adjusted according to the patient’s weight, thenthe screw in the red release handle must be adjusted. Loosen to increase thespeed and tighten to decrease the speed.Note: Manual emergency lowering is only possible when a patient is sitting inthe hoist.Emergency stopIn case of emergency: Press thered button for emergency stop.The emergency stop can bereset by turning the stopbuttonNote!The mechanical emergency lowering system will only operate when there is a patient in the hoist.The mechanical emergency lowering system has to be adjusted according to the patient’s weight.13
6. AccessoriesOrdering numbersSpreader bar, 350 mm, 2 points 1446274-0152Spreader bar, 450 mm, 2 points 1507415-7012Spreader bar, 550 mm, 2 points 1507417-7012Spreader bar, 450 mm, 4 points 1507418-7012Spreader bar, 550 mm, 4 points 1513442-7012Castor, Ø75 mm, with brake, 1 pcs. 1510645-7012Castor, Ø100 mm, with brake, 1 pcs. 1510803-0125Castor, Ø75 mm, (electric Birdie TM ) with brake, 1 pcs. 1510802-7012Castor, Ø100 mm, (electric Birdie TM ) with brake, 1 pcs. 1510804-0125Castor, Ø125 mm, (Birdie TM Plus) with brake, 1 pcs. 1522073-0125Castor, Ø75 mm, 1 pcs. 1510642-0125Castor, Ø100 mm, 1 pcs. 1510643-0125Handle for manual leg spread 1510505-9006Packaging box (Birdie TM ) 1511776Packaging box (Birdie TM Plus) 1514780Packaging box (Birdie TM Compact) 1511779Packaging insert (Birdie TM and Birdie TM Plus) 1511777Packaging insert (Birdie TM Compact) 1511778Polystyrene support (Birdie TM and Birdie TM Compact) 1513628Polystyrene support (Birdie TM Plus) 1514781Scale with display (for carabiner attachment) 1513627SlingSee the sling brochure7. Maintenance and cleaningAt normal daily operation, a service check-up should take place every year, according to the maintenance chart.When performing annual or regular maintenance, all parts designed to carry load must be as a minimum testedwith maximum load. All safety features must be checked according to EN ISO 10535: 2006 Annex B.The hoist must be stored at normal room temperature. If it is stored in a damp, cold or wet environment thenthe motor and other mounting parts may be prone to corrosion.••••The hoist have been designed so that it requires a minimum amount of maintenance.It is recommended that the batteries are charged frequently, if possible every night, as it will extend thelifetime of the batteries and will ensure high performance.It is recommended that the hoist is cleaned after use.Please check that the spreader bar connections, control unit and motors are in good working order andnot damaged in any way. If there is any damage to the hoist, refrain from using it, and contact your localInvacare®dealer before further use.Wear and damage of loading partsIt is necessary to maintain and check all parts that are exposed to static or dynamic strain, such as the sling, thespreader bar and the turning points, do not have fractures, are fragile, askew or damaged.Damaged parts must be replaced before further use.Cleaning• To prevent cross-infection, the hoists must be cleaned after use.• The hoist must be wiped with a moist firmly wrung cloth with ordinary household disinfectants.• Only use officially approved disinfection detergents.• Dry the hoist carefully after cleaning.• Never use acids, alkaline or solvents for cleaning the hoist.Motors, control unit and mounting parts can be destroyed if the hoist is cleaned in any other way than statedabove.14
Maintenance chartOnly personnel having received the necessary instruction or training by Invacare® must performservice and maintenance on Birdie TM , Birdie TM Plus and Birdie TM Compact.Serial number (located on the hoist base): _______________________Date:Initials:Visual inspection of all hoist partsInspection of the spreader bar and carabiner- welding and assembliesInspection of the motors - undamagedInspection of cables and plugs - undamagedInspection of emergency stop, electricalemergency lowering and -raising (onlyBirdie TM Plus)Inspection of the castors - attachment, brakingability and free rollingInvacare® offers courses in service and maintenance of the hoist.For all servicing and maintenance requirements, please contact your local Invacare®dealer.8. Waste disposalThis product has been supplied from an environmentally aware manufacturer that complies with the Waste Electricaland Electronic Equipment (WEEE) Directive 2002/96/CE.This product may contain substances that could be harmful to the environment if disposed of in places (landfills)that are not appropriate according to legislation.The ‘crossed out wheelie bin’ symbol is placed on this product to encourage you to recycle wherever possible.Please be environmentally responsible and recycle this product through your recycling facility at the end of it’s life.15
9. Trouble-shootingOnly personnel having received the necessary instruction or training by Invacare® must perform service andmaintenance on Birdie TM , Birdie TM Plus and Birdie TM Compact.Symptom Possible cause RemedyThe mast seems looseThe mast axis screw has becomelooseInsert the locking pin into the mastaxis screw, and tighten the screwCastors are noisy Dust or dirt in the castors Clean the castorsHinge between jib and mast is noisyduring operationThe motor is not runningMotor noise, but no movement inthe piston rodThe piston rod only movesin and not outThe control unit emits a beepingsound during lifting, and the jibmotor stops (Birdie TM and Birdie TMCompact).The jib motor stops (Birdie TM Plus)Missing lubricationHand control or motoris not connectedNo power on the batteryThe red emergency stopis activatedMotor is damagedMotor is damagedMax. load is exceededLubricate the hingeInsert the plugs fullyCharge or replace the batteryTurn the red button clockwise todeactivateReplace the motorReplace the motorReduce the load (and the hoist willfunction normally)Contact your dealer if the above does not solve your problems.Lubricate with medically clean oil, e.g. Kemitura Kem Lub KEM-WO 50, order no. 813239.16
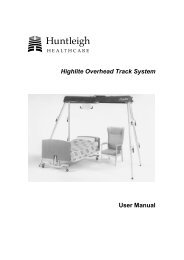
10. Technical specificationsDirectionof travel17
General specifikationsManual and electricBirdie TMBirdie TM PlusManualBirdie TM CompactCastor Ø 75 mm Ø 100 mm Ø 100 mm + Ø 125 mm Ø 75 mm Ø 100 mmMaximum lifting capacity 170 kg 170 kg 150 kgLowest position (min.height of CSP**) 3*Lifting area(height range)Maximum heightof CSP**65,5 cm 67 cm 67 cm 73 cm 74,5 cm46,5 - 168,5 cm 47,5 - 170 cm 47,5 - 170 cm 51,5 - 158,5 cm 53 - 160 cm189 cm 190,5 cm 190,5 cm 180 cm 181,5 cmLeg length 115 cm 116,5 cm 100 cmMinimum internal width r *58 cm 58 cm 46 cmTotal width (closed),external measure65,5 cm 68 cm 68 cm 53 cm 55 cmInteral widthat maximum reachq *91 cm 91 cm 78 cmTotal width (open)internal measureTotal width (open) centreto centre of castor104 cm 104 cm 89 cm108,5 cm 108,5 cm 93 cmTurning radius 140 cm 140 cm 107 cmWeight, mast, incl. battery,excl. spreader bar 21 kg 21,5 kg 17,5 kgTotal weight incl.spreader bar42 kg 44 kg 36 kgWeight, leg section * 19 kg 21 kg 16,5 kgHeight to upper edge of legs 10 cm 11,5 cm 11,5 cm 10 cm 11,5 cmMin. free height 2 cm 3,5 cm 3,5 cm 2 cm 3,5 cmMin. space for patient (to(motor) in top position34 cm 34 cm 30 cma *Maximum reach at 60 cm b * 66,5 cm 66,5 cm 54,5 cmMaximum reach from base c * 66,5 cm 66,5 cm 54,5 cmReach from base withlegs spread to 70 cm m * 24 cm 24 cm 41,5 cmHoisting range 123,5 cm 123,5 cm 107 cmVoltage output 24 V max. 250 VAVoltage supply 100 -240 V 50/60 HzMax. current input Max. 200 mA Max. 400 mA Max. 200 mAOperating temperature.Air humiditySound pressureAtmospheric pressureProtection class,control unitProtection class,hand controlProtection class, motorInsulation classWorking abilityIntermittens5 o to 40 o C20% to 90% @ 30 o C - not condensing45-50 dB(A)700 to 1060 hPaIPX4IPX4IPX4II - type B40 full lifts without battery charge with batteries at 50% of full capacity10%, max. 2 minuttes/18 minuttesBattery capacity 2,9 Ah 2,9 Ah + display 2,9 AhManual emergencyloweringElectric emergencylowering/liftingl *k *p *Yes Yes NoYes/No Yes/Yes Yes/No18
Customer Sales and ServiceDenmarkINVACARE A/SSdr. Ringvej 37DK-2605 BrøndbyPhone: +45 36 90 00 00Fax: +45 36 90 00 01www.<strong>invacare</strong>.dkdenmark@<strong>invacare</strong>.comSweden & FinlandINVACARE ABFagerstagatan 9 / Box 66S-163 91 SpångaPhone: +46 8 761 70 90Fax: +46 8 761 81 08www.<strong>invacare</strong>.sesweden@<strong>invacare</strong>.comNorway & IcelandINVACARE ASGrensesvingen 9Postbox 6230 EtterstadN-0603 OsloPhone: +47 22 57 95 00Fax: +47 22 57 95 01www.<strong>invacare</strong>.nonorway@<strong>invacare</strong>.comSpainINVACARE S.A.C/Areny S/NPoligon Industrial de CelràE-17460 Celrà (Girona)Phone: +34 972 49 32 00Fax: +34 972 49 32 20www.<strong>invacare</strong>.escontactsp@<strong>invacare</strong>.comSwitzerlandMOBITEC REHAB AGBenkenstrasse 260CH-4108 WitterswilPhone: +41 61 487 70 80Fax: +41 61 487 70 81switzerland@<strong>invacare</strong>.comBelgium & LuxemburgINVACARE N.V.Autobaan 22B-8210 Loppem, BrüggePhone: +32 50 83 10 10Fax: +32 50 83 10 11www.<strong>invacare</strong>.bebelgium@<strong>invacare</strong>.comNetherlandsINVACARE B.V.Celsiusstraat 46NL-6716 BZ EdePhone: +31 318 695 757Fax: +31 318 695 758www.<strong>invacare</strong>.comnederland@<strong>invacare</strong>.comcsede@<strong>invacare</strong>.comGermanyINVACARE AQUATEC GmbHAlemannenstrasse 10D-88316 IsnyPhone: +49 75 62 7 00 0Fax: +49 75 62 7 00 66www.<strong>invacare</strong>-aquatec.cominfo@<strong>invacare</strong>-aquatec.comPortugalINVACARE LdaRua Estrada Velha 949P-4465-784 Leça do BalioPhone: +351 225 1059 46/47Fax: +351 225 1057 39www.<strong>invacare</strong>.ptportugal@<strong>invacare</strong>.comAustraliaINVACARE Australia Pty Ltd1 Lenton Place, North RocksNSW 2151Phone: +61 2 8839 5333Fax: +61 2 8839 5353www.<strong>invacare</strong>.com.ausales@<strong>invacare</strong>.com.auFranceINVACARE Poirier S.A.SRoute de St. RochF-37230 FondettesPhone: +33 2 47 62 64 66Fax: +33 2 47 42 12 24www.<strong>invacare</strong>.frcontactfr@<strong>invacare</strong>.comItalyINVACARE MECC SAN S.R.L.Via dei Pini 62I-36016 Thiene (VI)Phone: +39 0445 38 00 59Fax: +39 0445 38 00 34www.<strong>invacare</strong>.ititalia@<strong>invacare</strong>.comUnited Kingdom & IrelandINVACARE LTDSouth RoadBridgend Industrial EstateUK-Bridgend, CF31 3PYPhone: +44 1 656 664 321Fax: +44 1 656 667 532www.<strong>invacare</strong>.co.ukuk@<strong>invacare</strong>.comireland@<strong>invacare</strong>.comNew ZealandINVACARE NZ4 Westfield Place,Mt. WellingtonAucklandPhone: +64 9 917 3939Fax: +64 9 917 3957www.<strong>invacare</strong>.co.nzsales@<strong>invacare</strong>.co.nzAustriaMOBITEC MOBILITÄTSHILFEN GmbHHerzog Odilostrasse 101A-5310 MondseePhone: +43 6232 5535 0Fax: +43 6232 5535 4www.mobitec-austria.comaustria@<strong>invacare</strong>.comInvacare ® EC-Høng A/SIdent. no.: 1515013Version: 03Date: 05.20093rd party certifiedaccording toEN ISO 9001EN ISO 13485Manufacturer:INVACARE EC-Høng A/SØstergade 3DK-4270 Høngwww.<strong>invacare</strong>beds.dk