No-Nik Fiber (R-1206-JA).pmd - Ripley Tools
No-Nik Fiber (R-1206-JA).pmd - Ripley Tools
No-Nik Fiber (R-1206-JA).pmd - Ripley Tools

You also want an ePaper? Increase the reach of your titles
YUMPU automatically turns print PDFs into web optimized ePapers that Google loves.
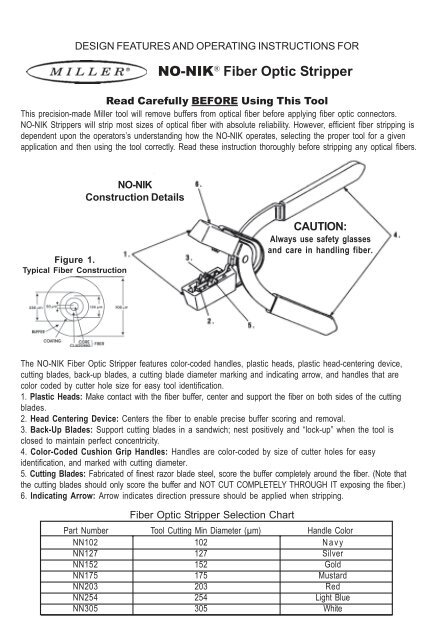
DESIGN FEATURES AND OPERATING INSTRUCTIONS FORNO-NIK ® <strong>Fiber</strong> Optic StripperRead Carefully BEFORE Using This ToolThis precision-made Miller tool will remove buffers from optical fiber before applying fiber optic connectors.NO-NIK Strippers will strip most sizes of optical fiber with absolute reliability. However, efficient fiber stripping isdependent upon the operators’s understanding how the NO-NIK operates, selecting the proper tool for a givenapplication and then using the tool correctly. Read these instruction thoroughly before stripping any optical fibers.NO-NIKConstruction DetailsFigure 1.Typical <strong>Fiber</strong> ConstructionCAUTION:Always use safety glassesand care in handling fiber.The NO-NIK <strong>Fiber</strong> Optic Stripper features color-coded handles, plastic heads, plastic head-centering device,cutting blades, back-up blades, a cutting blade diameter marking and indicating arrow, and handles that arecolor coded by cutter hole size for easy tool identification.1. Plastic Heads: Make contact with the fiber buffer, center and support the fiber on both sides of the cuttingblades.2. Head Centering Device: Centers the fiber to enable precise buffer scoring and removal.3. Back-Up Blades: Support cutting blades in a sandwich; nest positively and “lock-up” when the tool isclosed to maintain perfect concentricity.4. Color-Coded Cushion Grip Handles: Handles are color-coded by size of cutter holes for easyidentification, and marked with cutting diameter.5. Cutting Blades: Fabricated of finest razor blade steel, score the buffer completely around the fiber. (<strong>No</strong>te thatthe cutting blades should only score the buffer and NOT CUT COMPLETELY THROUGH IT exposing the fiber.)6. Indicating Arrow: Arrow indicates direction pressure should be applied when stripping.<strong>Fiber</strong> Optic Stripper Selection ChartPart Number Tool Cutting Min Diameter (µm) Handle ColorNN102 102 NavyNN127 127 SilverNN152 152 GoldNN175 175 MustardNN203 203 RedNN254 254 Light BlueNN305 305 White
OPERATING INSTRUCTIONSCorrect Tool SelectionTo strip the fiber buffer properly, the operator should be familiar with the NO-NIK <strong>Fiber</strong> Optic Stripper’scomponents and their functions. Also, the operator should be aware that the fiber construction and thestrippability vary from fiber to fiber. The typical construction of a tight-buffer fiber is shown in Figure 1.While the buffer on some fibers may be loose and easily removed, other fibers may have a much tighterbuffer, allowing only small lengths of buffer to be removed at a time. As the operator gains experience byusing the NO-NIK <strong>Fiber</strong> Optic Stripper with a variety of fibers, removing the buffer will become easier.Proper utilitization of the NO-NIK <strong>Fiber</strong> Optic Stripper to not cause damage to the fiber requires firstselecting the proper tool for your application using the following steps:1. Determine the diameter of the fiber to be stripped, and then select a tool with a cutting blade diametermarginally larger in size using the chart on the opposite page.2. Because the type of buffer material surrounding the fiber and its method of construction can affectproper tool selection, check your selection by inserting the fiber between the plastic head centering devicesof your tool. Allow approximately 1/4" of fiber to protrude out the side of the tool.3. Score the buffer by exerting light hand pressure on the tool handles. Very little pressure is required. DONOT OVER SQUEEZE! (Through practice, you will obtain a “feel” for the tool and know just how muchpressure must be exerted.) As the inner blade of the tool closes, the cutting blades score the buffercompletely around the fiber while the plastic heads are held apart by the buffer. NOTE: that the plasticheads DO NOT COMPLETELY CLOSE!The NO-NIK tool is designed in this manner and attempting to exert sufficient pressure to close them couldbend the handles, rendering the tool useless.4. Strip the buffer from the fiber while continuing to squeeze and pull in the direction of the indicating arrowon the head of the tool.5. Carefully examine the fiber for any nicks or scratches. If any are found, or if the fiber has broken, thecutting diameter of the tool you used was probably too small. Try the next larger size NO-NIK and repeatsteps 2-5 until you select the correct size NO-NIK.Stripping Procedure1. Open the tool and carefully pull each plastic head back to be sure that the cutting area isfree of any foreign materiel. Perform this step frequently while the tool is in use.2. After a visual inspection of the cutting area of the tool, hold the tool with the marking onthe tool head facing up. The arrow on the tool head should face the fiber end.3. Open the tool with one hand ONLY.4. Hold the buffered fiber very tightly between the thumb and the forefinger. Place the toolon the fiber, making sure to insert the fiber though the “vees” in the plastic heads. The toolshould be perpendicular to the fiber, and the fiber should extend through the other side ofthe tool approximately one-quarter inch.NOTE: If the buffer is very tight on the fiber, a small piece of lapping film, one-half inch wideby one inch long, held between the thumb and forefinger will give additional holding power.5. Gently squeeze the handles until the tool bottoms. Hold the handles in this position.6. While holding the buffered fiber tightly, pull the tool along the fiber, toward the fiber end.Operating Tips: If the fiber strips easily, longer strip lengths (up to 3/4") are possible. Given sufficientpractice and skill, using the fiber-stripping tool will provide accurate stripping of optical fiber. To strip thefibers consistently:• Hold the fiber tightly.• Pull the tool as straight as possible toward the fiber end.• Do not try to remove too much buffer at one time.• Clean the tool after each strip by pulling back on each plastic head, then letting the head snap back intoposition. If the fiber breaks during the stripping procedure, check for debris in the plastic head. This debrismay prevent proper tool operation.• Be sure to clean the blade area of the tool thoroughly after each use. Before storing the tool, remove anydebris that has accumulated in the cutting area.All metal and Kevlar ® shielding must first be removed from buffer beforeusing the NO-NIK fiber optic stripper. The cutting blades operated in astationary or fixed position by pressure alone will not cut through certaintypes of materials. A Miller Kevlar ® Shears will remove the Kevlarshielding.ImportantAlso, if the fiber is not sufficiently concentric within the fiber, or theinsulation itself has become distorted, satisfactory stripping results mightnot be possible. When used according to instructions, the NO-NIK willstrip fiber precisely with no damage to the fiber.WARRANTY: The <strong>Ripley</strong> Company warrants that our line of tools are free of defect and fully operable at the time of shipment. The warranty islimited to the repair or replacement of any product which proves to be defective in material or workmanship, under normal use and service.46 <strong>No</strong>oks Hill Road Cromwell, CT 06416 860-635-2200 www.ripley-tools.com 46440 R-12/06-<strong>JA</strong>