Modular Aeroponic System Models 66, 318 & 236 - General ...
Modular Aeroponic System Models 66, 318 & 236 - General ...
Modular Aeroponic System Models 66, 318 & 236 - General ...
Create successful ePaper yourself
Turn your PDF publications into a flip-book with our unique Google optimized e-Paper software.
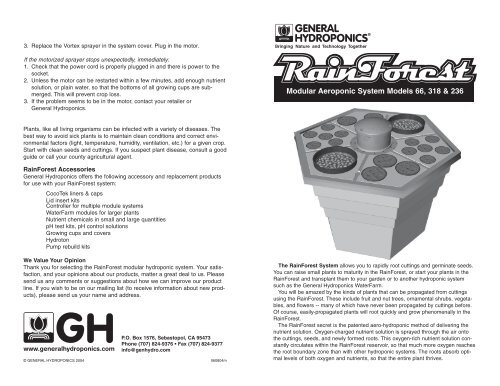
Sprayer BootVortex SprayerCapMAINTAINING YOUR RAINFORESTCapLinerGrowing CupReservoirAccessOpeningunder eachlid insertRoot GuardRoot Guard SleeveLinerGrowing CupDrain Level Tubewith water leveltape marks6” Lid InsertMaintain the Solution LevelNutrient solution is lost through evaporation and plant transpiration. Large,fast-growing plants can lower the reservoir solution level very quickly so youshould check the reservoir daily, or use a controller.Always maintain the nutrient solution at a level between the upper and lowermark on the drain/level tube. Under warm, dry conditions, add plain water asneeded to maintain the correct solution level; under cool, humid conditions,add very mild nutrient solution instead. Stir well and adjust the pH levelwhenever you add water or solution to the system.Completely Replace Nutrient SolutionYou should completely replace the nutrient solution at least once a month. Ifnutrient use exceeds 1 gallon/day in the RainForest, drain and replace thesolution every two weeks. If nutrient use exceeds 2 gallons/day in theRainForest, replace the solution once a week.Transplant Your RainForest PlantsYou can grow fast-growing crops such as lettuce to maturity in theRainForest. Some other kinds of plants, such as Ficus benjamina, will livehappily for years in a RainForest system.Other large or long-lived plants can be started in the RainForest and thentransplanted to the ground or to an WaterFarm unit (a <strong>General</strong> Hydroponicsunit specifically designed for use with large, long-lived plants).Each RainForest module consists of:Reservoir with drain/level tube -- 17 gallon capacityReservoir coverRoot GuardRoot Guard SleeveLid insertsVortex Sprayer (with Sprayer Boot)HydrotonGrowing cups (plastic net cups)CocoTek liners & caps•Model <strong>236</strong> has 36 - 2” sites (6 in each lid insert)•Model <strong>318</strong> has 18 - 3” sites (3 in each lid insert)•Model <strong>66</strong> has 6 - 6” sites (1 in each lid insert)3” Lid Insert2” Lid InsertOptional RainForest <strong>System</strong> Controller<strong>General</strong> Hydroponics offers an optional system Controller that automaticallymaintains the level of the nutrient in many interconnected RainForest modules.This option is perfect for large-scale growing, since it eliminates the need tomonitor each module separately.When transplanting, carefully separate or cut apart tangled roots. If there is alarge root system, do not try to salvage the cup. For short-lived plants, suchas annuals, transplant the plant in its cup. For plants whose enlarging rootsmight be choked by the cup, cut the cup apart and remove it from the rootsin sections.Clean the <strong>System</strong> Between CropsIn between crops, drain and dismantle the RainForest system. Thoroughlyclean the reservoir, drain/level tube, cups, lids, spinner, and Hydroton with adilute chlorine bleach solution (1/2 cup/gallon). Rinse well and reassemble.This disinfects the system and reduces the rate of algae buildup anddisease. Note: Do not remove spinner from motor shaft.TroubleshootingFrom time to time, you may need to clear nutrient deposits or bits of plant matterfrom the sprayer holes. To do this:1. Turn off the system and remove the motorized sprayer from the cover.2. Spray clogged holes with pressurized water until debris is removed.
THE NUTRIENT SOLUTIONThe Model <strong>318</strong> RainForest reservoir holds approximately 16 gallons when filledto the upper mark on the drain/level tube, the lower mark indicates approximately10 gallons, do not allow the level to fall below the lower mark. You can mixthe nutrient solution in the reservoir or another container.Mild Solution (for seeds, cuttings or delicate seedlings)Use the following very mild nutrient solution until the cuttings have rooted or theseedlings have grown several sets of leaves.1. Add distilled, purified, or reverse-osmosis filtered water to the reservoir up tothe top mark on the drain/level tube (18 gallons).2. Add the following nutrients and stir well:1/4 tsp FloraMicro / gallon of water (4.5 tsps /18 gallons).1/ 4 tsp FloraGro / gallon of water (4.5 tsps /18 gallons).1/4 tsp FloraBloom / gallon of water (4.5 tsps / 18 gallons).3. Adjust the nutrient solution pH to between 5.8 and 6.2 (see instructions withthe <strong>General</strong> Hydroponics Ph Control kit).Regular Solution (for mature or very fast growing plants)Mature or very fast growing plants usually prefer a stronger nutrient solution foroptimal growth and maximum yield.1. Mix the nutrient solution as described above, but use:1.5 tsp FloraMicro / gallon of water (9 Tablespoons / 18 gallons)1.5 tsp FloraGro / gallon of water (9 Tablespoons / 18 gallons)1 tsp FloraBloom / gallon of water (6 Tablespoons / 18 gallons)2. Adjust the nutrient solution pH to between 5.5 and 6.5 (see instructions withthe <strong>General</strong> Hydroponics Ph Control Kit).You may want to adjust the nutrient solution to meet your specific needs.• To enhance vegetative growth, use more FloraGro and less FloraBloom.• To enhance flower and fruit production, use less FloraGro and moreFloraBloom.• To provide more calcium or iron (for green, leafy vegetables), use slightlymore FloraMicro.• See nutrient bottle labels for additional information.PLANTING YOUR RAINFORESTYou can start 1 to 5 (Model <strong>318</strong>) cuttings in each RainForest growing cup. If youstart several cuttings in one cup, plan to separate them soon after roots haveformed and before their roots become tangled. For large plants and plants thatyou will raise to maturity in the RainForest, use the center hole in the CocoTekcap and start only 1 cutting per cup.To start cuttings in the RainForest:Always use fresh, clean cuttings that are free of disease and/or soil contamination,soft green stems work best; woody stems are slower.1. Put a cap on each growing cup. Poke a pencil through the holes in each capto loosen any tight hole flaps.2. Trim each cutting to the correct length. Each cutting should have a leaf nodevery near the bottom end of the cutting. Trim so that 3-1/2" of the cutting canextend below the cap (through the bottom of the cup and into the air gap)and a few inches (containing several leaves) can extend above the cover.Remove all leaves from the portion of the cutting that will be below the cap.3. Insert the cuttings into the cups. Be sure the cuttings are well separatedwhere they pass through the cup bottom. Be sure all cuttings extend at least1/2" below the bottom of the cup. The first roots will form at the lowest nodeon the cutting, which MUST BE ALWAYS SUBMERGEDin the nutrient solution.4. Insert the cups firmly in the holes in the reservoir cover. Cover any unusedreservoir cover holes to retard water loss by spray.5. Place the RainForest in a warm, well-lit location. The optimum temperaturefor starting cuttings is 20-25 C (70-75 F). Keep the plants in bright, indirectsunlight or use color-corrected, or sunlight-simulating, lamps placed close tothe cuttings (fluorescent lamps are best, if you are using "Metal-halide orHigh pressure sodium place them well above the cuttings so thatthey do not burn).6. If using artificial lights, set the light timer to simulate a normal day/nightcycle. If using a motor timer, connect and set the timer. Plug in the sprayermotor. When starting cuttings, the RainForest motor should be ON 24hours/day. Once roots extend into the nutrient solution, you can use a timerto run the motor intermittently. Set the timer to run the motor through the dayand off at night (it should be turned ON for about 1 hour midwaythrough the night).


