CIVIA FENDER INSTALLATION INSTRUCTIONS - Civia Cycles
CIVIA FENDER INSTALLATION INSTRUCTIONS - Civia Cycles
CIVIA FENDER INSTALLATION INSTRUCTIONS - Civia Cycles

Create successful ePaper yourself
Turn your PDF publications into a flip-book with our unique Google optimized e-Paper software.
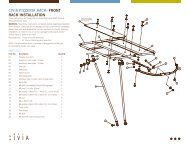
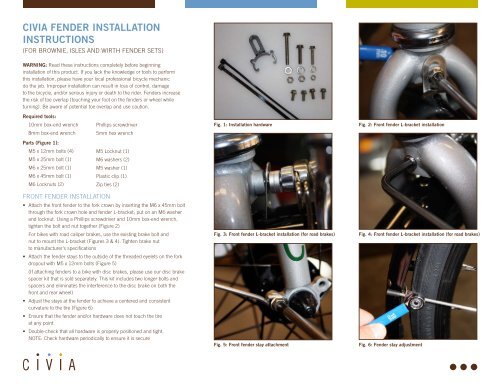
<strong>Civia</strong> Fender InstallationInstructions(for Brownie, Isles and Wirth fender sets)WARNING: Read these instructions completely before beginninginstallation of this product. If you lack the knowledge or tools to performthis installation, please have your local professional bicycle mechanicdo the job. Improper installation can result in loss of control, damageto the bicycle, and/or serious injury or death to the rider. Fenders increasethe risk of toe overlap (touching your foot on the fenders or wheel whileturning). Be aware of potential toe overlap and use caution.Required tools:10mm box-end wrench8mm box-end wrenchPhillips screwdriver5mm hex wrenchFig. 1: Installation hardwareFig. 2: Front fender L-bracket installationParts (Figure 1):M5 x 12mm bolts (4)M5 x 25mm bolt (1)M6 x 25mm bolt (1)M6 x 45mm bolt (1)M6 Locknuts (2)M5 Locknut (1)M6 washers (2)M5 washer (1)Plastic clip (1)Zip ties (2)Front Fender Installation• Attach the front fender to the fork crown by inserting the M6 x 45mm boltthrough the fork crown hole and fender L-bracket; put on an M6 washerand locknut. Using a Phillips screwdriver and 10mm box-end wrench,tighten the bolt and nut together (Figure 2)For bikes with road caliper brakes, use the existing brake bolt andnut to mount the L-bracket (Figures 3 & 4). Tighten brake nutto manufacturer’s specifications• Attach the fender stays to the outside of the threaded eyelets on the forkdropout with M5 x 12mm bolts (Figure 5)(If attaching fenders to a bike with disc brakes, please use our disc brakespacer kit that is sold separately. This kit includes two longer bolts andspacers and eliminates the interference to the disc brake on both thefront and rear wheel)• Adjust the stays at the fender to achieve a centered and consistentcurvature to the tire (Figure 6)• Ensure that the fender and/or hardware does not touch the tireat any point• Double-check that all hardware is properly positioned and tight.NOTE: Check hardware periodically to ensure it is secureFig. 3: Front fender L-bracket installation (for road brakes)Fig. 5: Front fender stay attachmentFig. 4: Front fender L-bracket installation (for road brakes)Fig. 6: Fender stay adjustment
<strong>Civia</strong> Fender InstallationInstructions continuedRear Fender Installation• Snap the plastic clip onto the rear fender (Figure 7). Attach it to the brakebridge by inserting the M6 x 25mm bolt and tighten with the washer andlock nut (Figure 8)For road brakes, use the existing brake bolt and nut to secure the fenderclip (Figure 9). Tighten to manufacturer specificationsIf there is no hole or if there is no brake bridge then thread the twozip ties through the open channels on the plastic clip and loosely securethem to the seatstays• Attach the front of the fender to the chainstay bridge. On most frames,this is done by inserting the M5 x 25mm bolt, washer and lock nut(Figure 10)If your fender comes equipped with a quick clip, then no hardwareis needed—simply clip the fender to the chainstay bridge• Attach the fender stays to the outside of the threaded eyelets on the reardropout with the M5 x 12mm bolts (Figure 11)Note: If attaching fenders to a bike with disc brakes, please use our discbrake spacer kit that is sold separately. This kit includes two longer boltsand spacers and eliminates the interference to the disc brake on both thefront and rear wheel• Adjust the fender stays to achieve a centered and consistent curvatureto the tire (Figure 12)• Ensure that the fender and/or hardware does not touch the tireat any point• Double-check that all hardware is properly positioned and tight.NOTE: Check hardware periodically to ensure it is secure<strong>Civia</strong> <strong>Cycles</strong> Limited 2-Year WarrantyThis product is warranted against defects in materials and workmanship only, for two yearsfrom the original date of retail purchase by the consumer, subject to the limitations detailedbelow. This warranty is expressly limited to the repair or replacement of the original product,at the option of <strong>Civia</strong> <strong>Cycles</strong>, and is the sole remedy of this warranty. This limited warrantyapplies only to the original purchaser of this product and is not transferable. In no eventshall <strong>Civia</strong> <strong>Cycles</strong> be liable for loss, inconvenience or damage, whether direct, incidental,or otherwise resulting from breach of any express or implied warranty or condition,of respect to this product except as set forth herein.This warranty does not cover the following:• Damage due to improper assembly or follow-up maintenance or lack of skill, competence,or experience of user• Products that have been modified, neglected, used in competition or for commercialpurposes, misused or abused, involved in accidents or anything other than normal use• Damage or deterioration to the surface finish, aesthetics, or appearance of the product• Normal wear and tear• Labor required to remove and/or refit and re-adjust the product within the bicycle assemblyThis warranty gives the consumer specific legal rights, and those rights and other rights mayvary from state to state.5585 9/10Fig. 7: Rear fender clipFig. 9: Rear fender clip installation (for road brakes)Fig. 11: Rear fender stay attachmentFig. 8: Rear fender clip installationFig. 10: Rear fender to chainstay bridge attachmentFig. 12: Rear fender stay adjustment