HD7810/60 - Senseo
HD7810/60 - Senseo
HD7810/60 - Senseo
- No tags were found...

You also want an ePaper? Increase the reach of your titles
YUMPU automatically turns print PDFs into web optimized ePapers that Google loves.
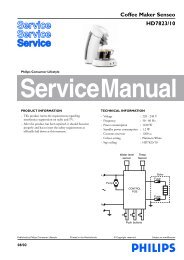
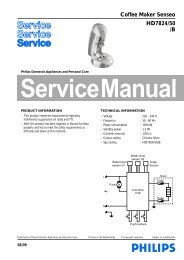
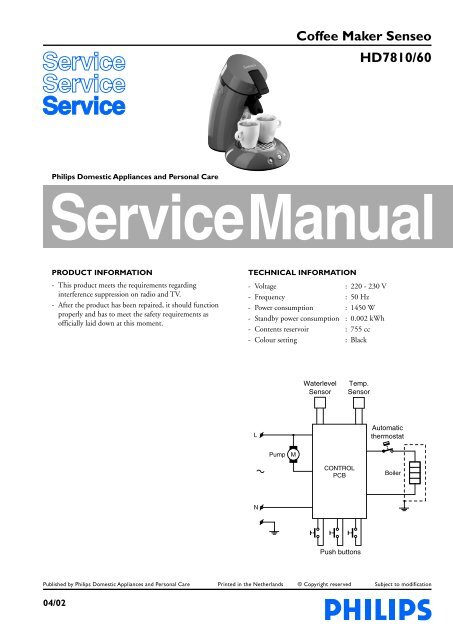
Coffee Maker <strong>Senseo</strong><strong>HD7810</strong>/<strong>60</strong>Philips Domestic Appliances and Personal CareService ManualPRODUCT INFORMATION- This product meets the requirements regardinginterference suppression on radio and TV.- After the product has been repaired, it should functionproperly and has to meet the safety requirements asofficially laid down at this moment.TECHNICAL INFORMATION- Voltage : 220 - 230 V- Frequency : 50 Hz- Power consumption : 1450 W- Standby power consumption : 0.002 kWh- Contents reservoir : 755 cc- Colour setting : BlackWaterlevelSensorTemp.SensorLAutomaticthermostatPumpMCONTROLPCBBoilerNPush buttonsPublished by Philips Domestic Appliances and Personal Care Printed in the Netherlands © Copyright reserved Subject to modification04/02
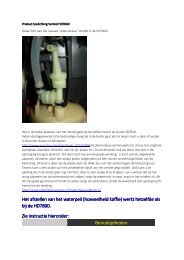
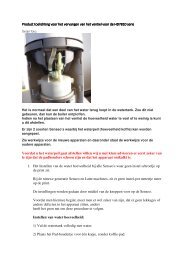
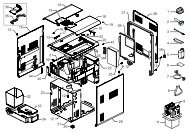
DISASSEMBLY- AND RE-ASSEMBLY ADVISEDisassembly informationTo remove the brew chamber lid cover (item 8 exploded view)handle as follows:- Place the screwdriver on thepositions (see picture 1) andlift the cover over the snaplocks on both positions.- The cover lid can now be liftedup a little and to remove thecomplete cover including leverand push rod (items 9 and 10)squeeze strongly with twofingers both legs of the pushrod (see picture 2) to eachother, so that the two pins willget out of the hinge positionon the brew chamber.picture 1picture 2- To remove lever from lid cover, take a screwdriver and bendcarefully the two lips/ribs in the lid cover outwards andpush the lever with force out of the hinge.- Reassemble follow steps backwards, without using ascrewdriver.To remove the back cover (item 23 exploded view) handle asfollows:- Remove valve outlet.- Start at the upper side of the back cover and stick ascrewdriver into the 2 snap locks positions and gently pullthe back cover from the appliance so that a little chinkbetween back cover and brew chamber becomes visible.- Put the screwdriver in to the 4 rectangular holes (snaplocks) at the back and gently pull the screwdriver such awaythat the lips of the snap locks are bent outwards.- If all clicks positions are loose, it is possible to remove theback cover.- Reassemble follow steps backwards.Removing 3-way valve (item 13 exploded view) handle asfollows:- Unsnap boiler out of brew chamber.- Rotate the 3-way valve a quarter (90°) counter clockwise.- Gently pull the 3-way valve out of the boiler.- Reassemble follow the above steps backwards.<strong>HD7810</strong>/<strong>60</strong>Removing Brew chamber head (item 1 exploded view) handleas follows:- Back cover and 3-way valve must be disassembled!- Place the appliance such a way that you are looking at theboiler.- First remove the boiler from the snap lock position of thebrew chamber.(there were the boiler is fixed to the brew chamber)- To do so use a screwdriver and bend slightly the both ribs tothe outer side and pull the boiler out of the fixation point.- To remove the brew chamber,use your both thumbs (seepicture 3) and push stronglywith a little distortion(rotation) until the brewchamber comes loose.- Reassemble follow above steps backwards.To reach the components placed on the base handle asfollows:- First remove back cover, brew chamber and 3-way valve.- Remove both Torx T15 screws see exploded view in the nearof position A.- Bend the 2 click snap locks with a screwdriver (see base),and the housing can now be removed.- To remove the rest of the housing unlock the last 4 snaplocks at the base and gently pull of the front cover.- To reassemble follow above steps backwards.REPAIR INSTRUCTIONDescalingRegular descaling will prolong the life of your appliance andwill guarantee optimal brewing results for a long time.- Follow the steps in the section headed “Preparing theappliance for use” see DFU (Direction For Use manual).- In stead of only water use a mix of water and Lemon sour.- For the best result leave the mix of water and Lemon sourfor about 30 minutes in the appliance, before you start withflushing the appliance.- To get the best results repeat above mentioned step once ortwice.- When finished, flush the appliance twice by repeating theabove mentioned steps only use water instead.OPTIONAL (accessories)picture 3- XL watertank (10 Cups)Commercial type number HD7982Service code : 4222 259 201002-4
PARTS LIST & EXPLODED VIEW<strong>HD7810</strong>/<strong>60</strong>128910345111267APos Service code Description1234567891011124222 259 065104222 259 080704222 259 045904222 247 357504222 247 371404222 240 063<strong>60</strong>4222 247 357904222 259 065204222 247 371304222 247 358204222 247 068104222 259 06890Brewchamber assy compl.Pad holder singlePad holder doubleFoam chamberFoam chamber coverDrip tray coverDrip trayBrewchamber LidLeverPush RodBrew chamber radial sealDistrubutor assyBlackBlackBlackBlackBlackBlack3-4
PARTS LIST & EXPLODED VIEW<strong>HD7810</strong>/<strong>60</strong>13211422152316171819202425A26Pos Service code Description13141516171819204222 259 012904222 259 036104222 247 355904222 259 111614222 247 068404222 246 163004222 247 358804222 247 068<strong>60</strong>= changedValve (3way)Boiler assy compl. 230 V / 1450 WBoiler frameTemp. sensorHose 0.25 metreWater level sensorPump ElboO-ring (elbo)Pos Service code Description2122232425264222 259 065804222 259 201004222 247 372004222 247 371904222 247 358704222 247 068204213 247 05250Water tank assyXL (10 Cups)Water tank assyValve outletBack coverFilterWater socketFootSoft GreySilent blueBlackBlack4-4