69302 ProForm Seat Install.pm7 - Attwood
69302 ProForm Seat Install.pm7 - Attwood
69302 ProForm Seat Install.pm7 - Attwood
- No tags were found...

Create successful ePaper yourself
Turn your PDF publications into a flip-book with our unique Google optimized e-Paper software.
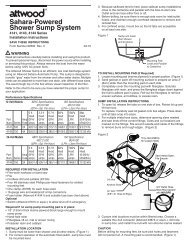
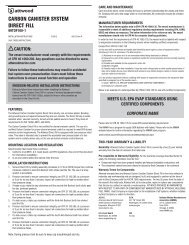
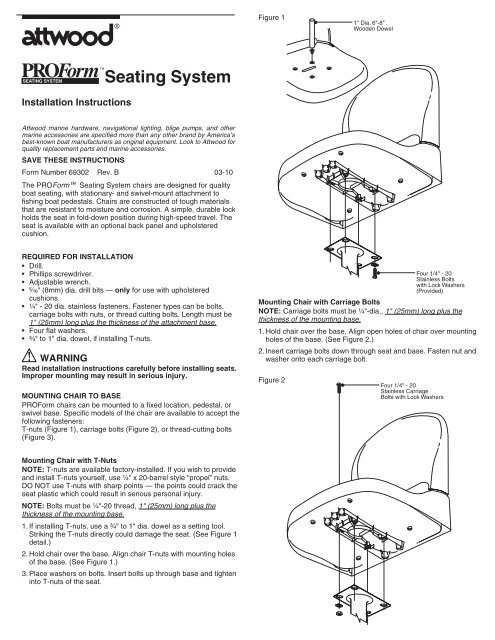
3®Figure 11" Dia. 6"-8"Wooden Dowel<strong>Install</strong>ation Instructions<strong>Seat</strong>ing System<strong>Attwood</strong> marine hardware, navigational lighting, bilge pumps, and othermarine accessories are specified more than any other brand by America’sbest-known boat manufacturers as original equipment. Look to <strong>Attwood</strong> forquality replacement parts and marine accessories.SAVE THESE INSTRUCTIONSForm Number <strong>69302</strong> Rev. B 03-10The PROForm <strong>Seat</strong>ing System chairs are designed for qualityboat seating, with stationary- and swivel-mount attachment tofishing boat pedestals. Chairs are constructed of tough materialsthat are resistant to moisture and corrosion. A simple, durable lockholds the seat in fold-down position during high-speed travel. Theseat is available with an optional back panel and upholsteredcushion.REQUIRED FOR INSTALLATION• Drill.• Phillips screwdriver.• Adjustable wrench.• ⁵⁄₁₆" (8mm) dia. drill bits — only for use with upholsteredcushions.• ¹⁄₄" - 20 dia. stainless fasteners. Fastener types can be bolts,carriage bolts with nuts, or thread cutting bolts. Length must be1" (25mm) long plus the thickness of the attachment base.• Four flat washers.• ³⁄₄" to 1" dia. dowel, if installing T-nuts.WARNINGRead installation instructions carefully before installing seats.Improper mounting may result in serious injury.MOUNTING CHAIR TO BASEPROForm chairs can be mounted to a fixed location, pedestal, orswivel base. Specific models of the chair are available to accept thefollowing fasteners:T-nuts (Figure 1), carriage bolts (Figure 2), or thread-cutting bolts(Figure 3).Figure 2Four 1/4" - 20Stainless Boltswith Lock Washers(Provided)Mounting Chair with Carriage BoltsNOTE: Carriage bolts must be ¹⁄₄"-dia., 1" (25mm) long plus thethickness of the mounting base.1. Hold chair over the base. Align open holes of chair over mountingholes of the base. (See Figure 2.)2. Insert carriage bolts down through seat and base. Fasten nut andwasher onto each carriage bolt.Four 1/4" - 20Stainless CarriageBolts with Lock WashersMounting Chair with T-NutsNOTE: T-nuts are available factory-installed. If you wish to provideand install T-nuts yourself, use ¹⁄₄" x 20-barrel style “propel” nuts.DO NOT use T-nuts with sharp points — the points could crack theseat plastic which could result in serious personal injury.NOTE: Bolts must be ¹⁄₄"-20 thread, 1" (25mm) long plus thethickness of the mounting base.1. If installing T-nuts, use a ³⁄₄" to 1" dia. dowel as a setting tool.Striking the T-nuts directly could damage the seat. (See Figure 1detail.)2. Hold chair over the base. Align chair T-nuts with mounting holesof the base. (See Figure 1.)3. Place washers on bolts. Insert bolts up through base and tighteninto T-nuts of the seat.
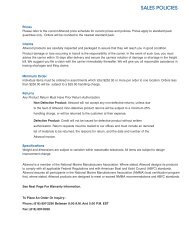
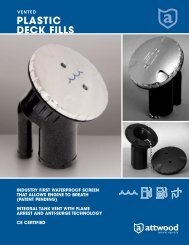
Thread-Cutting BoltsNOTE: Bolts must be thread-cutting type, ¹⁄₄" dia., 1" (25mm) longplus the thickness of the mounting base.1. Hold chair over the base. Align screw retainers in bottom ofchair with mounting holes of the base. (See Figure 3.)2. Place washer on each thread-cutting bolt. Fasten bolts throughbase into chair. Do not overtighten; this may strip fasteners.Figure 3MOUNTING OPTIONAL CUSHIONSAND/OR BACK PANELChair can be fitted with the optional Back Panel (Figure 5),Upholstered Cushion (Figure 6), or both (Figure 7).CAUTIONDo not overtighten screws into screw retainers.BACK PANEL AND UPHOLSTERED CUSHION1. Use ⁵⁄₁₆" (8mm) dia. bit to drill through screw retainers in back ofseat. (See Figure 5.)2. Align cushion with holes in the seat. Fold seat down andsupport cushion so holes in seat back and cushion remainedlined up.3. Align back panel with holes in the seat and cushion. Use four#8 -18 x ³⁄₄" screws (provided) to fasten back panel andcushion. Attach screw covers to the back panel.Figure 5MOUNTING CUSHION TO SEATFour 1/4" - 20Stainless Thread-CuttingBolts with Lock Washers••CAUTIONDo not overtighten screws into screw retainers.1. Use ⁵⁄₁₆" (8mm) dia. bit to drill through screw retainers moldedbeneath seat. (See Figure 4.)2. Align cushion screw retainers with the seat screw holes. Usefour #8 -18 x ³⁄₄" screws (provided) to fasten cushion.Figure 4#8 ScrewsScrew CoversUPHOLSTERED CUSHION ONLY1.Use ⁵⁄₁₆" (8mm) dia. bit to drill through screw retainers in back ofseat. (See Figure 6.)2. Align screw retainers in back of cushion with holes in seat. Usefour #8 -18 x ³⁄₄" screws (provided) to fasten cushion. Press insnap cover fittings and screw covers.Figure 6•••Four #8 StainlessScrews (Provided)Snap Cover Fitting#10 ScrewsScrew Covers
BACK PANEL ONLY1. Align back panel holes with screw retainers in back of seat.(See Figure 7.)2. Use four #10 -16 x ⁵⁄₈" screws (provided) to fasten back panel toseat. Attach the screw covers.Figure 7TO REPLACE LOCK1. From back of the seat, hold replacement lock with handle upand toward outside. (See Figure 9.)2. Slide lock into place. From bottom, insert the #4 screw (provided)and washer through seat and into lock. Tighten withPhillips screwdriver.Figure 9••#10 ScrewsScrew CoversTO LOCK SEAT1. To lock, fold seat down. Turn lever out 90° to “lock” position.(See Figure 8.)2. To raise seat, turn lever in to “unlock” position.Figure 8UnlockedLockedSAVE THESE INSTRUCTIONSATTWOOD LIMITED WARRANTY <strong>Attwood</strong> Corporation, 1016 North Monroe,Lowell, Michigan 49331 (“<strong>Attwood</strong>”) warrants to the original consumer purchaserthat <strong>Attwood</strong> brand products will be free from defects in materials and workmanshipunder normal use and service for one year from the date of original consumerpurchases.This limited warranty is not applicable if the product has been damaged by accident,improper installation, unreasonable or improper use, lack of proper maintenance,unauthorized repairs or modifications, normal wear and tear, or other causes notarising out of defects in materials or workmanship.<strong>Attwood</strong> products are warranted for use on pleasure boats. Any other use—includingbut not limited to commercial, racing, or non-marine use—are not covered under thiswarranty. <strong>Attwood</strong>’s obligation under this warranty is limited to repair of the productat <strong>Attwood</strong>’s plant or replacement of the products at <strong>Attwood</strong>’s option withoutexpense to the original consumer purchaser. Any expenses involved in the removal,reinstallation or transportation of the product are not covered by this warranty. Theproduct must be returned to <strong>Attwood</strong>’s plant at the address above, postage pre-paid,and insured with proof of original purchase including date. If <strong>Attwood</strong> is unable toreplace the product and repair is not commercially practical or cannot be timelymade, or if the original consumer purchaser is willing to accept a refund in lieu ofrepair or replacement, <strong>Attwood</strong> may refund the purchase price, less an amount fordepreciation. The acceptance by <strong>Attwood</strong> of any product returned or any refundprovided by <strong>Attwood</strong> shall not be deemed an admission that the product is defectiveor in violation of any warranty. Products that are replaced or for which a refund isissued become the property of <strong>Attwood</strong>.This warranty is <strong>Attwood</strong>’s only expressed warranty of these products. No impliedwarranty including, without limitation, the implied warranties of merchantability andfitness for a particular purpose, shall be extended beyond the warranty period statedabove for each product. <strong>Attwood</strong> shall not be liable for any damages, for loss of useof this product, nor for any other incidental or consequential damages, costs, orexpenses.Some states do not allow limitations on how long an implied warranty lasts or theexclusion or limitation of incidental or consequential damages, so the abovelimitations and exclusions may not apply to you. This warranty gives you specificlegal rights, and you may have other rights which vary from state to state.© 2003 <strong>Attwood</strong> Corporation1016 N. Monroe Street, Lowell, MI 49331-0260 www.attwoodmarine.com