Bridge Building: Focus: Structural Engineering Grades - Educational ...
Bridge Building: Focus: Structural Engineering Grades - Educational ...
Bridge Building: Focus: Structural Engineering Grades - Educational ...

You also want an ePaper? Increase the reach of your titles
YUMPU automatically turns print PDFs into web optimized ePapers that Google loves.
<strong>Bridge</strong> <strong>Building</strong>:<strong>Focus</strong>: <strong>Structural</strong> <strong>Engineering</strong><strong>Grades</strong>: suggested for grades K-12<strong>Bridge</strong> <strong>Building</strong>The purpose for the bridge building experience is to make students aware of the field of civilengineering. Introduce students to an engineer and give them an overview of some of thekinds of things an engineer has to deal with on a day-to-day basis. The basic idea is to give thestudents hands on experiences with building a structure such as a bridge with various types ofmediums. An actual bridge is brought in the classroom; giving the students the opportunity towork cooperatively, put the bridge together and cross it when it is completed. A wizard(scientist or engineer) explains direction to the students then identifies the parts of the bridgeand finally the bridge is built then placed on four chairs for the children to cross. When thebridge is completed, the wizard has a discussion with the students relative to what they havelearned and then they break into groups dismantle the bridge.<strong>Bridge</strong> <strong>Building</strong> K-6The basic concept is to enhance the student’s knowledge base in the area of civil engineering.An engineer is a person that works to build and dismantle things. They work from a blue printor plan to create various types of structures.The responsibilities of a civil engineer are planning, designing, construction, or management ofmachinery on roads, bridges, buildings, etc. Our goal is to give the student a differentprospective on the life of an engineer and help the student make an alternative career decision.Teacher interested in having this demonstration in their classrooms will contact the Wright -Patterson Air Force Base <strong>Educational</strong> outreach office. The Program director will be happy toassist you in scheduling a wizard to visit your classroom for a one-hour presentation. Theteacher is sent a pre-activity packet one week prior to the actual presentation to formularize thestudents with lesson preceding the visit. The pre-activity consists of vocabulary, a lessonoverview, description of an engineer and the materials used in the demo.Once the demonstration is scheduled, the wizard visits the site that the demo will be held andthe students will partake in hands on experiences that will help with future decision for a stablecareer.1
Academic Content Standards:These K-8 grade level indicators for Physical science & Science and Technology are parallel theOhio Achievement test.Kindergarten: 1. Explore that some materials can be used over and over again (e.g., plasticor glass containers, cardboard boxes and tubes).Grade One:Grade Two:1. Explore that some kinds of materials are better suited that other for makingsomething new (e.g., the building materials used in the three little pigs).2. Explain that when trying to build something or get something to workbetter, it helps to follow directions and ask someone who has done itbefore.6. Investigate that tools are used to help make things and some things cannotbe made without tools.7. Explore that several steps are usually needed to make things (e.g., buildingwith blocks).8. Investigate that when parts are put together they can do things that theycould not do by themselves (e.g., Blocks gears and wheels).3. Predict how building or trying something new might affect other people andthe environment.4. Communicate orally, pictorially, or in written form the design process usedto make something.Grade Three: 4. Use a simple design process to solve a problem (e.g., identifies a problem,identify possible solutions and design a solution).Grade Four:Grade Five:Grade six:1. Explain how technology from different areas (e.g., transportation,communication, nutrition, healthcare, agriculture, entertainment andmanufacturing) had improved human lives.2. Investigate how technology and inventions change to meet people’sneeds and wants.3. Describe, illustrate, and evaluate the design process used to solve aproblem.2. Revise an existing design used to solve a problem based on peer review.3. Explain how the solution to one problem may create other problems.4. Explain how the usefulness of manufactured parts of an object depends onhow well their properties allow them to fit and interact with other material.5. Design and build a product or create a solution to a problem given oneconstraint (e.g., limits of cost and time for design and production, supply ofmaterials and environmental effects).Grade Seven: 4. Design and build a product or create a solution to a problem given twoconstraint (e.g., limits of cost and time for design and production, supply ofmaterials and environmental effects).2
Grade Eight:Grade Nine:Grade Ten:Grade Eleven:Grade Twelve:3. Design and build a product or create a solution to a problem given twoconstraint (e.g., limits of cost and time for design and production, supplyof materials and environmental effects).4. Evaluate the overall effectiveness of a product design or solution.2. Identify a problem or need, propose design and choose among alternativesolutions for the problem.3. Explain why a design should be continually assessed and the ideas of the3. Design should be tested, adapted, and refined.Explain that when evaluating a design for a device or process, thoughtshould be given to how it will be manufactured, operated, maintained,replaced and disposed of in addition to who will sell, operate and take careof it. Explain hoe the costs associated with these considerations mayintroduce additional constraints on the design.No Indicators present in this grade for Life science standardsNo Indicators present in this grade for Life science standards3
<strong>Bridge</strong> PicturesI. Hida River <strong>Bridge</strong> in Japan (Small Truss bridge) Similar To the bridge constructed in theclass.2. Tonegawa River <strong>Bridge</strong> in Japan (Larger Truss bridge)3. Francis Scott Key <strong>Bridge</strong> in Baltimore (Arched Truss <strong>Bridge</strong>)4 & 5. Pont Du Gard in Southern France (Stone Arch -Aqueduct) this is one of the oldestbridges in the world, which is still in good condition Built by the Romans about 60 BCE.6. Kintai <strong>Bridge</strong> in Japan (Pedestrian Arch <strong>Bridge</strong>)7. Fehmarnsund <strong>Bridge</strong> in (I think) Germany (Tied Arch -Train <strong>Bridge</strong>)8. Avon River <strong>Bridge</strong> in England (Concrete Girder <strong>Bridge</strong>)9. New River <strong>Bridge</strong> in West Virginia (Steel Arch) this is the largest single arch bridge.10. Pedestrian Cable Stayed <strong>Bridge</strong> near in Mannheim11. Brooklyn <strong>Bridge</strong> in New York (Suspension with Stone Supports) this was the firstreally good suspension bridge built -about 1908.12. Tacoma Narrows in Washington State (Suspension) this is after it was rebuilt -theoriginal had slender girder stiffeners along the span, rather than the deep trusses on thisbridge.13 & 14. Golden Gate in California (Suspension) during the gold rush, ship captains wouldsail between the mountains into the San Francisco bay to deliver supplies and pick up gold.They referred to the entrance into the bay as the golden gate, hence the name of the bridgebuilt across.Department of Basic <strong>Engineering</strong> University of Missouri- Ro"a Rolla, Missourl65409-02104
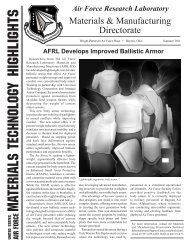
Douglas R. CarrollDepartment of Basic <strong>Engineering</strong>University of Missouri-RollaABSTRACTA one-hour presentation was developed to get elementary school students interested inengineering. The presentation begins with the students building a six-foot long structurallysound bridge which they can crawl across. A pictorial presentation helps them learn to identifysome of the different types of bridges: truss, stone arch, steel arch, concrete girder, cablestayed,and suspension. They are introduced to the fundamental engineering concepts oftension and compression. Demonstrating that if a tension member is replaced with a chain thenthe bridge is still strong, but if a compression member is replaced with a chain the bridge willcollapse reinforces these concepts. The presentation is designed to be fun for the children andthe presenter, and to introduce the children to the field of engineering.INTRODUCTION -OBJECTIVEThe objective of this project was to develop a means of getting elementary school childreninterested in engineering. Most teachers consider engineering to be a good career choice andwould like to include some engineering units in their lessons, but there are very limited less
BRIDGE DESIGNThe bridge was designed to have 29 major pieces, so each student in the classroom will get toput a major piece into the bridge. An equilateral truss arrangement was used for simplicity inconstruction, so that any truss member would fit in any position. The major pieces are 4 floorbeams, 22 truss members, and 3 lateral braces. Each of these pieces is approximately two feetlong, and shaped as shown in Figure 1.The truss members are all made from 314 X 314 X 118 aluminum angles (or larger), the floorbeams are made from wooden hand railing, and the lateral bracing across the top is made fromY2 X Y2 X 118 aluminum angles. There are 26 pieces of hardware, consisting of brackets andwing nuts. The entire bridge frame weighs 10 to 20 lbs, and can carry a 200 lb person. All ofthe pieces for the frame, including the hardware, fit nicely into a softball bag. The decking wasmade from 1/2-inch plywood, hinged in two places for ease of transport. It weighs about 20Ibs. The design is lightweight and compact enough that one person can carry everything intothe classroom in one trip.PRESENTATIONI begin the presentation by saying that the first thing I needeveryone to do is help me build a bridge. The students form aline and I hand about one major piece of the bridge to eachstudent. Each student will get to put his or her piece in thebridge so that no one feels left out. We start with two floorbeams, connected by two of the truss members, making asquare on the floor. The other floor beams are then added,making two feet by six feet rectangle on the floor, as shown in Figure 2. No hardware has beenused to this point, and I need several students to hold all the pieces in place, which keeps theminvolved.The floor beams were made from wood hand railing, which has a flat side, and I tell them weneed the flat side up so the decking will have a flat place to rest on. It is important to use thecorrect terminology during the presentation so the students learn the engineering vocabulary.They can use the terms floor beams, truss members and decking as easily as boards and metalpieces. It is also important to point out that truss members are made from aluminum, not steel,and not "metal".The next step in building the bridge is to begin erecting thetrusses, as shown in Figure 3. I select two children with trussmembers, and say, "I need you two to do something a littledifferent. I have them put their two truss members on the ends ofthe floor beams, and point them straight up. Then I ask them tolean their members in, and line up the holes, and slide the largebolt on one of the brackets through the holes. One of them will needto stay kneeling beside the bridge, holding the bracket straight up asshown in figure. There are no wings nuts on the bridge at this point.Figure 3. Start erectingTrusses.6
For the younger students, I usually ask, "what shape have wemade?" Learning shapes is a major theme in elementary schoolmathematics, and talking about the shapes in the bridge helpsreinforce what the teacher has been teaching them. If you lookcarefully at the completed bridge you can find squares,rectangles, triangles, trapezoids, rhombus, and parallelograms.The next step is to choose pairs of students, and have them erectthe other five triangles. After building all of the triangles, thebridge will look like Figure 4. At this point I hand out eight ofthe large wing nuts, and have the children screw then on thebottom floor beam connections. There are still members to beadded to the top, so they cannot put wing nuts on the topconnections.Figure 4. Completed TrussesThere are still four truss members left at this point, and for mostpeople it is not obvious where they go. I select one of thechildren with a truss member and ask, "Where do you think yourpiece goes?" I have him/her go out in the middle of the bridgeand experiment and figure out where it should go. The otherchildren will offer lots of suggestions, and they will figure it outquickly. Once the last four truss members are in place, I hand outthe other six large wing nuts and have the children screw themon the top connections. At this point the bridge will look likeFigure 5.Figure 5. Trusses ErectedOnce the hardware is installed, the bridge is fairly strong, butthere are still some lateral stability problems with the trusses.The final step in constructing the frame is to install the threelateral braces across the top as shown in Figure 6. I ask them"Does it look like a bridge?" I point out that there are big holesbetween the floor beams, and that people might fall throughthe bridge if we left it like that. We need a decking for thebridge. Most bridges have a concrete decking, but carrying aconcrete decking into the class would be too heavy, so ourbridge will have a wooden decking. The students then standback while I slide the decking place. (The hinged design makesit a potential hazard for pinching fingers).Figure 6. Shows thecompleted bridge.7
“Does it look like a bridge now?” The bridge is sitting flaton the floor, and you don’t see bridges laying flat on theground. <strong>Bridge</strong>s go across something. Two chairs in theroom are placed under each end of the bridge, to make itlook like a bridge. (Originally I used one chair under eachend, but this made it awkward to get on and off the bridge.A teacher pointed out that placing two chairs under eachend, spread apart slightly, would give them a clear pathdown the center of the bridge, which works much better.)The students line up, and are allowed to crawl across thebridge twice. Figure 7 shows the bridge in use. It takesabout 30 minutes to construct the bridge and give everyonetwo opportunities to crawl across it. I generally ask thequestion “Do you think this bridge is strong enough for yourteacher to crawl across it?” Most of the teachers are willing to give it a try. (All adults will havetrouble with their rear end getting caught on the lateral braces as they try to crawl through, andwill have to slide on their stomach to fit through. Large teachers will have a very difficult timefitting through the bridge, so you should size up the teacher and decide whether or not to ask.(Don’t put her in an embarrassing situation.)Up to this point there has been a lot of activity, and the students are now interested in bridges,so I begin the lecture part of the presentation. I have them sit together in a small group on thefloor, so they can see the pictures I have brought. First we learn to identify the different typesof bridges. The first picture is a small truss bridge very similar to the one they have built. I likethis picture because it makes the bridge they have built seem more realistic. The bridge theyhave built has three bays, while the one in the picture is an eight bay bridge. For the youngerchildren it is good to count the bays of the bridge together, to help them understand the bridgeterm “bay”.Figure 8 Eight Bay Truss <strong>Bridge</strong>Figure 8 is a small truss bridge. Figure 9 is a much larger truss bridge with the same basicdesign, and figure 10 is an arched truss bridge, sometimes called a rainbow truss bridge.8
The next two pictures (Figures 11 and 12) are of a stone arch bridge, the Font Du Gard insouthern France. This is a famous bridge, because it is one of the oldest bridges in the worldthat is still in good condition. The Romans in about 60 B.C.E. built it, so the bridge is more than2000 years old. This is an aqueduct bridge; the middle level was designed to carry a channel ofwater for the city. In early times, when a large number of people gathered together and formeda city, it was always a problem to get enough water for the people to drink, cook, wash, etc.Aqueducts like this helped solve the water problems of the early cities, and are still used today.The bridge is now a tourist trap, and if you go to southern France you can buy a ticket andhave the opportunity to walk across.Figure 13 a very unique arch design because you actually walk on the arches. This works finefor a pedestrian bridge, but it would be a bumpy ride to drive your car over it. Figure 14 is atied arch bridge.9
Figure 15 is the New River <strong>Bridge</strong> in West Virginia. It is a large steel arch bridge. I like the wayit comes out of the top of one mountain, and goes across to the other mountain.Figure 16 is of a large concrete girder bridge. The children do not get very excited about thisone, but it is one of the most common designs, so I included it.10
Figures 17 & 18 can be contrasted to show the difference between a cable-stayed bridge and asuspension bridge. In both cases, the cables are the main structure that holds up the bridgedeck. Both require very tall towers above the bridge for attaching the cables. In a cable-stayedbridge the cables are tied directly from the towers to the bridge deck. On a suspension bridge,there are catenary cables draped over the top of the towers and smaller cables are connectedfrom the catenary cables to the decking. The catenary cables are typically about five feet indiameter. Most people do not realize just how huge these cables are. Figure 18 is the Brooklyn<strong>Bridge</strong> one of the first really good suspension bridgesFigure18. Suspension <strong>Bridge</strong>.Figure 19 is the Tacoma Narrows <strong>Bridge</strong>, after it was rebuilt.This bridge originally had a thin girder type deck, rather thatthe truss type it currently has. The deck was very flexible, andthe bridge swayed in any wind storm. The people who livednear by and used the bridge ,referred to it as "GallopingGertie". One day a large wind storm came up and the bridgebegan oscillating violently. A news person filmed the bridge asit waived violently in the wind, and finally collapsed. It is a veryfamous film clip, that some of the children will have seen if theyhave visited a science center. Some people believe that theaerodynamics of the bridge was what caused it to waive soviolently and fail during the wind storm. Others felt that thedeck was too flexible, and that the flexibility was what causedthe bridge to collapse. When the bridge was rebuilt, the decking was made much stiffer, and itno longer sways in the wind.Figure 20 and 21 are of the Golden Gate <strong>Bridge</strong>, which is probably the most famous bridge inthe world. Some will refer to it as the "Full House" bridge because of the TV series. During thegold rush in California, ship captains would deliver supplies such as food, clothing and tools tothe miners. They would sail into the San Francisco bay, off-load supplies, and load the ship backup with gold. The ship captains named the two mountains that they sailed between to enter thebay "the Golden Gate", i.e. they sailed through the Golden Gate to deliver the supplies and loadup with gold. So when they built the <strong>Bridge</strong> across the two mountains, they named it theGolden Gate <strong>Bridge</strong>.11
At this point the children are usually getting tired of sitting and listening. The next part of thepresentation is to introduce them to the concepts of tension and compression. I explain thattension is stretching of the members, and compression is squeezing of the members. Some ofthe members in the trusses are in compression, and some are in tension. I have a chain whichis brought out at this time to illustrate that chains are very strong in tension, but weak incompression. We talk about replacing one of the members in the truss with a chain. Will thebridge still be strong? I first replace one of the compression members with a chain, and showthem that the bridge will collapse under even a small load. [The compression member I select isone of the diagonal members on the end of the truss.] I then replace a tension member with achain, and show that the bridge is as strong as before. [The tension member I select is thediagonal member adjacent to the compression member that was selected.]Some of the students understand this discussionof tension and compression and others do not.The chain is used to give a "hands-on" feel tothe forces generated in the truss members asthe bridge is loaded. All of the children get onemore turn to crawl across the bridge, and Iencourage them to touch the chain as theycross so they can "feel" the forces developed inthe chain because of their weight on the bridge,as shown in Figure 22. The final part of thepresentation is having the students take thebridge apart and pack it up, which is a quickprocess. The entire presentation takes aboutone hour.If you need information about ordering a bridge kit, please contact Doug Carroll at theUniversity of Missouri-Rolla, dougc@umr.edu or (573)-341-4554.12
Activity 1Introduce yourself.Discuss various bridges.Discuss names of bridges.Introduce various parts of a bridge.Work in cooperative group to discuss and learn about structures.Organize students into groups.Build a bridge.Steps:1. Lay the equipment out in order in which it will be used.2. Place all of the same parts together.3. Select a group of students to work on specific parts of the bridge.4. Finally, have each group work in their designated area. Keep students interested in activity.Explanation:Discuss the various parts of a bridge:The truss -Lateral brace - A rod that is in place to support the bridge.Floor beams – A wooden beam with two screws extended from either side.Truss brackets – An aluminum “ L” shape bracket with two holes.Decking – A wooden base that lines the bottom of the bridge.Wing nuts _ A nut that fits the screws on either side of the floor beam.DemonstrationInvite wizard from the Wizards Of Wright (W.O.W) program to visit your classroom to presentthe demo for an exciting hands-on experience. Contact Fran Johnson, W.O.W Program managerfrom the Education Outreach office WPAFB Ohio @ 255-0068.13
Suspension <strong>Bridge</strong>Aesthetic, light, and strong, suspension bridges can spandistances from 2,000 to 7,000 feet -- far longer than anyother kind of bridge. They also tend to be the mostexpensive to build. True to its name, a suspension bridgesuspends the roadway from huge main cables, whichextend from one end of the bridge to the other. Thesecables rest on top of high towers and are secured at eachend by anchorages.The towers enable the main cables to be draped over longdistances. Inside the anchorages, thecables are spread over a large area toevenly distribute the load and toprevent the cables from breakingfree.Suspension bridgeanchorageSuspension bridgeGolden Gate <strong>Bridge</strong>, SanFrancisco, CAArch <strong>Bridge</strong>Arch bridges are one of the oldest types of bridges andhave great natural strength. Instead of pushing straightdown, the weight of an arch bridge is carried outwardalong the curve of the arch to the supports at each end.These supports, called the abutments, carry the load andkeep the ends of the bridge from spreading out. Alsodiscuss tension and compression.Arch <strong>Bridge</strong>Bixby Creek <strong>Bridge</strong>,Monterey, CABeam <strong>Bridge</strong>A beam or "girder" bridge is the simplest and mostinexpensive kind of bridge. According to Craig Finley ofFinley/ McNary <strong>Engineering</strong>, "they're basically the vanillasof the bridge world."In its most basic form, a beam bridge consists of ahorizontal beam that is supported at each end by piers. Thebeam itself must be strong so that it doesn't bend under itsown weight and theBeam bridge14
Cable-Stayed <strong>Bridge</strong>Cable-stayed bridges may look similar to suspensionsbridges -- both have roadways that hang from cables andboth have towers. But the two bridges support the load ofthe roadway in very different ways. The difference lies inhow the cables are connected to the towers. In suspensionbridges, the cables ride freely across the towers,transmitting the load to the anchorages at either end. Incable-stayed bridges, the cables are attached to thetowers, which alone bear the load.ICable-stayed bridgeClark <strong>Bridge</strong>, Alton, ILActivity 2First <strong>Bridge</strong> BoxesClick on picture for a larger pictureHere is the bridge activity using cubes.FirstRun off 4 copies of a cube pattern to form the boxes. (Alternatives to Worksheets - CreativeTeaching Press) This pattern is glued to railroad board. Cut out and then formed into a stiff box.Make 4 boxes in this way.Join the boxes with tape.SecondUsing all the drawn bridges on the square or long paper, cut out the pictures and glue the partsonto the cubes.(see activity 2 of lesson plan or make a template as shown.)15
Finally, you have a bridge box that you can move to show the different types of bridgearchitecture. You will also have identified where some of these bridges are found.Activity 3<strong>Building</strong> a truss bridge using toothpicks and gumdropsObjectiveStudents will learn how to build a structure out of simple household products.Time allotted1 hourMaterialsToothpicks,Gumdrops,Wax paperOverheads ProjectorInstructionsPlace the model of several different bridges on the overhead for students to view. Place waxpaper on the desk for students to use as a work surface. Give each student a pile of toothpicksand a few gumdrops.Have each student build their bridge approximately twelve inches long using overheads as areference.AssessmentTeacher made test1. Cover bridge vocabulary.2. Discuss the various types of bridges.3. Have students draw a truss bridge.Activity 4Topic:StructureTime:Each activity can take as little as 15 minutes or launch full period lessons.Purpose:The activities demonstrated will give the students an opportunity to do hands on sciencethat is cheap and easily available to the teacher. Science, creativity and teambuilding are the16
primary areas covered by these activities. They may be developed into larger units. Acompetitive environment seems to help motivate students for these activities.Objectives:• To understand basic structural terminology and to identify these terms in a groupactivity.• To use simple items to demonstrate how design plays into structure. To offer manysimple activities to demonstrate different aspects of• Structure. -Procedures:The procedures for each activity will be outlined on the group activity cards.Materials:Each activity card will contain a supply list for that particular activity. Substitutions arewelcomed and any available item can be appropriate. Some supplies generally used are:SpaghettiStraws, Marshmallows, StringToothpicksMasking Tape, Clay, ScissorsStringPaperPaper ClipsAny Material AvailableMeasuring Devices Stop watchWeights (what ever you decide to use)Assessment: Various forms of assessment can be used. A competitive environmentseems to motivate and points become an easy way to determine grade. Rubric templates areattached.17
Activity 5Free Standing TowerGive each group (no more than 4 students per group) an envelope containing 2 pieces of 8 1/2x 11 paper and 12 paper clips and a pair of scissors.Instruct students to build the highest freestanding tower they can only using the supplies in theenvelope. The envelope and scissors may not be used.They only have 8 minutes to complete the structure.Inform the groups that they will earn points for every inch their structure is high. The structuremust stand for at least 6 second countRecord the scoresNow give the exact same amount of supplies and repeat the assignment. This time you willaward bonus points for towers that are higher than their previous structure. Close the activitydiscussing the role design played into the product. Point out that this is what design teams do inthe real world.Student’s cardYour group's assignment is to build a freestanding tower with the supplies contained in theenvelope and some scissors. You may alter the supplies; however you may not use theenvelope or scissors.Before building the structure plan with your group and discuss several possibilities. You onlyhave 8 minutes to complete this task.ScoringThe team will receive 20 points if they have a freestanding structure at the end of 8 minutes.The structure will receive 5 points for every inch high.The tallest structure will receive 15 additional bonus points.18
Resources and ReferencesThe Clark <strong>Bridge</strong>, Alton, Illinoishttp://www.altonweb.com/history/clarkbridge/index.htmlA photo history of the bridge featured in the NOVA program Super <strong>Bridge</strong>.American Society of Civil Engineershttp://www.asce.orgA site for engineering professionals with information on publications, jobopenings, educational programs, conferences and other industryresourcesAssociation for <strong>Bridge</strong> Construction and Designhttp://abcdpittsburgh.org/Learn about the activities of this organization devoted to improving thescience of bridge design, construction and maintenance.<strong>Bridge</strong> Research: Leading the Way to the Futurehttp://www.tfhrc.gov/pubrds/summer95/p95su23.htmAn article from the Turner Fairbanks Highway Research Center discussingthe importance of research in maintaining America’s bridges.Matsuo <strong>Bridge</strong> Companyhttp://www.matsuo-bridge.co.jp/english/index.htmA site profiling an innovative 72-year-old Japanese bridge company with aphoto catalog of its bridges and descriptions of bridge construction methods.Portland Cement Associationhttp://www.portcement.org/Take a tour through the cement making process, read the latest news inthe concrete industry and take the cement pond quiz.19
Precast/Prestressed Concrete Institutehttp://www.pci.org/This organization is dedicated to fostering greater understanding and useof precast/prestressed concrete. Their web site offers the opportunity tosearch for a concrete producer in your area and learn about the uses ofprecast/prestressed concrete in many types of construction projects.Boeing: Exploring <strong>Engineering</strong>9 Th Educators enrichment dayBoeing <strong>Educational</strong> outreach programFebruary 19, 2002Douglas R. Carroll, PhD, PEAssociate ProfessorDepartment of basic engineeringUniversity of Missouri-RollaBook<strong>Bridge</strong>sBy Fritz LeonhardtMIT Press, Cambridge 1990.VocabularyTrusses -Floor beams-Lateral brace-Wing nuts-Coupling-Decking-A truss is a type of framework, usually comprising straight struts and ties,which are designed to be stiff, even if all the joints are considered to bepinned.A wooden structure that is used to allow the flooring to lie properlyThe aluminum support that stabilizes the top of the bridgeA nut with wing like projections for thumb and forefinger leverage inturningA device that links or connectsTo furnish with or as if with a deck20