Assembly and owner's manual - Smoke Hollow Smokers by Outdoor ...
Assembly and owner's manual - Smoke Hollow Smokers by Outdoor ...
Assembly and owner's manual - Smoke Hollow Smokers by Outdoor ...

You also want an ePaper? Increase the reach of your titles
YUMPU automatically turns print PDFs into web optimized ePapers that Google loves.
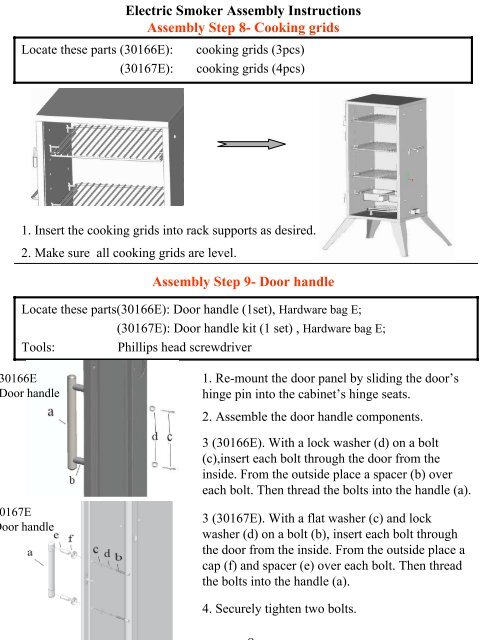
Electric <strong>Smoke</strong>r <strong>Assembly</strong> Instructions<strong>Assembly</strong> Step 8- Cooking gridsLocate these parts (30166E): cooking grids (3pcs)(30167E): cooking grids (4pcs)1. Insert the cooking grids into rack supports as desired.2. Make sure all cooking grids are level.<strong>Assembly</strong> Step 9- Door h<strong>and</strong>leLocate these parts(30166E): Door h<strong>and</strong>le (1set), Hardware bag E;(30167E): Door h<strong>and</strong>le kit (1 set) , Hardware bag E;Tools: Phillips head screwdriver0166Eoor h<strong>and</strong>le1. Re-mount the door panel <strong>by</strong> sliding the door’shinge pin into the cabinet’s hinge seats.2. Assemble the door h<strong>and</strong>le components.3 (30166E). With a lock washer (d) on a bolt(c),insert each bolt through the door from theinside. From the outside place a spacer (b) overeach bolt. Then thread the bolts into the h<strong>and</strong>le (a).167Eoor h<strong>and</strong>le3 (30167E). With a flat washer (c) <strong>and</strong> lockwasher (d) on a bolt (b), insert each bolt throughthe door from the inside. From the outside place acap (f) <strong>and</strong> spacer (e) over each bolt. Then threadthe bolts into the h<strong>and</strong>le (a).4. Securely tighten two bolts.