Manual for Hand Portable Carbon Dioxide Extinguishers. pdf
Manual for Hand Portable Carbon Dioxide Extinguishers. pdf
Manual for Hand Portable Carbon Dioxide Extinguishers. pdf

You also want an ePaper? Increase the reach of your titles
YUMPU automatically turns print PDFs into web optimized ePapers that Google loves.
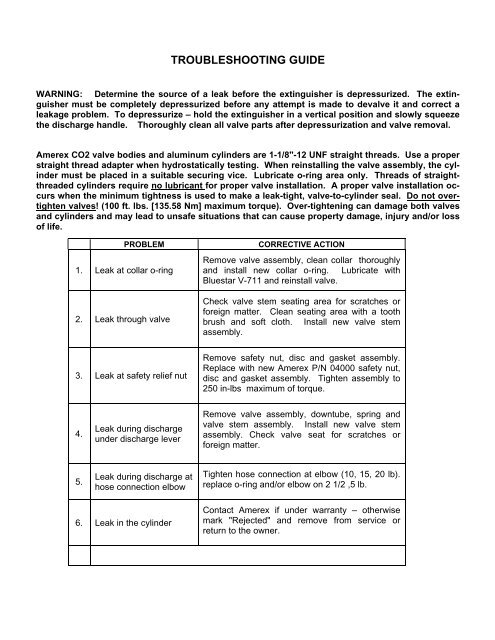
TROUBLESHOOTING GUIDEWARNING: Determine the source of a leak be<strong>for</strong>e the extinguisher is depressurized. The extinguishermust be completely depressurized be<strong>for</strong>e any attempt is made to devalve it and correct aleakage problem. To depressurize – hold the extinguisher in a vertical position and slowly squeezethe discharge handle. Thoroughly clean all valve parts after depressurization and valve removal.Amerex CO2 valve bodies and aluminum cylinders are 1-1/8"-12 UNF straight threads. Use a properstraight thread adapter when hydrostatically testing. When reinstalling the valve assembly, the cylindermust be placed in a suitable securing vice. Lubricate o-ring area only. Threads of straightthreadedcylinders require no lubricant <strong>for</strong> proper valve installation. A proper valve installation occurswhen the minimum tightness is used to make a leak-tight, valve-to-cylinder seal. Do not overtightenvalves! (100 ft. lbs. [135.58 Nm] maximum torque). Over-tightening can damage both valvesand cylinders and may lead to unsafe situations that can cause property damage, injury and/or lossof life.PROBLEM1. Leak at collar o-ring2. Leak through valveCORRECTIVE ACTIONRemove valve assembly, clean collar thoroughlyand install new collar o-ring. Lubricate withBluestar V-711 and reinstall valve.Check valve stem seating area <strong>for</strong> scratches or<strong>for</strong>eign matter. Clean seating area with a toothbrush and soft cloth. Install new valve stemassembly.3. Leak at safety relief nutRemove safety nut, disc and gasket assembly.Replace with new Amerex P/N 04000 safety nut,disc and gasket assembly. Tighten assembly to250 in-lbs maximum of torque.4.Leak during dischargeunder discharge leverRemove valve assembly, downtube, spring andvalve stem assembly. Install new valve stemassembly. Check valve seat <strong>for</strong> scratches or<strong>for</strong>eign matter.5.Leak during discharge athose connection elbowTighten hose connection at elbow (10, 15, 20 lb).replace o-ring and/or elbow on 2 1/2 ,5 lb.6. Leak in the cylinderContact Amerex if under warranty – otherwisemark "Rejected" and remove from service orreturn to the owner.