Modern Fan Company Controls
Modern Fan Company Controls
Modern Fan Company Controls

You also want an ePaper? Increase the reach of your titles
YUMPU automatically turns print PDFs into web optimized ePapers that Google loves.
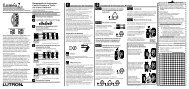
Instructions for Setting Remote Frequency:Your Wall Mounted (#004) orHand-Held Remote Control(#003) is a two componentsystem. The Wall Switch orHandset is preset to the samefrequency as the ReceivingUnit. You may want tochange these settings if:dip switches(a) Other RF signals or appliances are interferingwith operation of your ceiling fan.(b) You are installing more than one fan in closeproximity, and you want to control these fans separately.Be sure power to your fan and switch is OFF. Locate the dip switches aspictured above, and carefully select a new combination of “on” and “off”switches. Be sure the combinations match on the sending unit and the receivingunit. Turn power back on and test that the new frequency corresponds and thatyour fan is functioning properly.Operation Instructions:With power supply on, use the handset or wall switch to send commands to thefan and/or light.To dim light, hold down light button until desired level is reached. <strong>Fan</strong>s withfluorescent lights must use “ND”- non-dimming series controls.Note: Due to these controls’ (#003 and #004) reliance on electronics, it isrecommended that power be turned off at the wall location during electricalstorms, or during long periods of vacancy. This will limit the possibility ofelectrical damage to the receiving unit.Reminder:Any fan that uses a fluorescent lamp may not be dimmed or operated with adimming control. Non-dimming versions of our controls are available for usewith the Aurora, Aurora Hugger, or any other model using a fluorescent lamp.Non dimming controls are designated by the suffix “ND”.