Veritas® Bench Plane Tote - Lee Valley Tools
Veritas® Bench Plane Tote - Lee Valley Tools
Veritas® Bench Plane Tote - Lee Valley Tools

Create successful ePaper yourself
Turn your PDF publications into a flip-book with our unique Google optimized e-Paper software.
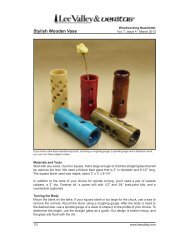
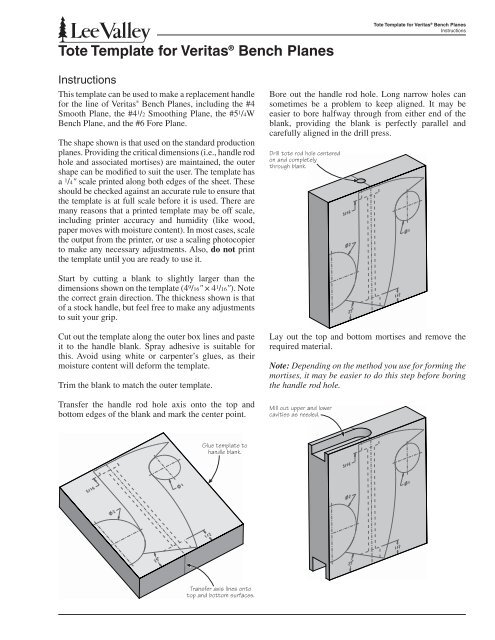
<strong>Tote</strong> Template for Veritas ® <strong>Bench</strong> <strong>Plane</strong>sInstructions<strong>Tote</strong> Template for Veritas ® <strong>Bench</strong> <strong>Plane</strong>sInstructionsThis template can be used to make a replacement handlefor the line of Veritas ® <strong>Bench</strong> <strong>Plane</strong>s, including the #4Smooth <strong>Plane</strong>, the #4 1 /2 Smoothing <strong>Plane</strong>, the #5 1 /4W<strong>Bench</strong> <strong>Plane</strong>, and the #6 Fore <strong>Plane</strong>.The shape shown is that used on the standard productionplanes. Providing the critical dimensions (i.e., handle rodhole and associated mortises) are maintained, the outershape can be modified to suit the user. The template hasa 1 /4" scale printed along both edges of the sheet. Theseshould be checked against an accurate rule to ensure thatthe template is at full scale before it is used. There aremany reasons that a printed template may be off scale,including printer accuracy and humidity (like wood,paper moves with moisture content). In most cases, scalethe output from the printer, or use a scaling photocopierto make any necessary adjustments. Also, do not printthe template until you are ready to use it.Bore out the handle rod hole. Long narrow holes cansometimes be a problem to keep aligned. It may beeasier to bore halfway through from either end of theblank, providing the blank is perfectly parallel andcarefully aligned in the drill press.Drill tote rod hole centeredon and completelythrough blank.Start by cutting a blank to slightly larger than thedimensions shown on the template (4 9 /16" × 4 1 /16"). Notethe correct grain direction. The thickness shown is thatof a stock handle, but feel free to make any adjustmentsto suit your grip.Cut out the template along the outer box lines and pasteit to the handle blank. Spray adhesive is suitable forthis. Avoid using white or carpenter’s glues, as theirmoisture content will deform the template.Trim the blank to match the outer template.Transfer the handle rod hole axis onto the top andbottom edges of the blank and mark the center point.Lay out the top and bottom mortises and remove therequired material.Note: Depending on the method you use for forming themortises, it may be easier to do this step before boringthe handle rod hole.Mill out upper and lowercavities as needed.Glue template tohandle blank.Transfer axis lines ontotop and bottom surfaces.