You also want an ePaper? Increase the reach of your titles
YUMPU automatically turns print PDFs into web optimized ePapers that Google loves.
WARRANTYPreSonus Limited WarrantyPreSonus Audio Electronics Inc. warrants this product to be free of defects in material andworkmanship for a period of one year from the date of original retail purchase. This warranty isenforceable only by the original retail purchaser. To be protected by this warranty, the purchasermust complete and return the enclosed warranty card within 14 days of purchase. During thewarranty period PreSonus shall, at its sole and absolute option, either repair or replace, free ofcharge, any product that proves to be defective on inspection by PreSonus or its authorizedservice representative. To obtain warranty service, the purchaser must first call or writePreSonus at the address and telephone number printed below to obtain a Return AuthorizationNumber and instructions of where to return the unit for service. All inquiries must be accompaniedby a description of the problem. All authorized returns must be sent to the PreSonus repair facilitypostage prepaid, insured and properly packaged. PreSonus reserves the right to update any unitreturned for repair. PreSonus reserves the right to change or improve the design of the product atany time without prior notice. This warranty does not cover claims for damage due to abuse,neglect, alteration or attempted repair by unauthorized personnel, and is limited to failures arisingduring normal use that are due to defects in material or workmanship in the product. Any impliedwarranties, including implied warranties of merchantability and fitness for a particular purpose, arelimited in duration to the length of this limited warranty. Some states do not allow limitations on howlong an implied warranty lasts, so the above limitation may not apply to you. In no event willPreSonus be liable for incidental, consequential or other damages resulting from the breach of anyexpress or implied warranty, including , among other things, damage to property, damage based oninconvenience or on loss of use of the product, and, to the extent permitted by law, damages forpersonal injury. Some states do not allow the exclusion of limitation of incidental or consequentialdamages, so the above limitation or exclusion may not apply to you. This warranty gives you specificlegal rights, and you may also have other rights which vary form state to state. This warranty onlyapplies to products sold and used in the United States of America. For warranty information in allother countries please refer to your local distributor.PreSonus Audio Electronics, Inc.7257 Florida Blvd.Baton Rouge, LA 70806(225) 216-7887? 2003, PreSonus Audio Electronics, Incorporated. All rights reserved.
PRESONUS2. 1 A WORD ABOUT COMPRE SSIONPunch, apparent loudness, presence… just three of many termsused to describe the effects of compression/ limiting.Compression and limiting are forms of dynamic range (volume)control. Audio signals have very wide peak to average signal levelratios (sometimes referred to as dynamic range which is thedifference between the loudest level and the softest level). Thepeak signal can cause overload in the audio recording orreproduction chain resulting in signal distortion. Acompressor/limiter is a type of amplifier in which gain is dependenton the signal level passing through it. You can set the maximumlevel a compressor/limiter allows to pass through, thereby causingautomatic gain reduction above some predetermined signal levelor threshold.Compression refers basically to the ability to reduce the outputlevel of an audio signal by a fixed ratio relative to the input. It isuseful for lowering the dynamic range of an instrument or vocal,making it easier to record without distorting the recorder. It alsoassists in the mixing process by reducing the amount of levelchanges needed for a particular instrument. Take, for example, avocalist who moves around in front of the microphone whileperforming, thus making the output level vary up and downunnaturally. A compressor can be applied to the signal to helpcorrect this recording problem by reducing the ‘louder’ passagesenough to be compatible with the overall performance.How severely the compressor reduces the signal is determined bythe compression ratio and compression threshold. A ratio of 2:1 orless is considered mild compression, reducing the output by twofor signals greater than the compression threshold. Ratios above5
PRESONUS10:1 are considered hard limiting. Limiting refers to the point atwhich the signal is restrained from going any louder at the output.The level of input signal at which the output is reduced isdetermined by the compression threshold. As the compressionthreshold is lowered, more and more of the input signal iscompressed (assuming a nominal input signal level). Care mustbe taken not to ‘over compress’a signal. Too much compressiondestroys the acoustical dynamic response of a performance.(‘Over compression’, however, is used by some engineers as aneffect, and with killer results!)Compressor/limiters are commonly used for many audioapplications. A kick drum can get lost in a wall of electric guitars.No matter how much level is increased, the kick drum stays ‘lost inthe mud’. Add a touch of compression and tighten up that kickdrum sound allowing it to ‘punch’ through without having to crankthe level way up.A vocal performance usually has a wide dynamic range.Transients (the very loudest portion of the signal) can be faroutside the average level of the vocal signal. It is extremely difficultto ride the level with a console fader. A compressor/limiterautomatically controls gain without altering the subtleties of theperformance.A solo guitar can seem to be masked by the rhythm guitars.Compression can make your ‘lead’ soar above the track withoutshoving the fader through the roof .Bass guitar can be difficult to record . A consistent level with goodattack can be achieved with proper compression . Your bassdoesn’t have to be washed out in the low end of the mix . Let thecompressor/limiter give your bass the punch it needs to drive thebottom of the track .
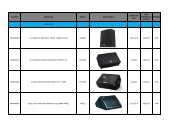
PRESONUS2. 2 COMP16 FRONT PANEL BASIC L AYOUTThe front panel on the COMP16 is divided into three sections.These are:1. Presets:Sixteen selectable preset positions.The Presets for the COMP16 are controlled by this sixteenposition rotary encoder. As the encoder is rotated,parameters are digitally switched, simultaneouslycontrolling attack, release, ratio and threshold.2. Controls:The Input control adjusts the gain on the input amplifier.Note: The input control is always active.3. Output & PushbuttonsThe Output control is used to set the desired output of theCOMP16. It is sometimes referred to as ‘gain makeup’control. This term is derived from the fact that as the7
PRESONUScompressor lowers the output level during gain reduction,the overall signal level is lowered, requiring the user to‘makeup’the gain thereby restoring the original signal level.Output to MeterThis button selects the function of the Output/GainReduction meter. Pushed out, the meter gives you thelevel of the gain reduction. Pushed in, the meter gives youthe level of the signal after compression; the output level.BypassIf the BYPASS button is not pushed in, the COMP16 isprocessing the signal (compressing). When pushed in, theCOMP16 is no longer compressing the signal, however theinput gain setting remains active.2.2 COMP16 BACK PANEL LAYOUT
PRESONUSInputThe input jack accepts balanced/unbalanced tip-sleeve ortip-ring-sleeve connectors or XLR connectors. The inputcan handle up to +22dBu unbalanced levels.OutputThe output jack accepts (balanced/unbalanced) tip-sleeve,tip-ring-sleeve or XLR connectors. The output will deliverup to +22dBu in signal level unbalanced.2. 3 PRESETSVocal1 SOFT - Easy compression. A low ratio setting for balladsallowing a wider dynamic range. Good for ‘live’use. This settinglets the vocal sit ‘in the track’.Threshold Ratio Attack Release-8.2dB 1.8:1 0.002mS 38mS2 MEDIUM - More limiting than preset 1 for a narrower dynamicrange. It moves the vocal more up front in the mix.Threshold Ratio Attack Release9
PRESONUS-3.3dB 2.8:1 0.002mS 38mS3 SCREAMER - For loud vocals. Fairly hard compression for avocalist who is ‘on’and ‘off’the microphone a lot. It puts the voice‘in your face’.Threshold Ratio Attack Release-1.1dB 3.8:1 0.002mS 38mSPerc.1 SNARE/KICK - Allows the first transient through andcompresses the rest of the signal giving a hard snap up front witha longer release.Threshold Ratio Attack Release-2.1dB 3.5:1 78mS 300mS2 L/R (Mono) OVERHEAD - A low ratio and threshold gives a‘fat’contour to even out the sound from overhead drum mics. Lowend is increased and the overall sound is more present and lessambient. More ‘boom’less ‘room’.Threshold Ratio Attack Release-13.7dB 1.3:1 27mS 128mSFretted1 ELECTRIC BASS - A fast attack and slow release to tighten upthe electric bass and give you control for more consistent level.
PRESONUSThreshold Ratio Attack Release-4.4dB 2.6:1 45.7mS 189mS2 ACOUSTIC GUITAR - This setting accentuates the attack ofthe acoustic guitar and helps maintain an even signal levelkeeping the acoustic guitar from disappearing in the track.Threshold Ratio Attack Release-6.3dB 3.4:1 188mS 400mS3 ELECTRIC GUITAR - A setting for ‘crunch’ electric rhythmguitar. A slow attack helps get the electric rhythm guitar up closeand personal and gives punch to your crunch.Threshold Ratio Attack Release0.1dB 2.4:1 26mS 194mSKeyboards1 PIANO - A special setting for an even level. Designed to helpeven up the top and bottom of an acoustic piano. Helps the lefthand be heard with the right hand.Threshold Ratio Attack Release-10.8dB 1.9:1 108mS 112mS2 SYNTH - Fast attack and release for synthesizer horn stabsand for bass lines played on a synthesizer.Threshold Ratio Attack Release-11.9dB 1.8:1 0.002mS 85mS11
PRESONUS3 ORCHESTRAL - Use this setting for string ‘pads’ and othertypes of synthesized orchestra parts. It will decrease the overalldynamic range for easier placement in the mix.Threshold Ratio Attack Release3.3dB 2.5:1 1.8mS 50mSLimit1 MONO LIMITER - Just as the name implies. A hard limitersetting (brick wall) ideal for controlling level to the 2 track mixdowndeck or Mono output.Threshold Ratio Attack Release5.5dB 7.1:1 0.001mS 98mS2 CONTOUR - A contoured setting for use on the Mono output tofatten up the mix.Threshold Ratio Attack Release-13.4dB 1.2:1 0.002mS 182mSEffects1 SQUEEZE - Dynamic compression for solo work, especiallyelectric guitar. It gives you that glassy ‘tele/strat’ sound. A trueclassic.Threshold Ratio Attack Release-4.6dB 2.4:1 7.2mS 93mS
PRESONUS2 PUMP - Make the COMP16 ‘pump up the prime’. A setting formaking the compressor pump in a desirable way. This effect isgood for snare drum to increase the length of the transient bybringing the signal up after the initial spike. Very contemporary.Threshold Ratio Attack Release0dB 1.9:1 1mS 0.001mS3 Tamer – Tame that funky low end. Designed to help controllow end transients. This setting is especially useful for BassGuitar.Threshold Ratio Attack Release-8dB 2:1 1mS 50mS13
PRESONUS2.4 APPLICATION GUIDEQUICK START1. Connect your COMP16 using one input jack (TS, TRS, orXLR) and one or more of the output jacks(TS, TRS, orXLR).2. Select your preset. (Refer to the preset descriptions above.Remember that the Ratio, Attack and Release knobs areonly active in Manual mode.)3. Do not push the bypass button in.4. Turn the Input knob all the way to -20 (counter-clockwise).5. Set the Output knob on 0.6. Slowly turn the Input knob up (clockwise) until the GainReduction meters begin to move. Continue to rotate theInput knob until the Gain Reduction meters read between -5 and -7.7. Adjust the Output knob to the desired output level.You should now have a very natural sounding compressedsignal. Of course you should experiment with the settings tosuit your taste.14
PRESONUSBASIC CONNECTIONSThe COMP16 can be hooked to another processor, such as theEQ3B or TubePre in a live or studio environment. Please note thata microphone can not be plugged directly into the COMP16. Themicrophone has to be preamplified first. The TubePre would be aperfect preamp in front of the COMP16. We do recommend thatwhenever possible, balanced cables be used. Examples ofbalanced cables would be XLR or TRS (Tip – Ring – Sleeve). Abalanced cable is preferred because it generally has a greaterlevel of noise rejection. In other words it is less susceptible tooutside interference.Use with a Console/Mixer InsertThe COMP16 can be connected to an insert point on a console(mixer) by using a TRS Y-cable. This cable is Y-shaped, has asingle TRS ¼” jack on one end and two ¼” TS (Tips-Sleeve) jackson the other end. The single end will look like a stereo ¼”connector jack. This end of the cable plugs into the insert jack onthe mixer channel. The other ends of the cable plug into the inputand output of the EQ3B. If the EQ3B does not work immediately,you may want to try changing the jacks that are plugged into theinput and output of the unit.15
PRESONUSBASIC OPERATING PRO CEDURESSetting Compression AmountYour COMP16 was designed with a fixed threshold mode ofoperation. This differs from other compressors in the fact thatthere is no threshold control. This offers the unique ability toimmediately hear the sometimes subtle differences betweenpresets which each have unique threshold settings. In setting thecompression amount, always begin with the Input control all theway counter-clockwise (-20dB), and slowly increase the input untilthe Gain Reduction meters begin to register the compressionactivity. The more you crank up the Input the more compressionyour signal will experience. Always pay close attention to the bestjudge of your sound, your ear. You should also frequently removethe compression from the signal using the Bypass button to listento the changes in your sound. In modern recording practice, it iscustomary to adjust the Output control such that the Input andOutput level are of equal amounts according to the Output/GainReduction meter. This gives you an equal level output so that youcan switch processing in and out to compare difference.
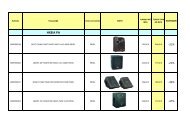
PRESONUS3.1 EQ3B FRONT PANE L BASIC LAYOUTThe front panel on the EQ3B is divided into three sections. Theseare the three bands of equalization:There is a frequency selection knob (Hz), gain/gain reduction(dB)(amplitude) knob and a Q control. The frequency selection knob(Hz) allows the user to choose the center frequency of that band ofthe EQ. The Q knob allows the user to alter the width of thefrequency being adjusted. Q is defined as the ratio of the centerfrequency divided by bandwidth. An example of how the widthlooks can be seen below in Figure 1. An example of use of high Qwould be a “Notch Filter”. A Notch Filter is used to remove a smallfrequency range that may be annoying or unwanted. An exampleof wide width or low Q would be a bell. An example of using a bellwould be a low end roll off. Let’s say that a person is performinglive and the low end is too overpowering. The engineer or soundperson could set the Q at 0.1, frequency at 80Hz and the gainreduction to -12. This would enable that person to lower a widefrequency range fairly quickly. The Gain/Gain Reduction knob (dB)allows the user to raise or lower the amplitude (peak) of thechosen frequency.17
PRESONUSInputThe input jack accepts balanced/unbalanced tip-sleeve ortip-ring-sleeve connectors or XLR connectors. The inputcan handle up to +24dBu unbalanced levels.OutputThe output jack accepts (balanced/unbalanced) tip-sleeve,tip-ring-sleeve or XLR connectors. The output will deliverup to +24dBu in signal level unbalanced.3. 2 APPLICATION GUIDEThe EQ3B can be hooked to another processor, such as theCOMP16 or TubePre in a live or studio environment. We dorecommend that whenever possible, balanced cables be used.Examples of balanced cables would be XLR or TRS (Tip – Ring –Sleeve). A balanced cable is preferred because it generally has agreater level of noise rejection. In other words it is less susceptibleto outside interference.Use with a Console/Mixer InsertThe EQ3B can be connected to an insert point on a console(mixer) by using a TRS Y-cable. This cable is Y-shaped, has asingle TRS ¼” jack on one end and two ¼” TS (Tips-Sleeve) jackson the other end. The single end will look like a stereo ¼”19
PRESONUSconnector jack. This end of the cable plugs into the insert jack onthe mixer channel. The other ends of the cable plug into the inputand output of the EQ3B. If the EQ3B does not work immediately,you may want to try changing the jacks that are plugged into theinput and output of the unit.
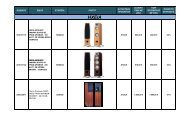
PRESONUS4 .1 HP4 FRONT PANEL B ASIC LAYOUTThe front panel on the HP4 is divided into three sections. Theseare the potentiometers (knobs), headphone jacks, and buttons:Headphone VolumeThe HP4 has the potential to be very loud (it goes to 12).Please be careful when you first start passing sound throughthe unit. It is generally a good idea to start with the volume setat 1 and then bring the volume up.Monitor LevelThe monitor level knob corresponds to the output volume ofthe output on the back of the HP4. The level can be muted bypressing the Monitor Mute button.MonoWhen the Mono button is pushed in, each input will besummed together on each output. For example, if you pluga CD player into the left input and press the mono button,the signal from the left input will be present in the left andright headphone and master output. When the Mono button21
PRESONUSis not pushed in, the left output will have the left input signaland vice-versa.Monitor MuteThe monitor mute button is handy when you are only usingthe headphone outputs and don’t want to use the MasterOutputs. Also, it enables the user to hit one button ratherthan turn down the volume knob for the Monitor Level. Agood use of this button would be for recording in front of acomputer or DAW. When a mic is on, the Monitor Mutebutton would be pushed in to prevent feedback. When therecording/performance is over, the mic could be muted andthen the Monitor Mute button would be disengaged.4 .1 BACK PANEL BASIC LA YOUTInputThe input jack accepts balanced/unbalanced tip-sleeve ortip-ring-sleeve connectors. The input can handle up to+24dBu unbalanced levels.OutputThe output jack accepts (balanced/unbalanced) tip-sleeveor tip-ring-sleeve. The output will deliver up to +24dBu insignal level unbalanced. These outputs are designed to be
PRESONUSconnected to the power amp of your studio speakers, to theinputs of self amplified speakers, or to another HP4.4 .2 APPLIC ATION GUIDEThe HP4 can be hooked to another processor, such as theCOMP16 or TubePre in a live or studio environment. We dorecommend that whenever possible, balanced cables be used. Anexample of a balanced cable would be a TRS (Tip – Ring –Sleeve). A balanced cable is preferred because it generally has agreater level of noise rejection. In other words it is less susceptibleto outside interference.Use with a ConsoleThe HP4 can be connected to the headphone output of aconsole/mixer to multiply the headphone outputs. Care should betaken that the headphone output level of the console/mixer is notset to high. Setting the output level to the HP4 too loud, couldcause the unit to distort. The monitor outputs are designed to beconnected to the power amp of your studio speakers, to the inputsof self amplified speakers, or to another HP4.23
PRESONUS5.1 COMP16 SPECIFICATION SNumber of Channels................................................... 1Dynamic Range ................................................ >115dBSignal to Noise Ratio .......................................... >95dBHeadroom......................................................... +22dBuFrequency Response............................. 10Hz to 50kHzCompression Ratio .......................................1:1 to 20:1Compressor Attack Time .................. 0.01mS to 100mSCompressor Release Time .................. 10mS to 500mSXLR Input Impedance .................................... 10kOhmsTRS Input Impedance.................................... 10kOhmsXLR Output Impedance ................................... 51OhmsTRS Output Impedance ................................... 51OhmsTHD + Noise.....................................................
PRESONUS5.2 EQ3B SPECIFICATIONSNumber of Channels................................................... 1Dynamic Range ................................................ >115dBSignal to Noise Ratio .......................................... >95dBHeadroom......................................................... +22dBuFrequency Response............................. 10Hz to 50kHzXLR Input Impedance .................................... 10kOhmsTRS Input Impedance.................................... 10kOhmsXLR Output Impedance .................................. 51 OhmsTRS Output Impedance .................................. 51 OhmsTHD + Noise...................................................
PRESONUS5 .3 HP4 SPECIFICATION SNumber of Channels.......................................1 in 5 outDynamic Range ................................................ >115dBSignal to Noise Ratio .......................................... >95dBHeadroom......................................................... +22dBuFrequency Response............................. 10Hz to 50kHzInput Impedance............................................ 10kOhmsMaster Output Impedance............................... 51 OhmsTHD + Noise...................................................