
You also want an ePaper? Increase the reach of your titles
YUMPU automatically turns print PDFs into web optimized ePapers that Google loves.
PKZ42766 05482 16646 8<strong>ParkZone</strong> ® products are distributed exclusively byHorizon Hobby, Inc.4105 Fieldstone RoadChampaign, IL 61822©2006 Horizon Hobby, Inc.www.parkzone.com9135
Step 2Attaching the Vertical Fins1. Slide the fins into the slots on the fuselage. The leading edgeof the fin should fit under the retainer that is already securedin the fuselage.2. Confirm that the fit is tight and both fins are secured properly.Battery CapNote: It may be helpful to add a few drops of CA to the front tips of the vertical stabs inorder to keep them in place while flying your F-27C <strong>Stryker</strong> <strong>PNP</strong>. There is rubber double-sidedtape on the front of each one, but over time, and despite a tight tension fitwhen you slide the fins on the first time, they can lose their sticking power. At speedsexceeding 80 mph, it is good, for your safety and the safety of your plane, to add CA toensure they will stay in place.Step 3Installing Your ReceiverYour F-27C <strong>Stryker</strong> <strong>PNP</strong> requires, at minimum, a 3-Channel FM 72MHz radio system, and utilizes elevons that control pitchand roll. The E-flite 25A brushless ESC that comes already installed in your F-27C <strong>Stryker</strong> <strong>PNP</strong> controls throttle.1. Plug the ESC lead into the Throttle channel of your receiver.2. Consult your radio instructions for the set-up for elevons/”V” tail control.Make certain to carefully route the receiver antenna from the receiver through the bottom of the left wing. There is asmall cavity molded in the foam for the purpose of running the antenna through (just behind the carbon spar in the wing).Make sure the antenna exits the bottom left wing tip so there is at least 14 inches (35.5 cm) of the antennahanging from the plane to ensure the range will be sufficient.Note: Always make certain that you perform a proper range check prior to your first flight and after you have made anychange to your receiver and/or transmitter.3
Step 2continuedKeep any body parts, clothing and tools clear of the propellerarc. Never leave the battery connected when you are notflying the aircraft. Always remove the battery pack from themodel before charging the battery, and when finished flying.Programming:The programming sequence of the E-flite 25A BrushlessESC uses an intuitive stick up=Full Throttle orstick down=Idle menu system that is designed to be verysimple to learn and remember.The default setup for your E-flite 25-amp ESC is:• 3S auto cutoff• Brake inactive• 4-pole and greater timing• Auto setting throttle input rangeTo enter the programming mode:1. With the battery disconnected from the ESC, and thetransmitter turned on, first move the throttle stick to thefull-power position. Leave it in this position and thenconnect the battery to the controller.2. After five seconds, the ESC will give two sets of fastringing tones to indicate you have successfully enteredthe programming mode.3. Once you hear these tones, move the stick to center andthe ESC will beep once, indicating that you are at menuitem #1.4. The ESC will now wait five seconds for you to make yourselection. Move the stick to Full Throttle or to Idle.5. When you have made a valid selection, the ESC will beeponce with a lower tone and then you can move the stickback to center for the next menu item. It will then beeptwice indicating that you are at menu item #2 (threetimes for menu item #3 and so on). If you do not makea selection within 5 seconds, the ESC will move to thenext menu item.To exit programming mode at any point in themenu sequence:1. Move the throttle stick to Idle, after making your lastmenu selection.2. Simply unplug the battery – or – wait approximatelyeight seconds until the ESC indicates it has armed themotor with one set of three medium length, rising tones.Menu Item Selections:The menu items and choices are as below;Menu Item 1: Cell CountStick up - 3S Li-Po soft cut (default setting)Stick down - 2 cells Ni-Cd or Ni-MH and our exclusive 70%Smart Cut. (See below for Smart Cutinformation).To access the 70% Smart Cut option, leave the stick at FullThrottle for 7 seconds while in menu item 1, until 7 beepsare heard, then continue through the program normally. Thisoption will activate the soft cut at 70% of startup voltage.For example, if your pack measures 10.0 volts at startup,then the soft cut will occur at 7 volts. The Smart Cut optionwill check the startup voltage every time you plug the controllerin, so beware of using partially charged packs, as thesystem cannot protect your Li-Po batteries if you are usingSmart Cut and connect a partially charged pack.Note: The default setting is 3-cell auto cutoff (3.05 volts percell). You will know that your battery pack has reached autocutoff when you hear the motor “whine/pulse” repeatedly.Menu Item 2: BrakeStick up - Brake inactive (default setting)Stick down - Brake activeThis option gives you the choice to force the propeller tostop during flight or allow it to windmill. Use the brakeoption for gliders.Menu Item 3: TimingStick up - 4-pole and greater timing mode (default setting)Stick down - 2-pole motorsRefer to your motor specifications to confirm the numberof poles.Menu Item 4: Input RangeStick up - Throttle range 1.1mS to 1.9mSStick down - Auto set (default setting)This option is to allow for all the different radios on themarket. Most radios will work well with the auto set option,but some radios have a wider output range and may give amore linear response with the 1.1- to 1.9mS range. If youfeel that there is too much “dead” area in the stick movementnear full throttle, try adjusting the end points in yourradio or change to the wider input range. Beware that if5
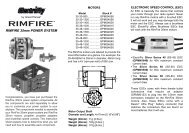
Step 2continuedthese settings are not correct, it may be impossible to armthe controller. If this happens, return the input range settingto the default auto learning setting. The auto setting optionlearns the minimum position of your throttle (between 1.1and 1.3mS), stores this value at each startup, and thenadds a value of 0.6mS for the full throttle setting.Error Codes:The controller will beep continuously (beep..beep..beep) ifthe input voltage is below the soft-cut voltage when thebattery is connected. If you have trouble arming the controller,enter the programming mode and try the auto settingin menu item 4 to see if it helps fix your problem. If it is acomputer radio, you may alternatively increase your ATV(endpoint) percentages.Note: If you reverse the polarity of the ESC, you will destroyit. Do not allow the ESC to contract any moisture.When flying in hot weather, we recommend checking on thecondition of the ESC, battery, and motor after each flight.You should strongly consider letting the electronic componentscool between flights. We also recommend throttlemanagement. Flying an entire flight at full throttle cancause permanent damage to your motor, battery, and ESC.For more information regarding specifications and informationon the E-flite 25A ESC, go to e-fliterc.comStep 3<strong>ParkZone</strong> 6-Pole 1880Kv Brushless MotorYour F-27C <strong>Stryker</strong> <strong>PNP</strong> is powered by <strong>ParkZone</strong>’s 6-pole1880Kv brushless motor, which is installed at the factory,and a 6 x 4 propeller. The 6 x 4 propeller, along with themotor, was chosen to create the correct balance ofspeed and torque and we do not recommend changingpropeller sizes.Warning:Changing the propeller size could increase the current drawand may cause damage to the motor, ESC and battery pack.Step 4Charging Your Li-Po BatteryThe <strong>ParkZone</strong> team recommends that you fly your F-27C<strong>Stryker</strong> <strong>PNP</strong> with a 3S Li-Po battery pack. The one thatcomes stock with the ready-to-fly version of the F-27C isa 3S 11.1V 2200mAh pack, which features a balancingcharge lead to more safely charge the pack (PKZ1030). Inorder to avoid damage and possibly a fire, you must chargeyour Li-Po pack with a Li-Po compatible charger and at theproper charge rate. The <strong>ParkZone</strong> Li-Po charger that comeswith the F-27C <strong>Stryker</strong> <strong>PNP</strong> ready-to-fly will work well withthe <strong>ParkZone</strong> Li-Po battery pack (PKZ1040).Refer to the chart below to select the appropriate charge rates:Capacity:Charge Rate:300mAh–400mAh 300mAh500mAh–1000mAh 500mAh1000mAh–1500mAh 1A1500mAh–2000mAh 1.5A2000mAh or greater 2.0AWarning: Selecting a charge rate higher than1 x battery capacity may cause a fire!6
Step 5Checking the Center of GravityThe correct center of gravity (CG) sits approximately 6 inches(15.25cm) in front of the trailing edge of the elevons andis based on using the <strong>ParkZone</strong> 3S 2200mAh Li-Po battery(PKZ1030). Molded round holes in each side of the fingerholds on the bottom of the plane mark the correctCG location.Whatever 3S Li-Po battery you choose, the CG should becorrect, provided you insert it correctly into the molded batterysaddle. In order to avoid any problems, always doublecheckthe CG when using a different size battery fromthe one you previously used. Also, any battery you chooseshould fit snuggly into the foam saddle to prevent the CGfrom shifting in flight.Step 6Range Checking Your Radio SystemPrior to each flight, range check the radio system to makecertain everything is functioning correctly. To do this:• Make certain that no one is using the channel you will beflying on.• Always make sure the transmitter is on prior toplugging in the flight battery, and when you havefinished flying, the transmitter is turned off after the batteryhas been unplugged.• Have someone help you with your range check. Oneperson needs to carefully hold the aircraft while the otherwalks approximately 100 feet (30 meters) away.Make certain the person holding the plane staysclear of the propeller.• With the radio on and the battery plugged in, the personwith the transmitter needs to turn the motor on and off,and move the elevons up and down, to ensure the planefunctions properly and is receiving a strong signal fromthe transmitter. Make certain the aircraft is respondingcorrectly to all input. If the aircraft does not respondproperly to every control command, DO NOT FLY. Call theHorizon Hobby Product Support Team at:1-877-504-0233 (M – F, 8 a.m. to 7 p.m. CST).• Prior to each flight, always make sure all controlsare functioning per the transmitter input.• Always make sure you have fully chargedtransmitter batteries.Step 7Launching and LandingAs stated in the beginning of this instruction manual, werecommend you only fly the F-27C <strong>Stryker</strong> <strong>PNP</strong> at an AMAsanctioned flying field. This airplane covers ground at morethan 80 mph (129 kilometers/hour) – that’s 117.3 feet persecond or 35.8 meters per second. Make certain no one isflying on the same frequency before you take flight.1. Always launch your aircraft directly into the wind, with avery slight upward angle.2. We recommend launching with power off, and then addingbetween 60% and full throttle. This is due to the factthat the F-27C <strong>Stryker</strong> <strong>PNP</strong> has a pusher propeller, and ifyou are not careful you could cut your finger(s).3. Do not fly the F-27C <strong>Stryker</strong> <strong>PNP</strong> at full throttle for theduration of your flight. This may cause permanent damageto your Li-Po battery and/or ESC.4. After several minutes of flying, (approximately 6-10)and when you begin to feel the power decreasing, it istime to land.5. Line up the aircraft directly into the wind when landing,making sure you land with no power to the motor. Thiswill avoid causing damage to the prop, motor, and othercomponents of the plane.7
Replacement Parts:Item Description RetailPKZ1009 Propeller: F-27C (6 x 4) $ 2.99PKZ1010 Prop Adapter $ 4.99PKZ1061 Mini Servo (3) with Arms, Long Lead $ 12.99PKZ1062 Servo Gear Set (3W and 5W) $ 2.49PKZ1212 Battery Hatch $ 3.49PKZ1218 Clevis and Pushrod $ 2.49PKZ1220 Vertical Fin Set $ 7.99PKZ1221 Vertical Fin Retainer (2) $ 1.59PKZ4203 Decal Sheet $ 5.99PKZ4213 Complete Hatch Set $ 7.99PKZ4215 Painted Nose $ 4.99PKZ4216 6-pole 1880Kv Brushless Motor $ 55.99PKZ4233 Elevons with Control Horns $ 3.99PKZ4234 Motor Mount with Hardware $ 4.99PKZ4276 Instruction <strong>Manual</strong> $ .99EFLA1025 25A Brushless ESC $ 52.99Optional Accessories:Item Description RetailPKZ1030 3S 2200mAh Li-Po Battery $ 75.99PKZ1040 Variable Rate DC Balancing Charger $ 34.99PKZ1050 3S 2200mAh Li-Po and 2-3S DC Balancing Li-Po Charger $ 119.99PKZ1051 Non-Balancing Charge Lead Adapter (3S to EC3) $ 2.99PKZ1052 Non-Balancing Charge Lead Adapter (3S to JST) $ 1.99PKZ1053 Non-Balancing Charge Lead Adapter (2S to JST) $ 1.99PKZ1267 Unpainted Fuselage $ 19.99PKZ4141 Transmitter: (T572) CH 17, 72.130 $ 32.99PKZ4142 Transmitter: (T572) CH 19, 72.170 $ 32.99PKZ4143 Transmitter: (T572) CH 21, 72.210 $ 32.99PKZ4144 Transmitter: (T572) CH 50, 72.790 $ 32.99PKZ4145 Transmitter: (T572) CH 52, 72.830 $ 32.99PKZ4146 Transmitter: (T572) CH 54, 72.870 $ 32.99PKZ4151 Receiver: (RG600T) CH 17, 72.130 $ 28.99PKZ4152 Receiver: (RG600T) CH 19, 72.170 $ 28.99PKZ4153 Receiver: (RG600T) CH 21, 72.210 $ 28.99PKZ4154 Receiver: (RG600T) CH 50, 72.790 $ 28.99PKZ4155 Receiver: (RG600T) CH 52, 72.830 $ 28.99PKZ4156 Receiver: (RG600T) CH 54, 72.870 $ 28.99PKZ4161 FM Crystal Set: Ch 17, 72.130 $ 9.99PKZ4162 FM Crystal Set: Ch 19, 72.170 $ 9.99PKZ4163 FM Crystal Set: Ch 21, 72.210 $ 9.99PKZ4164 FM Crystal Set: Ch 50, 72.790 $ 9.99PKZ4165 FM Crystal Set: Ch 52, 72.830 $ 9.99PKZ4166 FM Crystal Set: Ch 54, 72.870 $ 9.99Future RC FlightThank you for choosing to purchase the F-27C <strong>Stryker</strong> <strong>PNP</strong>. We are sure you will have an amazing time flying it, and hope thatyou will consider checking out <strong>ParkZone</strong>’s many other fun and exciting aircraft at www.<strong>ParkZone</strong>.com. Please don’t hesitate togive us a call if you have any questions. Our Product Support Team is available to help you enjoy your flying experience. They canbe reached toll-free, Monday through Friday 8 a.m. to 7 p.m. CST, at 1-877-504-0233.Sincerely,The <strong>ParkZone</strong> TeamF-27C <strong>Stryker</strong> Plug-N-Play Parts8
WarrantyLimited Warranty PeriodHorizon Hobby, Inc. guarantees this product to be free fromdefects in both material and workmanship at the date of purchase.Limited Warranty & Limits of LiabilityPursuant to this Limited Warranty, Horizon Hobby, Inc. will, at itsoption, (i) repair or (ii) replace, any product determined by HorizonHobby, Inc. to be defective. In the event of a defect, these areyour exclusive remedies.This warranty does not cover cosmetic damage or damage dueto acts of God, accident, misuse, abuse, negligence, commercialuse, or modification of or to any part of the product. This warrantydoes not cover damage due to improper installation, operation,maintenance, or attempted repair by anyone other than an authorizedHorizon Hobby, Inc. service center. This warranty is limitedto the original purchaser and is not transferable. In no case shallHorizon Hobby’s liability exceed the original cost of the purchasedproduct and will not cover consequential, incidental or collateraldamage. Horizon Hobby, Inc. reserves the right to inspect any andall equipment involved in a warranty claim. Repair or replacementdecisions are at the sole discretion of Horizon Hobby, Inc. Further,Horizon Hobby, Inc. reserves the right to change or modify thiswarranty without notice.REPAIR OR REPLACEMENT AS PROVIDED UNDER THIS WARRANTYIS THE EXCLUSIVE REMEDY OF THE CONSUMER. HORIZONHOBBY, INC. SHALL NOT BE LIABLE FOR ANY INCIDENTAL ORCONSEQUENTIAL DAMAGES.As Horizon Hobby, Inc. has no control over use, setup, final assembly,modification or misuse, no liability shall be assumed noraccepted for any resulting damage or injury. By the act of use,setup or assembly, the user accepts all resulting liability.If you as the purchaser or user are not prepared to accept theliability associated with the use of this product, you are advised toimmediately return this product, in new and unused condition, tothe place of purchase.Safety PrecautionsThis is a sophisticated hobby product and not a toy. It must beoperated with caution and common sense and requires somebasic mechanical ability. Failure to operate this product in a safeand responsible manner could result in injury or damage to theproduct or other property. This product is not intended for use bychildren without direct adult supervision.The product manual contains instructions for safety, operation andmaintenance. It is essential to read and follow all the instructionsand warnings in the manual, prior to assembly, setup or use, inorder to operate correctly and avoid damage or injury.Questions, Assistance, and RepairsYour local hobby store and/or place of purchase cannot providewarranty support or repair. Once assembly, setup or use of theproduct has been started, you must contact Horizon Hobby, Inc.directly. This will enable Horizon to better answer your questionsand service you in the event that you may need any assistance.Questions or AssistanceFor questions or assistance, please direct your email to productsupport@horizonhobby.com,or call toll free 877.504.0233(M – F, 8 a.m. – 7 p.m. CST) to speak to a service technician.Inspection or RepairsIf your product needs to be inspected or repaired, please call fora Return Merchandise Authorization (RMA). Pack the productsecurely using a shipping carton. Please note that original boxesmay be included, but are not designed to withstand the rigorsof shipping without additional protection. Ship via a carrier thatprovides tracking and insurance for lost or damaged parcels,as Horizon Hobby, Inc. is not responsible for merchandise untilit arrives and is accepted at our facility. Include your completename, address, phone number where you can be reached duringbusiness days, RMA number, and a brief summary of the problem.Be sure your name, address, and RMA number are clearly writtenon the shipping carton.Warranty Inspection and RepairsTo receive warranty service, you must include your original salesreceipt verifying the proof-of-purchase date. Providing warrantyconditions have been met, your product will be repaired orreplaced free of charge. Repair or replacement decisions are atthe sole discretion of Horizon Hobby.Non-Warranty RepairsShould your repair not be covered by warranty and the expenseexceeds 50% of the retail purchase cost, you will be provided withan estimate advising you of your options. You will be billed forany return freight for non-warranty repairs. Please advise us ofyour preferred method of payment. Horizon Hobby accepts moneyorders and cashiers checks, as well as Visa, MasterCard, AmericanExpress, and Discover cards. If you choose to pay by credit card,please include your credit card number and expiration date. Anyrepair left unpaid or unclaimed after 90 days will be consideredabandoned and will be disposed of accordingly.Electronics and engines requiring inspection or repair should beshipped to the following address (freight prepaid):Horizon Service Center4105 Fieldstone RoadChampaign, Illinois 61822All other products requiring inspection or repair should be shippedto the following address (freight prepaid):Horizon Product Support4105 Fieldstone RoadChampaign, Illinois 618229