ENT-PT - Community Professional Loudspeakers
ENT-PT - Community Professional Loudspeakers
ENT-PT - Community Professional Loudspeakers

You also want an ePaper? Increase the reach of your titles
YUMPU automatically turns print PDFs into web optimized ePapers that Google loves.
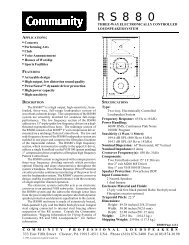
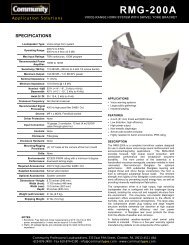
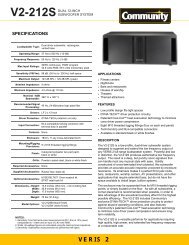
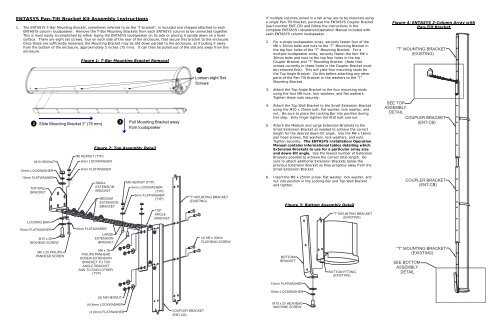
<strong>ENT</strong>ASYS Pan-Tilt Bracket Kit Assembly Instructions1. The <strong>ENT</strong>ASYS T-Bar Mounting Bracket, sometimes referred to as the “T-bracket”, is included and shipped attached to each<strong>ENT</strong>ASYS column loudspeaker. Remove the T-Bar Mounting Brackets from each <strong>ENT</strong>ASYS column to be connected together.This is most easily accomplished by either laying the <strong>ENT</strong>ASYS loudspeaker on its side or placing it upside down on a levelsurface. There are eight set screws, four on each side of the rear of the enclosure, that secure this bracket to the enclosure.Once these are sufficiently loosened, the Mounting Bracket may be slid down parallel to the enclosure, as if pulling it awayfrom the bottom of the enclosure, approximately 3 inches (75 mm). It can then be pulled out of the slot and away from theenclosure.10mm LOCK WASHER10mm FLAT WASHERTOP WALLBRACKETLOCKING BARSlide Mounting Bracket 3” (75 mm)M10 HEX NUTFigure 1: T-Bar Mounting Bracket RemovalM6 HEX NUT (TYP)6mm LOCK WASHER6mm FLATWASHERSMALLEXTENSIONBRACKETMEDIUMEXTENSIONBRACKETPull Mounting Bracket awayfrom loudspeakerFigure 2: Top Assembly DetailM6 HEX NUT (TYP)6mm LOCK WASHER(TYP)6mm FLATWASHER(TYP)TOPANGLEBRACKETLoosen eight SetScrews"T " MOUNTING BRACKET(EXISTING)If multiple columns joined in a tall array are to be mounted usinga single Pan-Tilt Bracket, purchase the <strong>ENT</strong>ASYS Coupler Bracket(part number <strong>ENT</strong>-CB) and follow the instructions in thecomplete <strong>ENT</strong>ASYS Installation/Operation Manual included witheach <strong>ENT</strong>ASYS column loudspeaker.2. For a single loudspeaker array, securely fasten four of theM6 x 30mm bolts and nuts to the “T” Mounting Bracket inthe top four holes of the “T” Mounting Bracket. For amultiple loudspeaker array, securely fasten the four M6 x30mm bolts and nuts to the top four holes in the topCoupler Bracket and “T” Mounting Bracket (Note thatscrews currently in these holes in the Coupler Bracket mustbe removed first). This will yield four mounting studs forthe Top Angle Bracket. Do this before attaching any otherparts of the Pan-Tilt Bracket or the washers to the “T”Mounting Bracket.3. Attach the Top Angle Bracket to the four mounting studsusing the four M6 nuts, lock washers, and flat washers.Tighten these nuts securely.4. Attach the Top Wall Bracket to the Small Extension Bracketusing the M10 x 25mm bolt, flat washer, lock washer, andnut. Be sure to place the Locking Bar into position duringthis step. Only finger tighten the M10 bolt and nut.5. Attach the Medium and Large Extension Brackets to theSmall Extension Bracket as needed to achieve the correctlength for the desired down-tilt angle. Use the M6 x 16mmpan head screws, flat washers, lock washers, and nuts.Tighten securely. The <strong>ENT</strong>ASYS Installation/OperationManual contains informational tables detailing whichExtension Brackets to use for a particular array sizeand down-tilt angle. Use the fewest number of ExtensionBrackets possible to achieve the correct total length. Besure to attach additional Extension Brackets below theprevious Extension Bracket as they progress away from theSmall Extension Bracket.6. Insert the M6 x 25mm screw, flat washer, lock washer, andnut into position in the Locking Bar and Top Wall Bracketand tighten.Figure 3: Bottom Assembly Detail"T" MOUNTING BRACKET(EXISTING)Figure 4: <strong>ENT</strong>ASYS 3-Column Array withPan-Tilt Bracket"T" MOUNTING BRACKET(EXISTING)SEE TOPASSEMBLYDETAILCOUPLER BRACKET(<strong>ENT</strong>-CB)COUPLER BRACKET(<strong>ENT</strong>-CB)10mm FLAT WASHERM10 x 25HEX HEAD SCREWM6 x 25 PHILIPSPAN HEAD SCREW6mm FLATWASHERLARGEEXTENSIONBRACKETM6 x 16PHILIPS PAN HEADSCREW-EXTENSIONBRACKET TO TOPANGLE BRACKETAND TO EACH OTHER(TYP)(4) M6 x 30mmFLAT HEAD SCREWBOTTOMBRACKETBOTTOM FITTING(EXISTING)"T" MOUNTING BRACKET(EXISTING)SEE BOTTOMASSEMBLYDETAIL10mm FLAT WASHER10mm LOCK WASHER(8) M6 HEX NUT(4) 6mm LOCK WASHER(4 ) 6mm FLAT WASHERCOUPLER BRACKET(<strong>ENT</strong>-CB)M10 x 20 HEX HEADMACHINE SCREW